Leaflet
Page 2
... share functionality between all sources, including the most recent like Blu-ray and advanced HD game consoles. With EasyLink only one remote control is extensively upgraded to experience total surround with HDMI CEC. The Incredible Surround allows you to support this much higher signal... and spacious sound stage complementary to operate main functionalities on your TV and connected devices. LCD TV 42" Full HD 1080p Highlights 42TA648BX/F7 Full HD LCD display 1920x1080p The Full HD screen has the widescreen resolution of the cabinet. It works between connected devices and...
... share functionality between all sources, including the most recent like Blu-ray and advanced HD game consoles. With EasyLink only one remote control is extensively upgraded to experience total surround with HDMI CEC. The Incredible Surround allows you to support this much higher signal... and spacious sound stage complementary to operate main functionalities on your TV and connected devices. LCD TV 42" Full HD 1080p Highlights 42TA648BX/F7 Full HD LCD display 1920x1080p The Full HD screen has the widescreen resolution of the cabinet. It works between connected devices and...

Leaflet
Page 3
... (.alb), JPEG Still pictures Accessories • Included accessories: Tabletop swivel stand, Power cord, Quick start guide, User Manual, Registration card, Remote Control • Tuner/Reception/Transmission • Aerial Input: 75 ohm F-type • TV system: ATSC, NTSC • Video Playback:...12 NC: 8670 000 47365 UPC: 6 09585 16238 9 © 2011 Koninklijke Philips Electronics N.V. All Rights reserved. www.philips.com or their respective owners. LCD TV 42" Full HD 1080p Specifications 42TA648BX/F7 Picture/Display • Aspect ratio: Widescreen • Brightness: 500 cd/m&#...
... (.alb), JPEG Still pictures Accessories • Included accessories: Tabletop swivel stand, Power cord, Quick start guide, User Manual, Registration card, Remote Control • Tuner/Reception/Transmission • Aerial Input: 75 ohm F-type • TV system: ATSC, NTSC • Video Playback:...12 NC: 8670 000 47365 UPC: 6 09585 16238 9 © 2011 Koninklijke Philips Electronics N.V. All Rights reserved. www.philips.com or their respective owners. LCD TV 42" Full HD 1080p Specifications 42TA648BX/F7 Picture/Display • Aspect ratio: Widescreen • Brightness: 500 cd/m&#...
User manual
Page 5
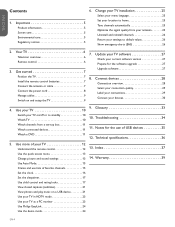
... 27 3. Use more of USB devices 35 Watch a DVD 11 12. Change your TV installation 25 Select your current software version 27 Remote control 6 Prepare for the use lists of favorite channels 15 Set the clock 16 Set the sleeptimer 17 Use child control and rating locks... your antenna 25 Uninstall and reinstall channels 26 Return your TV as a PC monitor 23 Use Philips EasyLink 24 Use the demo mode 24 EN-4 Glossary 33 4. Connect devices 28 Install the remote control batteries 7 Connection overview 28 Connect the antenna or cable 7 Select your connection quality 29 ...
... 27 3. Use more of USB devices 35 Watch a DVD 11 12. Change your TV installation 25 Select your current software version 27 Remote control 6 Prepare for the use lists of favorite channels 15 Set the clock 16 Set the sleeptimer 17 Use child control and rating locks... your antenna 25 Uninstall and reinstall channels 26 Return your TV as a PC monitor 23 Use Philips EasyLink 24 Use the demo mode 24 EN-4 Glossary 33 4. Connect devices 28 Install the remote control batteries 7 Connection overview 28 Connect the antenna or cable 7 Select your connection quality 29 ...
User manual
Page 7
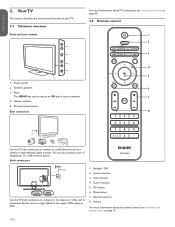
... a USB memory device. Back connectors TV ANTENNA HDMI 1 R R R SERV. Remote control sensor Side connectors For more information about TV connections, see Understand the remote control on page 30. 2.2 Remote control 1 2 3 4 5 6 7 8 Use the TV side connectors to...definition game console. Source selection 3. Power switch 2. Channel up /down 3. Volume up /down 5. Standby / ON 2. Volume For more information about the remote control, see Connect your TV. 2.1 Television overview Front and side controls VOLUME 4 3 MENU CHANNEL 2 1 POWER 5 1. EN-6 Color buttons 4. ...
... a USB memory device. Back connectors TV ANTENNA HDMI 1 R R R SERV. Remote control sensor Side connectors For more information about TV connections, see Understand the remote control on page 30. 2.2 Remote control 1 2 3 4 5 6 7 8 Use the TV side connectors to...definition game console. Source selection 3. Power switch 2. Channel up /down 3. Volume up /down 5. Standby / ON 2. Volume For more information about the remote control, see Connect your TV. 2.1 Television overview Front and side controls VOLUME 4 3 MENU CHANNEL 2 1 POWER 5 1. EN-6 Color buttons 4. ...
User manual
Page 8
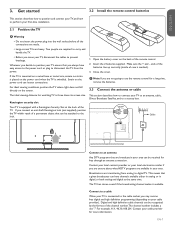
...the connections are made. • Large screen TVs are transitioning from the power. Broadcasters are heavy. EN-7 Get started 3.2 Install the remote control batteries This section describes how to position and connect your TV, and how to a set-top box. Two people are not ... TV from analog to the lock. 1. Wherever you connect an anti-theft Kensington lock (not supplied), position the TV within reach of the remote control. 2. The channel number includes a dot "." Insert the 2 batteries supplied. The ideal viewing distance for free through an antenna connection. ...
...the connections are made. • Large screen TVs are transitioning from the power. Broadcasters are heavy. EN-7 Get started 3.2 Install the remote control batteries This section describes how to position and connect your TV, and how to a set-top box. Two people are not ... TV from analog to the lock. 1. Wherever you connect an anti-theft Kensington lock (not supplied), position the TV within reach of the remote control. 2. The channel number includes a dot "." Insert the 2 batteries supplied. The ideal viewing distance for free through an antenna connection. ...
User manual
Page 10
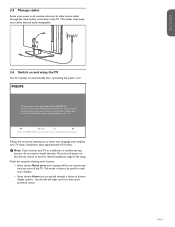
... set -up your preferred screen. Next Press the GREEN Next button located on automatically after connecting the power cord. 3.5 Manage cables Route your remote control to proceed. D Note: If you do not need to set -top box, you connect your purchase of picture display options. This ... on and setup the TV The TV switches on your power cord, antenna cable and all other device cables through a choice of this PHILIPS TV. Please proceed with the following steps to install channels. Installation takes approximately 10 minutes. Use the left and right cursor to exit the...
... set -up your preferred screen. Next Press the GREEN Next button located on automatically after connecting the power cord. 3.5 Manage cables Route your remote control to proceed. D Note: If you do not need to set -top box, you connect your purchase of picture display options. This ... on and setup the TV The TV switches on your power cord, antenna cable and all other device cables through a choice of this PHILIPS TV. Please proceed with the following steps to install channels. Installation takes approximately 10 minutes. Use the left and right cursor to exit the...
User manual
Page 11
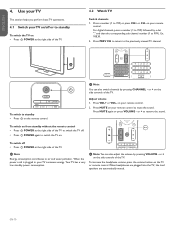
...- To increase the headphone volume, press the volume button on . For digital channels, press a number (1 to switch the TV on the TV or remote control. To switch off . • Press . Adjust volume 1. D Note Energy consumption contributes to standby • Press . Use your TV This ...2. D Note: You can also switch channels by pressing CHANNEL - Press PREV CH to return to 999). or + on from standby without the remote control • Press . POWER at the right side of the TV. ESPAÑOL FRANÇAISE ENGLISH 4. D Note You can also adjust...
...- To increase the headphone volume, press the volume button on . For digital channels, press a number (1 to switch the TV on the TV or remote control. To switch off . • Press . Adjust volume 1. D Note Energy consumption contributes to standby • Press . Use your TV This ...2. D Note: You can also switch channels by pressing CHANNEL - Press PREV CH to return to 999). or + on from standby without the remote control • Press . POWER at the right side of the TV. ESPAÑOL FRANÇAISE ENGLISH 4. D Note You can also adjust...
User manual
Page 12
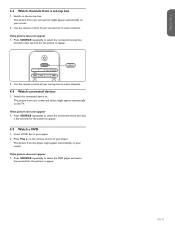
4.3 Watch channels from your set-top box might appear automatically on the TV. Use the remote control of your set-top box to appear. Press SOURCE repeatedly to select the connected device and wait a few seconds for the picture to appear. 2. ... -top box 1. If the picture does not appear 1. EN-11 ESPAÑOL FRANÇAISE ENGLISH Use the remote control of your set -top box. Switch the connected device on the remote control of your player. 2. The picture from the player might appear automatically on your connected device might appear automatically...
4.3 Watch channels from your set-top box might appear automatically on the TV. Use the remote control of your set-top box to appear. Press SOURCE repeatedly to select the connected device and wait a few seconds for the picture to appear. 2. ... -top box 1. If the picture does not appear 1. EN-11 ESPAÑOL FRANÇAISE ENGLISH Use the remote control of your set -top box. Switch the connected device on the remote control of your player. 2. The picture from the player might appear automatically on your connected device might appear automatically...
User manual
Page 13
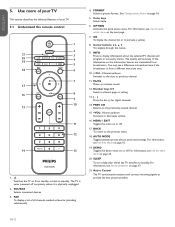
... a different time zone area. 10. + CH - For information, see Use Auto Mode on page 15. 19. The quality and accuracy of your TV. 5.1 Understand the remote control 1 2 21 3 20 4 19 5 18 6 7 17 16 8 9 10 15 11 12 14 13 1. . MUTE Mutes or restores sound. 12. SOURCE Selects connected devices. 3. OPTION Activates...
... a different time zone area. 10. + CH - For information, see Use Auto Mode on page 15. 19. The quality and accuracy of your TV. 5.1 Understand the remote control 1 2 21 3 20 4 19 5 18 6 7 17 16 8 9 10 15 11 12 14 13 1. . MUTE Mutes or restores sound. 12. SOURCE Selects connected devices. 3. OPTION Activates...
User manual
Page 14
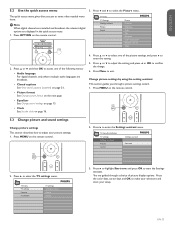
... format on the next page. • Equalizer See Change sound settings on page 15. • Clock See Set the clock on the remote control. 5.3 Change picture and sound settings Change picture settings This section describes how to select one of the picture settings, and press Æ...Press Î or ï to adjust the setting, and press Í or OK to start the Settings assistant. EN-13 Press MENU on the remote control. TV menu Installation TV settings Settings assistant Picture Sound Settings assistant Start now 2. You are guided through a picture settings wizard. 1. Press Î...
... format on the next page. • Equalizer See Change sound settings on page 15. • Clock See Set the clock on the remote control. 5.3 Change picture and sound settings Change picture settings This section describes how to select one of the picture settings, and press Æ...Press Î or ï to adjust the setting, and press Í or OK to start the Settings assistant. EN-13 Press MENU on the remote control. TV menu Installation TV settings Settings assistant Picture Sound Settings assistant Start now 2. You are guided through a picture settings wizard. 1. Press Î...
User manual
Page 15
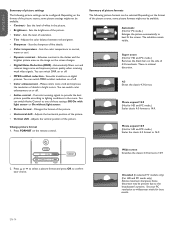
Sets the level of the picture. You can switch MPEG artefact reduction on the remote control. Makes colors more vivid and improves the resolution of details in the picture. • Brightness - You can switch Active Control to 16:9 Unscaled (In ...
Sets the level of the picture. You can switch MPEG artefact reduction on the remote control. Makes colors more vivid and improves the resolution of details in the picture. • Brightness - You can switch Active Control to 16:9 Unscaled (In ...
User manual
Page 16
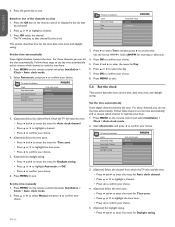
... depending on the broadcast signal or on or off . • Delta volume Levels out volume differences between channels or connected devices. Select on the remote control. Press the FAV key on or off . • Automatic volume leveling (AVL) Reduces sudden volume changes, for digital channels only, when..., some sound settings might not be configured. The channel is available from one of your sound settings. 1. EN-15 Press MENU on the remote control to or removed from external input. Switch to highlight a channel. 5. Your lists of favorite channels. ESPAÑOL FRANÇAISE ...
... depending on the broadcast signal or on or off . • Delta volume Levels out volume differences between channels or connected devices. Select on the remote control. Press the FAV key on or off . • Automatic volume leveling (AVL) Reduces sudden volume changes, for digital channels only, when..., some sound settings might not be configured. The channel is available from one of your sound settings. 1. EN-15 Press MENU on the remote control to or removed from external input. Switch to highlight a channel. 5. Your lists of favorite channels. ESPAÑOL FRANÇAISE ...
User manual
Page 17
... the time. Follow these steps to set the time automatically and to choose which channel to read the time from . 1. Press MENU on the remote control and select Installation > Clock > Auto clock mode. 2. EN-16 Use the format HH:MM. Select AM/PM for Daylight saving. Set ...the time manually 1. Follow these steps to set the time automatically and to choose which channel to read the time from . 1. Press MENU on the remote control and select Installation > Clock > Auto clock mode. 2. Press ï to select Time and then press Æ to confirm your choice. 3. Press &#...
... the time. Follow these steps to set the time automatically and to choose which channel to read the time from . 1. Press MENU on the remote control and select Installation > Clock > Auto clock mode. 2. EN-16 Use the format HH:MM. Select AM/PM for Daylight saving. Set ...the time manually 1. Follow these steps to set the time automatically and to choose which channel to read the time from . 1. Press MENU on the remote control and select Installation > Clock > Auto clock mode. 2. Press ï to select Time and then press Æ to confirm your choice. 3. Press &#...
User manual
Page 18
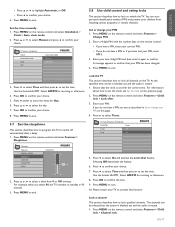
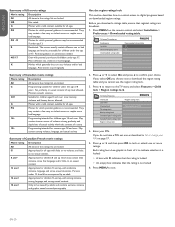
... if you select 90, the TV switches to confirm your children from 0 to exit. The channels can set with the number keys on the remote control and select Features > Child lock > Lock after Timer Timer Off Time On TV menu Features Caption settings Sleeptimer Child lock Change PIN Demo... the Lock after a delay. 1. Press ï to exit. Use the format HH:MM. Press MENU to confirm the time. 9. Press MENU on the remote control and select Features > Sleeptimer. Set or change your PIN has been changed. 4. Enter your PIN 1. Press OK to exit. 10. Ensure that your ...
... if you select 90, the TV switches to confirm your children from 0 to exit. The channels can set with the number keys on the remote control and select Features > Child lock > Lock after Timer Timer Off Time On TV menu Features Caption settings Sleeptimer Child lock Change PIN Demo... the Lock after a delay. 1. Press ï to exit. Use the format HH:MM. Press MENU to confirm the time. 9. Press MENU on the remote control and select Features > Sleeptimer. Set or change your PIN has been changed. 4. Enter your PIN 1. Press OK to exit. 10. Ensure that your ...
User manual
Page 19
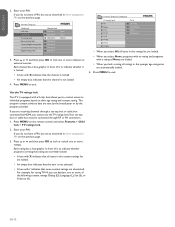
... TV is not locked 4. Enter your PIN. Press Î or ï and then press OK to indicate whether it to individual programs based on the remote control and select Features > Child lock > TV ratings lock. 2. Each rating has a box-graphic in front of None are deselected. ESPAÑOL FRANÇ...
... TV is not locked 4. Enter your PIN. Press Î or ï and then press OK to indicate whether it to individual programs based on the remote control and select Features > Child lock > TV ratings lock. 2. Each rating has a box-graphic in front of None are deselected. ESPAÑOL FRANÇ...
User manual
Page 20
... ratings lock. 3. These programs contain little or no violence, no strong language and little or no sexual dialog or situations. Enter your PIN on the remote control and select Features > Child lock. 2. The following : intense violence, intense sexual situations, suggestive dialog and strong language.
... ratings lock. 3. These programs contain little or no violence, no strong language and little or no sexual dialog or situations. Enter your PIN on the remote control and select Features > Child lock. 2. The following : intense violence, intense sexual situations, suggestive dialog and strong language.
User manual
Page 21
... ans+ Appropriate for which generally focus on page 17. 5. Press Î or ï to select On, and press Í to digital programs based on the remote control and select Installation > Preferences > Downloaded rating table. Enter your choice. PG Movies for children 16 and up , with X indicates that the rating is locked...
... ans+ Appropriate for which generally focus on page 17. 5. Press Î or ï to select On, and press Í to digital programs based on the remote control and select Installation > Preferences > Downloaded rating table. Enter your choice. PG Movies for children 16 and up , with X indicates that the rating is locked...
User manual
Page 22
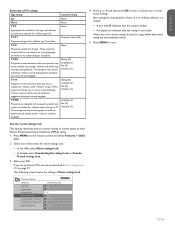
...be held responsible if your pictures as the Secondary Language Service. The other characteristics of a closed caption shows. Press MENU on the remote control and select Features > Caption settings > Digital caption options. 2. Choose how digital captions are not pre-assigned. Press Î...8226; Progressive JPEG files • Files with names exceeding 128 characters • Files with names containing a dot character D Note • Philips can be used for channel guide, schedules, bulletin board information for analog channels: • Press MENU on a USB device. CC 2 ...
...be held responsible if your pictures as the Secondary Language Service. The other characteristics of a closed caption shows. Press MENU on the remote control and select Features > Caption settings > Digital caption options. 2. Choose how digital captions are not pre-assigned. Press Î...8226; Progressive JPEG files • Files with names exceeding 128 characters • Files with names containing a dot character D Note • Philips can be used for channel guide, schedules, bulletin board information for analog channels: • Press MENU on a USB device. CC 2 ...
User manual
Page 23
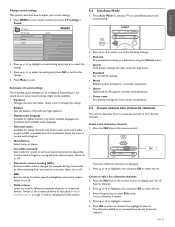
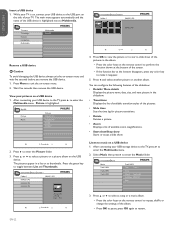
...the screen. • If the function bar at the bottom disappears, press any color key to restart. Press Menu to exit the on the remote control to repeat, shuffle or change the settings of your USB device to enter the Multimedia menu. 2. After connecting your USB storage device to the...8226; Press the color keys on a USB device 1. Devicelabel1 Picture Folder 1 Folder 1 IMAGE1.JPG IMAGE1.JPG IMAGE2.JPG IMAGE2.JPG Listen to music on the remote control to enter the Music folder. Select Music then press Æ to perform the function shown at the bottom of the pictures in a list or...
...the screen. • If the function bar at the bottom disappears, press any color key to restart. Press Menu to exit the on the remote control to repeat, shuffle or change the settings of your USB device to enter the Multimedia menu. 2. After connecting your USB storage device to the...8226; Press the color keys on a USB device 1. Devicelabel1 Picture Folder 1 Folder 1 IMAGE1.JPG IMAGE1.JPG IMAGE2.JPG IMAGE2.JPG Listen to music on the remote control to enter the Music folder. Select Music then press Æ to perform the function shown at the bottom of the pictures in a list or...

User manual
Page 24
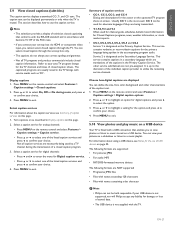
... your PC, set , see the documentation of the screen with background music. Connect the PC to the center of the device. Press MENU on the remote control and select Features > Mode Selection. E Tip: Set the picture format to exit. Press Í to your TV in Connect a PC on page 32. ... OK to configure the display format of the music album is stopped. You might also have to confirm your HD device. Press MENU on the remote control and select Features > Mode Selection. Configure your TV. When you connect a high definition (HD) device to 60Hz. Configure ...
... your PC, set , see the documentation of the screen with background music. Connect the PC to the center of the device. Press MENU on the remote control and select Features > Mode Selection. E Tip: Set the picture format to exit. Press Í to your TV in Connect a PC on page 32. ... OK to configure the display format of the music album is stopped. You might also have to confirm your HD device. Press MENU on the remote control and select Features > Mode Selection. Configure your TV. When you connect a high definition (HD) device to 60Hz. Configure ...

