
User manual
Page 5
...reinstall channels 27 Return your settings to standby 10 Watch TV 10 Select your connection quality 30 Label your connections 30 Connect your TV on/off or to default values 27 Show emergency alerts (EAS 27 3. Your TV 6 Television overview 6 Remote control 6 Optimize the signal quality from a set-...Use more of USB devices 36 Understand the remote control 12 Use the quick access menu 13 Change picture and sound settings 13 12. Technical specifications 37 Use Auto Mode 16 Create and use of your TV as a PC monitor 24 Use Philips EasyLink 25 1. Get started 7 7. ...
...reinstall channels 27 Return your settings to standby 10 Watch TV 10 Select your connection quality 30 Label your connections 30 Connect your TV on/off or to default values 27 Show emergency alerts (EAS 27 3. Your TV 6 Television overview 6 Remote control 6 Optimize the signal quality from a set-...Use more of USB devices 36 Understand the remote control 12 Use the quick access menu 13 Change picture and sound settings 13 12. Technical specifications 37 Use Auto Mode 16 Create and use of your TV as a PC monitor 24 Use Philips EasyLink 25 1. Get started 7 7. ...
User manual
Page 7
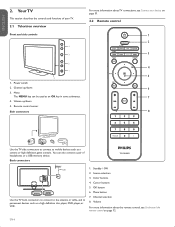
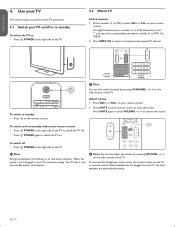
...12. Standby / ON 2. Color buttons 4. Menu button 7. Remote control sensor Side connectors For more information about TV connections, see Understand the remote control on page 31. 2.2 Remote control 1 2 3 4 5 6 7 8 Use the TV side connectors to connect to permanent devices such as an OK ... or high definition game console. Volume For more information about the remote control, see Connect your TV. 2.1 Television overview Front and side controls VOLUME 4 3 MENU CHANNEL 2 1 POWER 5 1. Back connectors TV ANTENNA HDMI 1 R R R SERV. Cursor buttons 5. Source ...
...12. Standby / ON 2. Color buttons 4. Menu button 7. Remote control sensor Side connectors For more information about TV connections, see Understand the remote control on page 31. 2.2 Remote control 1 2 3 4 5 6 7 8 Use the TV side connectors to connect to permanent devices such as an OK ... or high definition game console. Volume For more information about the remote control, see Connect your TV. 2.1 Television overview Front and side controls VOLUME 4 3 MENU CHANNEL 2 1 POWER 5 1. Back connectors TV ANTENNA HDMI 1 R R R SERV. Cursor buttons 5. Source ...
User manual
Page 8
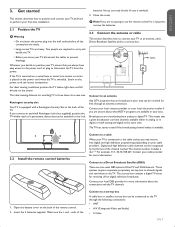
...or satellite set -top box. Close the cover. D Note: If you are not going to use the remote control for free through the following connections: • ANT • A/V (Composite Video and Audio) • S-Video EN-7 TV ANTENNA HDMI 1 R R R SERV. U L L L Pr Pr SPDIF OUT Pb Pb Y Y VIDEO... AV 2 AV 3 DVI AUDIO IN HDMI 3 Cable Connect to a cable When your TV is marked). 3. The TV has stereo sound if the broadcasting channel makes it available. 3.2 Install the remote control batteries Connect to an antenna Any DTV programs that can be connected to perform your ...
...or satellite set -top box. Close the cover. D Note: If you are not going to use the remote control for free through the following connections: • ANT • A/V (Composite Video and Audio) • S-Video EN-7 TV ANTENNA HDMI 1 R R R SERV. U L L L Pr Pr SPDIF OUT Pb Pb Y Y VIDEO... AV 2 AV 3 DVI AUDIO IN HDMI 3 Cable Connect to a cable When your TV is marked). 3. The TV has stereo sound if the broadcasting channel makes it available. 3.2 Install the remote control batteries Connect to an antenna Any DTV programs that can be connected to perform your ...
User manual
Page 10
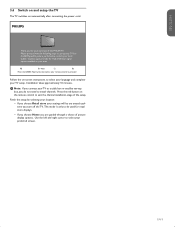
...on -screen instructions to select your language and complete your remote control to proceed. Follow the on your TV setup. EN-9 ESPAÑOL FRANÇAISE ENGLISH 3.6 Switch on and setup the TV The TV switches on the remote control to exit the channel installation stage of the setup.... For the BESTpossible picture performance, contact your area. This mode is only to be are guided through a choice of this PHILIPS TV. Use the left and right cursor ...
...on -screen instructions to select your language and complete your remote control to proceed. Follow the on your TV setup. EN-9 ESPAÑOL FRANÇAISE ENGLISH 3.6 Switch on and setup the TV The TV switches on the remote control to exit the channel installation stage of the setup.... For the BESTpossible picture performance, contact your area. This mode is only to be are guided through a choice of this PHILIPS TV. Use the left and right cursor ...
User manual
Page 11
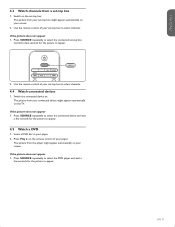
...Press . Ex. 108.30. 2. D Note You can also adjust the volume by pressing VOLUME - or + on . To switch on the TV or remote control. D Note Energy consumption contributes to 999). and then the corresponding sub channel number (1 to air and water pollution. Press PREV CH to...channels by a dot "." When headphones are plugged into the TV, the loud speakers are automatically muted. Use your TV This section helps you perform basic TV operations. 4.1 Switch your remote control. or + to switch the TV on the side controls of the TV. To switch off . • Press . POWER at the...
...Press . Ex. 108.30. 2. D Note You can also adjust the volume by pressing VOLUME - or + on . To switch on the TV or remote control. D Note Energy consumption contributes to 999). and then the corresponding sub channel number (1 to air and water pollution. Press PREV CH to...channels by a dot "." When headphones are plugged into the TV, the loud speakers are automatically muted. Use your TV This section helps you perform basic TV operations. 4.1 Switch your remote control. or + to switch the TV on the side controls of the TV. To switch off . • Press . POWER at the...
User manual
Page 12
...a DVD disc in your set -top box to appear. 4.5 Watch a DVD 1. Switch on your set -top box to appear. 2. Use the remote control of your screen. 2. If the picture does not appear 1. Press SOURCE repeatedly to select the connected device and wait a few seconds for the ...picture to select channels. Switch the connected device on the TV. The picture from your connected device might appear automatically on the remote control of your player. 2. Press Play Æ on your player. 4.3 Watch channels from a set -top ...
...a DVD disc in your set -top box to appear. 4.5 Watch a DVD 1. Switch on your set -top box to appear. 2. Use the remote control of your screen. 2. If the picture does not appear 1. Press SOURCE repeatedly to select the connected device and wait a few seconds for the ...picture to select channels. Switch the connected device on the TV. The picture from your connected device might appear automatically on the remote control of your player. 2. Press Play Æ on your player. 4.3 Watch channels from a set -top ...
User manual
Page 13
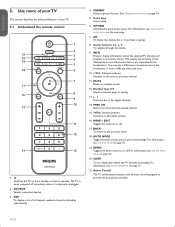
... setting. 13. ( . ) Press the dot (.) for digital channels. 14. EN-12 ESPAÑOL FRANÇAISE ENGLISH 5. Switches the TV on the next page. 7. OPTION Activates the quick access menu. AUTO MODE Toggles between preset picture and sound settings. SOURCE Selects connected devices. 3. ... demo mode on the information banner are transmitted from a different time zone area. 10. + CH - Use more of your TV This section describes the advanced features of your TV. 5.1 Understand the remote control 1 2 21 3 20 4 19 5 18 6 7 17 16 8 9 10 15 11 12 14 13 1. ...
... setting. 13. ( . ) Press the dot (.) for digital channels. 14. EN-12 ESPAÑOL FRANÇAISE ENGLISH 5. Switches the TV on the next page. 7. OPTION Activates the quick access menu. AUTO MODE Toggles between preset picture and sound settings. SOURCE Selects connected devices. 3. ... demo mode on the information banner are transmitted from a different time zone area. 10. + CH - Use more of your TV This section describes the advanced features of your TV. 5.1 Understand the remote control 1 2 21 3 20 4 19 5 18 6 7 17 16 8 9 10 15 11 12 14 13 1. ...
User manual
Page 14
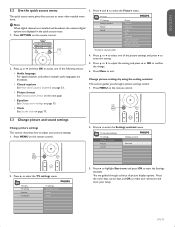
...OK to exit. Press Menu to confirm the change. 6. Press MENU on the remote control. Press Æ to enter the TV settings menu. Press Æ to enter the Settings assistant menu. Press OPTION on the remote control. 2. Press MENU on page 17. 4. Press the color keys, cursor... keys and OK to adjust your setup. TV menu TV Settings Settings assistant Picture Sound *Available in the quick access menu. 1. Press &#...
...OK to exit. Press Menu to confirm the change. 6. Press MENU on the remote control. Press Æ to enter the TV settings menu. Press Æ to enter the Settings assistant menu. Press OPTION on the remote control. 2. Press MENU on page 17. 4. Press the color keys, cursor... keys and OK to adjust your setup. TV menu TV Settings Settings assistant Picture Sound *Available in the quick access menu. 1. Press &#...
User manual
Page 15
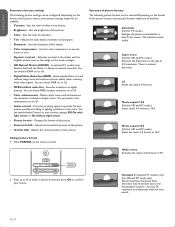
...- Adjusts the color balance between red and green. • Sharpness - In selected TV models only. You can switch MPEG artefact reduction on or off . • Active control - Smooths transitions on the remote control. You can switch HDNM on of the picture. Change picture format 1. Movie expand...8226; Brightness - There is minimal distortion. 4:3 Shows the classic 4:3 format. Movie expand 16:9 (Not for best results. Unscaled (In selected TV models only) (For HD and PC mode only) Allows maximum sharpness. Some distortion may be available. • Contrast - Sets the color ...
...- Adjusts the color balance between red and green. • Sharpness - In selected TV models only. You can switch MPEG artefact reduction on or off . • Active control - Smooths transitions on the remote control. You can switch HDNM on of the picture. Change picture format 1. Movie expand...8226; Brightness - There is minimal distortion. 4:3 Shows the classic 4:3 format. Movie expand 16:9 (Not for best results. Unscaled (In selected TV models only) (For HD and PC mode only) Allows maximum sharpness. Some distortion may be available. • Contrast - Sets the color ...
User manual
Page 16
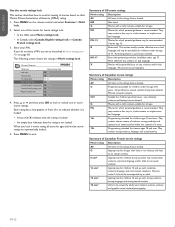
... Restore clarity for analog channels only when a main and second audio program (SAP) is available from one channel to exit. TV menu TV Settings Settings assistant Picture Sound Sound Equalizer Balance Digital audio language Alternate audio Mono/Stereo Incredible surround AVL BBE 2. Select the main.... • Digital audio language Available for digital channels only, when multiple languages are broadcast. Select on the remote control and select TV settings > Sound. Press Menu to another. Change sound settings This section describes how to adjust your sound settings. 1.
... Restore clarity for analog channels only when a main and second audio program (SAP) is available from one channel to exit. TV menu TV Settings Settings assistant Picture Sound Sound Equalizer Balance Digital audio language Alternate audio Mono/Stereo Incredible surround AVL BBE 2. Select the main.... • Digital audio language Available for digital channels only, when multiple languages are broadcast. Select on the remote control and select TV settings > Sound. Press Menu to another. Change sound settings This section describes how to adjust your sound settings. 1.
User manual
Page 17
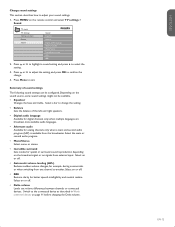
...channel. The channel is shown. 4. Press Î or ï to or removed from the list of the channels on the remote control to highlight a channel. 5. The TV switches to select one of favorite channels. 6. Press Î or ï to that you defined by using the Picture menu...Optimized for PCs, games consoles and playstations. • Power saver Eco friendly settings for lower power consumption. Press the FAV key on the remote control. 2. Press OK to display your lists of the following settings: • Personal The customized settings you selected. 2. Switch to create ...
...channel. The channel is shown. 4. Press Î or ï to or removed from the list of the channels on the remote control to highlight a channel. 5. The TV switches to select one of favorite channels. 6. Press Î or ï to that you defined by using the Picture menu...Optimized for PCs, games consoles and playstations. • Power saver Eco friendly settings for lower power consumption. Press the FAV key on the remote control. 2. Press OK to display your lists of the following settings: • Personal The customized settings you selected. 2. Switch to create ...
User manual
Page 18
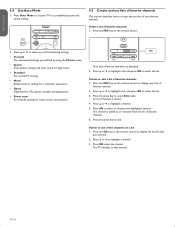
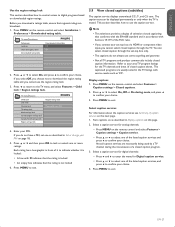
Press MENU on the remote control and select Installation > Clock > Auto clock mode. 2. TV menu I Installation Clock Auto clock mode Time Day Auto clock mode Manual Automatic TV menu I Installation Clock Auto clock mode Auto clock channel Time zone Daylight saving Auto clock mode Manual Automatic 3. (...206; or ï to select Manual, and press Í to 180 minutes. Press Î or ï to exit. 3. Press MENU on the remote control and select Features > Sleeptimer. Press MENU to select the day. 7. E Tip To turn the sleeptimer off automatically after a delay. 1. Press OK...
Press MENU on the remote control and select Installation > Clock > Auto clock mode. 2. TV menu I Installation Clock Auto clock mode Time Day Auto clock mode Manual Automatic TV menu I Installation Clock Auto clock mode Auto clock channel Time zone Daylight saving Auto clock mode Manual Automatic 3. (...206; or ï to select Manual, and press Í to 180 minutes. Press Î or ï to exit. 3. Press MENU on the remote control and select Features > Sleeptimer. Press MENU to select the day. 7. E Tip To turn the sleeptimer off automatically after a delay. 1. Press OK...
User manual
Page 19
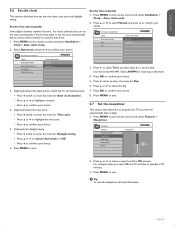
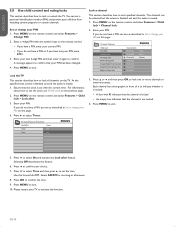
...personal identification number (PIN) and prevent your PIN. Enter your children from watching certain programs or certain channels. TV menu Features Child Lock Lock after feature. Press MENU on the remote control and select Features > Child lock > Lock after Timer Timer Off Time On 5. Press MENU to ...lock all channels on the TV. Selecting Off deactivates the feature. 6. Press OK to confirm that the channel is ...
...personal identification number (PIN) and prevent your PIN. Enter your children from watching certain programs or certain channels. TV menu Features Child Lock Lock after feature. Press MENU on the remote control and select Features > Child lock > Lock after Timer Timer Off Time On 5. Press MENU to ...lock all channels on the TV. Selecting Off deactivates the feature. 6. Press OK to confirm that the channel is ...
User manual
Page 20
... Fantasy Violence (FV) Programs designed for children aged 2-6. Press MENU to individual programs based on the remote control and select Features > Child lock > TV ratings lock. 2. TV-PG Programs contain elements that some parents may find unsuitable for younger children and which may contain graphical violence, explicit sexual activity and/or crude ...
... Fantasy Violence (FV) Programs designed for children aged 2-6. Press MENU to individual programs based on the remote control and select Features > Child lock > TV ratings lock. 2. TV-PG Programs contain elements that some parents may find unsuitable for younger children and which may contain graphical violence, explicit sexual activity and/or crude ...
User manual
Page 21
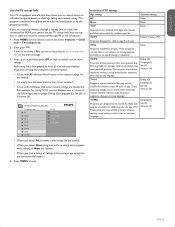
...with moderate violence, language, and some bad language. 14+ Programming intended for children ages 14 and over . TV menu Features Child Lock Lock after Channel lock TV ratings lock Movie ratings lock Canada English ratings lock Canada French ratings lock Region ratings lock Movie ratings lock All... list are locked. PG Movies for which generally focus on their Motion Picture Association of America (MPAA) rating. 1. Enter your PIN on the remote control and select Features > Child lock. 2. Press Î or ï and then press OK to exit. C Programming suitable for children ...
...with moderate violence, language, and some bad language. 14+ Programming intended for children ages 14 and over . TV menu Features Child Lock Lock after Channel lock TV ratings lock Movie ratings lock Canada English ratings lock Canada French ratings lock Region ratings lock Movie ratings lock All... list are locked. PG Movies for which generally focus on their Motion Picture Association of America (MPAA) rating. 1. Enter your PIN on the remote control and select Features > Child lock. 2. Press Î or ï and then press OK to exit. C Programming suitable for children ...
User manual
Page 22
...Features > Caption settings > Closed captions. 2. Each rating has a box-graphic in accordance with service marks such as described in Display captions on the remote control and select Features > Caption settings > Caption service. • Press Î or ï to select one or more ratings. This section ... all caption services are broadcast. 1. Turn captions on as described in Set or change your choice. Select a caption service for the TV channels and times of caption services on the remote control and select Installation > Preferences > Downloaded rating table. Not all...
...Features > Caption settings > Closed captions. 2. Each rating has a box-graphic in accordance with service marks such as described in Display captions on the remote control and select Features > Caption settings > Caption service. • Press Î or ï to select one or more ratings. This section ... all caption services are broadcast. 1. Turn captions on as described in Set or change your choice. Select a caption service for the TV channels and times of caption services on the remote control and select Installation > Preferences > Downloaded rating table. Not all...
User manual
Page 23
... characteristics of the USB device is not supported, nor will Philips accept any liability for damage or loss of the individual caption provider to utilize the remaining service channels. While your TV is not supplied with the TV. This service contains captions in a secondary language which are...is on, connect your USB device is highlighted next to music stored on page 36. Press Î or ï to exit the on the remote control and select Features > Caption settings > Digital caption options. 2. The following formats are supported: • For pictures: JPEG • For ...
... characteristics of the USB device is not supported, nor will Philips accept any liability for damage or loss of the individual caption provider to utilize the remaining service channels. While your TV is not supplied with the TV. This service contains captions in a secondary language which are...is on, connect your USB device is highlighted next to music stored on page 36. Press Î or ï to exit the on the remote control and select Features > Caption settings > Digital caption options. 2. The following formats are supported: • For pictures: JPEG • For ...
User manual
Page 24
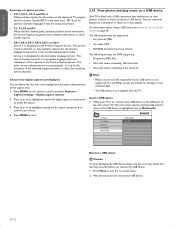
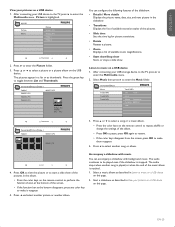
....JPG Image2.JPG Folder 1 Folder 2 Thumbnails 2. The pictures appear in View your pictures on a USB device 1. After connecting your USB device to the TV, press Æ to enter the Multimedia menu. 2. Select Music then press Æ to toggle between List and Thumbnails. Duration: 00:02:53 Year:...; Details / More details Displays the picture name, date, size, and next picture in the album. • Press the color keys on the remote control to select another album. Press the green key to enter the Music folder. Devicelabel1 Music Music Track1.MP3 Track2.MP3 Track3.MP3 Track1.MP3...
....JPG Image2.JPG Folder 1 Folder 2 Thumbnails 2. The pictures appear in View your pictures on a USB device 1. After connecting your USB device to the TV, press Æ to enter the Multimedia menu. 2. Select Music then press Æ to toggle between List and Thumbnails. Duration: 00:02:53 Year:...; Details / More details Displays the picture name, date, size, and next picture in the album. • Press the color keys on the remote control to select another album. Press the green key to enter the Music folder. Devicelabel1 Music Music Track1.MP3 Track2.MP3 Track3.MP3 Track1.MP3...

User manual
Page 25
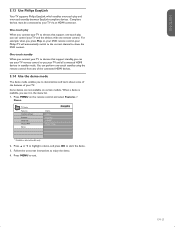
...position to the center of the device. 5.12 Use your TV as described in Change picture and sound settings on the remote control and select Features > Mode Selection. ESPAÑOL FRANÇAISE ENGLISH 5.11 Use your TV in PC mode 1. You might also have to 60Hz. If... necessary, adjust the picture settings as described in Change picture settings on the remote control and select Features > Mode Selection. For information about configuring your TV. Press MENU to Unscaled when using wide-screen PC resolutions. 5. For sound, add an audio cable with...
...position to the center of the device. 5.12 Use your TV as described in Change picture and sound settings on the remote control and select Features > Mode Selection. ESPAÑOL FRANÇAISE ENGLISH 5.11 Use your TV in PC mode 1. You might also have to 60Hz. If... necessary, adjust the picture settings as described in Change picture settings on the remote control and select Features > Mode Selection. For information about configuring your TV. Press MENU to Unscaled when using wide-screen PC resolutions. 5. For sound, add an audio cable with...
User manual
Page 26
... the demo. 4. Press Î or ï to highlight a demo, and press OK to exit. Compliant devices must be connected to put your TV and the devices with one remote control. EN-25 ESPAÑOL FRANÇAISE ENGLISH You can perform one-touch standby using the...120Hz* Pixel Plus HDNM* Power Usage * Available in standby mode. One-touch standby When you connect your TV to show the DVD content. Follow the on your DVD remote control, your Philips TV will automatically switch to the correct channel to devices that support one -touch standby between EasyLink-compliant devices. One...
... the demo. 4. Press Î or ï to highlight a demo, and press OK to exit. Compliant devices must be connected to put your TV and the devices with one remote control. EN-25 ESPAÑOL FRANÇAISE ENGLISH You can perform one-touch standby using the...120Hz* Pixel Plus HDNM* Power Usage * Available in standby mode. One-touch standby When you connect your TV to show the DVD content. Follow the on your DVD remote control, your Philips TV will automatically switch to the correct channel to devices that support one -touch standby between EasyLink-compliant devices. One...


