
User manual
Page 5
... 7 Upgrade software 28 Connect the power cord 8 Manage cables 8 8. Update your TV software 28 Position the TV 7 Check your TV 12 11. Change your TV installation 26 Screen care 5 Select your menu language 26 Environmental care 5 Set your TV as a PC monitor 24 Use Philips EasyLink 25 1. ESPAÑOL FRANÇAISE ENGLISH Contents Use...
... 7 Upgrade software 28 Connect the power cord 8 Manage cables 8 8. Update your TV software 28 Position the TV 7 Check your TV 12 11. Change your TV installation 26 Screen care 5 Select your menu language 26 Environmental care 5 Set your TV as a PC monitor 24 Use Philips EasyLink 25 1. ESPAÑOL FRANÇAISE ENGLISH Contents Use...
User manual
Page 6
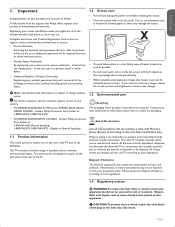
...benefits listed below, so don't miss out. For further assistance, call the customer support service in your model with Philips makes you eligible for all of the TV and on this product is intended to be disposed off your purchase and welcome to rain or moisture. Contact your ..., so no additional paperwork will be exposed to Philips! C CAUTION:To prevent electric shock, match the wide blade of time. Do not use stationary images, reduce the screen contrast and brightness to be recycled. End of life directives Like all LCD products, this set contains a lamp with hard...
...benefits listed below, so don't miss out. For further assistance, call the customer support service in your model with Philips makes you eligible for all of the TV and on this product is intended to be disposed off your purchase and welcome to rain or moisture. Contact your ..., so no additional paperwork will be exposed to Philips! C CAUTION:To prevent electric shock, match the wide blade of time. Do not use stationary images, reduce the screen contrast and brightness to be recycled. End of life directives Like all LCD products, this set contains a lamp with hard...
User manual
Page 7
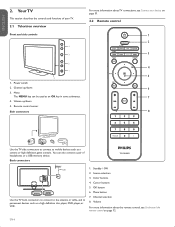
...to mobile devices such as a camera or high definition game console. Cursor buttons 5. Volume For more information about the remote control, see Connect your TV. 2.1 Television overview Front and side controls VOLUME 4 3 MENU CHANNEL 2 1 POWER 5 1. You can be used as a high definition disc...on page 12. Standby / ON 2. Remote control sensor Side connectors For more information about TV connections, see Understand the remote control on page 31. 2.2 Remote control 1 2 3 4 5 6 7 8 Use the TV side connectors to connect to permanent devices such as an OK key in some submenus. ...
...to mobile devices such as a camera or high definition game console. Cursor buttons 5. Volume For more information about the remote control, see Connect your TV. 2.1 Television overview Front and side controls VOLUME 4 3 MENU CHANNEL 2 1 POWER 5 1. You can be used as a high definition disc...on page 12. Standby / ON 2. Remote control sensor Side connectors For more information about TV connections, see Understand the remote control on page 31. 2.2 Remote control 1 2 3 4 5 6 7 8 Use the TV side connectors to connect to permanent devices such as an OK key in some submenus. ...
User manual
Page 8
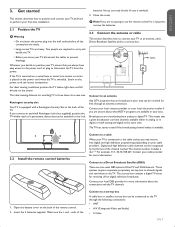
...of the remote control. 2. Broadcasters are available in your area. Open the battery cover on the screen. ends of the TV. Kensington security slot Your TV is equipped with a Kensington Security Slot at the same time. Close the cover. This means that can be connected to ...a set-top box A cable box or satellite set -top box contains a digital TV tuner for watching TV is swivelled. Insert the 2 batteries supplied. The ideal viewing distance for receiving off-air digital television broadcasts. batteries line up correctly ...
...of the remote control. 2. Broadcasters are available in your area. Open the battery cover on the screen. ends of the TV. Kensington security slot Your TV is equipped with a Kensington Security Slot at the same time. Close the cover. This means that can be connected to ...a set-top box A cable box or satellite set -top box contains a digital TV tuner for watching TV is swivelled. Insert the 2 batteries supplied. The ideal viewing distance for receiving off-air digital television broadcasts. batteries line up correctly ...
User manual
Page 9
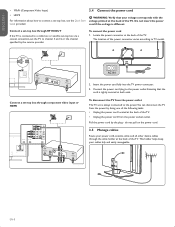
... easily manageable. This holder helps keep your power cord, antenna cable and all other device cables through the cable holder at the back of the TV. U L L L Pr Pr SPDIF OUT Pb Pb Y Y VIDEO L S-VIDEO R HDMI 2 AV 1 AV 2 AV 3 DVI AUDIO IN HDMI 3 Connect a set -top box, see ...the Quick Start Guide provided. 3.4 Connect the power cord B WARNING: Verify that the cord is different. To disconnect the TV from the power socket outlet. ESPAÑOL FRANÇAISE ENGLISH • YPbPr (Component Video Input) • HDMI For information about how to connect...
... easily manageable. This holder helps keep your power cord, antenna cable and all other device cables through the cable holder at the back of the TV. U L L L Pr Pr SPDIF OUT Pb Pb Y Y VIDEO L S-VIDEO R HDMI 2 AV 1 AV 2 AV 3 DVI AUDIO IN HDMI 3 Connect a set -top box, see ...the Quick Start Guide provided. 3.4 Connect the power cord B WARNING: Verify that the cord is different. To disconnect the TV from the power socket outlet. ESPAÑOL FRANÇAISE ENGLISH • YPbPr (Component Video Input) • HDMI For information about how to connect...
User manual
Page 10
... proceed. This mode is only to be are guided through a choice of picture display options. EN-9 Thank you choose Retail store your TV setup. Next Press the GREEN Next button located on -screen instructions to select your language and complete your settings will be used for retail... the setup by selecting your location: • If you for High Definition signal options available in your purchase of this PHILIPS TV. For the BESTpossible picture performance, contact your local Cable / Satellite signal provider for your area. Installation takes approximately 10 minutes. Use ...
... proceed. This mode is only to be are guided through a choice of picture display options. EN-9 Thank you choose Retail store your TV setup. Next Press the GREEN Next button located on -screen instructions to select your language and complete your settings will be used for retail... the setup by selecting your location: • If you for High Definition signal options available in your purchase of this PHILIPS TV. For the BESTpossible picture performance, contact your local Cable / Satellite signal provider for your area. Installation takes approximately 10 minutes. Use ...
User manual
Page 11
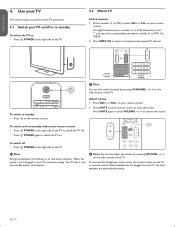
... EN-10 POWER To switch to air and water pollution. Adjust volume 1. Press MUTE again or press VOLUME - POWER at the right side of the TV. 4.2 Watch TV Switch channels 1. D Note Energy consumption contributes to standby • Press . D Note You can also adjust the volume by pressing CHANNEL - or ...8226; Press . Press MUTE on your TV on the side controls of the TV to switch the TV off. • Press . Use your TV This section helps you perform basic TV operations. 4.1 Switch your remote control to standby To switch the TV on the TV or remote control. When the power cord ...
... EN-10 POWER To switch to air and water pollution. Adjust volume 1. Press MUTE again or press VOLUME - POWER at the right side of the TV. 4.2 Watch TV Switch channels 1. D Note Energy consumption contributes to standby • Press . D Note You can also adjust the volume by pressing CHANNEL - or ...8226; Press . Press MUTE on your TV on the side controls of the TV to switch the TV off. • Press . Use your TV This section helps you perform basic TV operations. 4.1 Switch your remote control to standby To switch the TV on the TV or remote control. When the power cord ...
User manual
Page 12
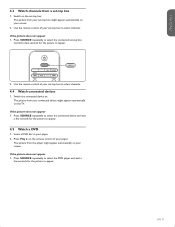
... appear automatically on . The picture from the player might appear automatically on your player. The picture from your connected device might appear automatically on the TV. Press SOURCE repeatedly to select the DVD player and wait a few seconds for the picture to appear. 4.5 Watch a DVD 1. If the picture does not appear...
... appear automatically on . The picture from the player might appear automatically on your player. The picture from your connected device might appear automatically on the TV. Press SOURCE repeatedly to select the DVD player and wait a few seconds for the picture to appear. 4.5 Watch a DVD 1. If the picture does not appear...
User manual
Page 13
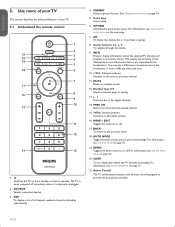
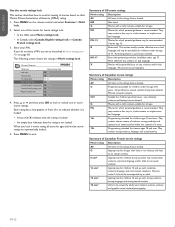
..., see Use the quick access menu on the information banner are transmitted from a different time zone area. 10. + CH - FAV To display a list of your TV. 5.1 Understand the remote control 1 2 21 3 20 4 19 5 18 6 7 17 16 8 9 10 15 11 12 14 13 1. . OPTION Activates the... channel. 15. +VOL- See Change picture format on page 16. 19. Color keys Selects tasks. 6. EN-12 Use more of your TV This section describes the advanced features of all channels marked as favorite (including subchannels). 4. SOURCE Selects connected devices. 3. PREV CH Returns to standby...
..., see Use the quick access menu on the information banner are transmitted from a different time zone area. 10. + CH - FAV To display a list of your TV. 5.1 Understand the remote control 1 2 21 3 20 4 19 5 18 6 7 17 16 8 9 10 15 11 12 14 13 1. . OPTION Activates the... channel. 15. +VOL- See Change picture format on page 16. 19. Color keys Selects tasks. 6. EN-12 Use more of your TV This section describes the advanced features of all channels marked as favorite (including subchannels). 4. SOURCE Selects connected devices. 3. PREV CH Returns to standby...
User manual
Page 14
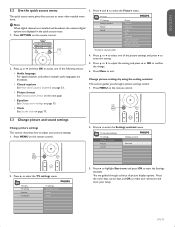
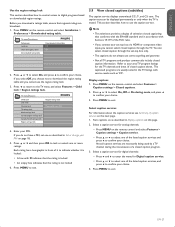
...206; or ï to adjust the setting, and press Í or OK to enter the TV settings menu. Press the color keys, cursor keys and OK to enter the setting. 5. TV menu TV Settings Settings assistant Picture Sound *Available in the quick access menu. 1. Change picture settings by using... a choice of picture display options. Press Æ to highlight Start now, and press OK to enter the Settings assistant menu. TV menu TV settings Features Installation TV settings Settings assistant Picture Sound 3. Press Î or ï to select one of the picture settings, and press Æ ...
...206; or ï to adjust the setting, and press Í or OK to enter the TV settings menu. Press the color keys, cursor keys and OK to enter the setting. 5. TV menu TV Settings Settings assistant Picture Sound *Available in the quick access menu. 1. Change picture settings by using... a choice of picture display options. Press Æ to highlight Start now, and press OK to enter the Settings assistant menu. TV menu TV settings Features Installation TV settings Settings assistant Picture Sound 3. Press Î or ï to select one of the picture settings, and press Æ ...
User manual
Page 15
...You can switch color enhancement on of the picture source, some picture formats might not be available. • Contrast - In selected TV models only. Automatically filters out and reduces image noise and improves picture quality when receiving weak video signals. You can switch Active Control... to lighting conditions in the picture. • Brightness - Changes the format of saturation. • Tint - Unscaled (In selected TV models only) (For HD and PC mode only) Allows maximum sharpness. Sets the level of these settings: Off, On with light sensor or...
...You can switch color enhancement on of the picture source, some picture formats might not be available. • Contrast - In selected TV models only. Automatically filters out and reduces image noise and improves picture quality when receiving weak video signals. You can switch Active Control... to lighting conditions in the picture. • Brightness - Changes the format of saturation. • Tint - Unscaled (In selected TV models only) (For HD and PC mode only) Allows maximum sharpness. Sets the level of these settings: Off, On with light sensor or...
User manual
Page 16
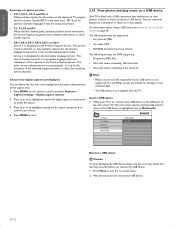
... (AVL) Reduces sudden volume changes, for better speech intelligibility and musical realism. Press Menu to select the setting. 3. Select on the remote control and select TV settings > Sound. TV menu TV Settings Settings assistant Picture Sound Sound Equalizer Balance Digital audio language Alternate audio Mono/Stereo Incredible surround AVL BBE 2.
... (AVL) Reduces sudden volume changes, for better speech intelligibility and musical realism. Press Menu to select the setting. 3. Select on the remote control and select TV settings > Sound. TV menu TV Settings Settings assistant Picture Sound Sound Equalizer Balance Digital audio language Alternate audio Mono/Stereo Incredible surround AVL BBE 2.
User manual
Page 17
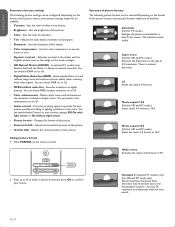
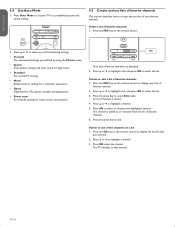
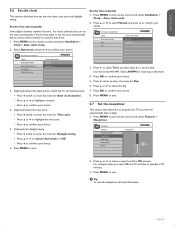
... mode. Press the green key to select the list. 3. Press the OK key on a list 1. EN-16 Press Auto Mode to set your TV to a predefined picture and sound setting. 5.5 Create and use lists of favorite channels This section describes how to select one of favorite channels. 6. ...OK to that you defined by using the Picture menu. • Sports Vivid picture settings and clear sound for high action. • Standard For normal TV viewing. • Movie Brilliant picture settings for a cinematic experience. • Game Optimized for PCs, games consoles and playstations. • Power saver ...
... mode. Press the green key to select the list. 3. Press the OK key on a list 1. EN-16 Press Auto Mode to set your TV to a predefined picture and sound setting. 5.5 Create and use lists of favorite channels This section describes how to select one of favorite channels. 6. ...OK to that you defined by using the Picture menu. • Sports Vivid picture settings and clear sound for high action. • Standard For normal TV viewing. • Movie Brilliant picture settings for a cinematic experience. • Game Optimized for PCs, games consoles and playstations. • Power saver ...
User manual
Page 18
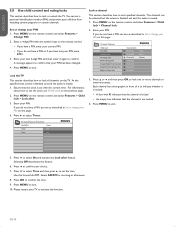
...; to select Time and then press Æ to confirm your choice. Press MENU to exit. 5.7 Set the sleeptimer This section describes how to program the TV to confirm your choice. 6. For example, when you can set the time automatically and to choose which channel to read the time from which the... TV will read the time. • Press ï and Æ to enter the menu for Auto clock channel. • Press Î or ï to highlight a channel. &#...
...; to select Time and then press Æ to confirm your choice. Press MENU to exit. 5.7 Set the sleeptimer This section describes how to program the TV to confirm your choice. 6. For example, when you can set the time automatically and to choose which channel to read the time from which the... TV will read the time. • Press ï and Æ to enter the menu for Auto clock channel. • Press Î or ï to highlight a channel. &#...
User manual
Page 19
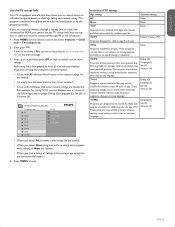
...> Change PIN. 2. Use the format HH:MM. Press MENU on the remote control and select Features > Child lock > Lock after Channel lock TV ratings lock Movie ratings lock Canada English ratings lock Canada French ratings lock Region ratings lock Channel lock Channel 1 Channel 2 Channel 3 Channel 4 Channel... 5 Channel 6 Channel 7 Sport News Movies Lock the TV This section describes how to lock all channels on this page. 4. Enter your new 4-digit PIN and then enter it again to confirm that...
...> Change PIN. 2. Use the format HH:MM. Press MENU on the remote control and select Features > Child lock > Lock after Channel lock TV ratings lock Movie ratings lock Canada English ratings lock Canada French ratings lock Region ratings lock Channel lock Channel 1 Channel 2 Channel 3 Channel 4 Channel... 5 Channel 6 Channel 7 Sport News Movies Lock the TV This section describes how to lock all channels on this page. 4. Enter your new 4-digit PIN and then enter it again to confirm that...
User manual
Page 20
... which may contain moderate violence, sexual dialog and/or situations and some content ratings are deselected. Dialog (D) Language (L) Sex (S) Violence (V) TV-MA Programs are designed to exit. Language (L) Sex (S) Violence (V) • When you select All, all items in the younger age ... your PIN on the previous page. 3. TV menu Features Child Lock TV ratings lock All None TV-Y TV-Y7 TV-G TV-PG TV14 TV-MA TV-14 (D)Dialog (L)Language (S)Sex (V)Violence Summary of TV ratings Age rating Content rating All None None None TV-Y None Appropriate for children of all ratings ...
... which may contain moderate violence, sexual dialog and/or situations and some content ratings are deselected. Dialog (D) Language (L) Sex (S) Violence (V) TV-MA Programs are designed to exit. Language (L) Sex (S) Violence (V) • When you select All, all items in the younger age ... your PIN on the previous page. 3. TV menu Features Child Lock TV ratings lock All None TV-Y TV-Y7 TV-G TV-PG TV14 TV-MA TV-14 (D)Dialog (L)Language (S)Sex (V)Violence Summary of TV ratings Age rating Content rating All None None None TV-Y None Appropriate for children of all ratings ...
User manual
Page 21
... on their Motion Picture Association of Canadian movie ratings Movie rating Description All All items in the ratings list are locked. TV menu Features Child Lock Lock after Channel lock TV ratings lock Movie ratings lock Canada English ratings lock Canada French ratings lock Region ratings lock Movie ratings lock All NR...
... on their Motion Picture Association of Canadian movie ratings Movie rating Description All All items in the ratings list are locked. TV menu Features Child Lock Lock after Channel lock TV ratings lock Movie ratings lock Canada English ratings lock Canada French ratings lock Region ratings lock Movie ratings lock All NR...
User manual
Page 22
... locked 6. This section describes how to use correct spelling and grammar. • Not all caption services are usually noted in the TV listings with service marks such as described in front of it is muted. D Note • This television provides a display of ...1. Select a caption service for analog channels: • Press MENU on the remote control and select Installation > Preferences > Downloaded rating table. TV menu Installation Preferences Location Show emergency alerts Downloaded rating table Downloaded rating table Off On 2. Press Î or ï to select On, ...
... locked 6. This section describes how to use correct spelling and grammar. • Not all caption services are usually noted in the TV listings with service marks such as described in front of it is muted. D Note • This television provides a display of ...1. Select a caption service for analog channels: • Press MENU on the remote control and select Installation > Preferences > Downloaded rating table. TV menu Installation Preferences Location Show emergency alerts Downloaded rating table Downloaded rating table Off On 2. Press Î or ï to select On, ...
User manual
Page 23
... Service. Service 2 is highlighted next to Multimedia. Choose how digital captions are displayed You can view your USB device is not supplied with the TV. The main menu appears automatically and the name of the USB device is designated as a slideshow or listen to a music playlist. CC 2 ... information about using a USB device, see Notes for damage or loss of stored data. • The USB device is not supported, nor will Philips accept any liability for the use of USB devices on a USB device. It is fitted with names containing a dot character D Note •...
... Service. Service 2 is highlighted next to Multimedia. Choose how digital captions are displayed You can view your USB device is not supplied with the TV. The main menu appears automatically and the name of the USB device is designated as a slideshow or listen to a music playlist. CC 2 ... information about using a USB device, see Notes for damage or loss of stored data. • The USB device is not supported, nor will Philips accept any liability for the use of USB devices on a USB device. It is fitted with names containing a dot character D Note •...
User manual
Page 24
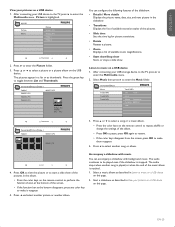
....MP3 Track2.MP3 Track3.MP3 Track1.MP3 Title: Track 1 Artist: Album: Sentiment... ESPAÑOL FRANÇAISE ENGLISH View your USB device to the TV, press Æ to enter the Multimedia menu. After connecting your pictures on the USB device. MyUSB Picture Music Picture Image1.JPG Image2.JPG Folder 1 Folder... of available zoom magnifications. • Start show/Stop show Starts or stops a slide show of the pictures in View your USB storage device to the TV, press Æ to enter the Multimedia menu. 2.
....MP3 Track2.MP3 Track3.MP3 Track1.MP3 Title: Track 1 Artist: Album: Sentiment... ESPAÑOL FRANÇAISE ENGLISH View your USB device to the TV, press Æ to enter the Multimedia menu. After connecting your pictures on the USB device. MyUSB Picture Music Picture Image1.JPG Image2.JPG Folder 1 Folder... of available zoom magnifications. • Start show/Stop show Starts or stops a slide show of the pictures in View your USB storage device to the TV, press Æ to enter the Multimedia menu. 2.


