
Owner's Manual
Page 4
...) Lower knife (49) Upper knife right (5) Looper thread tension - Parts of the hobbylock 4870 (1) Upper thread tension - middle Mod key (right) (1 2) LED needle display A,B,C (13) Knife guard (14) Looper cover (1 5) Sewing foot (combination foot) (16) Needle plate (17) Adjusting knob for seam width (1 8) Detachable work support (1 9) Window for the seam width (20) Accessories box (21) Needle holder (22) Lever for the sewing foot pressure (37) Right overedge looper (38) Converter (39) Left overedge looper (40) Chainstitch looper (41) Automatic looper threader...
...) Lower knife (49) Upper knife right (5) Looper thread tension - Parts of the hobbylock 4870 (1) Upper thread tension - middle Mod key (right) (1 2) LED needle display A,B,C (13) Knife guard (14) Looper cover (1 5) Sewing foot (combination foot) (16) Needle plate (17) Adjusting knob for seam width (1 8) Detachable work support (1 9) Window for the seam width (20) Accessories box (21) Needle holder (22) Lever for the sewing foot pressure (37) Right overedge looper (38) Converter (39) Left overedge looper (40) Chainstitch looper (41) Automatic looper threader...
Owner's Manual
Page 5
... drop or insert anything into water. Never operate on a soft surface such as a toy. Switch the sewing machine off (,,O") position, then remove plug from the electric outlet when removing covers, lubricating, or when making any other liquid. Important safety instructions For the United States only This sewing machine is not working pro perly, if it is designed and manufactured for its intended purpose as threading needle, changing needle, threading bobbin, or changing presser foot...
... drop or insert anything into water. Never operate on a soft surface such as a toy. Switch the sewing machine off (,,O") position, then remove plug from the electric outlet when removing covers, lubricating, or when making any other liquid. Important safety instructions For the United States only This sewing machine is not working pro perly, if it is designed and manufactured for its intended purpose as threading needle, changing needle, threading bobbin, or changing presser foot...
Owner's Manual
Page 6
... for domestic sewing machines according to damage your machine by knocking or dropping it. 6. When leaving the machine, during maintenance work or when changing mechanical parts or accessories, always disconnect the machine from the mains by its function is a machine for supervised use only original PFAFF parts. 2 Ihe maxim "n permissible wattage for the sewing lamp is wet, e.g. the machine. Do not use the sewing machine if: To clean the housing, use insecticides...
... for domestic sewing machines according to damage your machine by knocking or dropping it. 6. When leaving the machine, during maintenance work or when changing mechanical parts or accessories, always disconnect the machine from the mains by its function is a machine for supervised use only original PFAFF parts. 2 Ihe maxim "n permissible wattage for the sewing lamp is wet, e.g. the machine. Do not use the sewing machine if: To clean the housing, use insecticides...
Owner's Manual
Page 8
...the light bulb (sewing light). Changin9 the needle Changing the needle plate Changing the sewing foot Changing the spool Cleaning the knife Cleaning the needle plate Converter Converting the machine (chainstitch) Correction of the thread tension Detachable work support Differential feed Disengaging the overedge looper. Contents 2 thread overlook stitch........... 2 thread overlock with safety-stitch . 2 thread rolled/flat hem 3 thread overlook stitch 3 thread overlook with safety-stitch 3 thread rolled/flat hem 4 thread overlock stitch Accessories Accessory box Automatic threader Bead sewing...
...the light bulb (sewing light). Changin9 the needle Changing the needle plate Changing the sewing foot Changing the spool Cleaning the knife Cleaning the needle plate Converter Converting the machine (chainstitch) Correction of the thread tension Detachable work support Differential feed Disengaging the overedge looper. Contents 2 thread overlook stitch........... 2 thread overlock with safety-stitch . 2 thread rolled/flat hem 3 thread overlook stitch 3 thread overlook with safety-stitch 3 thread rolled/flat hem 4 thread overlock stitch Accessories Accessory box Automatic threader Bead sewing...
Owner's Manual
Page 9
... hem 52, 53 Safety instructions 1 Securing the seam 14 Setting the programs 39 Sewing foot chart 68 Sewing foot lever 22 Sewing foot pressure 34 Sewing test 23 Special accessories 68 - 76 Specifications 84 Speed pre-selection 37 Spool disc 67 Spool net. 67 Spool stands 11 Standard thread tension 42 Stitch length adjusting knob 26 Taping foot 69 Technical part 7 -3 Thread charts 54, 55 Thread cutter 24 Thread unreeling disc 67 Threading the looper 14 - 18 Threading the needles 20, 21 Threading the thread guides...
... hem 52, 53 Safety instructions 1 Securing the seam 14 Setting the programs 39 Sewing foot chart 68 Sewing foot lever 22 Sewing foot pressure 34 Sewing test 23 Special accessories 68 - 76 Specifications 84 Speed pre-selection 37 Spool disc 67 Spool net. 67 Spool stands 11 Standard thread tension 42 Stitch length adjusting knob 26 Taping foot 69 Technical part 7 -3 Thread charts 54, 55 Thread cutter 24 Thread unreeling disc 67 Threading the looper 14 - 18 Threading the needles 20, 21 Threading the thread guides...
Owner's Manual
Page 11
Technical part Electrical connection Detachable work support Accessory box Spool stands Waste box / looper cover Threading the thread guides and the looper Threader Threading the needles Sewing foot lever Sewing test / thread cutter Seam width adjusting knob Stitch length adjusting knob Differential feed Changing the needle, sewing foot and needle plate Converting the machine for chainstitch seam Fixing the upper knife /sewing foot pressure page 8, 9 page 9 page 10 page 11 page 12 page 13-18 page 19 page 20, 21 page 22 page 23, 24 page 25 page...
Technical part Electrical connection Detachable work support Accessory box Spool stands Waste box / looper cover Threading the thread guides and the looper Threader Threading the needles Sewing foot lever Sewing test / thread cutter Seam width adjusting knob Stitch length adjusting knob Differential feed Changing the needle, sewing foot and needle plate Converting the machine for chainstitch seam Fixing the upper knife /sewing foot pressure page 8, 9 page 9 page 10 page 11 page 12 page 13-18 page 19 page 20, 21 page 22 page 23, 24 page 25 page...

Owner's Manual
Page 12
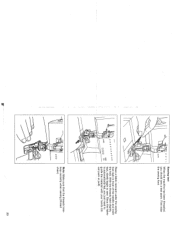
The preset area of the sewing machine. Caution: Do not put anything under the pedal. 8 Connecting the foot control Connect the plug of the foot control with the connection socket (31) of the sewing speed (see page 37) is regulated by pressing the pedal. Electrical connection Connect the mains cord between socket (29) of the sewing machine and the wall socket.
The preset area of the sewing machine. Caution: Do not put anything under the pedal. 8 Connecting the foot control Connect the plug of the foot control with the connection socket (31) of the sewing speed (see page 37) is regulated by pressing the pedal. Electrical connection Connect the mains cord between socket (29) of the sewing machine and the wall socket.

Owner's Manual
Page 25
... 8 and draw the thread through the thread guide before the needles. Lower the sewing feet. 7 11 22 3' 0000000 '5 000 LJDD 67 8 Threading overedge needles B and C (without needle A) Thread the overedge needles B and C in green (dots). The threading path for needle C in the order 1 to the left under the sewing foot. You can only sew with the threader. Draw the thread to the thread spool and put on the type of stitch). It is...
... 8 and draw the thread through the thread guide before the needles. Lower the sewing feet. 7 11 22 3' 0000000 '5 000 LJDD 67 8 Threading overedge needles B and C (without needle A) Thread the overedge needles B and C in green (dots). The threading path for needle C in the order 1 to the left under the sewing foot. You can only sew with the threader. Draw the thread to the thread spool and put on the type of stitch). It is...
Owner's Manual
Page 27
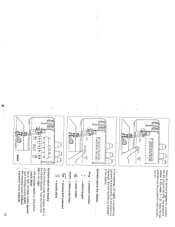
With the threads held slightly taut, slowly begin to guide the material with your hands (do not push or pull). Note: Make sure that the threads interloop correctly when sewing (thread chain). 000 23 Since the fabric 000 000 D 0 O is automatically fed, you should sew a test seam. Sewing test - 00' When the machine has been threaded, you just need to sew. First raise 000 the sewing foot. Place a fabric remnant under the sewing \ foot right in front of the needle and lower 00 the foot.
With the threads held slightly taut, slowly begin to guide the material with your hands (do not push or pull). Note: Make sure that the threads interloop correctly when sewing (thread chain). 000 23 Since the fabric 000 000 D 0 O is automatically fed, you should sew a test seam. Sewing test - 00' When the machine has been threaded, you just need to sew. First raise 000 the sewing foot. Place a fabric remnant under the sewing \ foot right in front of the needle and lower 00 the foot.

Owner's Manual
Page 32
Sew a test seam to deter mine the correct setting for the differential feed. Differential- The differential feed can also be set while sewing. Feed setting Fig. This table shows possible settings for your fabric. Correct seam Fabric 0,5-N 1 nylon, tricot, lining fabrics, satin, a poplin and silk light cotton and denim, N 2 c (normal fabrics) jersey, medium cotton, cut-pile 1,5 3 d fabrics and light knits 1,5-2 4 heavy knitwear, very elastic fabrics f and rib-knit b Fig. 1 Fig. 2 d j e 9 Fig. 3 Fig. 4 28
Sew a test seam to deter mine the correct setting for the differential feed. Differential- The differential feed can also be set while sewing. Feed setting Fig. This table shows possible settings for your fabric. Correct seam Fabric 0,5-N 1 nylon, tricot, lining fabrics, satin, a poplin and silk light cotton and denim, N 2 c (normal fabrics) jersey, medium cotton, cut-pile 1,5 3 d fabrics and light knits 1,5-2 4 heavy knitwear, very elastic fabrics f and rib-knit b Fig. 1 Fig. 2 d j e 9 Fig. 3 Fig. 4 28
Owner's Manual
Page 33
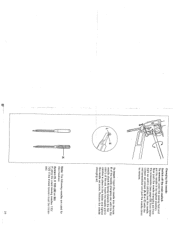
... this machine: System EL X 705 (80 or 90) If using the usual sewing needles 130/ 705 H the thread tension must be increa sed. 29 Insert the needle until it catches in place in its highest position. To remove: Lower the sewing foot and put the needle in the holder and tighten the needle set screws (A, B or C) with the flat needle shank K facing towards the flat side L of the aid. Changing the needle...
... this machine: System EL X 705 (80 or 90) If using the usual sewing needles 130/ 705 H the thread tension must be increa sed. 29 Insert the needle until it catches in place in its highest position. To remove: Lower the sewing foot and put the needle in the holder and tighten the needle set screws (A, B or C) with the flat needle shank K facing towards the flat side L of the aid. Changing the needle...
Owner's Manual
Page 43
... key (11 right) is pressed the standard characteristics of the stitch are from the left to the thread tensions. left program key (11). left overedge needle or chainstitch needle (blue) - The programs appear in the display. Symbols above the display: Prog. = program number = stitch length = seam width = differential feed Lrit >. = sewing foot pressure = needle plate Symbols below the display: All the symbols under the display...
... key (11 right) is pressed the standard characteristics of the stitch are from the left to the thread tensions. left program key (11). left overedge needle or chainstitch needle (blue) - The programs appear in the display. Symbols above the display: Prog. = program number = stitch length = seam width = differential feed Lrit >. = sewing foot pressure = needle plate Symbols below the display: All the symbols under the display...

Owner's Manual
Page 45
Practical sewing Setting the standard thread tension Chainstitch 3 thread overlock with safety-stitch 3 thread overlock stitch 4 thread overlock stitch 2 thread overlock seam 2 thread overlock with safety-stitch Correction of thread tensions Converter (2 thread seam> Rolled/flat hem (2 and 3 thread> Thread chart Program chart page 42 page 43 page 43 page 43 page 44 page 44 page 44 page 45 - 48 page 49 - 51 page 52, 53 page 54, 55 page 56 - 63 41
Practical sewing Setting the standard thread tension Chainstitch 3 thread overlock with safety-stitch 3 thread overlock stitch 4 thread overlock stitch 2 thread overlock seam 2 thread overlock with safety-stitch Correction of thread tensions Converter (2 thread seam> Rolled/flat hem (2 and 3 thread> Thread chart Program chart page 42 page 43 page 43 page 43 page 44 page 44 page 44 page 45 - 48 page 49 - 51 page 52, 53 page 54, 55 page 56 - 63 41

Owner's Manual
Page 60
... be altered or corrected depending on the type of fabric, fabric thickness and thread. The differential feed setting depends on the type of fabric (see page 54, 55) Needle thread tension Looper thread tension Sewing foot Stitch pressure length Prog. 1 2 thread tiatlock seam lnarrowl Prog. 2 2 thread flatlock seam wide) Prog. 3 2 thread flet hem m, 56 iI u< iN jN N N Nj blue green pink yellow mauve light medium 5 - +2 - - -5 +2 1-N N N heavy -5 +2 N-3 light 5 - +2 1-N - - - - Program no.: Stitch type Material (see page 28). N N-3 1 to 1,5 Program chart...
... be altered or corrected depending on the type of fabric, fabric thickness and thread. The differential feed setting depends on the type of fabric (see page 54, 55) Needle thread tension Looper thread tension Sewing foot Stitch pressure length Prog. 1 2 thread tiatlock seam lnarrowl Prog. 2 2 thread flatlock seam wide) Prog. 3 2 thread flet hem m, 56 iI u< iN jN N N Nj blue green pink yellow mauve light medium 5 - +2 - - -5 +2 1-N N N heavy -5 +2 N-3 light 5 - +2 1-N - - - - Program no.: Stitch type Material (see page 28). N N-3 1 to 1,5 Program chart...

Owner's Manual
Page 71
Insert fabric and sew a test seam. / 69 Taping foot This special sewing foot is for a tape width of 4- 9 mm) N N normal needle plate N see display (press mod key) taping foot switch off Inserting the tape: 1. Raise sewing foot and place tape in relation to the needle with the slide 2. 4. Preparing the machine: Program: Stitch length: Stitch width: Differential setting: Sewing foot pressure: Needle plate: Thread tension: Sewing foot: Upper knife: 4 or 5 depending on tapes to right stop with adjusting screw 3. 5. Depending on the...
Insert fabric and sew a test seam. / 69 Taping foot This special sewing foot is for a tape width of 4- 9 mm) N N normal needle plate N see display (press mod key) taping foot switch off Inserting the tape: 1. Raise sewing foot and place tape in relation to the needle with the slide 2. 4. Preparing the machine: Program: Stitch length: Stitch width: Differential setting: Sewing foot pressure: Needle plate: Thread tension: Sewing foot: Upper knife: 4 or 5 depending on tapes to right stop with adjusting screw 3. 5. Depending on the...

Owner's Manual
Page 73
... of the sewing foot shoe. 4. Gimp thread sewing foot This special sewing foot is used to sew in its highest position. 2. This produ ces an undulating or stiffer hem (e.g. Thread gimp thread (cord) through the hole 1 and then place it in guide 2 of 1,0 mm. on ) or prog. 18 1,0 to 1,5 3 to 4 N N rolled seam needle plate R see display (press mod key) gimp thread sewing foot engaged Inserting the gimp thread 1. Preparing the machine Program: Stitch length: Stitch width: Differential setting: Sewing foot pressure: Needle plate: Thread tension: Sewing foot: Upper knife...
... of the sewing foot shoe. 4. Gimp thread sewing foot This special sewing foot is used to sew in its highest position. 2. This produ ces an undulating or stiffer hem (e.g. Thread gimp thread (cord) through the hole 1 and then place it in guide 2 of 1,0 mm. on ) or prog. 18 1,0 to 1,5 3 to 4 N N rolled seam needle plate R see display (press mod key) gimp thread sewing foot engaged Inserting the gimp thread 1. Preparing the machine Program: Stitch length: Stitch width: Differential setting: Sewing foot pressure: Needle plate: Thread tension: Sewing foot: Upper knife...

Owner's Manual
Page 75
... one operation. Place the upper ply of opening 3. 4. Alwys sew a test seam to decide the desired gathering effect with the lower ply (right side to right side) right up to the edge 4 of fabric 2 flush with the diffe rential feed. 73 3 ' 1 Gathering foot This special gathering foot is for sewing two fabrics together and gathering the bottom ply in its highest position. 2. Preparing the machine: Program: Stitch length: Stitch width: Differential setting: Sewing foot pressure: Needle plate: Thread tension: Sewing foot: Upper...
... one operation. Place the upper ply of opening 3. 4. Alwys sew a test seam to decide the desired gathering effect with the lower ply (right side to right side) right up to the edge 4 of fabric 2 flush with the diffe rential feed. 73 3 ' 1 Gathering foot This special gathering foot is for sewing two fabrics together and gathering the bottom ply in its highest position. 2. Preparing the machine: Program: Stitch length: Stitch width: Differential setting: Sewing foot pressure: Needle plate: Thread tension: Sewing foot: Upper...

Owner's Manual
Page 79
Maintenance and malfunction Changing the knives Changing the light bulb Cleaning the needle plate Cleaning the knives Oiling the machine Sewing problems Specifications page 78, 79 page 80 page 80 page 81 page 81 page 82, 83 page 84 77
Maintenance and malfunction Changing the knives Changing the light bulb Cleaning the needle plate Cleaning the knives Oiling the machine Sewing problems Specifications page 78, 79 page 80 page 80 page 81 page 81 page 82, 83 page 84 77

Owner's Manual
Page 82
... the bulb right into its holder. j i 80 To insert: Insert the light bulb in place. Set largest stitch width. F AC Cleaning the needle plate Switch the mainswitch off To remove: With the tool from the accessories. Changing the light bulb Switch main switch off Disengage the upper knife (see page 66) press the light bulb right into the holder, twisting it clockwise until the pins on the bulb catch in the holder with...
... the bulb right into its holder. j i 80 To insert: Insert the light bulb in place. Set largest stitch width. F AC Cleaning the needle plate Switch the mainswitch off To remove: With the tool from the accessories. Changing the light bulb Switch main switch off Disengage the upper knife (see page 66) press the light bulb right into the holder, twisting it clockwise until the pins on the bulb catch in the holder with...
Owner's Manual
Page 84
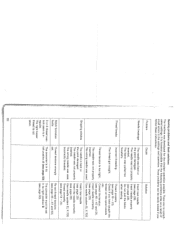
Problem Cause Solution Needle breakage The needle was not properly inserted. Insert new needle (see page 29>. Do not pull the fabric when sewing. Insert needle correctly. inserted. (see page 29>. Use needle system EL X 705 Thread correctly (see page 45 -47 and 51). 3 or 4 thread over- The needle was bent or the point damaged. Stitch formation faulty Thread tensions wrongly set lock seam is in its right position B regular. (see page 29). The converter...
Problem Cause Solution Needle breakage The needle was not properly inserted. Insert new needle (see page 29>. Do not pull the fabric when sewing. Insert needle correctly. inserted. (see page 29>. Use needle system EL X 705 Thread correctly (see page 45 -47 and 51). 3 or 4 thread over- The needle was bent or the point damaged. Stitch formation faulty Thread tensions wrongly set lock seam is in its right position B regular. (see page 29). The converter...


