
Owner's Manual
Page 4
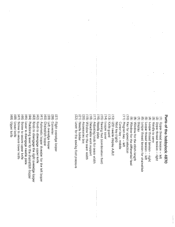
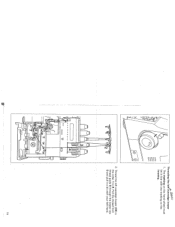
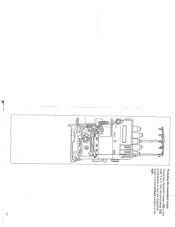
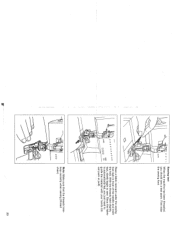
right (5) Looper thread tension - Parts of the hobbylock 4870 (1) Upper thread tension - left looper (42) Knob to disengage upper knife (43) Knob to carry (4) Looper thread tension - middle Mod key (right) (1 2) LED needle display A,B,C (13) Knife guard (14) Looper cover (1 5) Sewing foot (...Right overedge looper (38) Converter (39) Left overedge looper (40) Chainstitch looper (41) Automatic looper threader for the left (6) Looper thread tension for chainstitch (7) Display (8) Window for the stitch length (9) Window for the differential feed (1 0) Key for the chainstitch looper (45...
right (5) Looper thread tension - Parts of the hobbylock 4870 (1) Upper thread tension - left looper (42) Knob to disengage upper knife (43) Knob to carry (4) Looper thread tension - middle Mod key (right) (1 2) LED needle display A,B,C (13) Knife guard (14) Looper cover (1 5) Sewing foot (...Right overedge looper (38) Converter (39) Left overedge looper (40) Chainstitch looper (41) Automatic looper threader for the left (6) Looper thread tension for chainstitch (7) Display (8) Window for the stitch length (9) Window for the differential feed (1 0) Key for the chainstitch looper (45...
Owner's Manual
Page 5
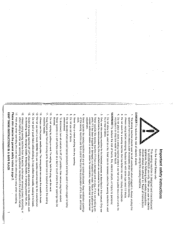
... may be adhered to break. 1 3:fYonot use this appliance from socket. 9. Please also observe the general safety notes on a soft surface such as threading needle, changing needle, threading bobbin, or changing presser foot, etc. 16. Always unplug this sewing machine for examination, repair, electrical or mechanical adjustment. 4. Do not place in this...
... may be adhered to break. 1 3:fYonot use this appliance from socket. 9. Please also observe the general safety notes on a soft surface such as threading needle, changing needle, threading bobbin, or changing presser foot, etc. 16. Always unplug this sewing machine for examination, repair, electrical or mechanical adjustment. 4. Do not place in this...
Owner's Manual
Page 8
... knife Display Elastic tape sewing foot Electrical connection Electronics Entering new data Foot control Free arm Gathering foot Gimp thread stitching foot Knob to adjust seam width Lace sewing foot LED needle display (A, B, C) Left overedge looper 4... the knife Changing the light bulb (sewing light). Contents 2 thread overlook stitch........... 2 thread overlock with safety-stitch . 2 thread rolled/flat hem 3 thread overlook stitch 3 thread overlook with safety-stitch 3 thread rolled/flat hem 4 thread overlock stitch Accessories Accessory box Automatic threader Bead sewing foot Blindstitch...
... knife Display Elastic tape sewing foot Electrical connection Electronics Entering new data Foot control Free arm Gathering foot Gimp thread stitching foot Knob to adjust seam width Lace sewing foot LED needle display (A, B, C) Left overedge looper 4... the knife Changing the light bulb (sewing light). Contents 2 thread overlook stitch........... 2 thread overlock with safety-stitch . 2 thread rolled/flat hem 3 thread overlook stitch 3 thread overlook with safety-stitch 3 thread rolled/flat hem 4 thread overlock stitch Accessories Accessory box Automatic threader Bead sewing foot Blindstitch...
Owner's Manual
Page 9
... Spool disc 67 Spool net. 67 Spool stands 11 Standard thread tension 42 Stitch length adjusting knob 26 Taping foot 69 Technical part 7 -3 Thread charts 54, 55 Thread cutter 24 Thread unreeling disc 67 Threading the looper 14 - 18 Threading the needles 20, 21 Threading the thread guides 13 Upper knife 78 Upper knife lock 34 Waste box...
... Spool disc 67 Spool net. 67 Spool stands 11 Standard thread tension 42 Stitch length adjusting knob 26 Taping foot 69 Technical part 7 -3 Thread charts 54, 55 Thread cutter 24 Thread unreeling disc 67 Threading the looper 14 - 18 Threading the needles 20, 21 Threading the thread guides 13 Upper knife 78 Upper knife lock 34 Waste box...
Owner's Manual
Page 11
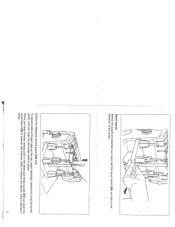
..., 33 page 34 -...-n,-v--- 7 ,,.,, Technical part Electrical connection Detachable work support Accessory box Spool stands Waste box / looper cover Threading the thread guides and the looper Threader Threading the needles Sewing foot lever Sewing test / thread cutter Seam width adjusting knob Stitch length adjusting knob Differential feed Changing the needle, sewing foot and needle plate...
..., 33 page 34 -...-n,-v--- 7 ,,.,, Technical part Electrical connection Detachable work support Accessory box Spool stands Waste box / looper cover Threading the thread guides and the looper Threader Threading the needles Sewing foot lever Sewing test / thread cutter Seam width adjusting knob Stitch length adjusting knob Differential feed Changing the needle, sewing foot and needle plate...
Owner's Manual
Page 15
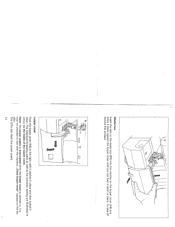
To assure optimal thread take-up the two upper telescopic extensions must pull the spool stand (28) out fully in the direction of the arrow. When you hear the ball stops catch in place. -- -, Spool stands Before the spools are attached you must be turned slowly until you have finished sewing push in the telescopic thread guide (24) and push the spool stand (28) in towards the machine, with or without the spools, until it catches in place. 11 Extend the telescopic thread guide (24) fully.
To assure optimal thread take-up the two upper telescopic extensions must pull the spool stand (28) out fully in the direction of the arrow. When you hear the ball stops catch in place. -- -, Spool stands Before the spools are attached you must be turned slowly until you have finished sewing push in the telescopic thread guide (24) and push the spool stand (28) in towards the machine, with or without the spools, until it catches in place. 11 Extend the telescopic thread guide (24) fully.
Owner's Manual
Page 16
... the tabs on the waste box (51) into the notches on the inside of the looper cover. To take off reverse this process. The individual threading paths as well as the converter setting are illustrated in the dis play.
... the tabs on the waste box (51) into the notches on the inside of the looper cover. To take off reverse this process. The individual threading paths as well as the converter setting are illustrated in the dis play.
Owner's Manual
Page 17
... (pink) 2. dis ccc ccc 000 0 00 With both hands pull the thread through the thread guide (36) and the appropriate thread tension (1, 2, 4, 5 and 6). - Make sure the thread stays in the slot on the spool pins (25). For smaller spools we recommend you attach a thread unwinding disc to the spool with the rounded end to ,,N" and...
... (pink) 2. dis ccc ccc 000 0 00 With both hands pull the thread through the thread guide (36) and the appropriate thread tension (1, 2, 4, 5 and 6). - Make sure the thread stays in the slot on the spool pins (25). For smaller spools we recommend you attach a thread unwinding disc to the spool with the rounded end to ,,N" and...
Owner's Manual
Page 19
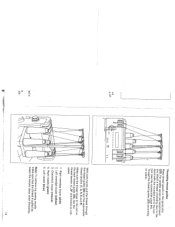
Thread the left overedge looper 1. Pull the thread from thread guide 8 through the looper eye 9 and pull it a bit with the marking on the hou&ng. 12 C 2. The marking on the hand wheel must be in the order 1 to 8. Threading the left overedge looper (39) in line with your left hand. - 000 000 DOD D 15
Thread the left overedge looper 1. Pull the thread from thread guide 8 through the looper eye 9 and pull it a bit with the marking on the hou&ng. 12 C 2. The marking on the hand wheel must be in the order 1 to 8. Threading the left overedge looper (39) in line with your left hand. - 000 000 DOD D 15
Owner's Manual
Page 20
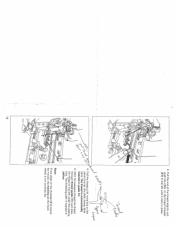
N , 11 7 0 16 3. Note: If the slider on the threader (41) cannot be moved, the marking on the looper threader (41) to the left until it rests in place. çgtL /Q 4. With the tweezers thread the thread through thread guide (1 1) and draw the thread to the left under the sewing foot. Pull the thread a bit more nd at the same time let the slider slowly slide back. The threading path is not correctly set. Pull the end of the thread slightly and push the slider on the hand wheel is marked in guide 10. 5. The thread is automatically inserted in yellow.
N , 11 7 0 16 3. Note: If the slider on the threader (41) cannot be moved, the marking on the looper threader (41) to the left until it rests in place. çgtL /Q 4. With the tweezers thread the thread through thread guide (1 1) and draw the thread to the left under the sewing foot. Pull the thread a bit more nd at the same time let the slider slowly slide back. The threading path is not correctly set. Pull the end of the thread slightly and push the slider on the hand wheel is marked in guide 10. 5. The thread is automatically inserted in yellow.
Owner's Manual
Page 21
Threading the chainstitch looper ooper(4O) in the Il 1 antiolockwjse so that the chainstitch looper is in the farthest position to the right. zz ID - 17
Threading the chainstitch looper ooper(4O) in the Il 1 antiolockwjse so that the chainstitch looper is in the farthest position to the right. zz ID - 17

Owner's Manual
Page 22
... moves the looper I 8 V 0 6 - , Draw the thread through thread guide 7 through the looper eye 9 and place it easily. lever (44) to the next position lever (44) of the chainstitch path is marked in mauve. to the right and chainstitch looper down. Now pull the thread the left under the sewing foot. Return... the looper to return the positioning 4870 does not sew chainstitch. you forget to its original position, the 18 The...
... moves the looper I 8 V 0 6 - , Draw the thread through thread guide 7 through the looper eye 9 and place it easily. lever (44) to the next position lever (44) of the chainstitch path is marked in mauve. to the right and chainstitch looper down. Now pull the thread the left under the sewing foot. Return... the looper to return the positioning 4870 does not sew chainstitch. you forget to its original position, the 18 The...

Owner's Manual
Page 23
D ! Place the threader from the needle's eye. Draw the thread from the bottom through hook D and the thread automatically passes behind the needle until the needle is in its highest position. B 19 You can now pull the end of the thread through slot A on the threader and hold it a bit taut. ,B ...B 1 AB Slowly lower the threader behind hook C. A Draw the thread through the eye to thread the needle. A C '42) Needle threader (accessory) Lower the sewing foot with the needle between the two guide lugs B. Draw the threader ...
D ! Place the threader from the needle's eye. Draw the thread from the bottom through hook D and the thread automatically passes behind the needle until the needle is in its highest position. B 19 You can now pull the end of the thread through slot A on the threader and hold it a bit taut. ,B ...B 1 AB Slowly lower the threader behind hook C. A Draw the thread through the eye to thread the needle. A C '42) Needle threader (accessory) Lower the sewing foot with the needle between the two guide lugs B. Draw the threader ...
Owner's Manual
Page 24
...This automatically releases the needle thread tensions and makes it easier to the left over the sewing foot. Draw the thread to thread the needles. 6 7 Threading the overedge needles B or C (with or without needle A) Thread the overedge needle in blue (triangles). 20 The threading path is marked in the...left under the sewing foot. Draw the thread to 8 and draw the thread through the needle's eye 7 with the threader. The threading path is marked in its highest position. 1 II 2 0 00 00 00 0 5 000 Threading the needles Note: When threading the needles make sure that the sewing ...
...This automatically releases the needle thread tensions and makes it easier to the left over the sewing foot. Draw the thread to thread the needles. 6 7 Threading the overedge needles B or C (with or without needle A) Thread the overedge needle in blue (triangles). 20 The threading path is marked in the...left under the sewing foot. Draw the thread to 8 and draw the thread through the needle's eye 7 with the threader. The threading path is marked in its highest position. 1 II 2 0 00 00 00 0 5 000 Threading the needles Note: When threading the needles make sure that the sewing ...

Owner's Manual
Page 25
... sewing foot. o Caution: You can also draw the looper threads straight through the thread guide before the needles. It is threaded Cut the threads off and thread the appropriate needles. Lower the sewing feet. Draw the thread to 8 and draw the thread through the needle's eye 9 with one or two - needles...the ends of stitch). Now pull the threads through until the knots are about six inches through the looper eye and to the thread spool and put on the type of the old thread and the new thread together. Pull the needle threads out of the needles. Never use ...
... sewing foot. o Caution: You can also draw the looper threads straight through the thread guide before the needles. It is threaded Cut the threads off and thread the appropriate needles. Lower the sewing feet. Draw the thread to 8 and draw the thread through the needle's eye 9 with one or two - needles...the ends of stitch). Now pull the threads through until the knots are about six inches through the looper eye and to the thread spool and put on the type of the old thread and the new thread together. Pull the needle threads out of the needles. Never use ...

Owner's Manual
Page 26
Closing the looper cover When the machine has been threaded you must close the looper cover (14). The LEDs on the speed selection also flash. .1 I 22 Sewing foot lever The sewing foot is open i.e. it is now impossible to the machine is cut off if the looper cover is raised and lowered with the sewing foot lever (33). Note The power to sew. ,,Close looper cover" appears in the display.
Closing the looper cover When the machine has been threaded you must close the looper cover (14). The LEDs on the speed selection also flash. .1 I 22 Sewing foot lever The sewing foot is open i.e. it is now impossible to the machine is cut off if the looper cover is raised and lowered with the sewing foot lever (33). Note The power to sew. ,,Close looper cover" appears in the display.
Owner's Manual
Page 27
With the threads held slightly taut, slowly begin to guide the material with your hands (do not push or pull). Since the fabric 000 000 D 0 O is automatically fed, you should sew a test seam. First raise 000 the sewing foot. Place a fabric remnant under the sewing \ foot right in front of the needle and lower 00 the foot. Note: Make sure that the threads interloop correctly when sewing (thread chain). 000 23 Sewing test - 00' When the machine has been threaded, you just need to sew.
With the threads held slightly taut, slowly begin to guide the material with your hands (do not push or pull). Since the fabric 000 000 D 0 O is automatically fed, you should sew a test seam. First raise 000 the sewing foot. Place a fabric remnant under the sewing \ foot right in front of the needle and lower 00 the foot. Note: Make sure that the threads interloop correctly when sewing (thread chain). 000 23 Sewing test - 00' When the machine has been threaded, you just need to sew.
Owner's Manual
Page 28
Knot the thread chain. 2. With knitwear you must sew over the end of the seam. Sew about 2 inches over the thread cutter. oO / Securing the seam There are various ways of securing the ends of the seam. Thread cutter To use the thread cutter (26) you can pull the thread chain into the seam with a crochet needle. 3. Draw the thread chain that results to the front over the end of seams: 1. Turn the sewing round and sew back a few stitches in the opposite direction without cutting the thread chain. 24
Knot the thread chain. 2. With knitwear you must sew over the end of the seam. Sew about 2 inches over the thread cutter. oO / Securing the seam There are various ways of securing the ends of the seam. Thread cutter To use the thread cutter (26) you can pull the thread chain into the seam with a crochet needle. 3. Draw the thread chain that results to the front over the end of seams: 1. Turn the sewing round and sew back a few stitches in the opposite direction without cutting the thread chain. 24
Owner's Manual
Page 33
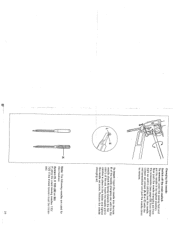
... aid. K Note: The following needles are used for this machine: System EL X 705 (80 or 90) If using the usual sewing needles 130/ 705 H the thread tension must be increa sed. 29 Loosen set screw. To insert: Insert the needle into the hole E of the needle changing aid, with the red...
... aid. K Note: The following needles are used for this machine: System EL X 705 (80 or 90) If using the usual sewing needles 130/ 705 H the thread tension must be increa sed. 29 Loosen set screw. To insert: Insert the needle into the hole E of the needle changing aid, with the red...

Owner's Manual
Page 36
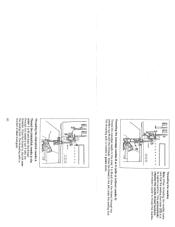
... with the hand wheel. The overedge looper is disen gaged. Now turn the knob to disengage the upper knife (42) fully to the left . First thread the chainstitch looper (40) and then needle A. Open the looper cover and pull the knife guard (13) off to 0). Disengaging the upper knife Note: To...
... with the hand wheel. The overedge looper is disen gaged. Now turn the knob to disengage the upper knife (42) fully to the left . First thread the chainstitch looper (40) and then needle A. Open the looper cover and pull the knife guard (13) off to 0). Disengaging the upper knife Note: To...


