
Owner's Manual
Page 9
... 52, 53 Safety instructions 1 Securing the seam 14 Setting the programs 39 Sewing foot chart 68 Sewing foot lever 22 Sewing foot pressure 34 Sewing test 23 Special accessories 68 - 76 Specifications 84 Speed pre-selection 37 Spool disc 67 Spool net. 67 Spool stands 11 Standard thread tension 42 Stitch...
... 52, 53 Safety instructions 1 Securing the seam 14 Setting the programs 39 Sewing foot chart 68 Sewing foot lever 22 Sewing foot pressure 34 Sewing test 23 Special accessories 68 - 76 Specifications 84 Speed pre-selection 37 Spool disc 67 Spool net. 67 Spool stands 11 Standard thread tension 42 Stitch...
Owner's Manual
Page 11
... work support Accessory box Spool stands Waste box / looper cover Threading the thread guides and the looper Threader Threading the needles Sewing foot lever Sewing test / thread cutter Seam width adjusting knob Stitch length adjusting knob Differential feed Changing the needle, sewing foot and needle plate Converting the machine for chainstitch...
... work support Accessory box Spool stands Waste box / looper cover Threading the thread guides and the looper Threader Threading the needles Sewing foot lever Sewing test / thread cutter Seam width adjusting knob Stitch length adjusting knob Differential feed Changing the needle, sewing foot and needle plate Converting the machine for chainstitch...
Owner's Manual
Page 27
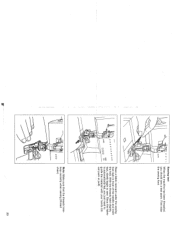
Sewing test - 00' When the machine has been threaded, you just need to sew. With the threads held slightly taut, slowly begin to guide the material with your hands (do not push or pull). Note: Make sure that the threads interloop correctly when sewing (thread chain). 000 23 First raise 000 the sewing foot. Place a fabric remnant under the sewing \ foot right in front of the needle and lower 00 the foot. Since the fabric 000 000 D 0 O is automatically fed, you should sew a test seam.
Sewing test - 00' When the machine has been threaded, you just need to sew. With the threads held slightly taut, slowly begin to guide the material with your hands (do not push or pull). Note: Make sure that the threads interloop correctly when sewing (thread chain). 000 23 First raise 000 the sewing foot. Place a fabric remnant under the sewing \ foot right in front of the needle and lower 00 the foot. Since the fabric 000 000 D 0 O is automatically fed, you should sew a test seam.

Owner's Manual
Page 32
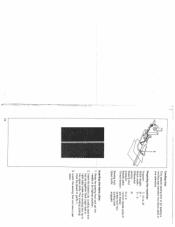
Differential- Feed setting Fig. Correct seam Fabric 0,5-N 1 nylon, tricot, lining fabrics, satin, a poplin and silk light cotton and denim, N 2 c (normal fabrics) jersey, medium cotton, cut-pile 1,5 3 d fabrics and light knits 1,5-2 4 heavy knitwear, very elastic fabrics f and rib-knit b Fig. 1 Fig. 2 d j e 9 Fig. 3 Fig. 4 28 The differential feed can also be set while sewing. This table shows possible settings for your fabric. Sew a test seam to deter mine the correct setting for the differential feed.
Differential- Feed setting Fig. Correct seam Fabric 0,5-N 1 nylon, tricot, lining fabrics, satin, a poplin and silk light cotton and denim, N 2 c (normal fabrics) jersey, medium cotton, cut-pile 1,5 3 d fabrics and light knits 1,5-2 4 heavy knitwear, very elastic fabrics f and rib-knit b Fig. 1 Fig. 2 d j e 9 Fig. 3 Fig. 4 28 The differential feed can also be set while sewing. This table shows possible settings for your fabric. Sew a test seam to deter mine the correct setting for the differential feed.

Owner's Manual
Page 71
... sewing on the width of 4- 9 mm) N N normal needle plate N see display (press mod key) taping foot switch off Inserting the tape: 1. Insert fabric and sew a test seam. / 69
... sewing on the width of 4- 9 mm) N N normal needle plate N see display (press mod key) taping foot switch off Inserting the tape: 1. Insert fabric and sew a test seam. / 69

Owner's Manual
Page 73
... threads (cords, synthetic threads) up to 4 N N rolled seam needle plate R see display (press mod key) gimp thread sewing foot engaged Inserting the gimp thread 1. Sew a test seam. 71 This produ ces an undulating or stiffer hem (e.g.
... threads (cords, synthetic threads) up to 4 N N rolled seam needle plate R see display (press mod key) gimp thread sewing foot engaged Inserting the gimp thread 1. Sew a test seam. 71 This produ ces an undulating or stiffer hem (e.g.

Owner's Manual
Page 75
... two fabrics together and gathering the bottom ply in its highest position. 2. Raise the sewing foot and set the needle in one operation. Alwys sew a test seam to the upper knife. 3. Insert the bottom ply of fabric 1 bet ween the needle plate and the gathe ring foot up to the edge...
... two fabrics together and gathering the bottom ply in its highest position. 2. Raise the sewing foot and set the needle in one operation. Alwys sew a test seam to the upper knife. 3. Insert the bottom ply of fabric 1 bet ween the needle plate and the gathe ring foot up to the edge...
Owner's Manual
Page 76
... and top ply together flush (right side to right side) under the cording foot up to the upper knife. Lower the sewing foot and sew a test seam. 74 Preparing the machine: Program: Stitch length: Stitch width: Differential setting: Sewing foot pressure: Needle plate: Thread tension: Sewing foot: Upper knife: 7.10cr 21...
... and top ply together flush (right side to right side) under the cording foot up to the upper knife. Lower the sewing foot and sew a test seam. 74 Preparing the machine: Program: Stitch length: Stitch width: Differential setting: Sewing foot pressure: Needle plate: Thread tension: Sewing foot: Upper knife: 7.10cr 21...

Owner's Manual
Page 78
... knife disengaged>. 5. Raise the sewing foot and set needle in highest position. 2. Lace sewing toot This special sewing foot is sewn on lace: 1. Always sew a test seam. • - ,- -. 1 ' ' 1' - Tighten screw 3. 3.
... knife disengaged>. 5. Raise the sewing foot and set needle in highest position. 2. Lace sewing toot This special sewing foot is sewn on lace: 1. Always sew a test seam. • - ,- -. 1 ' ' 1' - Tighten screw 3. 3.
