
Owner's Manual
Page 4
... (46) Screw to secure upper knife (47) Screw to carry (4) Looper thread tension - right (3) Handle to secure lower knife (48) Lower knife (49) Upper knife Parts of the hobbylock 4870 (1) Upper thread tension -
... (46) Screw to secure upper knife (47) Screw to carry (4) Looper thread tension - right (3) Handle to secure lower knife (48) Lower knife (49) Upper knife Parts of the hobbylock 4870 (1) Upper thread tension -
Owner's Manual
Page 5
... the manufacturer. 14. Never operate this manual. Keep ventilation openings of the sewing machine and foot control free from socket. 9. To disconnect, turn all moving parts. Special care is designed and manufactured for its intended purpose as contained in this sewing machine if it has a damaged cord or plug, if it...
... the manufacturer. 14. Never operate this manual. Keep ventilation openings of the sewing machine and foot control free from socket. 9. To disconnect, turn all moving parts. Special care is designed and manufactured for its intended purpose as contained in this sewing machine if it has a damaged cord or plug, if it...
Owner's Manual
Page 6
...5 Watts. 4. place any stubborn dirt, use a soft - its cord. Ihe maxim "n permissible wattage for supervised use only original PFAFF parts. 2 To - cloth with condensation. To avoid the risk of our qualified service staff. 11. To permit adequate ventilation the machine must...and even surface. Please Note! 9. When leaving the machine, during maintenance work or when changing mechanical parts or accessories, always disconnect the machine from the mains by a Pfaff mechanic. 5. Treatment Always make sure not to : dust, severe dampness, direct sunlight, static elec ...
...5 Watts. 4. place any stubborn dirt, use a soft - its cord. Ihe maxim "n permissible wattage for supervised use only original PFAFF parts. 2 To - cloth with condensation. To avoid the risk of our qualified service staff. 11. To permit adequate ventilation the machine must...and even surface. Please Note! 9. When leaving the machine, during maintenance work or when changing mechanical parts or accessories, always disconnect the machine from the mains by a Pfaff mechanic. 5. Treatment Always make sure not to : dust, severe dampness, direct sunlight, static elec ...
Owner's Manual
Page 9
... pre-selection 37 Spool disc 67 Spool net. 67 Spool stands 11 Standard thread tension 42 Stitch length adjusting knob 26 Taping foot 69 Technical part 7 -3 Thread charts 54, 55 Thread cutter 24 Thread unreeling disc 67 Threading the looper 14 - 18 Threading the needles 20, 21 Threading the thread guides...
... pre-selection 37 Spool disc 67 Spool net. 67 Spool stands 11 Standard thread tension 42 Stitch length adjusting knob 26 Taping foot 69 Technical part 7 -3 Thread charts 54, 55 Thread cutter 24 Thread unreeling disc 67 Threading the looper 14 - 18 Threading the needles 20, 21 Threading the thread guides...
Owner's Manual
Page 11
Technical part Electrical connection Detachable work support Accessory box Spool stands Waste box / looper cover Threading the thread guides and the looper Threader Threading the needles Sewing ...
Technical part Electrical connection Detachable work support Accessory box Spool stands Waste box / looper cover Threading the thread guides and the looper Threader Threading the needles Sewing ...

Owner's Manual
Page 34
... the sewing foot with the sewing foot lever (33) and set the needle width adjusting knob (17) 30 Press the white lever on the back part of the sewing foot holder.
... the sewing foot with the sewing foot lever (33) and set the needle width adjusting knob (17) 30 Press the white lever on the back part of the sewing foot holder.

Owner's Manual
Page 47
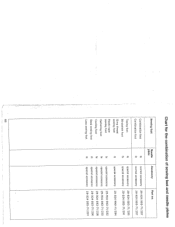
... bed linen with safety stitch (narrow) Thread tensions blue = triangle green = dot pink =dot yellow = dot mauve = triangle Examples of use Joining linen or jeans parts without ser ging top side i chainstitch iop side overlock stitch -to side / overlock stitch underside chainstitch. Prog. 4 or 5 3 thread overlock seam (narrow or wide) Thread...
... bed linen with safety stitch (narrow) Thread tensions blue = triangle green = dot pink =dot yellow = dot mauve = triangle Examples of use Joining linen or jeans parts without ser ging top side i chainstitch iop side overlock stitch -to side / overlock stitch underside chainstitch. Prog. 4 or 5 3 thread overlock seam (narrow or wide) Thread...
Owner's Manual
Page 70
... Taping foot Blindstitch foot Gimp thread sewing foot Elastic tape sewing foot Gathering foot Cording foot Bead sewing foot Lace sewing foot Needle plate N R N N H N N N R N Accessory Part no normal accessory normal accessory 29-924 993-71/287 29-924 993-71/287 special accessory special accessory 29-924 993-71/295 29...
... Taping foot Blindstitch foot Gimp thread sewing foot Elastic tape sewing foot Gathering foot Cording foot Bead sewing foot Lace sewing foot Needle plate N R N N H N N N R N Accessory Part no normal accessory normal accessory 29-924 993-71/287 29-924 993-71/287 special accessory special accessory 29-924 993-71/295 29...

Owner's Manual
Page 72
...: Thread tension: Sewing foot: Upper knife: 4 4 N N N normal needle plate N see display (press mod key) blindstitch foot switch on Sewing: 1. Before sewing cut 2 cm off hem part 3. The crease line 4 of the outer fabric must run along the edge of the seam. 2. seams and wherever the seam should not be visible. This..., serged and sewn in the outer fabric is regulated as follows: Loosen the adusting screw 1 and adjust the edge guide 2 so that the folded hem part 3 is ideal for skirt and trouser.
...: Thread tension: Sewing foot: Upper knife: 4 4 N N N normal needle plate N see display (press mod key) blindstitch foot switch on Sewing: 1. Before sewing cut 2 cm off hem part 3. The crease line 4 of the outer fabric must run along the edge of the seam. 2. seams and wherever the seam should not be visible. This..., serged and sewn in the outer fabric is regulated as follows: Loosen the adusting screw 1 and adjust the edge guide 2 so that the folded hem part 3 is ideal for skirt and trouser.
Owner's Manual
Page 81
... (48) between the lower knife holder and the upper knife. Place the pressure plate on the hole in the lower knife so that the longer part with the slanted corner is pointing backwards to their high est position and disengage the upper knife (see page 30, 31). Raise the needles to...
... (48) between the lower knife holder and the upper knife. Place the pressure plate on the hole in the lower knife so that the longer part with the slanted corner is pointing backwards to their high est position and disengage the upper knife (see page 30, 31). Raise the needles to...

Owner's Manual
Page 83
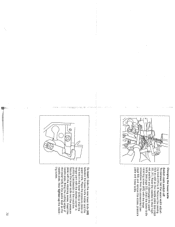
One or two drops of PFAFF sewing machine oil are made of lightly oiling the marked points with the oil from the accessories (see page 66). Oiling the machine Before using your machine you should make a habit of a special material and do not need to be oiled. 81 All the other parts are enough. You can now remove the upper knife (49) and clean the lint off Take out the upper knife retaining screw (46) with the screwdriver supplied. 0 0 Cleaning the knife Switch the main switch off the upper and lower knife with the brush from the accessories (see page 66). / 0 -U N 6 I -
One or two drops of PFAFF sewing machine oil are made of lightly oiling the marked points with the oil from the accessories (see page 66). Oiling the machine Before using your machine you should make a habit of a special material and do not need to be oiled. 81 All the other parts are enough. You can now remove the upper knife (49) and clean the lint off Take out the upper knife retaining screw (46) with the screwdriver supplied. 0 0 Cleaning the knife Switch the main switch off the upper and lower knife with the brush from the accessories (see page 66). / 0 -U N 6 I -
Owner's Manual
Page 87
Parts of the hobbylock 4870 (23) Thread guide with coloured markings (24) TelescoPic thread guide (25) Spool pins (26) Thread cutter (27) Spool centering (28) Spool stands (29) Power socket (30) Main switch (31) Foot control socket (32) Hand wheel (33) Sewing foot lever (34) Stitch length adjusting knob (35) Adjusting ring for the differential feed (36) Reverse thread guide (50) Material guide plate (51) Waste box
Parts of the hobbylock 4870 (23) Thread guide with coloured markings (24) TelescoPic thread guide (25) Spool pins (26) Thread cutter (27) Spool centering (28) Spool stands (29) Power socket (30) Main switch (31) Foot control socket (32) Hand wheel (33) Sewing foot lever (34) Stitch length adjusting knob (35) Adjusting ring for the differential feed (36) Reverse thread guide (50) Material guide plate (51) Waste box


