User Manual
Page 6
...be Taken During Handling 2 Contents 4 Composition of the Operating Manual 9 Before Using Your Camera 11 L Camera Characteristics 12 Checking the Contents of the Package 13 Names of Working Parts 14 Camera 14 LCD Monitor Indications 16 Viewfinder Indications 20 LCD Panel Indications 22 Getting Started 23 ...Adapter (Optional 28 Inserting/Removing the SD Memory Card 29 Recorded Pixels and Quality Level 31 Turning the Camera On and Off 32 Initial Settings 33 Setting the Display Language 33 Setting the Date and Time 35 Attaching the Lens 37 Adjusting the Viewfinder Diopter 39
...be Taken During Handling 2 Contents 4 Composition of the Operating Manual 9 Before Using Your Camera 11 L Camera Characteristics 12 Checking the Contents of the Package 13 Names of Working Parts 14 Camera 14 LCD Monitor Indications 16 Viewfinder Indications 20 LCD Panel Indications 22 Getting Started 23 ...Adapter (Optional 28 Inserting/Removing the SD Memory Card 29 Recorded Pixels and Quality Level 31 Turning the Camera On and Off 32 Initial Settings 33 Setting the Display Language 33 Setting the Date and Time 35 Attaching the Lens 37 Adjusting the Viewfinder Diopter 39

User Manual
Page 7
Basic Operations 5 41 Basic Shooting Operation 42 Holding the Camera 42 Letting the Camera Choose the Optimal Settings 43 Selecting the Appropriate Capturing Mode for Scenes 47 Using the Zoom Lens 48 Using the Built-in Flash 49 Using the Built-...Selected Images (from Nine-Image Display 75 Protecting Images from Deletion (Protect 77 Setting the Printing Service (DPOF 79 Printing Single Images 79 Settings for All Images 81 Printing Using PictBridge 83 Setting Transfer Modes 84 Connecting the Camera to the Printer 85 Printing Single Images 86 Printing All Images 88 Printing Images...
Basic Operations 5 41 Basic Shooting Operation 42 Holding the Camera 42 Letting the Camera Choose the Optimal Settings 43 Selecting the Appropriate Capturing Mode for Scenes 47 Using the Zoom Lens 48 Using the Built-in Flash 49 Using the Built-...Selected Images (from Nine-Image Display 75 Protecting Images from Deletion (Protect 77 Setting the Printing Service (DPOF 79 Printing Single Images 79 Settings for All Images 81 Printing Using PictBridge 83 Setting Transfer Modes 84 Connecting the Camera to the Printer 85 Printing Single Images 86 Printing All Images 88 Printing Images...
User Manual
Page 8
... 94 Using the Menu 96 How to Operate the Menu 96 [A Rec. Mode] Menu Setting Items 98 [Q Playback] Menu Setting Items 98 [H Set-up] Menu Setting Items 99 [A Custom] Menu Setting Items 100 Using the Fn Menu 102 Capture Mode 102 Playback 103 Using the Mode Dial ...104 Function Reference 107 Setting the Recorded Pixels and Quality Level 108 Setting the Image Tone 108 Setting the Recorded Pixels 109 Setting the Quality Level 110 Setting the Saturation/Sharpness/Contrast 111 Setting the White Balance 112 Setting the Sensitivity 115 Setting the Color Space 117 Focusing ...
... 94 Using the Menu 96 How to Operate the Menu 96 [A Rec. Mode] Menu Setting Items 98 [Q Playback] Menu Setting Items 98 [H Set-up] Menu Setting Items 99 [A Custom] Menu Setting Items 100 Using the Fn Menu 102 Capture Mode 102 Playback 103 Using the Mode Dial ...104 Function Reference 107 Setting the Recorded Pixels and Quality Level 108 Setting the Image Tone 108 Setting the Recorded Pixels 109 Setting the Quality Level 110 Setting the Saturation/Sharpness/Contrast 111 Setting the White Balance 112 Setting the Sensitivity 115 Setting the Color Space 117 Focusing ...
User Manual
Page 9
...Compatibility with the Built-in Flash 151 Using an External Flash (Optional 153 Settings During Playback 160 Changing Playback Display Method 160 Displaying Bright Portion Warning 160 Setting the Slideshow Display Interval 161 Camera Settings 162 Formatting the SD Memory Card 162 Turning the Beep On and Off ...163 Changing the Date and Time and the Display Style 163 Setting the World Time 164 Setting the Display Language 167 ...
...Compatibility with the Built-in Flash 151 Using an External Flash (Optional 153 Settings During Playback 160 Changing Playback Display Method 160 Displaying Bright Portion Warning 160 Setting the Slideshow Display Interval 161 Camera Settings 162 Formatting the SD Memory Card 162 Turning the Beep On and Off ...163 Changing the Date and Time and the Display Style 163 Setting the World Time 164 Setting the Display Language 167 ...

User Manual
Page 10
8 Appendix 173 Default Settings 174 Functions Available with Various Lens Combinations .......... 178 Notes on [Using Aperture Ring 180 Cleaning the CCD 181 Optional Accessories 183 Error Messages 186 Troubleshooting 188 Main Specifications 190 Specifications for Remote Control F (Optional 192 Glossary 193 Index 198 WARRANTY POLICY 202
8 Appendix 173 Default Settings 174 Functions Available with Various Lens Combinations .......... 178 Notes on [Using Aperture Ring 180 Cleaning the CCD 181 Optional Accessories 183 Error Messages 186 Troubleshooting 188 Main Specifications 190 Specifications for Remote Control F (Optional 192 Glossary 193 Index 198 WARRANTY POLICY 202
User Manual
Page 18
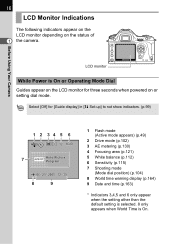
... [Off] for three seconds when powered on or setting dial mode. Before Using Your Camera LCD monitor While Power is On. 16 LCD Monitor Indications The following indicators appear on the LCD monitor depending on the LCD monitor for [Guide display] in [H Set-up] to not show indicators. (p.99) 1 ... mode (Mode dial position) (p.104) 8 World time warning display (p.164) 9 Date and time (p.163) * Indicators 3,4,5 and 6 only appear when the setting other than the default setting is selected. 8 only appears when World Time is On or Operating Mode Dial Guides appear on the status of 1 the...
... [Off] for three seconds when powered on or setting dial mode. Before Using Your Camera LCD monitor While Power is On. 16 LCD Monitor Indications The following indicators appear on the LCD monitor depending on the LCD monitor for [Guide display] in [H Set-up] to not show indicators. (p.99) 1 ... mode (Mode dial position) (p.104) 8 World time warning display (p.164) 9 Date and time (p.163) * Indicators 3,4,5 and 6 only appear when the setting other than the default setting is selected. 8 only appears when World Time is On or Operating Mode Dial Guides appear on the status of 1 the...
User Manual
Page 19
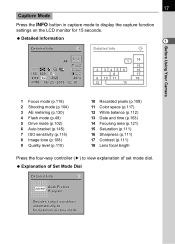
... in capture mode to fix optimum picture mode Explanation of set mode dial. Detailed Information 1 Detailed Info Detailed Info AF ISO 800 sRGB 40mm 06 / 25 / 2005 12 : 30 1 14 15 2 3456 16 7 8 17 9 10 11 18 12 13 Before Using Your Camera 1 Focus mode (p.118) 2 Shooting mode (p.104) 3 AE metering...area (p.121) 15 Saturation (p.111) 16 Sharpness (p.111) 17 Contrast (p.111) 18 Lens focal length Press the four-way controller (5) to view explanation of Set Mode Dial Detailed Info Auto Picture Program Decides subjct condition automatically to display the capture function...
... in capture mode to fix optimum picture mode Explanation of set mode dial. Detailed Information 1 Detailed Info Detailed Info AF ISO 800 sRGB 40mm 06 / 25 / 2005 12 : 30 1 14 15 2 3456 16 7 8 17 9 10 11 18 12 13 Before Using Your Camera 1 Focus mode (p.118) 2 Shooting mode (p.104) 3 AE metering...area (p.121) 15 Saturation (p.111) 16 Sharpness (p.111) 17 Contrast (p.111) 18 Lens focal length Press the four-way controller (5) to view explanation of Set Mode Dial Detailed Info Auto Picture Program Decides subjct condition automatically to display the capture function...

User Manual
Page 22
...Aperture (p.136) Aperture when capturing or adjusting (underlined when aperture can be adjusted with e-dial). 20 Viewfinder Indications 2 1 1 1 Before Using Your Camera 34 5 6 78 9 10 11 12 13 14 1 Autofocus frame (p.39) 2 Spot metering frame (p.130) 3 Flash status (p.49) Appears when... flash is available and blinks when flash is recommended but not set to k (Continuous mode). 6 Picture mode icon (p.47) Icon for Picture mode in use appears. . Night Scene Portrait, \ Moving Object, q Macro,...
...Aperture (p.136) Aperture when capturing or adjusting (underlined when aperture can be adjusted with e-dial). 20 Viewfinder Indications 2 1 1 1 Before Using Your Camera 34 5 6 78 9 10 11 12 13 14 1 Autofocus frame (p.39) 2 Spot metering frame (p.130) 3 Flash status (p.49) Appears when... flash is available and blinks when flash is recommended but not set to k (Continuous mode). 6 Picture mode icon (p.47) Icon for Picture mode in use appears. . Night Scene Portrait, \ Moving Object, q Macro,...

User Manual
Page 23
...100) EV compensation value appears when EV compensation is exceeded. 14 AE lock indicator (p.142) Appears during AE lock. Before Using Your Camera 11 Number of recordable images/EV compensation 1 Show the number of recordable images with the appropriate exposure value appears if exposure mode is... 13 ISO sensitivity warning (p.116) Appears when warning value is being adjusted. (p.133) The difference with current quality and recorded pixel setting. Blinks quickly when compensating exposure and flash output. Show the number of recordable images is available or in use. 21 10 EV ...
...100) EV compensation value appears when EV compensation is exceeded. 14 AE lock indicator (p.142) Appears during AE lock. Before Using Your Camera 11 Number of recordable images/EV compensation 1 Show the number of recordable images with the appropriate exposure value appears if exposure mode is... 13 ISO sensitivity warning (p.116) Appears when warning value is being adjusted. (p.133) The difference with current quality and recorded pixel setting. Blinks quickly when compensating exposure and flash output. Show the number of recordable images is available or in use. 21 10 EV ...

User Manual
Page 24
22 LCD Panel Indications The following information appears in the LCD panel on top of the camera. 1 Before Using Your Camera 1 72 8 3 9 4 5 610 11 1 Shutter speed (p.134) 5 Focusing area (p.121) 2 Aperture (p.136) No indicator : Wide 3 Flash mode (p.49) M :... > : Red-eye reduction flash on 7 Auto bracketing (p.145) 4 Drive Mode (p.102) 8 White balance (p.112) 9 : Single frame shooting (Not displayed when set to Auto) j : Continuous shooting 9 Battery level g : Self-Timer shooting 10 EV compensation (p.141) h : Remote control shooting 11 Number of recordable images/ EV...
22 LCD Panel Indications The following information appears in the LCD panel on top of the camera. 1 Before Using Your Camera 1 72 8 3 9 4 5 610 11 1 Shutter speed (p.134) 5 Focusing area (p.121) 2 Aperture (p.136) No indicator : Wide 3 Flash mode (p.49) M :... > : Red-eye reduction flash on 7 Auto bracketing (p.145) 4 Drive Mode (p.102) 8 White balance (p.112) 9 : Single frame shooting (Not displayed when set to Auto) j : Continuous shooting 9 Battery level g : Self-Timer shooting 10 EV compensation (p.141) h : Remote control shooting 11 Number of recordable images/ EV...
User Manual
Page 25
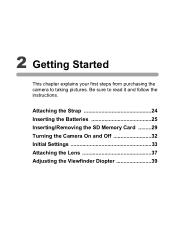
2 Getting Started This chapter explains your first steps from purchasing the camera to read it and follow the instructions. Be sure to taking pictures. Attaching the Strap 24 Inserting the Batteries 25 Inserting/Removing the SD Memory Card .........29 Turning the Camera On and Off 32 Initial Settings 33 Attaching the Lens 37 Adjusting the Viewfinder Diopter 39
2 Getting Started This chapter explains your first steps from purchasing the camera to read it and follow the instructions. Be sure to taking pictures. Attaching the Strap 24 Inserting the Batteries 25 Inserting/Removing the SD Memory Card .........29 Turning the Camera On and Off 32 Initial Settings 33 Attaching the Lens 37 Adjusting the Viewfinder Diopter 39
User Manual
Page 27
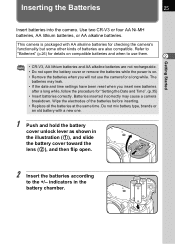
This camera is on. • Remove the batteries when you insert new batteries after a long while, follow the procedure for "Setting the Date and Time". (p.35) • Insert batteries correctly. Batteries inserted incorrectly may leak. • If the date and time settings have been reset when you will... not use them. 2 • CR-V3, AA lithium batteries and AA alkaline batteries are not rechargeable. • Do not open . 2 2 Insert the batteries according to use the camera for checking the camera's functionality but some ...
This camera is on. • Remove the batteries when you insert new batteries after a long while, follow the procedure for "Setting the Date and Time". (p.35) • Insert batteries correctly. Batteries inserted incorrectly may leak. • If the date and time settings have been reset when you will... not use them. 2 • CR-V3, AA lithium batteries and AA alkaline batteries are not rechargeable. • Do not open . 2 2 Insert the batteries according to use the camera for checking the camera's functionality but some ...
User Manual
Page 32
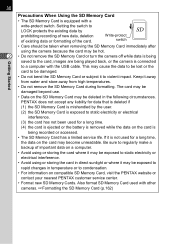
...When Using the SD Memory Card • The SD Memory Card is equipped with other cameras. 1Formatting the SD Memory Card (p.162) This may become unreadable. Also format SD Memory Card used with a write-protect switch. Setting the switch to LOCK protects the existing data by the user. (2) the SD Memory...Memory Card immediately after using or storing the card in direct sunlight or where it may be exposed to regularly make a backup of the card. PENTAX does not accept any liability for a long time. (4) the card is ejected or the battery is removed while the data on the SD ...
...When Using the SD Memory Card • The SD Memory Card is equipped with other cameras. 1Formatting the SD Memory Card (p.162) This may become unreadable. Also format SD Memory Card used with a write-protect switch. Setting the switch to LOCK protects the existing data by the user. (2) the SD Memory...Memory Card immediately after using or storing the card in direct sunlight or where it may be exposed to regularly make a backup of the card. PENTAX does not accept any liability for a long time. (4) the card is ejected or the battery is removed while the data on the SD ...
User Manual
Page 33
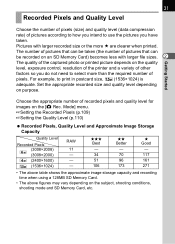
... Recorded Pixels P (3008×2008) (3008×2000) Q (2400×1600) R (1536×1024) RAW 11 - - - For example, to select more E are clearer when printed. Set the appropriate recorded size and quality level depending on the subject, shooting conditions, shooting mode and SD Memory Card, etc. Getting Started Choose the appropriate...
... Recorded Pixels P (3008×2008) (3008×2000) Q (2400×1600) R (1536×1024) RAW 11 - - - For example, to select more E are clearer when printed. Set the appropriate recorded size and quality level depending on the subject, shooting conditions, shooting mode and SD Memory Card, etc. Getting Started Choose the appropriate...

User Manual
Page 34
The camera will automatically turn off when you do not perform any operations within a set period of time. (Default setting is 1 minute) (p.169) Getting Started • Always turn the camera off the camera. 32 Turning the Camera On and Off 1 2 Move the main switch to turn off when not in use. • The power will turn on. Move the main switch to [OFF] position to [ON] position.
The camera will automatically turn off when you do not perform any operations within a set period of time. (Default setting is 1 minute) (p.169) Getting Started • Always turn the camera off the camera. 32 Turning the Camera On and Off 1 2 Move the main switch to turn off when not in use. • The power will turn on. Move the main switch to [OFF] position to [ON] position.

User Manual
Page 35
... You can choose the language in which the menus, error messages, etc. Initial Settings 33 Getting Started The first time the camera is English. Initial Settings English New York DST Cancel OK OK 2 Use the four-way controller (2345) to set again when turning your applicable language. Follow the procedure below to select your...
... You can choose the language in which the menus, error messages, etc. Initial Settings 33 Getting Started The first time the camera is English. Initial Settings English New York DST Cancel OK OK 2 Use the four-way controller (2345) to set again when turning your applicable language. Follow the procedure below to select your...

User Manual
Page 36
The screen for setting the date and time will be displayed. The cursor moves to [W]. 5 Press the four-way controller (45) to select the city. 6 Press the four-way controller (3). 2 The cursor moves to select O (On) or P (Off). 8 Press the 4 button. Getting Started 7 Use the four-way controller (45) to DST (daylight saving time). 34 4 Press the four-way controller (3).
The screen for setting the date and time will be displayed. The cursor moves to [W]. 5 Press the four-way controller (45) to select the city. 6 Press the four-way controller (3). 2 The cursor moves to select O (On) or P (Off). 8 Press the 4 button. Getting Started 7 Use the four-way controller (45) to DST (daylight saving time). 34 4 Press the four-way controller (3).

User Manual
Page 37
... / 01 / 2005 Time 00 : 00 Cancel OK OK Getting Started 2 Use the four-way controller (23) to [Date Style]. 6 Press the four-way controller (3). 35 Setting the Date and Time Set the current date and time and the display style. 1 Press the four-way controller (5).
... / 01 / 2005 Time 00 : 00 Cancel OK OK Getting Started 2 Use the four-way controller (23) to [Date Style]. 6 Press the four-way controller (3). 35 Setting the Date and Time Set the current date and time and the display style. 1 Press the four-way controller (5).

User Manual
Page 38
... • You can cancel the setting operation and switch to the [H Set-up] menu. The camera is reset to take pictures. 36 7 Press the four-way controller (5). To set the time. In this case, the Initial Settings screen will return to Capture mode during initial settings by pressing the 3 button. Press ... you select [12h] in the same manner. If you set the month. Set the day and year in Step 4, the setting switches between am and pm depending on . • When you finish the settings and press the 4 button, the camera clock is ready to 00 seconds. The frame moves to ...
... • You can cancel the setting operation and switch to the [H Set-up] menu. The camera is reset to take pictures. 36 7 Press the four-way controller (5). To set the time. In this case, the Initial Settings screen will return to Capture mode during initial settings by pressing the 3 button. Press ... you select [12h] in the same manner. If you set the month. Set the day and year in Step 4, the setting switches between am and pm depending on . • When you finish the settings and press the 4 button, the camera clock is ready to 00 seconds. The frame moves to ...
User Manual
Page 39
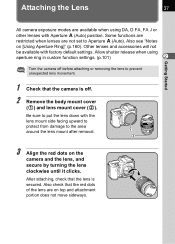
... other lenses with Aperture s (Auto) position. Attaching the Lens 37 Getting Started All camera exposure modes are available when using aperture ring in custom function settings. (p.101) 2 Turn the camera off before attaching or removing the lens to prevent unexpected lens movement. 1 Check that... the camera is secured. Some functions are restricted when lenses are on [Using ...
... other lenses with Aperture s (Auto) position. Attaching the Lens 37 Getting Started All camera exposure modes are available when using aperture ring in custom function settings. (p.101) 2 Turn the camera off before attaching or removing the lens to prevent unexpected lens movement. 1 Check that... the camera is secured. Some functions are restricted when lenses are on [Using ...


