User Manual
Page 3
.... • Do not look directly at the sun through the camera with the specified power and voltage. Seek medical assistance immediately if a battery is accidentally swallowed. • Wrapping the strap around your nearest PENTAX service center. Continued use could cause serious personal injury. Viewing directly...of electric shock. • To avoid the risk of it being swallowed by mistake, keep the SD Memory Card out of the reach of electric shock. • If the camera interior is dangerous. Continued use immediately, remove the batteries or the AC adapter, and contact your neck...
.... • Do not look directly at the sun through the camera with the specified power and voltage. Seek medical assistance immediately if a battery is accidentally swallowed. • Wrapping the strap around your nearest PENTAX service center. Continued use could cause serious personal injury. Viewing directly...of electric shock. • To avoid the risk of it being swallowed by mistake, keep the SD Memory Card out of the reach of electric shock. • If the camera interior is dangerous. Continued use immediately, remove the batteries or the AC adapter, and contact your neck...
User Manual
Page 4
... or high humidity. PRECAUTIONS FOR BATTERY USAGE • Only use . It may be guaranteed if recording, playback or transferring your camera or recording media (SD Memory Card), etc. • Do not clean the product with a new one. The batteries could explode or catch fire. • ... Do not disassemble the batteries. This will be Taken During Handling • Take the Worldwide Service Network that it is included in this camera. 2 Caution • Do not short the batteries or dispose of other than rechargeable Ni-MH batteries. Fingers or clothing may cause explosion...
... or high humidity. PRECAUTIONS FOR BATTERY USAGE • Only use . It may be guaranteed if recording, playback or transferring your camera or recording media (SD Memory Card), etc. • Do not clean the product with a new one. The batteries could explode or catch fire. • ... Do not disassemble the batteries. This will be Taken During Handling • Take the Worldwide Service Network that it is included in this camera. 2 Caution • Do not short the batteries or dispose of other than rechargeable Ni-MH batteries. Fingers or clothing may cause explosion...
User Manual
Page 5
...do not press forcefully on the LCD monitor. Wipe dry any rain or water drops on the camera. • Refer to "Precautions When Using the SD Memory Card" (p.30) regarding the SD Memory Card. • Use a lens brush to maintain high performance. • Sudden temperature changes will ...return to strong vibrations, shocks, or pressure. Remove from vibrations of the camera. This is due to liquid crystal ...
...do not press forcefully on the LCD monitor. Wipe dry any rain or water drops on the camera. • Refer to "Precautions When Using the SD Memory Card" (p.30) regarding the SD Memory Card. • Use a lens brush to maintain high performance. • Sudden temperature changes will ...return to strong vibrations, shocks, or pressure. Remove from vibrations of the camera. This is due to liquid crystal ...
User Manual
Page 6
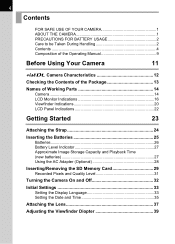
... 27 Approximate Image Storage Capacity and Playback Time (new batteries 27 Using the AC Adapter (Optional 28 Inserting/Removing the SD Memory Card 29 Recorded Pixels and Quality Level 31 Turning the Camera On and Off 32 Initial Settings 33 Setting the Display Language 33 Setting the Date and Time 35 Attaching the...
... 27 Approximate Image Storage Capacity and Playback Time (new batteries 27 Using the AC Adapter (Optional 28 Inserting/Removing the SD Memory Card 29 Recorded Pixels and Quality Level 31 Turning the Camera On and Off 32 Initial Settings 33 Setting the Display Language 33 Setting the Date and Time 35 Attaching the...
User Manual
Page 9
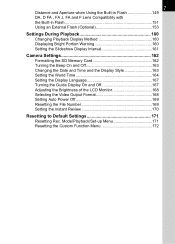
... (Optional 153 Settings During Playback 160 Changing Playback Display Method 160 Displaying Bright Portion Warning 160 Setting the Slideshow Display Interval 161 Camera Settings 162 Formatting the SD Memory Card 162 Turning the Beep On and Off 163 Changing the Date and Time and the Display Style 163 Setting the World Time 164...
... (Optional 153 Settings During Playback 160 Changing Playback Display Method 160 Displaying Bright Portion Warning 160 Setting the Slideshow Display Interval 161 Camera Settings 162 Formatting the SD Memory Card 162 Turning the Beep On and Off 163 Changing the Date and Time and the Display Style 163 Setting the World Time 164...
User Manual
Page 25
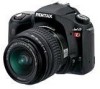
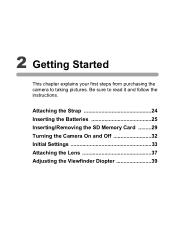
Be sure to taking pictures. Attaching the Strap 24 Inserting the Batteries 25 Inserting/Removing the SD Memory Card .........29 Turning the Camera On and Off 32 Initial Settings 33 Attaching the Lens 37 Adjusting the Viewfinder Diopter 39 2 Getting Started This chapter explains your first steps from purchasing the camera to read it and follow the instructions.
Be sure to taking pictures. Attaching the Strap 24 Inserting the Batteries 25 Inserting/Removing the SD Memory Card .........29 Turning the Camera On and Off 32 Initial Settings 33 Attaching the Lens 37 Adjusting the Viewfinder Diopter 39 2 Getting Started This chapter explains your first steps from purchasing the camera to read it and follow the instructions.

User Manual
Page 30
SD Memory Card and data will not charge when connected to the AC adapter. 4 Plug the AC cord into the power outlet. • Make sure the camera is turned off before opening the terminal cover. 2 Connect the DC terminal on the AC adapter to the DC input terminal on the camera. 3 Connect the ... We recommend using the AC adapter D-AC10 (optional) when using the LCD monitor for a long time or when connecting to your camera will be corrupted if disconnected while camera is recording or reading data. • Be sure to read the AC adapter D-AC10 operating manual when using the AC adapter. ...
SD Memory Card and data will not charge when connected to the AC adapter. 4 Plug the AC cord into the power outlet. • Make sure the camera is turned off before opening the terminal cover. 2 Connect the DC terminal on the AC adapter to the DC input terminal on the camera. 3 Connect the ... We recommend using the AC adapter D-AC10 (optional) when using the LCD monitor for a long time or when connecting to your camera will be corrupted if disconnected while camera is recording or reading data. • Be sure to read the AC adapter D-AC10 operating manual when using the AC adapter. ...

User Manual
Page 31
... product). • Do not remove the SD Memory Card while card access lamp is lit. • Format new SD Memory Card. Card cover opens. 2 Insert the card all the way with other cameras. Refer to "Formatting the SD Memory Card" (p.162) for details on the SD Memory Card. Also format SD Memory Card used with the SD Memory Card label toward the LCD monitor. 3 Close the...
... product). • Do not remove the SD Memory Card while card access lamp is lit. • Format new SD Memory Card. Card cover opens. 2 Insert the card all the way with other cameras. Refer to "Formatting the SD Memory Card" (p.162) for details on the SD Memory Card. Also format SD Memory Card used with the SD Memory Card label toward the LCD monitor. 3 Close the...
User Manual
Page 32
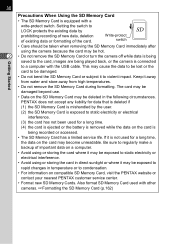
... to condensation. • For information on the card is being played back, or the camera is removed while the data on compatible SD Memory Card, visit the PENTAX website or contact your nearest PENTAX customer service center. • Format new SD Memory Cards. Also format SD Memory Card used for a long time. (4) the card is ejected or the battery is connected...
... to condensation. • For information on the card is being played back, or the camera is removed while the data on compatible SD Memory Card, visit the PENTAX website or contact your nearest PENTAX customer service center. • Format new SD Memory Cards. Also format SD Memory Card used for a long time. (4) the card is ejected or the battery is connected...
User Manual
Page 33
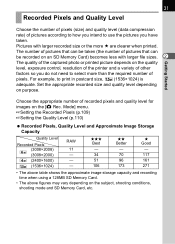
... 173 E Good - 117 161 271 • The above table shows the approximate image storage capacity and recording time when using a 128MB SD Memory Card. • The above figures may vary depending on purpose. Set the appropriate recorded size and quality level depending on the subject, shooting conditions..., shooting mode and SD Memory Card, etc. 31 Recorded Pixels and Quality Level Choose the number of pixels (size) and quality level (data compression rate) of ...
... 173 E Good - 117 161 271 • The above table shows the approximate image storage capacity and recording time when using a 128MB SD Memory Card. • The above figures may vary depending on purpose. Set the appropriate recorded size and quality level depending on the subject, shooting conditions..., shooting mode and SD Memory Card, etc. 31 Recorded Pixels and Quality Level Choose the number of pixels (size) and quality level (data compression rate) of ...
User Manual
Page 70
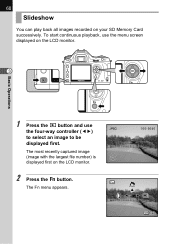
The most recently captured image (image with the largest file number) is displayed first on your SD Memory Card successively. Fn The Fn menu appears. 100-0046 OK Exit 68 Slideshow You can play back all images recorded on the LCD monitor. 2 Press the { button. To start continuous playback, use the menu screen displayed on the LCD monitor. 3 Basic Operations 1 Press the Q button and use the four-way controller (45) to select an image to be displayed first.
The most recently captured image (image with the largest file number) is displayed first on your SD Memory Card successively. Fn The Fn menu appears. 100-0046 OK Exit 68 Slideshow You can play back all images recorded on the LCD monitor. 2 Press the { button. To start continuous playback, use the menu screen displayed on the LCD monitor. 3 Basic Operations 1 Press the Q button and use the four-way controller (45) to select an image to be displayed first.
User Manual
Page 79
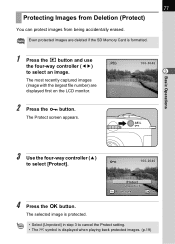
... Deletion (Protect) You can protect images from being accidentally erased. The most recently captured images (image with the largest file number) are deleted if the SD Memory Card is protected. • Select [Unprotect] in step 3 to select [Protect]. 100-0046 Protect Unprotect All images OK OK 4 Press the 4 button. The selected image...
... Deletion (Protect) You can protect images from being accidentally erased. The most recently captured images (image with the largest file number) are deleted if the SD Memory Card is protected. • Select [Unprotect] in step 3 to select [Protect]. 100-0046 Protect Unprotect All images OK OK 4 Press the 4 button. The selected image...
User Manual
Page 80
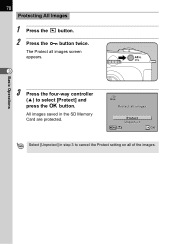
The Protect all images screen appears. 3 Basic Operations 3 Press the four-way controller (2) to cancel the Protect setting on all images Protect Unprotect OK OK Select [Unprotect] in the SD Memory Card are protected. Protect all of the images. All images saved in step 3 to select [Protect] and press the 4 button. 78 Protecting All Images 1 Press the Q button. 2 Press the Z button twice.
The Protect all images screen appears. 3 Basic Operations 3 Press the four-way controller (2) to cancel the Protect setting on all images Protect Unprotect OK OK Select [Unprotect] in the SD Memory Card are protected. Protect all of the images. All images saved in step 3 to select [Protect] and press the 4 button. 78 Protecting All Images 1 Press the Q button. 2 Press the Z button twice.
User Manual
Page 81
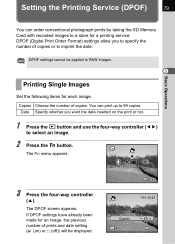
... print up to imprint the date. Copies Choose the number of copies or to 99 copies. You can order conventional photograph prints by taking the SD Memory Card with recorded images to a store for each image. OK Exit 100-0046 Copies Date Fn All images 00 OK OK The DPOF screen appears.... DPOF (Digital Print Order Format) settings allow you want the date inserted on ) or P (off)) will be applied to RAW images. 3 Printing Single Images Set the following...
... print up to imprint the date. Copies Choose the number of copies or to 99 copies. You can order conventional photograph prints by taking the SD Memory Card with recorded images to a store for each image. OK Exit 100-0046 Copies Date Fn All images 00 OK OK The DPOF screen appears.... DPOF (Digital Print Order Format) settings allow you want the date inserted on ) or P (off)) will be applied to RAW images. 3 Printing Single Images Set the following...
User Manual
Page 101
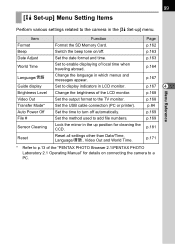
.... p.168 Transfer Mode* Set the USB cable connection (PC or printer). Item Function Page Format Format the SD Memory Card. p.169 File # Set the method used to a PC. p.171 * Refer to p.13 of the "PENTAX PHOTO Browser 2.1/PENTAX PHOTO Laboratory 2.1 Operating Manual" for cleaning the CCD. p.163 Date Adjust Set the date format and... . p.168 Video Out Set the output format to the TV monitor. 99 [H Set-up] Menu Setting Items Menu Reference Perform various settings related to the camera in the [H Set-up position for details on /off automatically.
.... p.168 Transfer Mode* Set the USB cable connection (PC or printer). Item Function Page Format Format the SD Memory Card. p.169 File # Set the method used to a PC. p.171 * Refer to p.13 of the "PENTAX PHOTO Browser 2.1/PENTAX PHOTO Laboratory 2.1 Operating Manual" for cleaning the CCD. p.163 Date Adjust Set the date format and... . p.168 Video Out Set the output format to the TV monitor. 99 [H Set-up] Menu Setting Items Menu Reference Perform various settings related to the camera in the [H Set-up position for details on /off automatically.
User Manual
Page 163
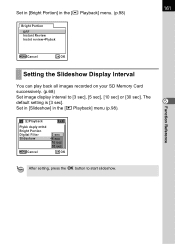
161 Set in [Bright Portion] in the [Q Playback] menu (p.98). Playback Plybk dsply mthd Bright Portion Digital Filter Slideshow Cancel 3 sec 5 sec 10 sec 30 sec OK OK After setting, press the 4 button to [3 sec], [5 sec], [10 sec] or [30 sec]. The ... OFF Instant Review Instnt review+Plybck Cancel OK OK Function Reference Setting the Slideshow Display Interval You can play back all images recorded on your SD Memory Card successively. (p.68) Set image display interval to start slideshow.
161 Set in [Bright Portion] in the [Q Playback] menu (p.98). Playback Plybk dsply mthd Bright Portion Digital Filter Slideshow Cancel 3 sec 5 sec 10 sec 30 sec OK OK After setting, press the 4 button to [3 sec], [5 sec], [10 sec] or [30 sec]. The ... OFF Instant Review Instnt review+Plybck Cancel OK OK Function Reference Setting the Slideshow Display Interval You can play back all images recorded on your SD Memory Card successively. (p.68) Set image display interval to start slideshow.

User Manual
Page 164
...] menu (p.99). 162 Camera Settings Function Reference Formatting the SD Memory Card Be sure to take pictures. When formatting is completed, the camera is ready to format new SD Memory Card with the camera before using the card. Be aware. 1 52 Select [Format] on the SD Memory Card. • Do not open the card cover while formatting SD Memory Card. Press the four...
...] menu (p.99). 162 Camera Settings Function Reference Formatting the SD Memory Card Be sure to take pictures. When formatting is completed, the camera is ready to format new SD Memory Card with the camera before using the card. Be aware. 1 52 Select [Format] on the SD Memory Card. • Do not open the card cover while formatting SD Memory Card. Press the four...
User Manual
Page 171
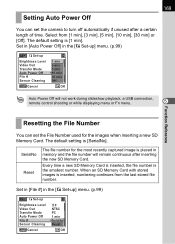
... PC 1 min SerialNo Reset OK OK The default setting is the smallest number. SerialNo Reset The file number for the images when inserting a new SD Memory Card. Set in [File #] in the [H Set-up] menu. (p.99) Set-up Brightness Level Video Out Transfer Mode Auto Power Off File #... Auto Power Off will remain continuous after a certain length of time. 169 Setting Auto Power Off You can set the camera to turn off automatically if unused after inserting the new SD Memory Card. The default setting is inserted, numbering continues from [1 min], [3 min], [5 min], [10 min], [30 min]...
... PC 1 min SerialNo Reset OK OK The default setting is the smallest number. SerialNo Reset The file number for the images when inserting a new SD Memory Card. Set in [File #] in the [H Set-up] menu. (p.99) Set-up Brightness Level Video Out Transfer Mode Auto Power Off File #... Auto Power Off will remain continuous after a certain length of time. 169 Setting Auto Power Off You can set the camera to turn off automatically if unused after inserting the new SD Memory Card. The default setting is inserted, numbering continues from [1 min], [3 min], [5 min], [10 min], [30 min]...
User Manual
Page 188
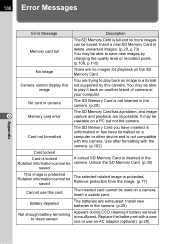
... one or use this image You are trying to play it back on another brand of camera or your computer. Use after formatting with the camera. (p.162) Card locked Card is locked A locked SD Memory Card is insufficient. Insert a new SD Memory Card or delete unwanted images. (p.29, p.73) You may be saved. Replace the battery set level...
... one or use this image You are trying to play it back on another brand of camera or your computer. Use after formatting with the camera. (p.162) Card locked Card is locked A locked SD Memory Card is insufficient. Insert a new SD Memory Card or delete unwanted images. (p.29, p.73) You may be saved. Replace the battery set level...
User Manual
Page 189
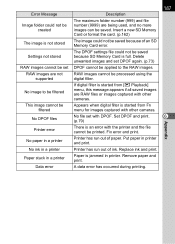
... not stored The DPOF settings file could not be saved because SD Memory Card is not stored The image could not be created The maximum folder...printing. Delete unwanted images and set DPOF again. (p.73) RAW images cannot be set with other cameras. RAW images are RAW files or images captured with DPOF. No DPOF files No file set DPOF cannot .... Fix error and print. Insert a new SD Memory Card or format the card. (p.162) The image is full. This image cannot be filtered Appears when digital filter is an error with other cameras. Set DPOF and print. 6 (p.79) Appendix...
... not stored The DPOF settings file could not be saved because SD Memory Card is not stored The image could not be created The maximum folder...printing. Delete unwanted images and set DPOF again. (p.73) RAW images cannot be set with other cameras. RAW images are RAW files or images captured with DPOF. No DPOF files No file set DPOF cannot .... Fix error and print. Insert a new SD Memory Card or format the card. (p.162) The image is full. This image cannot be filtered Appears when digital filter is an error with other cameras. Set DPOF and print. 6 (p.79) Appendix...


