
Operation Manual
Page 1
Digital Camera Operating Manual To ensure the best performance from your camera, please read the Operating Manual before using the camera.
Digital Camera Operating Manual To ensure the best performance from your camera, please read the Operating Manual before using the camera.

Operation Manual
Page 2
...99% or better, you for anything other brands or product names are placed on printers that are for purchasing the PENTAX Optio SV Digital Camera. Some functions are not available on taking pictures even for the direct printout of images. The PRINT Image Matching logo ... not function correctly when used in order to connect the printer and digital camera directly, using the Optio SV that are not PRINT Image Matching III compliant. However, this manual before using the camera in surroundings such as installations generating strong electromagnetic radiation or magnetic fields....
...99% or better, you for anything other brands or product names are placed on printers that are for purchasing the PENTAX Optio SV Digital Camera. Some functions are not available on taking pictures even for the direct printout of images. The PRINT Image Matching logo ... not function correctly when used in order to connect the printer and digital camera directly, using the Optio SV that are not PRINT Image Matching III compliant. However, this manual before using the camera in surroundings such as installations generating strong electromagnetic radiation or magnetic fields....
Operation Manual
Page 10
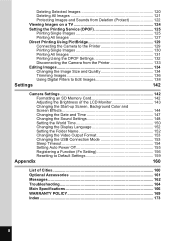
... TV 124 Setting the Printing Service (DPOF 125 Printing Single Images 125 Printing All Images 127 Direct Printing Using PictBridge 129 Connecting the Camera to the Printer 129 Printing Single Images 130 Printing All Images 131 Printing Using the DPOF Settings 132 Disconnecting the... the Printer 133 Editing Images 134 Changing the Image Size and Quality 134 Trimming Images 136 Using Digital Filters to Edit Images 138 Settings 142 Camera Settings 142 Formatting an SD Memory Card 142 Adjusting the Brightness of the LCD Monitor 143 Changing the Start-up Screen, Background ...
... TV 124 Setting the Printing Service (DPOF 125 Printing Single Images 125 Printing All Images 127 Direct Printing Using PictBridge 129 Connecting the Camera to the Printer 129 Printing Single Images 130 Printing All Images 131 Printing Using the DPOF Settings 132 Disconnecting the... the Printer 133 Editing Images 134 Changing the Image Size and Quality 134 Trimming Images 136 Using Digital Filters to Edit Images 138 Settings 142 Camera Settings 142 Formatting an SD Memory Card 142 Adjusting the Brightness of the LCD Monitor 143 Changing the Start-up Screen, Background ...

Operation Manual
Page 43
...On p.97 Time-lapse Movie For setting the frame rate when recording movies Off p.79 Digital Zoom For taking 3D pictures e (Parallel mode) p.60 Memory For saving the shooting function settings when the camera is turned off - p.104 b For setting the capture modes to register for the ...For setting the metering method to lighting AWB (Auto) p.92 Focusing Area For changing the area of time - p.99 3D Mode For taking digital zoom pictures On p.68 Instant Review For setting the Instant Review time 1 sec. Common Operations FULL Menu List [A Rec.Mode] Menu Item ...
...On p.97 Time-lapse Movie For setting the frame rate when recording movies Off p.79 Digital Zoom For taking 3D pictures e (Parallel mode) p.60 Memory For saving the shooting function settings when the camera is turned off - p.104 b For setting the capture modes to register for the ...For setting the metering method to lighting AWB (Auto) p.92 Focusing Area For changing the area of time - p.99 3D Mode For taking digital zoom pictures On p.68 Instant Review For setting the Instant Review time 1 sec. Common Operations FULL Menu List [A Rec.Mode] Menu Item ...
Operation Manual
Page 44
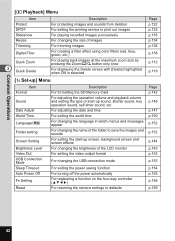
Common Operations [Q Playback] Menu Item Protect DPOF Slideshow Resize Trimming Digital Filter Quick Zoom 3 Quick Delete Description For protecting images and sounds from deletion For setting the printing service to defaults p.154 p.155 p.156 p.159 42 ... p.153 For setting the power saving function For turning off the power automatically For registering a function on the four-way controller (2345) For returning the camera settings to print out images For playing recorded images successively For changing the size of images For trimming images For creating a filter effect using color...
Common Operations [Q Playback] Menu Item Protect DPOF Slideshow Resize Trimming Digital Filter Quick Zoom 3 Quick Delete Description For protecting images and sounds from deletion For setting the printing service to defaults p.154 p.155 p.156 p.159 42 ... p.153 For setting the power saving function For turning off the power automatically For registering a function on the four-way controller (2345) For returning the camera settings to print out images For playing recorded images successively For changing the size of images For trimming images For creating a filter effect using color...

Operation Manual
Page 59
... Movie mode. Taking Pictures Keeping the Shutter Release Button Pressed If you keep the button pressed. Use the LCD monitor when recording movies using the digital zoom. • The optical zoom can be used when shooting movies in the Remote Control mode. • The movie will be recorded when [Time-lapse... pressed for more than one second, pictures will be longer when [Time-lapse Movie] is set to On. • Only the digital zoom can be used to get the camera ready for the next shooting. • The recording time of the image in the Movie mode if it is before shooting. •...
... Movie mode. Taking Pictures Keeping the Shutter Release Button Pressed If you keep the button pressed. Use the LCD monitor when recording movies using the digital zoom. • The optical zoom can be used when shooting movies in the Remote Control mode. • The movie will be recorded when [Time-lapse... pressed for more than one second, pictures will be longer when [Time-lapse Movie] is set to On. • Only the digital zoom can be used to get the camera ready for the next shooting. • The recording time of the image in the Movie mode if it is before shooting. •...

Operation Manual
Page 69
..."Viewing Digital Camera Images on the left of the image appears in the Panorama Assist mode. Use the panorama softwares supplied with the camera (ACDSee for instructions on creating panorama pictures. • Continuous shooting is not possible in half-transparent form on a PC" for PENTAX and ACD... photostitcher). Taking Pictures 67 Repeat Steps 5 and 6 to another mode. • The camera cannot join the images. The screen returns to Step 4. 046 7/ 7/2004 3:00 PM 4...
..."Viewing Digital Camera Images on the left of the image appears in the Panorama Assist mode. Use the panorama softwares supplied with the camera (ACDSee for instructions on creating panorama pictures. • Continuous shooting is not possible in half-transparent form on a PC" for PENTAX and ACD... photostitcher). Taking Pictures 67 Repeat Steps 5 and 6 to another mode. • The camera cannot join the images. The screen returns to Step 4. 046 7/ 7/2004 3:00 PM 4...
Operation Manual
Page 71
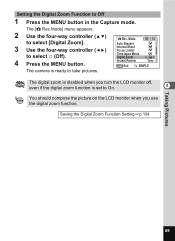
...1p.104 Taking Pictures 69 The camera is set to take pictures. Mode Auto Bracket Interval Shoot Focus Limiter Time-lapse Movie Off Digital Zoom Instant Review 1sec MENU Exit SIMPLE The digital zoom is disabled when you turn the LCD monitor off, even if the digital zoom function is ready to ...On. 4 You should compose the picture on the LCD monitor when you use the digital zoom function. Rec. The [A Rec.Mode] menu appears. 2 Use the four-way controller (23) to select [Digital Zoom]. 3 Use the four-way controller (45) to Off 1 Press the MENU button in the...
...1p.104 Taking Pictures 69 The camera is set to take pictures. Mode Auto Bracket Interval Shoot Focus Limiter Time-lapse Movie Off Digital Zoom Instant Review 1sec MENU Exit SIMPLE The digital zoom is disabled when you turn the LCD monitor off, even if the digital zoom function is ready to ...On. 4 You should compose the picture on the LCD monitor when you use the digital zoom function. Rec. The [A Rec.Mode] menu appears. 2 Use the four-way controller (23) to select [Digital Zoom]. 3 Use the four-way controller (45) to Off 1 Press the MENU button in the...

Operation Manual
Page 75
... change the magnification using the Zoom button and take pictures using the shutter button. 1 Press the gh button in the Remote Control mode when the camera is set to display i or h on the 046 remote control unit. The self-timer lamp blinks slowly and the... camera is ready to take pictures using the remote control unit. 2 Press the Zoom button on the LCD monitor. The zoom bar is pressed. • The digital zoom cannot be used in the Remote Control mode. • The zoom...
... change the magnification using the Zoom button and take pictures using the shutter button. 1 Press the gh button in the Remote Control mode when the camera is set to display i or h on the 046 remote control unit. The self-timer lamp blinks slowly and the... camera is ready to take pictures using the remote control unit. 2 Press the Zoom button on the LCD monitor. The zoom bar is pressed. • The digital zoom cannot be used in the Remote Control mode. • The zoom...
Operation Manual
Page 99
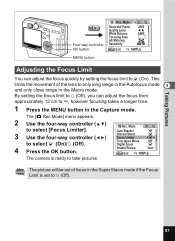
... focus in the Super Macro mode if the Focus Limit is ready to P (Off). 97 The camera is set to take pictures. Rec. Mode Auto Bracket Interval Shoot Focus Limiter Time-lapse Movie Off Digital Zoom Instant Review 1sec MENU Exit SIMPLE The picture will be out of the lens to ∞...
... focus in the Super Macro mode if the Focus Limit is ready to P (Off). 97 The camera is set to take pictures. Rec. Mode Auto Bracket Interval Shoot Focus Limiter Time-lapse Movie Off Digital Zoom Instant Review 1sec MENU Exit SIMPLE The picture will be out of the lens to ∞...
Operation Manual
Page 101
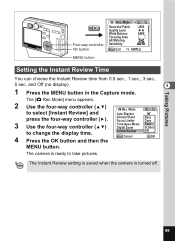
and Off (no display). 4 1 Press the MENU button in the Capture mode. The Instant Review setting is saved when the camera is ready to change the display time. 4 Press the OK button and then the Rec. Taking Pictures MENU Four-way controller OK button Rec. ...Mode Auto Bracket Interval Shoot Focus Limiter Time-lapse Movie Digital Zoom Instant Review MENU Cancel 5sec 3sec 1sec 0.5sec OAfUfTO OK OK MENU button. The camera is turned off. 99 Mode Recorded Pixels Quality Level White Balance Focusing Area AE Metering Sensitivity 2560...
and Off (no display). 4 1 Press the MENU button in the Capture mode. The Instant Review setting is saved when the camera is ready to change the display time. 4 Press the OK button and then the Rec. Taking Pictures MENU Four-way controller OK button Rec. ...Mode Auto Bracket Interval Shoot Focus Limiter Time-lapse Movie Digital Zoom Instant Review MENU Cancel 5sec 3sec 1sec 0.5sec OAfUfTO OK OK MENU button. The camera is turned off. 99 Mode Recorded Pixels Quality Level White Balance Focusing Area AE Metering Sensitivity 2560...

Operation Manual
Page 106
... Balance] setting on the [A Rec.Mode] menu is saved. P Sensitivity The [Sensitivity] setting on the [A Rec.Mode] menu is saved. P Digital Zoom The [Digital Zoom] setting on the qs/i button is saved. The file number is saved. Default Setting O P Focus Mode The focus mode setting on the [A...saved. If you select O (On), the settings will be reset to be saved in the status they were in immediately before the camera was turned off. P Zoom Position The optional zoom position setting on the Zoom/f/y button is saved. Taking Pictures Saving the Settings Saving...
... Balance] setting on the [A Rec.Mode] menu is saved. P Sensitivity The [Sensitivity] setting on the [A Rec.Mode] menu is saved. P Digital Zoom The [Digital Zoom] setting on the qs/i button is saved. The file number is saved. Default Setting O P Focus Mode The focus mode setting on the [A...saved. If you select O (On), the settings will be reset to be saved in the status they were in immediately before the camera was turned off. P Zoom Position The optional zoom position setting on the Zoom/f/y button is saved. Taking Pictures Saving the Settings Saving...

Operation Manual
Page 107
The camera is set to O(On) in [Memory]. • [Memory] can be saved even if [Zoom Position] is ready to take pictures. Flash 3 Drive Mode Press the ... not included in [Memory] will also be saved in the settings selected on the menus for each function when the camera is turned off. • The zoom position setting in the digital zoom range will not be set separately in the User mode and other capture modes. 1 Press the MENU button in...
The camera is set to O(On) in [Memory]. • [Memory] can be saved even if [Zoom Position] is ready to take pictures. Flash 3 Drive Mode Press the ... not included in [Memory] will also be saved in the settings selected on the menus for each function when the camera is turned off. • The zoom position setting in the digital zoom range will not be set separately in the User mode and other capture modes. 1 Press the MENU button in...

Operation Manual
Page 129
Copies 00 Date You can be printed correctly when the camera is connected directly to a PictBridge-compatible printer if the number of copies specified in the Playback mode. Prints can print up to the settings. • .... P (Off) : The date will be imprinted. 8 Press the OK button. Zoom/f/y button MENU Four-way controller OK button Playback Protect DPOF Slideshow 3sec Resize Trimming Digital Filter MENU Exit SIMPLE MENU button Printing All Images 1 Press the MENU button in the DPOF settings applies to choose the number of the Zoom...
Copies 00 Date You can be printed correctly when the camera is connected directly to a PictBridge-compatible printer if the number of copies specified in the Playback mode. Prints can print up to the settings. • .... P (Off) : The date will be imprinted. 8 Press the OK button. Zoom/f/y button MENU Four-way controller OK button Playback Protect DPOF Slideshow 3sec Resize Trimming Digital Filter MENU Exit SIMPLE MENU button Printing All Images 1 Press the MENU button in the DPOF settings applies to choose the number of the Zoom...

Operation Manual
Page 141
... the OK button and then the MENU button. The example shows the image filtered with the filter effect applied to the image and the camera is ready to select digital filter. Playback/Deleting/Editing 139 Go on the LCD monitor. The [Q Playback] menu appears. 2 Use the four-way controller (23)... to select [Digital Filter]. 3 Press the four-way controller (5). 4 Use the four-way controller (45) to choose an image to edit. 5 Press the four-way controller (...
... the OK button and then the MENU button. The example shows the image filtered with the filter effect applied to the image and the camera is ready to select digital filter. Playback/Deleting/Editing 139 Go on the LCD monitor. The [Q Playback] menu appears. 2 Use the four-way controller (23)... to select [Digital Filter]. 3 Press the four-way controller (5). 4 Use the four-way controller (45) to choose an image to edit. 5 Press the four-way controller (...

Operation Manual
Page 142
.... 8 Press the four-way controller (23) to select [Save as ...] or [Save]. 9 Press the OK button and then the MENU button. You can display the Digital Filter screen simply by pressing the Fn button. (1p.157) You cannot apply the slim filter on an image captured in the 3D or Panorama... (23) to capture or play back images. Playback/Deleting/Editing 140 The image is saved with the filter effect applied to the image and the camera is ready to select [Save as ...] or [Save]. 9 Press the OK button and then the MENU button. 6 The image is saved with the filter effect...
.... 8 Press the four-way controller (23) to select [Save as ...] or [Save]. 9 Press the OK button and then the MENU button. You can display the Digital Filter screen simply by pressing the Fn button. (1p.157) You cannot apply the slim filter on an image captured in the 3D or Panorama... (23) to capture or play back images. Playback/Deleting/Editing 140 The image is saved with the filter effect applied to the image and the camera is ready to select [Save as ...] or [Save]. 9 Press the OK button and then the MENU button. 6 The image is saved with the filter effect...

Operation Manual
Page 168
...Open DML Motion JPEG), streaming recording, approx. 30 fps, with sound Sound WAV (ADPCM system), monaural, max. White Balance Lens 8 Digital Zoom Viewfinder LCD Monitor Auto, Daylight, Shade, Tungsten Light, Fluorescent Light, Manual Focal Length 5.8 mm - 29 mm (equivalent to 20...274 Approx. 349 Movie (320×240) Approx. 158 sec. Main Specifications Camera Type Effective Pixels Sensor Recorded Pixels Sensitivity File Format Quality Level Storage Medium Fully automatic compact digital still camera with built-in 8 groups (two single-faced aspherical lenses) Zoom Type Electrically ...
...Open DML Motion JPEG), streaming recording, approx. 30 fps, with sound Sound WAV (ADPCM system), monaural, max. White Balance Lens 8 Digital Zoom Viewfinder LCD Monitor Auto, Daylight, Shade, Tungsten Light, Fluorescent Light, Manual Focal Length 5.8 mm - 29 mm (equivalent to 20...274 Approx. 349 Movie (320×240) Approx. 158 sec. Main Specifications Camera Type Effective Pixels Sensor Recorded Pixels Sensitivity File Format Quality Level Storage Medium Fully automatic compact digital still camera with built-in 8 groups (two single-faced aspherical lenses) Zoom Type Electrically ...
Operation Manual
Page 174
..., Parts 2 and 15 for ensuring that the equipment complies with the standards of 47CFR §15.101 to §15.109. 8 Product Name: PENTAX Digital Still Camera Model Number: Optio SV Contact person: Customer Service Manager Date and Place: September, 2004, Colorado Appendix 172 Operation is identical to the representative unit tested and found to...
..., Parts 2 and 15 for ensuring that the equipment complies with the standards of 47CFR §15.101 to §15.109. 8 Product Name: PENTAX Digital Still Camera Model Number: Optio SV Contact person: Customer Service Manager Date and Place: September, 2004, Colorado Appendix 172 Operation is identical to the representative unit tested and found to...


