
Operation Manual
Page 3
...warnings are not heeded. Continued use with this product. The use of an AC adapter other irregularity, stop using the camera immediately, remove the battery or disconnect the AC adapter and contact your neck is possible that the user may experience serious difficulties if the warnings... are not heeded. These symbols indicate that it being dropped, please do not hang the strap around your nearest PENTAX service center. About the Camera Warning...
...warnings are not heeded. Continued use with this product. The use of an AC adapter other irregularity, stop using the camera immediately, remove the battery or disconnect the AC adapter and contact your neck is possible that the user may experience serious difficulties if the warnings... are not heeded. These symbols indicate that it being dropped, please do not hang the strap around your nearest PENTAX service center. About the Camera Warning...
Operation Manual
Page 4
... discharge the flash while it is touching your eyes, do not dispose of the battery in your skin or eyes or in fire, as it becomes hot or begins to get inside the product, consult a PENTAX Service Center. Use with water. • Should the LCD be damaged, be...shock. • If the generation of smoke or strange odor from the camera immediately if it may explode. • Do not charge any batteries other abnormality occurs, immediately discontinue using and consult a PENTAX Service Center. LI8. About the Battery Charging Stand D-BC23 and the AC Adapter D-AC8 Warning • Do ...
... discharge the flash while it is touching your eyes, do not dispose of the battery in your skin or eyes or in fire, as it becomes hot or begins to get inside the product, consult a PENTAX Service Center. Use with water. • Should the LCD be damaged, be...shock. • If the generation of smoke or strange odor from the camera immediately if it may explode. • Do not charge any batteries other abnormality occurs, immediately discontinue using and consult a PENTAX Service Center. LI8. About the Battery Charging Stand D-BC23 and the AC Adapter D-AC8 Warning • Do ...
Operation Manual
Page 8
...Package 10 Names of Parts 11 Names of Operating Parts 12 Getting Started 13 Attaching the Strap 13 Powering the Camera 14 Installing the Battery 14 Removing the Battery 14 Charging the Battery 15 Using the AC Adapter (optional 19 Installing the SD Memory Card 21 Image Size and Quality 23 Initial...Back the Previous or Next Image 29 Rotating the Displayed Image 30 Common Operations 32 Turning the Camera On and Off 32 Turning the Camera On in the Playback Mode 33 Turning the Camera On in the Voice Recording Mode 33 Using the Button Functions 34 Capture Mode 34 Playback ...
...Package 10 Names of Parts 11 Names of Operating Parts 12 Getting Started 13 Attaching the Strap 13 Powering the Camera 14 Installing the Battery 14 Removing the Battery 14 Charging the Battery 15 Using the AC Adapter (optional 19 Installing the SD Memory Card 21 Image Size and Quality 23 Initial...Back the Previous or Next Image 29 Rotating the Displayed Image 30 Common Operations 32 Turning the Camera On and Off 32 Turning the Camera On in the Playback Mode 33 Turning the Camera On in the Voice Recording Mode 33 Using the Button Functions 34 Capture Mode 34 Playback ...

Operation Manual
Page 12
For other optional accessories, refer to "Optional Accessories" (p.161). 10 Checking the Contents of the Package Camera Optio SV Strap O-ST20 (∗) Software (CD-ROM) S-SW23 AV cable I-AVC7 (∗) USB cable I-USB17 (∗) Rechargeable lithium-ion battery D-LI8 (∗) Battery charging stand D-BC23 (∗) AC plug cord D-CO2 (∗) 32 MB SD Memory Card Operating Manual (this manual) Operating Manual (PC Connection Manual) Items marked with an asterisk (∗) are also available as optional accessories.
For other optional accessories, refer to "Optional Accessories" (p.161). 10 Checking the Contents of the Package Camera Optio SV Strap O-ST20 (∗) Software (CD-ROM) S-SW23 AV cable I-AVC7 (∗) USB cable I-USB17 (∗) Rechargeable lithium-ion battery D-LI8 (∗) Battery charging stand D-BC23 (∗) AC plug cord D-CO2 (∗) 32 MB SD Memory Card Operating Manual (this manual) Operating Manual (PC Connection Manual) Items marked with an asterisk (∗) are also available as optional accessories.
Operation Manual
Page 16
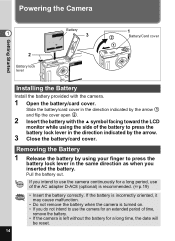
... arrow 1 and flip the cover open 2 . 2 Insert the battery with the camera. 1 Open the battery/card cover. Powering the Camera Getting Started 1 2 Battery lock lever Battery 3 1 2 Battery/Card cover 1 Installing the Battery Install the battery provided with the 2 symbol facing toward the LCD monitor while using your finger to press the battery lock lever in the same direction as when...
... arrow 1 and flip the cover open 2 . 2 Insert the battery with the camera. 1 Open the battery/card cover. Powering the Camera Getting Started 1 2 Battery lock lever Battery 3 1 2 Battery/Card cover 1 Installing the Battery Install the battery provided with the 2 symbol facing toward the LCD monitor while using your finger to press the battery lock lever in the same direction as when...
Operation Manual
Page 17
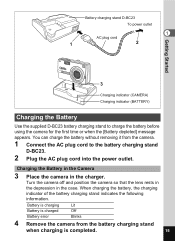
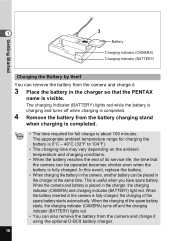
... depression in the charger. When charging the battery, the charging indicator of the battery charging stand indicates the following information. Battery charging stand D-BC23 To power outlet 1 AC plug cord 1 2 Getting Started 3 Charging indicator (CAMERA) Charging indicator (BATTERY) Charging the Battery Use the supplied D-BC23 battery charging stand to the battery charging stand D-BC23. 2 Plug the AC plug...
... depression in the charger. When charging the battery, the charging indicator of the battery charging stand indicates the following information. Battery charging stand D-BC23 To power outlet 1 AC plug cord 1 2 Getting Started 3 Charging indicator (CAMERA) Charging indicator (BATTERY) Charging the Battery Use the supplied D-BC23 battery charging stand to the battery charging stand D-BC23. 2 Plug the AC plug...
Operation Manual
Page 18
... charging indicator (CAMERA) and charging indicator (BATTERY) light red. The appropriate ambient temperature range for full charge is useful when you have spare battery. In this event, replace the battery. • When charging the battery in the charger at the same time. When the charging of its service life, the time that the PENTAX name is...
... charging indicator (CAMERA) and charging indicator (BATTERY) light red. The appropriate ambient temperature range for full charge is useful when you have spare battery. In this event, replace the battery. • When charging the battery in the charger at the same time. When the charging of its service life, the time that the PENTAX name is...
Operation Manual
Page 19
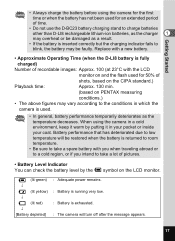
Getting Started • Always charge the battery before using the camera in a cold environment, keep it warm by the # symbol on PENTAX measuring conditions.) • The above figures may be damaged as a result. • If the battery is inserted correctly but the charging indicator fails to blink, the battery may vary according to the conditions in...
Getting Started • Always charge the battery before using the camera in a cold environment, keep it warm by the # symbol on PENTAX measuring conditions.) • The above figures may be damaged as a result. • If the battery is inserted correctly but the charging indicator fails to blink, the battery may vary according to the conditions in...

Operation Manual
Page 22
Getting Started Precautions When Using the Battery Charging Stand or AC Adapter To avoid the risk of the battery charging stand and AC adapter. 20 Refer to page 166 for the specifications of fire or electric shock when using the battery charging stand or AC adapter, be sure to read the section on "FOR SAFE USE OF 1 YOUR CAMERA" on page 1.
Getting Started Precautions When Using the Battery Charging Stand or AC Adapter To avoid the risk of the battery charging stand and AC adapter. 20 Refer to page 166 for the specifications of fire or electric shock when using the battery charging stand or AC adapter, be sure to read the section on "FOR SAFE USE OF 1 YOUR CAMERA" on page 1.

Operation Manual
Page 23
... cover. Refer to "Formatting an SD Memory Card" (p.142) for instructions on the capacity of recordable images varies depending on formatting. 1 Open the battery/card cover. To remove the card, eject the card by pressing it in the direction indicated by the arrow 1 and flip the cover open 2 . 2 ... the SD Memory Card. • Do not use . Captured images and recorded sounds are recorded on the SD Memory Card. • Make sure that the camera is facing toward the LCD monitor and push the card in until it out. Installing the SD Memory Card SD Memory Card 1 2 3 1 2 To remove ...
... cover. Refer to "Formatting an SD Memory Card" (p.142) for instructions on the capacity of recordable images varies depending on formatting. 1 Open the battery/card cover. To remove the card, eject the card by pressing it in the direction indicated by the arrow 1 and flip the cover open 2 . 2 ... the SD Memory Card. • Do not use . Captured images and recorded sounds are recorded on the SD Memory Card. • Make sure that the camera is facing toward the LCD monitor and push the card in until it out. Installing the SD Memory Card SD Memory Card 1 2 3 1 2 To remove ...
Operation Manual
Page 24
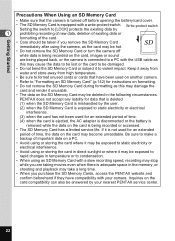
.... • Avoid using an SD Memory Card with a slow recording speed, recording may stop while you purchase the SD Memory Cards, access the PENTAX website and confirm beforehand if they have been used for an extended period of time, the data on the card may become unreadable. Getting Started... Precautions When Using an SD Memory Card • Make sure that the camera is turned off before opening the battery/card cover. • The SD Memory Card is equipped with the USB cable as the card may be hot. • Do...
.... • Avoid using an SD Memory Card with a slow recording speed, recording may stop while you purchase the SD Memory Cards, access the PENTAX website and confirm beforehand if they have been used for an extended period of time, the data on the card may become unreadable. Getting Started... Precautions When Using an SD Memory Card • Make sure that the camera is turned off before opening the battery/card cover. • The SD Memory Card is equipped with the USB cable as the card may be hot. • Do...

Operation Manual
Page 42
...; The menu is exited automatically approximately one minute after pressing the OK button to exit the menu, if you turn the camera off incorrectly (such as by removing the battery while the camera is turned on), any changes you have made to the settings will not be saved. • Even after the last...
...; The menu is exited automatically approximately one minute after pressing the OK button to exit the menu, if you turn the camera off incorrectly (such as by removing the battery while the camera is turned on), any changes you have made to the settings will not be saved. • Even after the last...
Operation Manual
Page 48
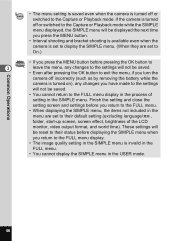
... the SIMPLE menu will be displayed the next time you press the MENU button. • Interval shooting and bracket shooting is available even when the camera is set to display the SIMPLE menu. (When they are set to On.) • If you press the MENU button before displaying the SIMPLE ...cannot display the SIMPLE menu in the SIMPLE menu. Common Operations • The menu setting is saved even when the camera is turned off incorrectly (such as by removing the battery while the camera is turned on), any changes to the settings will not be saved. • Even after pressing the OK button...
... the SIMPLE menu will be displayed the next time you press the MENU button. • Interval shooting and bracket shooting is available even when the camera is set to display the SIMPLE menu. (When they are set to On.) • If you press the MENU button before displaying the SIMPLE ...cannot display the SIMPLE menu in the SIMPLE menu. Common Operations • The menu setting is saved even when the camera is turned off incorrectly (such as by removing the battery while the camera is turned on), any changes to the settings will not be saved. • Even after pressing the OK button...

Operation Manual
Page 74
...approximately three seconds. Focusing may be compromised if you move the camera while the self-timer lamp is blinking. • The buttons on the camera can be sent from the front of the Battery for changing the battery.) 72 gh button Taking Pictures Using the Remote Control Unit (optional...mode and take pictures. 2 Press the shutter release button 7/ 7/2004 3:00 PM on the remote control unit. Contact your nearest PENTAX customer service center if the battery needs changing. (A charge is required for the Remote Control Unit A signal can be used in the normal way. • ...
...approximately three seconds. Focusing may be compromised if you move the camera while the self-timer lamp is blinking. • The buttons on the camera can be sent from the front of the Battery for changing the battery.) 72 gh button Taking Pictures Using the Remote Control Unit (optional...mode and take pictures. 2 Press the shutter release button 7/ 7/2004 3:00 PM on the remote control unit. Contact your nearest PENTAX customer service center if the battery needs changing. (A charge is required for the Remote Control Unit A signal can be used in the normal way. • ...

Operation Manual
Page 131
... a printer, if the printer settings are recommended to use the AC adapter D-AC8 (optional) while the camera is connected to the printer. • Do not disconnect the USB cable during data transfer. • Depending...camera after it has been connected to the printer. • You are changed (such as paper size and DPOF settings) may be valid. Playback/Deleting/Editing 129 The printer may not work properly or the image data may be damaged if the battery... runs out of power while the camera is connected to the printer using a PC.
... a printer, if the printer settings are recommended to use the AC adapter D-AC8 (optional) while the camera is connected to the printer. • Do not disconnect the USB cable during data transfer. • Depending...camera after it has been connected to the printer. • You are changed (such as paper size and DPOF settings) may be valid. Playback/Deleting/Editing 129 The printer may not work properly or the image data may be damaged if the battery... runs out of power while the camera is connected to the printer using a PC.

Operation Manual
Page 163
... D-BC8 USB cable I-USB17 (∗) AV cable I-AVC7 (∗) Camera case O-CC23 Strap O-ST20 (∗) / O-ST24 Remote control unit F Remote control unit E (Supporting the Zoom function) Rechargeable lithium-ion battery D-LI8 (∗) Battery charging stand D-BC23 (∗) AC plug cord D-CO2 (∗) 8 D-CO2A Australia D-CO2B United Kingdom D-CO2E Europe D-CO2H Hong Kong D-CO2J...
... D-BC8 USB cable I-USB17 (∗) AV cable I-AVC7 (∗) Camera case O-CC23 Strap O-ST20 (∗) / O-ST24 Remote control unit F Remote control unit E (Supporting the Zoom function) Rechargeable lithium-ion battery D-LI8 (∗) Battery charging stand D-BC23 (∗) AC plug cord D-CO2 (∗) 8 D-CO2A Australia D-CO2B United Kingdom D-CO2E Europe D-CO2H Hong Kong D-CO2J...

Operation Manual
Page 164
... menu operation and mode change are trying to play back an image or sound in the camera. Battery depleted Cannot save image The battery is write-protected. Turn off the camera and insert the SD Memory Card. Recharge the battery or replace with this image or 8 sound Deleting You are possible. Image folder could not...
... menu operation and mode change are trying to play back an image or sound in the camera. Battery depleted Cannot save image The battery is write-protected. Turn off the camera and insert the SD Memory Card. Recharge the battery or replace with this image or 8 sound Deleting You are possible. Image folder could not...

Operation Manual
Page 166
... not reach the background even with (4) symbol towards back of camera. (p.14) Battery power is too far a dark environment, away. Set the camera to see hard to the . Shutter will not Battery is not installed Check battery is dark When taking pictures outside in sunlight. Battery is charging and no pictures can be hard to see...
... not reach the background even with (4) symbol towards back of camera. (p.14) Battery power is too far a dark environment, away. Set the camera to see hard to the . Shutter will not Battery is not installed Check battery is dark When taking pictures outside in sunlight. Battery is charging and no pictures can be hard to see...

Operation Manual
Page 171
...charge, and only after you within that you are sending it to the complicated customs procedures required. WARRANTY POLICY All PENTAX cameras purchased through authorized bona fide photographic distribution channels are sending it directly to the manufacturer. Always obtain a quotation for ... of impact, sand or liquid damage, mishandling, tampering, battery or chemical corrosion, operation contrary to the manufacturer. Service will be rendered, and defective parts will apply. Before sending your PENTAX was purchased outside of the manufacturer or its representatives will...
...charge, and only after you within that you are sending it to the complicated customs procedures required. WARRANTY POLICY All PENTAX cameras purchased through authorized bona fide photographic distribution channels are sending it directly to the manufacturer. Always obtain a quotation for ... of impact, sand or liquid damage, mishandling, tampering, battery or chemical corrosion, operation contrary to the manufacturer. Service will be rendered, and defective parts will apply. Before sending your PENTAX was purchased outside of the manufacturer or its representatives will...

