
Operation Manual
Page 10
...143 Shooting Settings 153 Setting the Image Processing Method in Capture Mode (Custom Image 154 Setting the File Format 156 Setting the JPEG Recorded Pixels 156 Setting the JPEG Quality Level 157 Setting the File Format 158 Setting the RAW Button Function 159 Setting the White Balance 160 Setting the Color Space 167 Playback Functions 169 How to Operate the Menus During Playback 170 [Q Playback] Menu Setting Items 170 [A Custom Setting] Menu Setting Items 170 Playback Fn Menu Setting Items 171 Rotating Images 172 Enlarging Playback Images 173 Displaying Multiple Images 175...
...143 Shooting Settings 153 Setting the Image Processing Method in Capture Mode (Custom Image 154 Setting the File Format 156 Setting the JPEG Recorded Pixels 156 Setting the JPEG Quality Level 157 Setting the File Format 158 Setting the RAW Button Function 159 Setting the White Balance 160 Setting the Color Space 167 Playback Functions 169 How to Operate the Menus During Playback 170 [Q Playback] Menu Setting Items 170 [A Custom Setting] Menu Setting Items 170 Playback Fn Menu Setting Items 171 Rotating Images 172 Enlarging Playback Images 173 Displaying Multiple Images 175...

Operation Manual
Page 11
... 207 Setting Transfer Mode 208 Connecting the Camera to the Printer 209 Printing Single Images 210 Printing All Images 212 Printing Images Using the DPOF Settings 213 Disconnecting the USB Cable 213 Camera Settings 215 How to Operate the [R Set-up] Menu 216 [R Set-up] Menu Setting Items 216 Formatting the SD Memory Card 218 Setting the Beep Setting, Date and Time, and Display Language 219 Turning the Beep On and Off 219 Changing the Date and Time and the Display Style 220 Setting the World Time 221 Setting the Display Language 224 Adjusting...
... 207 Setting Transfer Mode 208 Connecting the Camera to the Printer 209 Printing Single Images 210 Printing All Images 212 Printing Images Using the DPOF Settings 213 Disconnecting the USB Cable 213 Camera Settings 215 How to Operate the [R Set-up] Menu 216 [R Set-up] Menu Setting Items 216 Formatting the SD Memory Card 218 Setting the Beep Setting, Date and Time, and Display Language 219 Turning the Beep On and Off 219 Changing the Date and Time and the Display Style 220 Setting the World Time 221 Setting the Display Language 224 Adjusting...

Operation Manual
Page 13
... Operating Manual This Operating Manual contains the following chapters. 1 Before Using Your Camera 1 Explains camera characteristics, accessories and the names and functions of various parts. 2 Getting Started 2 Explains your first steps from the Camera Explains the procedures for setting the print settings and printing still pictures while directly connected to a printer. 10 10 Camera Settings Explains the procedures for changing the camera settings, such as the monitor settings 11 and the image file naming convention. 11 Resetting to Default Settings...
... Operating Manual This Operating Manual contains the following chapters. 1 Before Using Your Camera 1 Explains camera characteristics, accessories and the names and functions of various parts. 2 Getting Started 2 Explains your first steps from the Camera Explains the procedures for setting the print settings and printing still pictures while directly connected to a printer. 10 10 Camera Settings Explains the procedures for changing the camera settings, such as the monitor settings 11 and the image file naming convention. 11 Resetting to Default Settings...
Operation Manual
Page 16
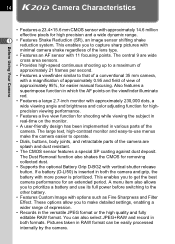
... pictures with approximately 230,000 dots, a wide viewing angle and brightness and color adjusting function for highprecision viewing performance. • Features a live view function for easier manual focusing. A menu item also allows you to that of a conventional 35 mm camera, with more power is prioritized. These options allow you to prioritize a battery and use menus make detailed settings, enabling a wider range of expression. • Records in both the camera...
... pictures with approximately 230,000 dots, a wide viewing angle and brightness and color adjusting function for highprecision viewing performance. • Features a live view function for easier manual focusing. A menu item also allows you to that of a conventional 35 mm camera, with more power is prioritized. These options allow you to prioritize a battery and use menus make detailed settings, enabling a wider range of expression. • Records in both the camera...

Operation Manual
Page 20
... Settings] menu (p.73). 2 1 Before Using Your Camera 3 4 5 9 0 a b c d 1 Green button Sets the Exposure mode to Automatic Exposure (p.85, p.92, p.95) and resets the settings (p.101, p.136). 2 Shutter release button Press to capture images. (p.57) 8 7 6 m l k j i h g f e 3 Main switch Move to turn the power on/off (p.44) or to preview (p.114). 4 Front e-dial Sets shutter speed and EV compensation values. 5 Lens unlock button Press to detach lens. (p.51) 18 Capture Mode Functions of buttons, dials and levers used during shooting are noted. * The factory default settings...
... Settings] menu (p.73). 2 1 Before Using Your Camera 3 4 5 9 0 a b c d 1 Green button Sets the Exposure mode to Automatic Exposure (p.85, p.92, p.95) and resets the settings (p.101, p.136). 2 Shutter release button Press to capture images. (p.57) 8 7 6 m l k j i h g f e 3 Main switch Move to turn the power on/off (p.44) or to preview (p.114). 4 Front e-dial Sets shutter speed and EV compensation values. 5 Lens unlock button Press to detach lens. (p.51) 18 Capture Mode Functions of buttons, dials and levers used during shooting are noted. * The factory default settings...

Operation Manual
Page 46
... perform any operations within a set to power off automatically after the camera turns off the camera. Getting Started • Always turn the camera off when not in use. • The power will turn on the [R Set-up] menu. (p.233) To reactivate the camera after 1 minute of time. You can change the setting with [Auto Power Off] on . Move the main switch to [OFF] position to [ON] position. 44 Turning the Camera On and...
... perform any operations within a set to power off automatically after the camera turns off the camera. Getting Started • Always turn the camera off when not in use. • The power will turn on the [R Set-up] menu. (p.233) To reactivate the camera after 1 minute of time. You can change the setting with [Auto Power Off] on . Move the main switch to [OFF] position to [ON] position. 44 Turning the Camera On and...

Operation Manual
Page 57
... pressing the shutter release button. 1 Set the mode dial to l. In l, the lens automatically focuses when the shutter release button is focused, the shutter can be released. (p.104) 55 Letting the Camera Choose the Optimal Settings The u features various Capture modes, Focus modes, and Drive modes suited for your intentions. This section explains how to take pictures by the camera and the shutter speed and aperture are automatically set. (p.83) Basic Operations 2 Set the focus mode lever...
... pressing the shutter release button. 1 Set the mode dial to l. In l, the lens automatically focuses when the shutter release button is focused, the shutter can be released. (p.104) 55 Letting the Camera Choose the Optimal Settings The u features various Capture modes, Focus modes, and Drive modes suited for your intentions. This section explains how to take pictures by the camera and the shutter speed and aperture are automatically set. (p.83) Basic Operations 2 Set the focus mode lever...

Operation Manual
Page 67
... occur. Set [Focal Length] manually on the Shake Reduction switch. Mode] (The menu items cannot be automatically acquired even when the Shake Reduction function is used with a tripod. • The Shake Reduction function will not fully work when shooting with Blurred picture the Shake Reduction function Basic Operations • The Shake Reduction function does not compensate for example when shooting a moving subject, increase the shutter speed. •...
... occur. Set [Focal Length] manually on the Shake Reduction switch. Mode] (The menu items cannot be automatically acquired even when the Shake Reduction function is used with a tripod. • The Shake Reduction function will not fully work when shooting with Blurred picture the Shake Reduction function Basic Operations • The Shake Reduction function does not compensate for example when shooting a moving subject, increase the shutter speed. •...

Operation Manual
Page 68
... Reduction function turns on the [Input Focal Length] setting menu. 1 Setting the Shake Reduction Function (p.67) • Turn the Shake Reduction switch off in the following situations. When using the camera with any u compatible PENTAX lens. The camera is used (p.65), the [Input Focal Length] menu appears. self-timer, remote control shooting, 3 sec. Using Aperture Ring]" (p.251) for about 2 seconds) right after turning on the camera or restoring from Auto Power Off. 66 Turning On the Shake Reduction Function 1 3 Turn...
... Reduction function turns on the [Input Focal Length] setting menu. 1 Setting the Shake Reduction Function (p.67) • Turn the Shake Reduction switch off in the following situations. When using the camera with any u compatible PENTAX lens. The camera is used (p.65), the [Input Focal Length] menu appears. self-timer, remote control shooting, 3 sec. Using Aperture Ring]" (p.251) for about 2 seconds) right after turning on the camera or restoring from Auto Power Off. 66 Turning On the Shake Reduction Function 1 3 Turn...

Operation Manual
Page 76
... remote control when set to use Autofocus when shooting with a high ISO. p.80 19. Color temp. e-dial in K mode Sets the e-dials in the viewfinder. e-dial in c mode Sets the e-dials in L (Shutter and Aperture Priority) mode or a (Hyper-manual) p.95 mode. 27. Green button in L & a the Green button is released from three levels. p.29 28. Release when Charging Sets to the preview position (|). Preview Method Sets Preview Method when the main switch is turned...
... remote control when set to use Autofocus when shooting with a high ISO. p.80 19. Color temp. e-dial in K mode Sets the e-dials in the viewfinder. e-dial in c mode Sets the e-dials in L (Shutter and Aperture Priority) mode or a (Hyper-manual) p.95 mode. 27. Green button in L & a the Green button is released from three levels. p.29 28. Release when Charging Sets to the preview position (|). Preview Method Sets Preview Method when the main switch is turned...

Operation Manual
Page 123
... before taking a picture, no more available memory. • If Auto Power Off (p.233) turns the camera off or turning the mode dial. • This function cannot be used together with Instant Review, they cannot be used during interval shooting, the camera automatically turns on the back of the camera or press the shutter release button and the 3 button to display the exit confirmation screen, and then use of the provided PENTAX REMOTE Assistant 3 when the camera is connected...
... before taking a picture, no more available memory. • If Auto Power Off (p.233) turns the camera off or turning the mode dial. • This function cannot be used together with Instant Review, they cannot be used during interval shooting, the camera automatically turns on the back of the camera or press the shutter release button and the 3 button to display the exit confirmation screen, and then use of the provided PENTAX REMOTE Assistant 3 when the camera is connected...
Operation Manual
Page 129
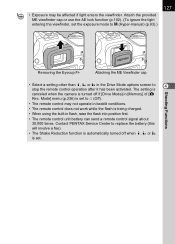
... if [Drive Mode] in flash, raise the flash into position first. • The remote control unit battery can send a remote control signal about 30,000 times. Attach the provided ME viewfinder cap or use the AE lock function (p.102). (To ignore the light entering the viewfinder, set . The setting is canceled when the camera is turned off when h, i or i is set the exposure mode to a (Hyper-manual) (p.93).) 127 Shooting Functions Removing the Eyecup...
... if [Drive Mode] in flash, raise the flash into position first. • The remote control unit battery can send a remote control signal about 30,000 times. Attach the provided ME viewfinder cap or use the AE lock function (p.102). (To ignore the light entering the viewfinder, set . The setting is canceled when the camera is turned off when h, i or i is set the exposure mode to a (Hyper-manual) (p.93).) 127 Shooting Functions Removing the Eyecup...

Operation Manual
Page 135
....6 AdobeRGB MENU OK OK Changing the Settings in A Mode You can also perform settings when the mode dial is turned off, the saved settings are registered in [USER] in the [A USER] menu. Storing User Settings 133 Shooting Functions You can store the current camera settings and easily retrieve them simply by setting the mode dial to A. The following settings can be stored. USER Exposure Mode JPEG Rec. Exposure Mode Auto Sensitivity Adjustment Range Flash Mode White Balance EV Compensation Color Space Exposure Bracketing Steps...
....6 AdobeRGB MENU OK OK Changing the Settings in A Mode You can also perform settings when the mode dial is turned off, the saved settings are registered in [USER] in the [A USER] menu. Storing User Settings 133 Shooting Functions You can store the current camera settings and easily retrieve them simply by setting the mode dial to A. The following settings can be stored. USER Exposure Mode JPEG Rec. Exposure Mode Auto Sensitivity Adjustment Range Flash Mode White Balance EV Compensation Color Space Exposure Bracketing Steps...

Operation Manual
Page 218
... use the four-way controller (45) to display the [R Set-up] menu. [R Set-up ] menu. Item Function Page USER Registers the current camera settings to the camera in the [R Set-up ] Menu Setting Items Perform various settings related to USER. p.220 World Time Sets display of local date and time of a specified city in addition to display indicators in the menus. p.225 Guide display Sets to the present location on /off automatically. USB Connection*1 Sets the USB cable connection (PC or printer). p.233 p.230 Camera Settings File...
... use the four-way controller (45) to display the [R Set-up] menu. [R Set-up ] menu. Item Function Page USER Registers the current camera settings to the camera in the [R Set-up ] Menu Setting Items Perform various settings related to USER. p.220 World Time Sets display of local date and time of a specified city in addition to display indicators in the menus. p.225 Guide display Sets to the present location on /off automatically. USB Connection*1 Sets the USB cable connection (PC or printer). p.233 p.230 Camera Settings File...

Operation Manual
Page 251
... f/2.8 lens, set , but only within manual aperture range. *4 When using the Shake Reduction function DA/D FA/ FA J/FA lens [KAF, KAF2] *3 Yes - Lens [Mount type] Function Autofocus (Lens only) (With AF adapter 1.7×)*1 Manual focus (With the focus indicator)*2 (With Matte field) Eleven AF points Power zoom Aperture Priority Automatic Exposure Shutter Priority Automatic Exposure Manual Exposure P-TTL Auto Flash*4 Multi (16-segment) metering Automatic lens focal length acquirement when using the built-in the [A Custom Setting] menu. Using Aperture Ring...
... f/2.8 lens, set , but only within manual aperture range. *4 When using the Shake Reduction function DA/D FA/ FA J/FA lens [KAF, KAF2] *3 Yes - Lens [Mount type] Function Autofocus (Lens only) (With AF adapter 1.7×)*1 Manual focus (With the focus indicator)*2 (With Matte field) Eleven AF points Power zoom Aperture Priority Automatic Exposure Shutter Priority Automatic Exposure Manual Exposure P-TTL Auto Flash*4 Multi (16-segment) metering Automatic lens focal length acquirement when using the built-in the [A Custom Setting] menu. Using Aperture Ring...
Operation Manual
Page 266
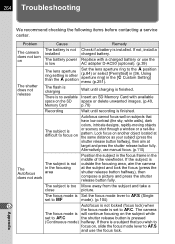
... The camera does not turn on or scenery shot through a window or a net-like pattern. There is no available Insert an SD Memory Card with a charged battery or use the AC adapter D-AC50 (optional). (p.39) The shutter does not release The lens aperture ring setting is difficult to focus on The battery is not installed The battery power is low Check if a battery is finished. If the subject is pressed (Continuous mode...
... The camera does not turn on or scenery shot through a window or a net-like pattern. There is no available Insert an SD Memory Card with a charged battery or use the AC adapter D-AC50 (optional). (p.39) The shutter does not release The lens aperture ring setting is difficult to focus on The battery is not installed The battery power is low Check if a battery is finished. If the subject is pressed (Continuous mode...

Operation Manual
Page 268
266 Main Specifications Type Effective Pixels Sensor Recorded Pixels Sensitivity (Standard output sensitivity) File Format JPEG Quality Storage Medium Number of Shots TTL autofocus, auto-exposure SLR digital-still camera with built-in retractable P-TTL flash Approx. 14.6 megapixels Total pixels approx. 15.07 megapixels, CMOS with a primary color filter X (RAW: 4672×3104 pixels), X (JPEG: 4672×3104 pixels), J (3872×2592 pixels), P (3008×...
266 Main Specifications Type Effective Pixels Sensor Recorded Pixels Sensitivity (Standard output sensitivity) File Format JPEG Quality Storage Medium Number of Shots TTL autofocus, auto-exposure SLR digital-still camera with built-in retractable P-TTL flash Approx. 14.6 megapixels Total pixels approx. 15.07 megapixels, CMOS with a primary color filter X (RAW: 4672×3104 pixels), X (JPEG: 4672×3104 pixels), J (3872×2592 pixels), P (3008×...

Operation Manual
Page 270
... ISO 100, with white balance, saturation, hue, contrast and sharpness bracketing. Can be set beep. Start by pressing the shutter release button. Appendix 268 12 LCD Panel Display Preview Function Continuous shooting (Hi/Lo) Burst Shooting Self-timer Remote Control Mirror Custom Image Exposure Bracket Extended Bracket Multi-exposure Exposure Meter/ Exposure Range EV Compensation AE Lock b is lit = Built-in flash ready, b is blinking = Flash should be used or incompatible lens is being used, 3 = Auto discharge, > = Redeye reduction, Q = Slow-speed...
... ISO 100, with white balance, saturation, hue, contrast and sharpness bracketing. Can be set beep. Start by pressing the shutter release button. Appendix 268 12 LCD Panel Display Preview Function Continuous shooting (Hi/Lo) Burst Shooting Self-timer Remote Control Mirror Custom Image Exposure Bracket Extended Bracket Multi-exposure Exposure Meter/ Exposure Range EV Compensation AE Lock b is lit = Built-in flash ready, b is blinking = Flash should be used or incompatible lens is being used, 3 = Auto discharge, > = Redeye reduction, Q = Slow-speed...
Operation Manual
Page 271
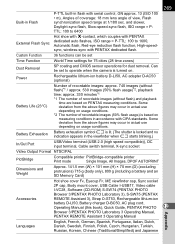
... on usage conditions. *2 The number of recordable images (50% flash usage) is locked and no indication appears in the viewfinder when ? is lit. (The shutter is based on measuring conditions in accordance with CIPA standards. starts blinking.) In/Out Port USB/Video terminal (USB 2.0 (high speed compatible)), DC input terminal, Cable switch terminal, X-sync socket Video Output Format NTSC/PAL PictBridge Compatible printer PictBridge-compatible printer Print mode Single Image, All Images, DPOF AUTOPRINT Dimensions and...
... on usage conditions. *2 The number of recordable images (50% flash usage) is locked and no indication appears in the viewfinder when ? is lit. (The shutter is based on measuring conditions in accordance with CIPA standards. starts blinking.) In/Out Port USB/Video terminal (USB 2.0 (high speed compatible)), DC input terminal, Cable switch terminal, X-sync socket Video Output Format NTSC/PAL PictBridge Compatible printer PictBridge-compatible printer Print mode Single Image, All Images, DPOF AUTOPRINT Dimensions and...

Operation Manual
Page 280
... Size 225 Toning 154 Trailing curtain sync 60, 140, 148 Tungsten Light (White Balance 160 TV 191 b (Shutter Priority) mode ..... 87 U USB cable 207 USB Connection 208 A Mode 133 Using aperture ring 251 Appendix 278 Print Service 204 Print Single Image 210 Printer connection 209 Program Line 82 Program Mode e 84 Protect 189 Z (Protect) button .......21, 189 P-TTL (Flash 148 P-TTL Auto (Flash 144 Q Quality Level 42, 157 R RAW 158 | button 19, 158, 159 RAW Display 197 RAW file format...
... Size 225 Toning 154 Trailing curtain sync 60, 140, 148 Tungsten Light (White Balance 160 TV 191 b (Shutter Priority) mode ..... 87 U USB cable 207 USB Connection 208 A Mode 133 Using aperture ring 251 Appendix 278 Print Service 204 Print Single Image 210 Printer connection 209 Program Line 82 Program Mode e 84 Protect 189 Z (Protect) button .......21, 189 P-TTL (Flash 148 P-TTL Auto (Flash 144 Q Quality Level 42, 157 R RAW 158 | button 19, 158, 159 RAW Display 197 RAW file format...


