

User Manual
Page 1
SLR Digital Camera Operating Manual For optimum camera performance, please read the Operating Manual before using the camera.
SLR Digital Camera Operating Manual For optimum camera performance, please read the Operating Manual before using the camera.

User Manual
Page 2
...this has no effect on printers that are different from the camera through a few simple operations. • There is 99.99% or better, you should be a valuable tool in this PENTAX x Digital Camera. This product includes DNG technology under license by Adobe Systems ...Incorporated. This product supports PRINT Image Matching III. The PRINT Image Matching logo is manufactured using the camera in the Copyright Act, and care should not...
...this has no effect on printers that are different from the camera through a few simple operations. • There is 99.99% or better, you should be a valuable tool in this PENTAX x Digital Camera. This product includes DNG technology under license by Adobe Systems ...Incorporated. This product supports PRINT Image Matching III. The PRINT Image Matching logo is manufactured using the camera in the Copyright Act, and care should not...

User Manual
Page 3
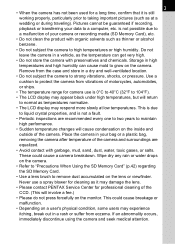
... cause an electrical shock. • Always use immediately, remove the batteries or the AC adapter, and contact your nearest PENTAX Service Center. 1 FOR USING YOUR CAMERA SAFELY We have paid close attention to the safety of this product, we request your special attention regarding items marked with ... by mistake, keep the SD Memory Card out of the reach of eyesight. • Be sure to dropping or otherwise damaging the camera, never touch the exposed portion. Continued use of children. Warning Caution This symbol indicates that violating this item could cause minor or medium...
... cause an electrical shock. • Always use immediately, remove the batteries or the AC adapter, and contact your nearest PENTAX Service Center. 1 FOR USING YOUR CAMERA SAFELY We have paid close attention to the safety of this product, we request your special attention regarding items marked with ... by mistake, keep the SD Memory Card out of the reach of eyesight. • Be sure to dropping or otherwise damaging the camera, never touch the exposed portion. Continued use of children. Warning Caution This symbol indicates that violating this item could cause minor or medium...

User Manual
Page 4
... with a new one end with a molded-on female connector body (with a specified NEMA configuration), and the other is the risk of the camera heat up during removal. • Some portions of low temperature burns when holding such portions for long periods. • Do not place your ...finger over or cover the flash with regard to polarity (+ and -) marked on the batteries and the camera. There is provided with a molded-on male attachment plug cap (with a specified IEC nonindustrial type configuration) or the equivalent. The batteries could result...
... with a new one end with a molded-on female connector body (with a specified NEMA configuration), and the other is the risk of the camera heat up during removal. • Some portions of low temperature burns when holding such portions for long periods. • Do not place your ...finger over or cover the flash with regard to polarity (+ and -) marked on the batteries and the camera. There is provided with a molded-on male attachment plug cap (with a specified IEC nonindustrial type configuration) or the equivalent. The batteries could result...
User Manual
Page 5
.... If an abnormality occurs, immediately discontinue using the camera and seek medical attention. 3 • When the camera has not been used for a long time, confirm that it may damage the lens. • Please contact PENTAX Service Center for cleaning as it is not possible due to a malfunction of ...your data to a computer, etc. Do not leave the camera in a dry and well-ventilated location. • Do not subject the camera to strong vibrations, shocks, or pressure...
.... If an abnormality occurs, immediately discontinue using the camera and seek medical attention. 3 • When the camera has not been used for a long time, confirm that it may damage the lens. • Please contact PENTAX Service Center for cleaning as it is not possible due to a malfunction of ...your data to a computer, etc. Do not leave the camera in a dry and well-ventilated location. • Do not subject the camera to strong vibrations, shocks, or pressure...

User Manual
Page 6
Thank you complete the product registration, which can be found on the CD-ROM supplied with the camera or on the PENTAX website. Refer to better serve you, we request that you for more information. 4 Regarding Product Registration In order to the PENTAX PHOTO Browser 3/PENTAX PHOTO Laboratory 3 Operating Manual (Windows users: p.9, Mac OS users: p.10) for your cooperation.
Thank you complete the product registration, which can be found on the CD-ROM supplied with the camera or on the PENTAX website. Refer to better serve you, we request that you for more information. 4 Regarding Product Registration In order to the PENTAX PHOTO Browser 3/PENTAX PHOTO Laboratory 3 Operating Manual (Windows users: p.9, Mac OS users: p.10) for your cooperation.

User Manual
Page 7
...2 Care to be Taken During Handling 2 Contents 5 Composition of the Operating Manual 11 Before Using Your Camera 13 x Camera Characteristics 14 Checking the Contents of the Package 16 Names and Functions of Working Parts 17 Camera 17 Capture Mode 18 Playback Mode 20 Display Indicators 22 Monitor 22 Viewfinder 27 LCD Panel 29... Inserting/Removing the SD Memory Card 41 Recorded Pixels and Quality Level 43 Attaching the Lens 45 Adjusting the Viewfinder Diopter 47 Turning the Camera On and Off 48 Initial Settings 49 Setting the Display Language 49 Setting the Date and Time 52
...2 Care to be Taken During Handling 2 Contents 5 Composition of the Operating Manual 11 Before Using Your Camera 13 x Camera Characteristics 14 Checking the Contents of the Package 16 Names and Functions of Working Parts 17 Camera 17 Capture Mode 18 Playback Mode 20 Display Indicators 22 Monitor 22 Viewfinder 27 LCD Panel 29... Inserting/Removing the SD Memory Card 41 Recorded Pixels and Quality Level 43 Attaching the Lens 45 Adjusting the Viewfinder Diopter 47 Turning the Camera On and Off 48 Initial Settings 49 Setting the Display Language 49 Setting the Date and Time 52

User Manual
Page 8
... 72 Deleting a Single Image 72 Shooting Functions 73 How to Operate the Shooting Menus 74 [A Rec. 6 Basic Operations 55 Basic Shooting Operation 56 Holding the Camera 56 Letting the Camera Choose the Optimal Settings 57 Using a Zoom Lens 61 Using the Built-in Focus Mode 111
... 72 Deleting a Single Image 72 Shooting Functions 73 How to Operate the Shooting Menus 74 [A Rec. 6 Basic Operations 55 Basic Shooting Operation 56 Holding the Camera 56 Letting the Camera Choose the Optimal Settings 57 Using a Zoom Lens 61 Using the Built-in Focus Mode 111

User Manual
Page 9
... Displaying the Preview 113 Continuous Shooting 115 Self-Timer Shooting 117 Remote Control Shooting (Remote Control F: Sold Separately 120 Using Mirror Up Function to Prevent Camera Shake 123 Changing the Shooting Conditions Automatically when Shooting (Auto Bracket 124 Using the Flash 127 Compensating Flash Output 128 Allowing Shooting while Charging the...
... Displaying the Preview 113 Continuous Shooting 115 Self-Timer Shooting 117 Remote Control Shooting (Remote Control F: Sold Separately 120 Using Mirror Up Function to Prevent Camera Shake 123 Changing the Shooting Conditions Automatically when Shooting (Auto Bracket 124 Using the Flash 127 Compensating Flash Output 128 Allowing Shooting while Charging the...

User Manual
Page 10
...from Multi-image Display 174 Deleting a Folder 176 Protecting Images from Deletion (Protect 177 Connecting the Camera to AV Equipment 179 Processing Images 181 Processing Images with Digital Filters 182 Editing RAW Images 185 Editing a RAW Image 185 Specifying the Parameters 186 Printing from ...the Camera 189 Setting the Printing Service (DPOF 190 Printing Single Images 190 Settings for All Images ...
...from Multi-image Display 174 Deleting a Folder 176 Protecting Images from Deletion (Protect 177 Connecting the Camera to AV Equipment 179 Processing Images 181 Processing Images with Digital Filters 182 Editing RAW Images 185 Editing a RAW Image 185 Specifying the Parameters 186 Printing from ...the Camera 189 Setting the Printing Service (DPOF 190 Printing Single Images 190 Settings for All Images ...

User Manual
Page 11
Camera Settings 9 201 How to Operate the [R Set-up] Menu 202 [R Set-up Menu 220 Resetting the Custom Function Menu 221 ...Size 210 Setting the Guide Display Time 210 Adjusting the Brightness of the Monitor 211 Setting the Display for Instant Review and Digital Preview 211 Setting the Image Folder Naming Convention 213 Selecting the Folder Name 213 Selecting the File Number Setting 213 Selecting the...Auto Power Off 214 Selecting a Battery 215 Using Pixel Mapping 216 Selecting Capture Mode Settings to Save in the Camera ...... 217 Resetting to Default Settings 219 Resetting Rec.
Camera Settings 9 201 How to Operate the [R Set-up] Menu 202 [R Set-up Menu 220 Resetting the Custom Function Menu 221 ...Size 210 Setting the Guide Display Time 210 Adjusting the Brightness of the Monitor 211 Setting the Display for Instant Review and Digital Preview 211 Setting the Image Folder Naming Convention 213 Selecting the Folder Name 213 Selecting the File Number Setting 213 Selecting the...Auto Power Off 214 Selecting a Battery 215 Using Pixel Mapping 216 Selecting Capture Mode Settings to Save in the Camera ...... 217 Resetting to Default Settings 219 Resetting Rec.
User Manual
Page 13
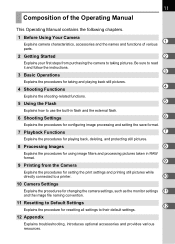
...Manual contains the following chapters. 1 Before Using Your Camera 1 Explains camera characteristics, accessories and the names and functions of various parts. 2 Getting Started 2 Explains your first steps from the Camera Explains the procedures for setting the print settings and ...Processing Images 8 Explains the procedures for using image filters and processing pictures taken in RAW format. 9 9 Printing from purchasing the camera to their default settings. 12 Appendix Explains troubleshooting, introduces optional accessories and provides various resources. Be sure to read it and ...
...Manual contains the following chapters. 1 Before Using Your Camera 1 Explains camera characteristics, accessories and the names and functions of various parts. 2 Getting Started 2 Explains your first steps from the Camera Explains the procedures for setting the print settings and ...Processing Images 8 Explains the procedures for using image filters and processing pictures taken in RAW format. 9 9 Printing from purchasing the camera to their default settings. 12 Appendix Explains troubleshooting, introduces optional accessories and provides various resources. Be sure to read it and ...

User Manual
Page 14
Shows precautions to take when operating the camera. Shows useful information. 12 The symbols used in this Operating Manual are explained below. 1 Shows reference page number explaining a related operation.
Shows precautions to take when operating the camera. Shows useful information. 12 The symbols used in this Operating Manual are explained below. 1 Shows reference page number explaining a related operation.

User Manual
Page 15
x Camera Characteristics 14 Checking the Contents of the Package 16 Names and Functions of working parts before use. 1 Before Using Your Camera Check the package contents and names and functions of Working Parts 17 Display Indicators 22 How to Operate the Menu 30 Using the Mode Dial 32 When using menus and Fn menu, items which cannot be changed due to camera settings appear gray and cannot be selected.
x Camera Characteristics 14 Checking the Contents of the Package 16 Names and Functions of working parts before use. 1 Before Using Your Camera Check the package contents and names and functions of Working Parts 17 Display Indicators 22 How to Operate the Menu 30 Using the Mode Dial 32 When using menus and Fn menu, items which cannot be changed due to camera settings appear gray and cannot be selected.

User Manual
Page 16
...alkaline batteries. • A user-friendly design has been implemented in various parts of expression. • Records in both the camera and grip, the battery set sensitivity. This enables you take pictures flexibly with the intended exposure. Also features a superimpose function ...in both formats. Before Using Your Camera 14 x Camera Characteristics • Features a 23.5×15.7 mm CCD with approximately 10.2 million effective pixels for removing collected dust. •...
...alkaline batteries. • A user-friendly design has been implemented in various parts of expression. • Records in both the camera and grip, the battery set sensitivity. This enables you take pictures flexibly with the intended exposure. Also features a superimpose function ...in both formats. Before Using Your Camera 14 x Camera Characteristics • Features a 23.5×15.7 mm CCD with approximately 10.2 million effective pixels for removing collected dust. •...

User Manual
Page 17
...shaken, such as a 150 mm lens attached to move the image sensor at high speeds, compensating camera shake. Shake Reduction (SR) Shake Reduction (SR) on the x features a PENTAX original system which uses magnetic force to a 35 mm camera 150÷1.5=100 Use a 100 mm lens with x by 1.5. Example) To capture the same ... an angle of view framing the same area, divide the focal length of a picture. 15 Before Using Your Camera The captured area (view angle) will differ between the x and 35 mm SLR cameras even if the same lens is used because the format size for 35 mm film and CCD 35 mm...
...shaken, such as a 150 mm lens attached to move the image sensor at high speeds, compensating camera shake. Shake Reduction (SR) Shake Reduction (SR) on the x features a PENTAX original system which uses magnetic force to a 35 mm camera 150÷1.5=100 Use a 100 mm lens with x by 1.5. Example) To capture the same ... an angle of view framing the same area, divide the focal length of a picture. 15 Before Using Your Camera The captured area (view angle) will differ between the x and 35 mm SLR cameras even if the same lens is used because the format size for 35 mm film and CCD 35 mm...

User Manual
Page 18
16 Checking the Contents of the Package The following accessories are included. 1 Hot shoe cover FK (Installed on camera) Eyecup FP (Installed on camera) ME Viewfinder cap Before Using Your Camera Body mount cover (Installed on camera) USB cable I-USB17 Video cable I-VC28 Software (CD-ROM) S-SW74 Strap O-ST53 Four AA lithium batteries (2 packs) Operating Manual (this manual) Quick Guide PENTAX PHOTO Browser 3/ PENTAX PHOTO Laboratory 3 Operating Manual Check that all accessories are packaged with your camera.
16 Checking the Contents of the Package The following accessories are included. 1 Hot shoe cover FK (Installed on camera) Eyecup FP (Installed on camera) ME Viewfinder cap Before Using Your Camera Body mount cover (Installed on camera) USB cable I-USB17 Video cable I-VC28 Software (CD-ROM) S-SW74 Strap O-ST53 Four AA lithium batteries (2 packs) Operating Manual (this manual) Quick Guide PENTAX PHOTO Browser 3/ PENTAX PHOTO Laboratory 3 Operating Manual Check that all accessories are packaged with your camera.

User Manual
Page 19
Names and Functions of Working 17 Parts Before Using Your Camera Camera Self-Timer lamp/ Remote control receiver Card cover Lens mount index (red dot) Lens unlock button Diopter adjustment lever Built-in Flash Cable switch terminal USB/Video terminal DC input terminal Terminal cover 1 Hot shoe Mirror Strap lug AF coupler Lens information contacts LCD panel Viewfinder Card access lamp Monitor Tripod socket Battery grip connector terminal Battery cover unlock lever Battery cover * In the illustrations above, the back and bottom sides of the camera are shown with the Eyecup FP removed.
Names and Functions of Working 17 Parts Before Using Your Camera Camera Self-Timer lamp/ Remote control receiver Card cover Lens mount index (red dot) Lens unlock button Diopter adjustment lever Built-in Flash Cable switch terminal USB/Video terminal DC input terminal Terminal cover 1 Hot shoe Mirror Strap lug AF coupler Lens information contacts LCD panel Viewfinder Card access lamp Monitor Tripod socket Battery grip connector terminal Battery cover unlock lever Battery cover * In the illustrations above, the back and bottom sides of the camera are shown with the Eyecup FP removed.

User Manual
Page 20
Depending on /off (p.48) or to preview (p.113). 4 Lens unlock button Press to detach lens. (p.46) Before Using Your Camera 1 5 2 3 6 7 4 8 c d 9 e 0 f a g b h 1 Green button Sets the Exposure mode to Automatic Exposure (p.88, p.96) and resets the settings (p.100, p.128, p.154). 2 Shutter release button Press to capture images. (p....
Depending on /off (p.48) or to preview (p.113). 4 Lens unlock button Press to detach lens. (p.46) Before Using Your Camera 1 5 2 3 6 7 4 8 c d 9 e 0 f a g b h 1 Green button Sets the Exposure mode to Automatic Exposure (p.88, p.96) and resets the settings (p.100, p.128, p.154). 2 Shutter release button Press to capture images. (p....

User Manual
Page 21
... Setting] menu (p.75, p.158). a M button Press to show shooting information on or off. (p.68) h { button Press to the Playback mode. (p.70, p.158) Before Using Your Camera c e-dial Sets the shutter speed, 1 aperture, sensitivity and EV compensation values. f 4 button Saves the setting you selected in flash. (p.62) 0 3 button Displays the [A Rec. g Shake...
... Setting] menu (p.75, p.158). a M button Press to show shooting information on or off. (p.68) h { button Press to the Playback mode. (p.70, p.158) Before Using Your Camera c e-dial Sets the shutter speed, 1 aperture, sensitivity and EV compensation values. f 4 button Saves the setting you selected in flash. (p.62) 0 3 button Displays the [A Rec. g Shake...


