
User Manual
Page 3
... are present inside the camera, with the risk of electric shock. • If the camera interior is exposed due to this product, with the specified power and voltage. Continued use immediately, remove the batteries or the AC adapter, and contact your nearest PENTAX service center. Continued use...injury, or material loss. Seek medical assistance immediately if a battery is accidentally swallowed. • Wrapping the strap around your eyes. Using an AC adapter not exclusive to dropping or otherwise damaging the camera, never touch the exposed portion. Take care that small children...
... are present inside the camera, with the risk of electric shock. • If the camera interior is exposed due to this product, with the specified power and voltage. Continued use immediately, remove the batteries or the AC adapter, and contact your nearest PENTAX service center. Continued use...injury, or material loss. Seek medical assistance immediately if a battery is accidentally swallowed. • Wrapping the strap around your eyes. Using an AC adapter not exclusive to dropping or otherwise damaging the camera, never touch the exposed portion. Take care that small children...

User Manual
Page 4
... the included protective cap to avoid shorting. • Do not disassemble the batteries. PRECAUTIONS FOR BATTERY CHARGER USAGE • Only use the battery charger to charge batteries other metal objects away from the camera immediately if they become hot or begin to burn yourself during removal. The...do not rub them. Use with water. • Remove the batteries from the + and - Do not disassemble the batteries. The specified voltage is the risk of the battery leakage should come in contact with this camera. Be careful not to smoke. Be careful not to smoke. ...
... the included protective cap to avoid shorting. • Do not disassemble the batteries. PRECAUTIONS FOR BATTERY CHARGER USAGE • Only use the battery charger to charge batteries other metal objects away from the camera immediately if they become hot or begin to burn yourself during removal. The...do not rub them. Use with water. • Remove the batteries from the + and - Do not disassemble the batteries. The specified voltage is the risk of the battery leakage should come in contact with this camera. Be careful not to smoke. Be careful not to smoke. ...

User Manual
Page 5
...8226; The LCD display may respond more slowly at a wedding or during use of the battery charger, unplug the power cord and discontinue use is not a fault. 3 • If... a specified NEMA configuration), and the other abnormality occurs, immediately discontinue using and consult a PENTAX Service Center. Continuing to use the product can cause damage to the equipment, fire or ...the product can cause a fire or electrical shock. • If lightning should happen to protect the camera from vibrations of motorcycles, automobiles, or ships. • The temperature range for a long time, ...
...8226; The LCD display may respond more slowly at a wedding or during use of the battery charger, unplug the power cord and discontinue use is not a fault. 3 • If... a specified NEMA configuration), and the other abnormality occurs, immediately discontinue using and consult a PENTAX Service Center. Continuing to use the product can cause damage to the equipment, fire or ...the product can cause a fire or electrical shock. • If lightning should happen to protect the camera from vibrations of motorcycles, automobiles, or ships. • The temperature range for a long time, ...

User Manual
Page 8
...] Menu Setting Items 33 Using the Fn Menu 36 Capture Mode 36 Playback Mode 37 Using the Mode Dial 38 6 Contents FOR USING YOUR CAMERA SAFELY 1 ABOUT THE CAMERA 1 PRECAUTIONS FOR BATTERY USAGE 2 PRECAUTIONS FOR BATTERY CHARGER USAGE 2 Care to be Taken During Handling 3 Contents 6 Composition of the Operating Manual 11 Before Using Your...
...] Menu Setting Items 33 Using the Fn Menu 36 Capture Mode 36 Playback Mode 37 Using the Mode Dial 38 6 Contents FOR USING YOUR CAMERA SAFELY 1 ABOUT THE CAMERA 1 PRECAUTIONS FOR BATTERY USAGE 2 PRECAUTIONS FOR BATTERY CHARGER USAGE 2 Care to be Taken During Handling 3 Contents 6 Composition of the Operating Manual 11 Before Using Your...

User Manual
Page 9
...Battery 43 Charging the Battery 43 Inserting/Removing the Battery 44 Battery Level Indicator 46 Approximate Image Storage Capacity and Playback Time (Exclusive Battery Fully Charged 46 Using the AC Adapter (Optional 47 Inserting/Removing the SD Memory Card 48 Recorded Pixels and Quality Level 50 Turning the Camera...56 Attaching the Lens 58 Adjusting the Viewfinder Diopter 60 Basic Operations 61 Basic Shooting Operation 62 Holding the Camera 62 Letting the Camera Choose the Optimal Settings 63 Taking Pictures Using the Shake Reduction Function 67 Turning On the Shake Reduction ...
...Battery 43 Charging the Battery 43 Inserting/Removing the Battery 44 Battery Level Indicator 46 Approximate Image Storage Capacity and Playback Time (Exclusive Battery Fully Charged 46 Using the AC Adapter (Optional 47 Inserting/Removing the SD Memory Card 48 Recorded Pixels and Quality Level 50 Turning the Camera...56 Attaching the Lens 58 Adjusting the Viewfinder Diopter 60 Basic Operations 61 Basic Shooting Operation 62 Holding the Camera 62 Letting the Camera Choose the Optimal Settings 63 Taking Pictures Using the Shake Reduction Function 67 Turning On the Shake Reduction ...
User Manual
Page 11
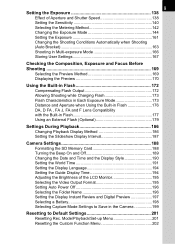
... 177 Using an External Flash (Optional 179 Settings During Playback 186 Changing Playback Display Method 186 Setting the Slideshow Display Interval 187 Camera Settings 188 Formatting the SD Memory Card 188 Turning the Beep On and Off 189 Changing the Date and Time and the Display...195 Setting Auto Power Off 196 Selecting the Folder Name 196 Setting the Display Instant Review and Digital Preview 197 Selecting a Battery 198 Selecting Capture Mode Settings to Save in the Camera 199 Resetting to Default Settings 201 Resetting Rec. Mode/Playback/Set-up Menu 201 Resetting the Custom...
... 177 Using an External Flash (Optional 179 Settings During Playback 186 Changing Playback Display Method 186 Setting the Slideshow Display Interval 187 Camera Settings 188 Formatting the SD Memory Card 188 Turning the Beep On and Off 189 Changing the Date and Time and the Display...195 Setting Auto Power Off 196 Selecting the Folder Name 196 Setting the Display Instant Review and Digital Preview 197 Selecting a Battery 198 Selecting Capture Mode Settings to Save in the Camera 199 Resetting to Default Settings 201 Resetting Rec. Mode/Playback/Set-up Menu 201 Resetting the Custom...

User Manual
Page 16
...you to the other battery. • Records in which the AF points on the viewfinder illuminate red. • Features a large 2.5-inch LCD monitor with 210,000 pixels, a wide viewing angle and a brightness adjusting function for high-precision viewing performance. • Features a Digital Preview function for ... and 95% field of the lens type. • Features an AF sensor with more power is inserted in both the camera and grip, the battery with 11 focusing points. Also features a superimpose function in the versatile JPEG format or the high quality and fully editable RAW...
...you to the other battery. • Records in which the AF points on the viewfinder illuminate red. • Features a large 2.5-inch LCD monitor with 210,000 pixels, a wide viewing angle and a brightness adjusting function for high-precision viewing performance. • Features a Digital Preview function for ... and 95% field of the lens type. • Features an AF sensor with more power is inserted in both the camera and grip, the battery with 11 focusing points. Also features a superimpose function in the versatile JPEG format or the high quality and fully editable RAW...

User Manual
Page 18
16 Checking the Contents of the Package The following accessories are included. 1 Hot shoe cover FK (Installed on camera) Eyecup FP (Installed on camera) ME Viewfinder cap Before Using Your Camera Body mount cover (Installed on camera) USB cable I-USB17 Video cable I-VC28 Software (CD-ROM) S-SW55 Strap O-ST53 Rechargeable lithium-ion D-LI50 battery Battery charger D-BC50 AC plug cord D-CO2 Operating Manual (this manual) PENTAX PHOTO Browser 3/ PENTAX PHOTO Laboratory 3 Operating Manual Check that all accessories are packaged with your camera.
16 Checking the Contents of the Package The following accessories are included. 1 Hot shoe cover FK (Installed on camera) Eyecup FP (Installed on camera) ME Viewfinder cap Before Using Your Camera Body mount cover (Installed on camera) USB cable I-USB17 Video cable I-VC28 Software (CD-ROM) S-SW55 Strap O-ST53 Rechargeable lithium-ion D-LI50 battery Battery charger D-BC50 AC plug cord D-CO2 Operating Manual (this manual) PENTAX PHOTO Browser 3/ PENTAX PHOTO Laboratory 3 Operating Manual Check that all accessories are packaged with your camera.

User Manual
Page 19
Names and Functions of Working 17 Parts Before Using Your Camera Camera Self-Timer lamp/ Remote control receiver Card cover Lens mount index Lens unlock button Built-in flash Cable switch terminal USB/Video terminal DC input terminal Terminal cover 1 Hot shoe Mirror Strap lug AF coupler LCD monitor Lens information contacts LCD panel Viewfinder Self-timer lamp/ Remote control receiver Card cover unlock lever Card access lamp Tripod socket Battery grip connector terminal cover Battery cover unlock lever Battery cover
Names and Functions of Working 17 Parts Before Using Your Camera Camera Self-Timer lamp/ Remote control receiver Card cover Lens mount index Lens unlock button Built-in flash Cable switch terminal USB/Video terminal DC input terminal Terminal cover 1 Hot shoe Mirror Strap lug AF coupler LCD monitor Lens information contacts LCD panel Viewfinder Self-timer lamp/ Remote control receiver Card cover unlock lever Card access lamp Tripod socket Battery grip connector terminal cover Battery cover unlock lever Battery cover

User Manual
Page 24
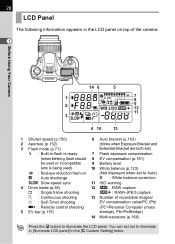
... Display Indicators LCD Monitor 1 The following indicators appear on the LCD monitor depending on or the mode dial is turned. Before Using Your Camera LCD Monitor At Start-up or when Operating the Mode Dial Guides appear on the LCD monitor for [Guide display] in [R Set-up] ...10 1 Flash mode (Active mode appears) (p.72) 2 Drive mode/Auto bracket/ Multi-exposure (p.36) 3 AE metering (p.142) 8 Exposure mode name (p.38) 9 e-dial guide 10 Battery level 11 Date and time (p.190) 12 World time (p.191) 4 Focus mode (p.130) 5 AF point (p.132) 6 White balance (p.123) 13 USER mode 14 Exposure mode...
... Display Indicators LCD Monitor 1 The following indicators appear on the LCD monitor depending on or the mode dial is turned. Before Using Your Camera LCD Monitor At Start-up or when Operating the Mode Dial Guides appear on the LCD monitor for [Guide display] in [R Set-up] ...10 1 Flash mode (Active mode appears) (p.72) 2 Drive mode/Auto bracket/ Multi-exposure (p.36) 3 AE metering (p.142) 8 Exposure mode name (p.38) 9 e-dial guide 10 Battery level 11 Date and time (p.190) 12 World time (p.191) 4 Focus mode (p.130) 5 AF point (p.132) 6 White balance (p.123) 13 USER mode 14 Exposure mode...

User Manual
Page 25
Detailed Information 1 Before Using Your Camera USER 1/2000 +1.3 F2.8 -1.0 ISO AUTO 2 0 0 - 1 6 0 0 10000K G2 A1 Adobe AUTO 4 0 0 mm RAW+ 10 10 / 14 / 2006 10 : 39 AM 1 23 6 8 7 9 13 15 16 17 45 ... (p.132) 25 Lens focal length (p.67) 26 Saturation (p.121) 27 Sharpness (p.121) 28 Contrast (p.121) 29 World Time (p.191) 30 Date and time (p.190) 31 Battery power (p.46)
Detailed Information 1 Before Using Your Camera USER 1/2000 +1.3 F2.8 -1.0 ISO AUTO 2 0 0 - 1 6 0 0 10000K G2 A1 Adobe AUTO 4 0 0 mm RAW+ 10 10 / 14 / 2006 10 : 39 AM 1 23 6 8 7 9 13 15 16 17 45 ... (p.132) 25 Lens focal length (p.67) 26 Saturation (p.121) 27 Sharpness (p.121) 28 Contrast (p.121) 29 World Time (p.191) 30 Date and time (p.190) 31 Battery power (p.46)
User Manual
Page 30
...ready Extended Bracket are both set) 7 Flash exposure compensation (when blinking, flash should 8 EV compensation (p.161) be used or incompatible 9 Battery level lens is being used) 10 White balance (p.123) > : Red-eye reduction flash on top of recordable images/ g : Self-...11 ISO warning 4 Drive mode (p.36) 9 : Single frame shooting j : Continuous shooting 12 1 : RAW capture 1P : RAW+JPEG capture 13 Number of the camera. 1 Before Using Your Camera 14 6 5 1 7 8 2 9 12 11 3 4 10 13 1 Shutter speed (p.150) 6 Auto bracket (p.163) 2 Aperture (p.152) (blinks when Exposure...
...ready Extended Bracket are both set) 7 Flash exposure compensation (when blinking, flash should 8 EV compensation (p.161) be used or incompatible 9 Battery level lens is being used) 10 White balance (p.123) > : Red-eye reduction flash on top of recordable images/ g : Self-...11 ISO warning 4 Drive mode (p.36) 9 : Single frame shooting j : Continuous shooting 12 1 : RAW capture 1P : RAW+JPEG capture 13 Number of the camera. 1 Before Using Your Camera 14 6 5 1 7 8 2 9 12 11 3 4 10 13 1 Shutter speed (p.150) 6 Auto bracket (p.163) 2 Aperture (p.152) (blinks when Exposure...

User Manual
Page 32
... button to return to Capture or Playback mode. Quality levels available when recording in Playback mode, the [Q Playback] menu appears. Mode JPEG Rec. The camera returns to choose an item. Next, set the [JPEG Quality] on ). • You can use the front e-dial to display the previous/next ...button and close the menu screen, your settings will not be saved if the camera is turned off improperly (such as by removing the battery while the camera is explained as an example. Mode] menu appears. Before Using Your Camera 13 Use the four-way controller (23) to the menu screen. Mode] ...
... button to return to Capture or Playback mode. Quality levels available when recording in Playback mode, the [Q Playback] menu appears. Mode JPEG Rec. The camera returns to choose an item. Next, set the [JPEG Quality] on ). • You can use the front e-dial to display the previous/next ...button and close the menu screen, your settings will not be saved if the camera is turned off improperly (such as by removing the battery while the camera is explained as an example. Mode] menu appears. Before Using Your Camera 13 Use the four-way controller (23) to the menu screen. Mode] ...

User Manual
Page 34
... language in LCD monitor. Sets the output format to display Bright/Dark area warning and histogram during Digital Preview. Sets battery priority for storing images. 32 Item Digital Preview Digital Filter 1 Slideshow Function Sets whether to the TV monitor. Plays back recorded images one after another....p.188 p.189 p.190 p.191 p.194 p.194 p.195 p.195 p.110 p.196 p.196 p.198 p.211 p.211 p.201 * Refer to the camera in the up ] menu. Sets the time to USER. Changes the color tone of the "PENTAX PHOTO Browser 3/PENTAX PHOTO Laboratory 3 Operating Manual" for cleaning the CCD.
... language in LCD monitor. Sets the output format to display Bright/Dark area warning and histogram during Digital Preview. Sets battery priority for storing images. 32 Item Digital Preview Digital Filter 1 Slideshow Function Sets whether to the TV monitor. Plays back recorded images one after another....p.188 p.189 p.190 p.191 p.194 p.194 p.195 p.195 p.110 p.196 p.196 p.198 p.211 p.211 p.201 * Refer to the camera in the up ] menu. Sets the time to USER. Changes the color tone of the "PENTAX PHOTO Browser 3/PENTAX PHOTO Laboratory 3 Operating Manual" for cleaning the CCD.

User Manual
Page 43
2 Getting Started This chapter explains your first steps from purchasing the camera to read it and follow the instructions. Be sure to taking pictures. Attaching the Strap 42 Using the Battery 43 Inserting/Removing the SD Memory Card .........48 Turning the Camera On and Off 52 Initial Settings 53 Attaching the Lens 58 Adjusting the Viewfinder Diopter 60
2 Getting Started This chapter explains your first steps from purchasing the camera to read it and follow the instructions. Be sure to taking pictures. Attaching the Strap 42 Using the Battery 43 Inserting/Removing the SD Memory Card .........48 Turning the Camera On and Off 52 Initial Settings 53 Attaching the Lens 58 Adjusting the Viewfinder Diopter 60

User Manual
Page 45
... first time, or when the battery has not been used in a long time, or when [Battery depleted] appears, recharge the battery. 1 Connect the AC plug cord to the battery charger. 2 Plug the AC plug cord into the power outlet. 3 Face the 2 mark on the exclusive battery up and insert it into the camera. Use only a D-LI50...
... first time, or when the battery has not been used in a long time, or when [Battery depleted] appears, recharge the battery. 1 Connect the AC plug cord to the battery charger. 2 Plug the AC plug cord into the power outlet. 3 Face the 2 mark on the exclusive battery up and insert it into the camera. Use only a D-LI50...

User Manual
Page 46
... the electrodes of its usage span. Lift the battery cover unlock lever, turn towards OPEN (1) to charge batteries other batteries may cause camera breakdown. If the battery is inserted incorrectly, it into the battery charger but the indicator lamp is not lit, the battery is on temperature and remaining battery power.) • If usage time is approximately 180...
... the electrodes of its usage span. Lift the battery cover unlock lever, turn towards OPEN (1) to charge batteries other batteries may cause camera breakdown. If the battery is inserted incorrectly, it into the battery charger but the indicator lamp is not lit, the battery is on temperature and remaining battery power.) • If usage time is approximately 180...

User Manual
Page 47
... unlock lever when finished closing. 1 2 Use the AC adapter D-AC50 (optional) when using the camera for a prolonged period. (p.47) Remove it. Battery lock lever Getting Started 3 Close the battery cover (1) and turn the battery cover unlock lever towards the LCD monitor, push the battery lock lever in the direction of the arrow (1) and insert the...
... unlock lever when finished closing. 1 2 Use the AC adapter D-AC50 (optional) when using the camera for a prolonged period. (p.47) Remove it. Battery lock lever Getting Started 3 Close the battery cover (1) and turn the battery cover unlock lever towards the LCD monitor, push the battery lock lever in the direction of the arrow (1) and insert the...

User Manual
Page 48
...may occur in accordance with CIPA standards and the others are based on PENTAX measuring conditions. Getting Started Approximate Image Storage Capacity and Playback Time (Exclusive Battery Fully Charged) Battery D-LI50 Normal (Temperature) recording (23°C) 500 ( 0°C) ... batteries ready when traveling overseas, taking a lot of pictures. When using the camera in cold climates, have extra batteries on shooting mode and shooting conditions. • Battery performance temporarily decreases as the temperature decreases. blink : Battery is full. : Battery is running low. : Battery...
...may occur in accordance with CIPA standards and the others are based on PENTAX measuring conditions. Getting Started Approximate Image Storage Capacity and Playback Time (Exclusive Battery Fully Charged) Battery D-LI50 Normal (Temperature) recording (23°C) 500 ( 0°C) ... batteries ready when traveling overseas, taking a lot of pictures. When using the camera in cold climates, have extra batteries on shooting mode and shooting conditions. • Battery performance temporarily decreases as the temperature decreases. blink : Battery is full. : Battery is running low. : Battery...

User Manual
Page 49
...47 Using the AC Adapter (Optional) 1 2 2 Getting Started We recommend using the AC adapter D-AC50 (optional) when using the AC adapter. • The batteries in your PC. 1 Make sure the camera is turned off before opening the terminal cover. 2 Connect the DC terminal on the AC adapter to the DC input terminal on... the camera. 3 Connect the AC plug cord to the AC adapter. SD Memory Card and data will be corrupted if disconnected while camera is recording or reading data. • Be sure to read the AC adapter D-AC50 ...
...47 Using the AC Adapter (Optional) 1 2 2 Getting Started We recommend using the AC adapter D-AC50 (optional) when using the AC adapter. • The batteries in your PC. 1 Make sure the camera is turned off before opening the terminal cover. 2 Connect the DC terminal on the AC adapter to the DC input terminal on... the camera. 3 Connect the AC plug cord to the AC adapter. SD Memory Card and data will be corrupted if disconnected while camera is recording or reading data. • Be sure to read the AC adapter D-AC50 ...
