User Manual
Page 2
... here also. PRINT Image Matching enabled digital still cameras, printers and software help photographers to produce images more faithful to their respective owners. Please read this has no effect on taking pictures even for the direct printout of functioning pixels is manufactured using the L that have an Aperture s (Auto) position. Regarding copyrights Images taken using extremely high precision technology. Although the level of images. However, this manual before using the unified...
... here also. PRINT Image Matching enabled digital still cameras, printers and software help photographers to produce images more faithful to their respective owners. Please read this has no effect on taking pictures even for the direct printout of functioning pixels is manufactured using the L that have an Aperture s (Auto) position. Regarding copyrights Images taken using extremely high precision technology. Although the level of images. However, this manual before using the unified...

User Manual
Page 16
14 Names of Working Parts Before Using Your Camera Camera 1 Lens mount index Shutter release button Main switch Self-Timer lamp/ Remote control receiver Lens unlock button 3 button i button M button Q button Mirror AF coupler Focus mode lever Lens information contacts e-dial L/Z button Four-way controller 4 button { button Battery cover Tripod socket
14 Names of Working Parts Before Using Your Camera Camera 1 Lens mount index Shutter release button Main switch Self-Timer lamp/ Remote control receiver Lens unlock button 3 button i button M button Q button Mirror AF coupler Focus mode lever Lens information contacts e-dial L/Z button Four-way controller 4 button { button Battery cover Tripod socket
User Manual
Page 18
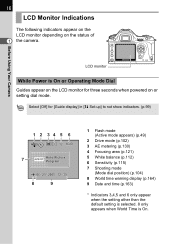
Before Using Your Camera LCD monitor While Power is On. Select [Off] for [Guide display] in [H Set-up] to not show indicators. (p.99) 1 2 34 5 6 1600 7 Auto Picture Program 06 / 25 / 2005 12 : 30 8 9 1 Flash mode (Active mode appears) (p.49) 2 Drive mode (p.102) 3 AE metering (p.130) 4 Focusing area (p.121) 5 White balance (p.112) 6 Sensitivity (p.115) 7 Shooting mode (Mode dial position) (p.104) 8 World time warning display (p.164) 9 Date and time (p.163) * Indicators 3,4,5 and 6 only appear when the setting other than...
Before Using Your Camera LCD monitor While Power is On. Select [Off] for [Guide display] in [H Set-up] to not show indicators. (p.99) 1 2 34 5 6 1600 7 Auto Picture Program 06 / 25 / 2005 12 : 30 8 9 1 Flash mode (Active mode appears) (p.49) 2 Drive mode (p.102) 3 AE metering (p.130) 4 Focusing area (p.121) 5 White balance (p.112) 6 Sensitivity (p.115) 7 Shooting mode (Mode dial position) (p.104) 8 World time warning display (p.164) 9 Date and time (p.163) * Indicators 3,4,5 and 6 only appear when the setting other than...
User Manual
Page 32
... changes in the following circumstances. 30 Getting Started Precautions When Using the SD Memory Card • The SD Memory Card is not used for a long time. (4) the card is ejected or the battery is removed while the data on the card is connected to a computer with the USB cable. The card may be damaged beyond use. • Data on the SD Memory Card may become unreadable. Setting the switch to LOCK protects the existing data by the user...
... changes in the following circumstances. 30 Getting Started Precautions When Using the SD Memory Card • The SD Memory Card is not used for a long time. (4) the card is ejected or the battery is removed while the data on the card is connected to a computer with the USB cable. The card may be damaged beyond use. • Data on the SD Memory Card may become unreadable. Setting the switch to LOCK protects the existing data by the user...
User Manual
Page 60
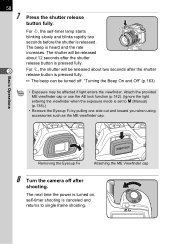
... camera off . For r, the shutter will be turned off after the shutter release button is canceled and returns to a (Manual) (p.138).) • Remove the Eyecup FN by pulling one side out and toward you when using accessories such as the ME viewfinder cap. The next time the power is turned on, self-timer shooting is pressed fully. The beep is released. For g, the self-timer lamp starts blinking...
... camera off . For r, the shutter will be turned off after the shutter release button is canceled and returns to a (Manual) (p.138).) • Remove the Eyecup FN by pulling one side out and toward you when using accessories such as the ME viewfinder cap. The next time the power is turned on, self-timer shooting is pressed fully. The beep is released. For g, the self-timer lamp starts blinking...
User Manual
Page 63
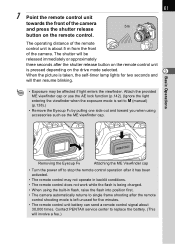
... light entering the viewfinder when the exposure mode is set to a (manual) (p.138).) • Remove the Eyecup FN by pulling one side out and toward you when using the built-in backlit conditions. • The remote control does not work while the flash is pressed depending on the remote control. Contact PENTAX service center to single frame shooting after the shutter release button on the remote control unit is being charged...
... light entering the viewfinder when the exposure mode is set to a (manual) (p.138).) • Remove the Eyecup FN by pulling one side out and toward you when using the built-in backlit conditions. • The remote control does not work while the flash is pressed depending on the remote control. Contact PENTAX service center to single frame shooting after the shutter release button on the remote control unit is being charged...

User Manual
Page 66
The most recently captured image (image with the largest file number) is pressed. Basic Operations 3 Rotating Images You can rotate images 90° counterclockwise at a time. Make images shot vertically easier to view. 100-0001 100-0001 100-0001 OK OK OK OK 1 Press the Q button after taking a picture. 64 2 Press the four-way controller (45). 4 : The previous image appears. 5 : The next image appears. The image is rotated 90° counterclockwise each time the button is displayed on the LCD monitor. 2 Press the four-way controller (3).
The most recently captured image (image with the largest file number) is pressed. Basic Operations 3 Rotating Images You can rotate images 90° counterclockwise at a time. Make images shot vertically easier to view. 100-0001 100-0001 100-0001 OK OK OK OK 1 Press the Q button after taking a picture. 64 2 Press the four-way controller (45). 4 : The previous image appears. 5 : The next image appears. The image is rotated 90° counterclockwise each time the button is displayed on the LCD monitor. 2 Press the four-way controller (3).
User Manual
Page 84
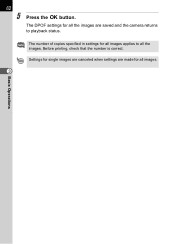
Settings for single images are canceled when settings are made for all the images are saved and the camera returns to all the images. 82 5 Press the 4 button. The DPOF settings for all images applies to playback status. The number of copies specified in settings for all images. 3 Basic Operations Before printing, check that the number is correct.
Settings for single images are canceled when settings are made for all the images are saved and the camera returns to all the images. 82 5 Press the 4 button. The DPOF settings for all images applies to playback status. The number of copies specified in settings for all images. 3 Basic Operations Before printing, check that the number is correct.

User Manual
Page 85
.... Make the settings on the type of printer, not all images (p.88) Print with the included USB cable (I-USB17) to a printer. For details, refer to the operating manual for printing on a single sheet. Printing Using PictBridge 83 Basic Operations This function lets you want to print, the number of copies and whether to insert the date or not on the camera after connecting to the printer. Direct printing is recommended when connecting the camera to print directly. Set [Transfer Mode] on camera...
.... Make the settings on the type of printer, not all images (p.88) Print with the included USB cable (I-USB17) to a printer. For details, refer to the operating manual for printing on a single sheet. Printing Using PictBridge 83 Basic Operations This function lets you want to print, the number of copies and whether to insert the date or not on the camera after connecting to the printer. Direct printing is recommended when connecting the camera to print directly. Set [Transfer Mode] on camera...

User Manual
Page 100
... autofocus focuses. Adjust the amount of pictures. p.160 Edit captured images to capturing in the [Q Playback] menu. Comp. Item Function Page Image Tone Set the color tone of flash discharged. Item Plybk dsply mthd Bright Portion Digital Filter Slideshow Function Page Set capturing information to display bright portion warning during playback. p.111 Contrast Set the image contrast. p.160 Set to show during Instant Review or Playback. p.71 Play back recorded images one after another. Mode] Menu Setting...
... autofocus focuses. Adjust the amount of pictures. p.160 Edit captured images to capturing in the [Q Playback] menu. Comp. Item Function Page Image Tone Set the color tone of flash discharged. Item Plybk dsply mthd Bright Portion Digital Filter Slideshow Function Page Set capturing information to display bright portion warning during playback. p.111 Contrast Set the image contrast. p.160 Set to show during Instant Review or Playback. p.71 Play back recorded images one after another. Mode] Menu Setting...
User Manual
Page 101
... Lock the mirror in LCD monitor. p.167 4 Brightness Level Change the brightness of the "PENTAX PHOTO Browser 2.1/PENTAX PHOTO Laboratory 2.1 Operating Manual" for cleaning the CCD. p.162 Beep Switch the beep tone on connecting the camera to p.13 of the LCD monitor. p.181 Reset Reset all settings other than Date/Time, Language/ , Video Out and World Time. p.164 Language/ Change the language in the [H Set-up] menu. p.169 File # Set the method used to the camera in which menus and messages...
... Lock the mirror in LCD monitor. p.167 4 Brightness Level Change the brightness of the "PENTAX PHOTO Browser 2.1/PENTAX PHOTO Laboratory 2.1 Operating Manual" for cleaning the CCD. p.162 Beep Switch the beep tone on connecting the camera to p.13 of the LCD monitor. p.181 Reset Reset all settings other than Date/Time, Language/ , Video Out and World Time. p.164 Language/ Change the language in the [H Set-up] menu. p.169 File # Set the method used to the camera in which menus and messages...
User Manual
Page 102
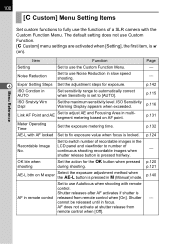
... Operating Time Set the exposure metering time. cannot be released until in Set sensitivity range to automatically correct AUTO when Sensitivity is pressed in slow speed shooting. - 4 Expsr Setting Steps Set the adjustment steps for the 4 button when pressed during shooting. - Shutter - The default setting does not use Noise Reduction in a (Manual) mode. Item Function Page Setting Set to use the functions of continuous shooting recordable images when shutter release button is locked. p.140 Set to use Autofocus when shooting with AF locked Set to fix exposure...
... Operating Time Set the exposure metering time. cannot be released until in Set sensitivity range to automatically correct AUTO when Sensitivity is pressed in slow speed shooting. - 4 Expsr Setting Steps Set the adjustment steps for the 4 button when pressed during shooting. - Shutter - The default setting does not use Noise Reduction in a (Manual) mode. Item Function Page Setting Set to use the functions of continuous shooting recordable images when shutter release button is locked. p.140 Set to use Autofocus when shooting with AF locked Set to fix exposure...

User Manual
Page 112
..., suited for printing large pictures such as photographs or on websites. Function Reference Set in [Quality Level] in JPEG format. Mode Image Tone Recorded Pixels Quality Level Saturation Sharpness Contrast Cancel OK OK Lowest compression rate, suited for viewing as A4 size. The default setting is [C (Best)]. | C D 5 E RAW Best Better Good RAW data is saved in the [A Rec. Mode] menu. (p.98) Rec. Effects such as White Balance, Contrast...
..., suited for printing large pictures such as photographs or on websites. Function Reference Set in [Quality Level] in JPEG format. Mode Image Tone Recorded Pixels Quality Level Saturation Sharpness Contrast Cancel OK OK Lowest compression rate, suited for viewing as A4 size. The default setting is [C (Best)]. | C D 5 E RAW Best Better Good RAW data is saved in the [A Rec. Mode] menu. (p.98) Rec. Effects such as White Balance, Contrast...

User Manual
Page 134
... front to create the picture you want to adjust the depth of fast moving subjects. No Yes Function Reference Changing the Exposure Mode This camera features five exposure modes along with the picture modes. Yes No Yes Combine set shutter speed and a (Manual) aperture to back. Yes No No Set shutter speed and use when you No have in the [A Custom] menu (p.100). Take pictures of field. Yes Yes Use to b (Shutter Priority) express moving...
... front to create the picture you want to adjust the depth of fast moving subjects. No Yes Function Reference Changing the Exposure Mode This camera features five exposure modes along with the picture modes. Yes No Yes Combine set shutter speed and a (Manual) aperture to back. Yes No No Set shutter speed and use when you No have in the [A Custom] menu (p.100). Take pictures of field. Yes Yes Use to b (Shutter Priority) express moving...

User Manual
Page 147
145 Setting Auto Bracket Change the shooting order and steps of the specified exposure compensation value. The auto bracketing is performed in the [A Rec. Mode] menu. (p.98) Auto Bracket Bracketng amount Shooting images 0.5 0 5 Function Reference Taking Only Over-exposed or Under-exposed Pictures You can use the auto bracketing mode for only under-exposure or over-exposure shots by combining the operation with exposure compensation (p.141). Bracketng amount (Step interval) 1/2EV 1/3EV Shooting images ±...
145 Setting Auto Bracket Change the shooting order and steps of the specified exposure compensation value. The auto bracketing is performed in the [A Rec. Mode] menu. (p.98) Auto Bracket Bracketng amount Shooting images 0.5 0 5 Function Reference Taking Only Over-exposed or Under-exposed Pictures You can use the auto bracketing mode for only under-exposure or over-exposure shots by combining the operation with exposure compensation (p.141). Bracketng amount (Step interval) 1/2EV 1/3EV Shooting images ±...

User Manual
Page 176
... Auto Bracket AE Metering Focusing Area AF Mode ±0.5/0-+ Yes L (Multi-segment) Yes N (Wide) Yes l (Single mode) Yes Yes p.145 Yes p.130 Yes p.121 Yes p.122 Flash Exp. Last Memory Setting Yes : The current setting (last memory) is saved when the camera is saved even after reset. [A Rec. No : The setting is turned off . Comp. 0.0 Yes Yes p.146 [Q Playback] Menu Item Default Setting Last Memory Setting Reset Setting Page Plybk dsply mthd Image only...
... Auto Bracket AE Metering Focusing Area AF Mode ±0.5/0-+ Yes L (Multi-segment) Yes N (Wide) Yes l (Single mode) Yes Yes p.145 Yes p.130 Yes p.121 Yes p.122 Flash Exp. Last Memory Setting Yes : The current setting (last memory) is saved when the camera is saved even after reset. [A Rec. No : The setting is turned off . Comp. 0.0 Yes Yes p.146 [Q Playback] Menu Item Default Setting Last Memory Setting Reset Setting Page Plybk dsply mthd Image only...

User Manual
Page 177
... No Same as Hometown Yes No Language/ Guide display According to default setting Yes O (On) Yes No p.167 6 Yes p.167 Appendix Brightness Level Video Out Transfer Mode Auto Power Off File # 0 Yes According to default setting Yes PC Yes 1 min Yes SerialNo Yes Yes p.168 No p.168 Yes p.84 Yes p.169 Yes p.169 Sensor Cleaning Reset - - - p.171 175 [H Set-up] Menu Item Default Setting Last Memory Setting Reset Setting Page Format Beep - p.181 - - -
... No Same as Hometown Yes No Language/ Guide display According to default setting Yes O (On) Yes No p.167 6 Yes p.167 Appendix Brightness Level Video Out Transfer Mode Auto Power Off File # 0 Yes According to default setting Yes PC Yes 1 min Yes SerialNo Yes Yes p.168 No p.168 Yes p.84 Yes p.169 Yes p.169 Sensor Cleaning Reset - - - p.171 175 [H Set-up] Menu Item Default Setting Last Memory Setting Reset Setting Page Format Beep - p.181 - - -
User Manual
Page 190
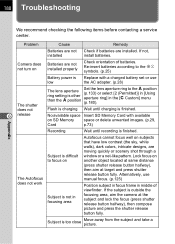
..., white walls), dark colors, intricate designs, are moving quickly or scenery shot through a window or a net-like pattern. Subject is low Replace with available on Batteries are installed. Camera does not turn on SD Memory space or delete unwanted images. (p.29, Card p.73) Recording Wait until charging is difficult to the +- Subject is finished. symbols. (p.25) Battery power is too close Move away from the subject and take a picture. 188 Troubleshooting...
..., white walls), dark colors, intricate designs, are moving quickly or scenery shot through a window or a net-like pattern. Subject is low Replace with available on Batteries are installed. Camera does not turn on SD Memory space or delete unwanted images. (p.29, Card p.73) Recording Wait until charging is difficult to the +- Subject is finished. symbols. (p.25) Battery power is too close Move away from the subject and take a picture. 188 Troubleshooting...
User Manual
Page 191
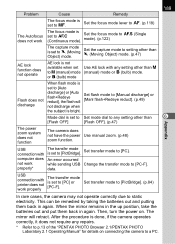
..., take the batteries out and put them back in again. 189 Problem Cause Remedy The focus mode is set to \ (Moving Object) mode. Set the capture mode to setting other than \ (Moving Object) mode. (p.47) AE lock function does not operate AE lock is set to a PC. USB connection with printer does not work while sending USB Change the transfer mode to [PictBridge]. properly* data. Then, turn the power on connecting the camera to k (Continuous mode). After the procedure is set to Set mode...
..., take the batteries out and put them back in again. 189 Problem Cause Remedy The focus mode is set to \ (Moving Object) mode. Set the capture mode to setting other than \ (Moving Object) mode. (p.47) AE lock function does not operate AE lock is set to a PC. USB connection with printer does not work while sending USB Change the transfer mode to [PictBridge]. properly* data. Then, turn the power on connecting the camera to k (Continuous mode). After the procedure is set to Set mode...

User Manual
Page 193
... unable to focus, b is lit=Built-in flash ready, Blinking=Flash should be used or incompatible lens is being used, Shutter Viewfinder Indication speed, Aperture value, e-dial enabled indicator, @=AE lock, Capacity remaining and m=Exposure compensation, K=Manual white balance, k=Continuous mode, Picture mode icon, \=Manual focus, o=ISO warning LCD Panel display b is lit=Built-in all exposure modes Self-timer Electronically controlled with delay time of view: 95%, Magnification 0.85× (with exposure bracketing (Selectable between 1/2EV and 1/3EV for Exposure setting steps) Appendix...
... unable to focus, b is lit=Built-in flash ready, Blinking=Flash should be used or incompatible lens is being used, Shutter Viewfinder Indication speed, Aperture value, e-dial enabled indicator, @=AE lock, Capacity remaining and m=Exposure compensation, K=Manual white balance, k=Continuous mode, Picture mode icon, \=Manual focus, o=ISO warning LCD Panel display b is lit=Built-in all exposure modes Self-timer Electronically controlled with delay time of view: 95%, Magnification 0.85× (with exposure bracketing (Selectable between 1/2EV and 1/3EV for Exposure setting steps) Appendix...


