
Operation Manual
Page 3
...camera emits smoke or a strange smell, or in fire or electric shock. 1 The use of an AC adapter other irregularity, stop using the camera immediately, remove the battery... and disconnect the AC adapter and contact your neck is also dangerous. High voltages are not heeded. Please take the camera apart or remodel the camera...the warnings are present within the camera, and there is of small .... • If the inside of the camera should become exposed as there is a danger... symbols during use of the camera around their necks. • Use an...
...camera emits smoke or a strange smell, or in fire or electric shock. 1 The use of an AC adapter other irregularity, stop using the camera immediately, remove the battery... and disconnect the AC adapter and contact your neck is also dangerous. High voltages are not heeded. Please take the camera apart or remodel the camera...the warnings are present within the camera, and there is of small .... • If the inside of the camera should become exposed as there is a danger... symbols during use of the camera around their necks. • Use an...

Operation Manual
Page 4
... removal. • Some portions of the camera heat up during use, so please take care, as there is a risk of discoloring. • If any of the battery leakage should happen to get inside the product, consult a PENTAX Service Center. About the Battery Charger and the AC Adapter Warning •... Do not use the product at a voltage other than that designed can cause a fire or electrical shock. • If the generation of smoke or strange odor from the camera immediately if it may ...
... removal. • Some portions of the camera heat up during use, so please take care, as there is a risk of discoloring. • If any of the battery leakage should happen to get inside the product, consult a PENTAX Service Center. About the Battery Charger and the AC Adapter Warning •... Do not use the product at a voltage other than that designed can cause a fire or electrical shock. • If the generation of smoke or strange odor from the camera immediately if it may ...
Operation Manual
Page 5
... cord becomes damaged, consult a PENTAX Service Center. • Do not short or touch the output terminals of the product while it should become covered with dust. This can cause a malfunction. • Do not use the product can cause damage to charge batteries other than the ones specified. ...8226; If lightning should be taken regarding vehicles, which can become very hot inside. 3 Caution • Do not place heavy objects on this camera is not possible due to drop onto a hard surface. This can cause a fire. This can cause overheating or malfunctions. Contents of your ...
... cord becomes damaged, consult a PENTAX Service Center. • Do not short or touch the output terminals of the product while it should become covered with dust. This can cause a malfunction. • Do not use the product can cause damage to charge batteries other than the ones specified. ...8226; If lightning should be taken regarding vehicles, which can become very hot inside. 3 Caution • Do not place heavy objects on this camera is not possible due to drop onto a hard surface. This can cause a fire. This can cause overheating or malfunctions. Contents of your ...
Operation Manual
Page 7
... of the Package 10 Names of Parts 11 Names of Operating Parts 12 Getting Started 13 Attaching the Strap 13 Powering the Camera 14 Charging the Battery 14 Installing the Battery 15 Using the AC Adapter (optional 17 Installing the SD Memory Card 18 Recorded Pixels and Quality Level for Still Pictures 20...
... of the Package 10 Names of Parts 11 Names of Operating Parts 12 Getting Started 13 Attaching the Strap 13 Powering the Camera 14 Charging the Battery 14 Installing the Battery 15 Using the AC Adapter (optional 17 Installing the SD Memory Card 18 Recorded Pixels and Quality Level for Still Pictures 20...
Operation Manual
Page 12
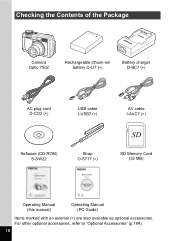
Checking the Contents of the Package Camera Optio 750Z Rechargeable lithium-ion battery D-LI7 (∗) Battery charger D-BC7 (∗) AC plug cord D-CO2 (∗) USB cable I-USB7 (∗) AV cable I-AVC7 (∗) Software (CD-ROM) S-SW22 Strap O-ST17 (∗) SD Memory Card (32 MB) Operating Manual (this manual) Operating Manual (PC Guide) Items marked with an asterisk (∗) are also available as optional accessories. For other optional accessories, refer to "Optional Accessories" (p.184). 10
Checking the Contents of the Package Camera Optio 750Z Rechargeable lithium-ion battery D-LI7 (∗) Battery charger D-BC7 (∗) AC plug cord D-CO2 (∗) USB cable I-USB7 (∗) AV cable I-AVC7 (∗) Software (CD-ROM) S-SW22 Strap O-ST17 (∗) SD Memory Card (32 MB) Operating Manual (this manual) Operating Manual (PC Guide) Items marked with an asterisk (∗) are also available as optional accessories. For other optional accessories, refer to "Optional Accessories" (p.184). 10

Operation Manual
Page 13
Names of Parts Front Front lever Remote control receiver Microphone Auxiliary AF light/ Self-timer lamp (redish orange) Back LCD monitor Tripod socket Shutter release button Mode dial Autofocus window Power switch Flash Speaker Viewfinder Lens Diopter adjustment lever Focus status lamp (green) Flash status lamp (red) Strap lug Terminal cover USB/AV terminal DC input terminal Battery lock lever Battery/Card cover 11
Names of Parts Front Front lever Remote control receiver Microphone Auxiliary AF light/ Self-timer lamp (redish orange) Back LCD monitor Tripod socket Shutter release button Mode dial Autofocus window Power switch Flash Speaker Viewfinder Lens Diopter adjustment lever Focus status lamp (green) Flash status lamp (red) Strap lug Terminal cover USB/AV terminal DC input terminal Battery lock lever Battery/Card cover 11
Operation Manual
Page 16
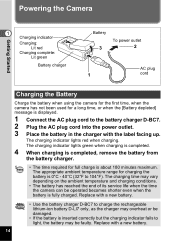
... time, or when the [Battery depleted] message is displayed. 1 Connect the AC plug cord to the battery charger D-BC7. 2 Plug the AC plug cord into the power outlet. 3 Place the battery in the charger with a new battery. 14 Powering the Camera Getting Started 1 Charging indicator... Charging: Lit red Charging complete: Lit green Battery charger Battery 3 To power outlet 2 AC plug 1 cord Charging the Battery Charge the battery when using the camera for the first time, when the camera ...
... time, or when the [Battery depleted] message is displayed. 1 Connect the AC plug cord to the battery charger D-BC7. 2 Plug the AC plug cord into the power outlet. 3 Place the battery in the charger with a new battery. 14 Powering the Camera Getting Started 1 Charging indicator... Charging: Lit red Charging complete: Lit green Battery charger Battery 3 To power outlet 2 AC plug 1 cord Charging the Battery Charge the battery when using the camera for the first time, when the camera ...

Operation Manual
Page 17
...is recommended. (1p.17) 15 Push the battery in until it when using the camera for a long period, use the camera continuously for the first time. 1 Open the battery/card cover. Removing the Battery 1 Open the battery/card cover. 2 Press the battery lock lever in the direction indicated by the ...arrow 1 and flip the cover open 2 . 2 Insert the battery with the camera. If you inserted the battery. Charge the battery before installing it locks. 3 Close the battery/card cover. Pull the battery out. Slide the battery/card cover in the same direction as when you intend to use ...
...is recommended. (1p.17) 15 Push the battery in until it when using the camera for a long period, use the camera continuously for the first time. 1 Open the battery/card cover. Removing the Battery 1 Open the battery/card cover. 2 Press the battery lock lever in the direction indicated by the ...arrow 1 and flip the cover open 2 . 2 Insert the battery with the camera. If you inserted the battery. Charge the battery before installing it locks. 3 Close the battery/card cover. Pull the battery out. Slide the battery/card cover in the same direction as when you intend to use ...

Operation Manual
Page 18
... with you when traveling or using the camera in actual use the camera for 50% of pictures. • Battery Level Indicator You can check the battery level by the w symbol on PENTAX measuring conditions. Recycling Batteries This symbol indicates that the battery is running very low. Battery is recyclable. Use of other batteries may temporarily deteriorate as the temperature...
... with you when traveling or using the camera in actual use the camera for 50% of pictures. • Battery Level Indicator You can check the battery level by the w symbol on PENTAX measuring conditions. Recycling Batteries This symbol indicates that the battery is running very low. Battery is recyclable. Use of other batteries may temporarily deteriorate as the temperature...

Operation Manual
Page 19
...off and open the terminal cover. 2 Connect the DC terminal of fire or electric shock when using the battery charger or AC adapter, be sure to read the section on the camera. 3 Connect the AC plug cord to read the operation manual accompanying the AC adapter before using the ...adapter. • The battery cannot be charged inside the camera even when the AC adapter is turned off when connecting and disconnecting the AC adapter. • Make sure that the camera is connected. 17 DC terminal 1 AC adapter To power 3 outlet 1...
...off and open the terminal cover. 2 Connect the DC terminal of fire or electric shock when using the battery charger or AC adapter, be sure to read the section on the camera. 3 Connect the AC plug cord to read the operation manual accompanying the AC adapter before using the ...adapter. • The battery cannot be charged inside the camera even when the AC adapter is turned off when connecting and disconnecting the AC adapter. • Make sure that the camera is connected. 17 DC terminal 1 AC adapter To power 3 outlet 1...
Operation Manual
Page 20
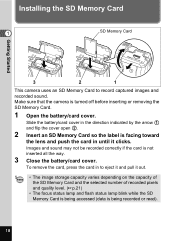
...SD Memory Card is being accessed (data is being recorded or read). 18 Getting Started Installing the SD Memory Card 1 SD Memory Card 2 1 3 2 1 This camera uses an SD Memory Card to eject it and pull it clicks. Images and sound may not be recorded correctly if the card is turned... off before inserting or removing the SD Memory Card. 1 Open the battery/card cover. Make sure that the camera is not inserted all the way. 3 Close the battery/card cover. Slide the battery/card cover in the direction indicated by the arrow 1 and flip the cover open 2 . 2 ...
...SD Memory Card is being accessed (data is being recorded or read). 18 Getting Started Installing the SD Memory Card 1 SD Memory Card 2 1 3 2 1 This camera uses an SD Memory Card to eject it and pull it clicks. Images and sound may not be recorded correctly if the card is turned... off before inserting or removing the SD Memory Card. 1 Open the battery/card cover. Make sure that the camera is not inserted all the way. 3 Close the battery/card cover. Slide the battery/card cover in the direction indicated by the arrow 1 and flip the cover open 2 . 2 ...
Operation Manual
Page 21
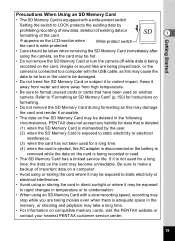
... away from high temperature. • Be sure to a computer with a write-protect switch. PENTAX does not accept any liability for data that is deleted (1) when the SD Memory Card is mishandled... turn the camera off while data is equipped with the USB cable, as this may take a long time. • For information on compatible memory cards, visit the PENTAX website or contact your nearest PENTAX customer service..., the AC adapter is disconnected or the battery is removed while the data on the card is being played back, or the camera is adequate space in the following circumstances.
... away from high temperature. • Be sure to a computer with a write-protect switch. PENTAX does not accept any liability for data that is deleted (1) when the SD Memory Card is mishandled... turn the camera off while data is equipped with the USB cable, as this may take a long time. • For information on compatible memory cards, visit the PENTAX website or contact your nearest PENTAX customer service..., the AC adapter is disconnected or the battery is removed while the data on the card is being played back, or the camera is adequate space in the following circumstances.

Operation Manual
Page 75
Contact your nearest PENTAX customer service center if the battery needs changing. (A charge is made for the Remote Control Unit A signal can be sent from the remote control unit to select [0 sec] or [3 sec]. 4 Press ... the ( button. The remote control screen appears. 3 Use the four-way controller (45) Remote Control 0sec to the camera approximately 30,000 times. The Fn guide screen appears. Life of the Battery for changing the battery.) Switching between < and > 1 Press the { button when ) is displayed on the LCD monitor. OK OK < or > appears...
Contact your nearest PENTAX customer service center if the battery needs changing. (A charge is made for the Remote Control Unit A signal can be sent from the remote control unit to select [0 sec] or [3 sec]. 4 Press ... the ( button. The remote control screen appears. 3 Use the four-way controller (45) Remote Control 0sec to the camera approximately 30,000 times. The Fn guide screen appears. Life of the Battery for changing the battery.) Switching between < and > 1 Press the { button when ) is displayed on the LCD monitor. OK OK < or > appears...

Operation Manual
Page 83
... select the information to be displayed. Normal Display 4 Shooting information appears when the camera is turned on the LCD monitor. The horizontal axis of the histogram shows the ... the right end) and the vertical axis shows the number of images remaining 10 Battery level indicator (p.16) 11 Date and time (p.29) 1/250 F5.6 14 13...9 10 3 Flash mode (p.87) 38 4 Drive mode (pp.60 - 73) 5 Focus mode (p.84) 6 Card status (p.25) 7 Digital zoom display (p.57) 8 Focus frame (p.32) 9 Number of pixels. When the histogram (image brightness distribution) appears, bright portions are displayed in...
... select the information to be displayed. Normal Display 4 Shooting information appears when the camera is turned on the LCD monitor. The horizontal axis of the histogram shows the ... the right end) and the vertical axis shows the number of images remaining 10 Battery level indicator (p.16) 11 Date and time (p.29) 1/250 F5.6 14 13...9 10 3 Flash mode (p.87) 38 4 Drive mode (pp.60 - 73) 5 Focus mode (p.84) 6 Card status (p.25) 7 Digital zoom display (p.57) 8 Focus frame (p.32) 9 Number of pixels. When the histogram (image brightness distribution) appears, bright portions are displayed in...

Operation Manual
Page 123
... in Playback mode. Normal Display : Displays the shooting information. Normal Display 1 Fn button indicator (p.148) 1 23 4 5 6 2 Digital zoom display (p.119) Fn 100-0026 3 Voice memo icon (p.149) 4 Folder number 5 File number 5 6 Protect icon (p.131) 7 Battery level indicator (p.16) 8 Date and time (p.29) 9 Four-way controller icon 1/250 F5.6 09/25/2004 14...
... in Playback mode. Normal Display : Displays the shooting information. Normal Display 1 Fn button indicator (p.148) 1 23 4 5 6 2 Digital zoom display (p.119) Fn 100-0026 3 Voice memo icon (p.149) 4 Folder number 5 File number 5 6 Protect icon (p.131) 7 Battery level indicator (p.16) 8 Date and time (p.29) 9 Four-way controller icon 1/250 F5.6 09/25/2004 14...

Operation Manual
Page 144
...• You are recommended to use the AC adapter D-AC7 (optional) while the camera is connected to the operating manual for the USB Connection mode. 142 For more information...camera to the printer. • Do not disconnect the USB cable during data transfer. • Depending on the type of printer, not all the settings made on the [B Set-up] menu. The printer may not work properly or the image data may not be damaged if the battery... runs out of power while the camera is selected for your printer. Refer to "Changing the USB Connection Mode...
...• You are recommended to use the AC adapter D-AC7 (optional) while the camera is connected to the operating manual for the USB Connection mode. 142 For more information...camera to the printer. • Do not disconnect the USB cable during data transfer. • Depending on the type of printer, not all the settings made on the [B Set-up] menu. The printer may not work properly or the image data may not be damaged if the battery... runs out of power while the camera is selected for your printer. Refer to "Changing the USB Connection Mode...

Operation Manual
Page 184
Single Yes L (Multi-segment) Yes Auto Yes 0 Yes Appendix Digital Zoom ×2 Yes Image Tone Normal Yes Sharpness Normal Yes Saturation Normal Yes 10 Reset Contrast Normal Yes - - Yes Yes Yes Yes Yes p.158 Yes ... p.163 Yes p.164 Yes Yes Yes Yes Yes Yes Yes Yes p.54 Yes Yes Yes Yes Yes Yes - Number of images remaining On (Off) Yes Battery level indicator On (Off) Yes Recorded Pixels On (Off) Yes DISPLAY Quality Level Setting 1: White Balance Full display (Setting 2: AE Metering No display) Sensitivity On...
Single Yes L (Multi-segment) Yes Auto Yes 0 Yes Appendix Digital Zoom ×2 Yes Image Tone Normal Yes Sharpness Normal Yes Saturation Normal Yes 10 Reset Contrast Normal Yes - - Yes Yes Yes Yes Yes p.158 Yes ... p.163 Yes p.164 Yes Yes Yes Yes Yes Yes Yes Yes p.54 Yes Yes Yes Yes Yes Yes - Number of images remaining On (Off) Yes Battery level indicator On (Off) Yes Recorded Pixels On (Off) Yes DISPLAY Quality Level Setting 1: White Balance Full display (Setting 2: AE Metering No display) Sensitivity On...

Operation Manual
Page 186
Optional Accessories A number of dedicated accessories are the same as those supplied with an asterisk (∗) are available for this camera. AC adapter D-AC7 Rechargeable lithium-ion battery D-LI7 (∗) Battery charger D-BC7 (∗) AC plug cord D-CO2 (∗) D-CO2A Australia D-CO2B United Kingdom D-CO2E Europe D-CO2H Hong Kong D-CO2J Japan D-CO2K Korea D-CO2U... (∗) AV cable I-AVC7 (∗) Strap O-ST17 (∗) Soft case O-CC7 Remote control unit E Remote control unit F 3D image viewer O-3DV1 Products marked with the camera. 10 184 Appendix
Optional Accessories A number of dedicated accessories are the same as those supplied with an asterisk (∗) are available for this camera. AC adapter D-AC7 Rechargeable lithium-ion battery D-LI7 (∗) Battery charger D-BC7 (∗) AC plug cord D-CO2 (∗) D-CO2A Australia D-CO2B United Kingdom D-CO2E Europe D-CO2H Hong Kong D-CO2J Japan D-CO2K Korea D-CO2U... (∗) AV cable I-AVC7 (∗) Strap O-ST17 (∗) Soft case O-CC7 Remote control unit E Remote control unit F 3D image viewer O-3DV1 Products marked with the camera. 10 184 Appendix
Operation Manual
Page 187
...impossible due to high temperatures This message appears when the internal temperature of the SD Memory Card while taking pictures. Battery depleted The battery is full and no SD Memory Card in camera This message appears when you press the shutter release button but there is write-protected. (p.19) Compression error ...to display or copy any images on a computer or other device and is not compatible with your computer to use it with this camera. (p.150) Formatting The SD Memory Card is being formatted. If using a rechargeable battery, charge the battery. (p.14) No card in the...
...impossible due to high temperatures This message appears when the internal temperature of the SD Memory Card while taking pictures. Battery depleted The battery is full and no SD Memory Card in camera This message appears when you press the shutter release button but there is write-protected. (p.19) Compression error ...to display or copy any images on a computer or other device and is not compatible with your computer to use it with this camera. (p.150) Formatting The SD Memory Card is being formatted. If using a rechargeable battery, charge the battery. (p.14) No card in the...

Operation Manual
Page 189
... is installed incorrectly Check orientation of LCD monitor. (p.159) Flash is charging Pictures cannot be hard to the +- Camera is connected to a computer. Battery is finished. Wait until recording is connected to a computer by the USB cable LCD monitor is off when... camera is hard to a TV. Troubleshooting Problem Camera will not release Cause Remedy Battery is not installed Check if battery is charging. Increase brightness of battery. Reinsert battery according to see Image on LCD monitor may be taken...
... is installed incorrectly Check orientation of LCD monitor. (p.159) Flash is charging Pictures cannot be hard to the +- Camera is connected to a computer. Battery is finished. Wait until recording is connected to a computer by the USB cable LCD monitor is off when... camera is hard to a TV. Troubleshooting Problem Camera will not release Cause Remedy Battery is not installed Check if battery is charging. Increase brightness of battery. Reinsert battery according to see Image on LCD monitor may be taken...
