Download PDF
Page 6
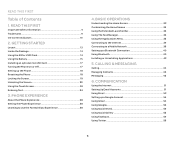
...STARTED Layout...13 Inside the Package 14 Using the SIM or USIM Card 14 Using the Battery 15 Installing an optional microSD Card 17 Turning the Phone On or Off 17 Setting up a Bluetooth Connection 40 Using Bluetooth 40 Installing or Uninstalling Applications 42 5. BASIC OPERATIONS Understanding...the Extended Launcher Bar 36 Using The Task Manager 36 Using the Applications Menu 38 Connecting to the Internet 39 Connecting to Use the Pantech Easy Experience 28 4. COMMUNICATION Using the Internet 51 Setting Up Email Accounts 51 Using Email 52 Setting up a Google Account 54 ...
...STARTED Layout...13 Inside the Package 14 Using the SIM or USIM Card 14 Using the Battery 15 Installing an optional microSD Card 17 Turning the Phone On or Off 17 Setting up a Bluetooth Connection 40 Using Bluetooth 40 Installing or Uninstalling Applications 42 5. BASIC OPERATIONS Understanding...the Extended Launcher Bar 36 Using The Task Manager 36 Using the Applications Menu 38 Connecting to the Internet 39 Connecting to Use the Pantech Easy Experience 28 4. COMMUNICATION Using the Internet 51 Setting Up Email Accounts 51 Using Email 52 Setting up a Google Account 54 ...
Download PDF
Page 12
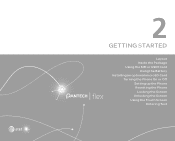
2 GETTING STARTED Layout Inside the Package Using the SIM or USIM Card Using the Battery Installing an optional microSD Card Turning the Phone On or Off Setting up the Phone Resetting the Phone Locking the Screen Unlocking the Screen Using the Touch Screen Entering Text
2 GETTING STARTED Layout Inside the Package Using the SIM or USIM Card Using the Battery Installing an optional microSD Card Turning the Phone On or Off Setting up the Phone Resetting the Phone Locking the Screen Unlocking the Screen Using the Touch Screen Entering Text

Download PDF
Page 13
Turn the phone on or off. 13 GETTING STARTED Layout Front View Earpiece Proximity Sensor Front camera VOLUME Touch screen Rear View Earphone jack Rear microphone Micro USB/ Charger connector LOCK/POWER Rear camera Flash Speaker Front microphone Key VOLUME Function Adjust sound volume. Internal antenna area Battery cover removal groove Key Function LOCK/PWR Lock the screen. Adjust the ring mode.
Turn the phone on or off. 13 GETTING STARTED Layout Front View Earpiece Proximity Sensor Front camera VOLUME Touch screen Rear View Earphone jack Rear microphone Micro USB/ Charger connector LOCK/POWER Rear camera Flash Speaker Front microphone Key VOLUME Function Adjust sound volume. Internal antenna area Battery cover removal groove Key Function LOCK/PWR Lock the screen. Adjust the ring mode.
Download PDF
Page 14
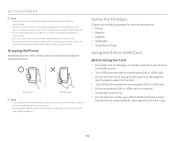
... the touch screen may not perform properly. x Do not use metallic cases or accessories, as you may disrupt the wireless signal and increase battery consumption. Pantech is not responsible for the following items: x Phone x Battery x Adapter x USB cable x Quick Start Guide Using the SIM or USIM Card Before ...not allow the touch screen to damage your face, as they can interfere with all types of stereo earphones. x Turn off the phone before installing the SIM or USIM card. x Turn off the phone before removing the SIM or USIM card. x Do not hold the phone too close to theft or...
... the touch screen may not perform properly. x Do not use metallic cases or accessories, as you may disrupt the wireless signal and increase battery consumption. Pantech is not responsible for the following items: x Phone x Battery x Adapter x USB cable x Quick Start Guide Using the SIM or USIM Card Before ...not allow the touch screen to damage your face, as they can interfere with all types of stereo earphones. x Turn off the phone before installing the SIM or USIM card. x Turn off the phone before removing the SIM or USIM card. x Do not hold the phone too close to theft or...
Download PDF
Page 15
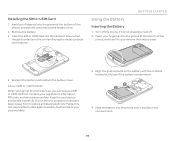
... compartment. 15 Insert your fingernail into the phone until it away from moisture and static electricity. Reinsert the battery and reattach the battery cover. Pantech is not already turned off. 2. Align the gold contacts on the phone. Slide the battery into the groove at the bottom of the phone, and then lift... phone service, you sign up for damages caused by theft or loss of the battery compartment. 4. Remove the battery. 3. Ensure that contains your personal data. 3. Turn off the phone, if it carefully.
... compartment. 15 Insert your fingernail into the phone until it away from moisture and static electricity. Reinsert the battery and reattach the battery cover. Pantech is not already turned off. 2. Align the gold contacts on the phone. Slide the battery into the groove at the bottom of the phone, and then lift... phone service, you sign up for damages caused by theft or loss of the battery compartment. 4. Remove the battery. 3. Ensure that contains your personal data. 3. Turn off the phone, if it carefully.
Download PDF
Page 17
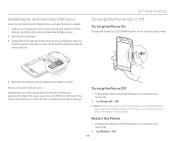
...than two seconds. 2. Restart the Phone 1. Press and hold the LOCK/PWR key for more than two seconds. 4. GETTING STARTED Turning the Phone On or Off Turning the Phone On Press and hold the LOCK/PWR key for more than two seconds. 2. We recommend that the gold contacts on... contacts on the phone. Insert your fingernail into the memory card slot. Remove the battery. 3. Reinsert the battery and reattach the battery cover. Turning the Phone Off 1. Tap Restart > OK. 17 Ensure that you forcibly shut down the phone by removing the battery, the screen may malfunction shortly...
...than two seconds. 2. Restart the Phone 1. Press and hold the LOCK/PWR key for more than two seconds. 4. GETTING STARTED Turning the Phone On or Off Turning the Phone On Press and hold the LOCK/PWR key for more than two seconds. 2. We recommend that the gold contacts on... contacts on the phone. Insert your fingernail into the memory card slot. Remove the battery. 3. Reinsert the battery and reattach the battery cover. Turning the Phone Off 1. Tap Restart > OK. 17 Ensure that you forcibly shut down the phone by removing the battery, the screen may malfunction shortly...
Download PDF
Page 18
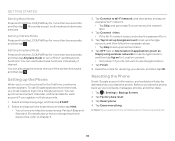
... each account if you reset the phone, all data saved on the phone for the first time, a welcome screen appears. x Your phone provides two experiences, Pantech Easy and Standard. Tap Factory data reset. 3. Tap Erase everything. Setting Airplane Mode Press and hold the LOCK/PWR key for more than two seconds... Connect > Next. GETTING STARTED Setting Mute Mode Press and hold the LOCK/PWR key for more than two seconds, and then tap Airplane mode to turn on the phone will also be lost. 18 x Tap Skip to use Google applications and services, you...
... each account if you reset the phone, all data saved on the phone for the first time, a welcome screen appears. x Your phone provides two experiences, Pantech Easy and Standard. Tap Factory data reset. 3. Tap Erase everything. Setting Airplane Mode Press and hold the LOCK/PWR key for more than two seconds... Connect > Next. GETTING STARTED Setting Mute Mode Press and hold the LOCK/PWR key for more than two seconds, and then tap Airplane mode to turn on the phone will also be lost. 18 x Tap Skip to use Google applications and services, you...
Download PDF
Page 21
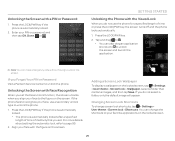
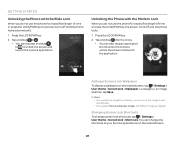
...If you do not use a secondary unlock type to unlock the screen and launch the application. If you Forget Your PIN or Password Visit a Pantech Service Center to the figure on the screen. For more details about setting the automatic lock, refer to . Press the LOCK/PWR key if the... on the locked screen. 21 x The phone is automatically locked after a specified length of time of time or press the LOCK/PWR key, the screen turns off and the phone locks automatically. 1. Adding a Screen Lock Wallpaper To display a wallpaper on the locked screen, tap > Settings > User theme > Screen lock >...
...If you do not use a secondary unlock type to unlock the screen and launch the application. If you Forget Your PIN or Password Visit a Pantech Service Center to the figure on the screen. For more details about setting the automatic lock, refer to . Press the LOCK/PWR key if the... on the locked screen. 21 x The phone is automatically locked after a specified length of time of time or press the LOCK/PWR key, the screen turns off and the phone locks automatically. 1. Adding a Screen Lock Wallpaper To display a wallpaper on the locked screen, tap > Settings > User theme > Screen lock >...
Download PDF
Page 22
... Phone with the Modern Lock When you do not use the phone for a specified length of time or press the LOCK/PWR key, the screen turns off and the phone locks automatically. 1. Unlocking the Phone with the Slide Lock When you do not use the phone for a specified length of time... or press the LOCK/PWR key, the screen turns off and the phone locks. 1. Tap and drag into the circle to set as wallpaper. x You can also tap and drag to to . Changing Screen...
... Phone with the Modern Lock When you do not use the phone for a specified length of time or press the LOCK/PWR key, the screen turns off and the phone locks automatically. 1. Unlocking the Phone with the Slide Lock When you do not use the phone for a specified length of time... or press the LOCK/PWR key, the screen turns off and the phone locks. 1. Tap and drag into the circle to set as wallpaper. x You can also tap and drag to to . Changing Screen...
Download PDF
Page 28
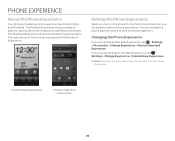
...recommended for the first time and set it up, you are not available in Pantech Easy Experience. Note Some functions and menus are using Pantech Standard Experience, tap > Settings > Change Experience > Pantech Easy Experience. You can change the phone experience at any time in this ... you are based on the phone for general users. The Pantech Easy Experience provides an easy-to-use the phone simply. Setting the Phone Experience When you turn on the Standard Experience. Pantech Easy Experience Pantech Standard Experience 28 The instructions in the Settings menu. If ...
...recommended for the first time and set it up, you are not available in Pantech Easy Experience. Note Some functions and menus are using Pantech Standard Experience, tap > Settings > Change Experience > Pantech Easy Experience. You can change the phone experience at any time in this ... you are based on the phone for general users. The Pantech Easy Experience provides an easy-to-use the phone simply. Setting the Phone Experience When you turn on the Standard Experience. Pantech Easy Experience Pantech Standard Experience 28 The instructions in the Settings menu. If ...

Download PDF
Page 33
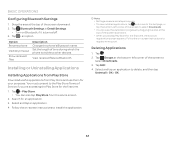
.... x You can also flick the Home screen upward, or tap . 2. Drag it to close the screen. 4. Drag it upward to the desired location. Quick settings Turn on or off Vibrate mode, Wi-Fi, Airplane 1 mode, GPS, Bluetooth, data connection, Power saver mode, Auto rotate, Auto sync, or Auto brightness.
.... x You can also flick the Home screen upward, or tap . 2. Drag it to close the screen. 4. Drag it upward to the desired location. Quick settings Turn on or off Vibrate mode, Wi-Fi, Airplane 1 mode, GPS, Bluetooth, data connection, Power saver mode, Auto rotate, Auto sync, or Auto brightness.
Download PDF
Page 39
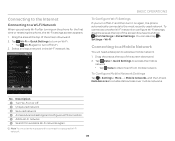
...-Fi network. 6 Search for the first time or resetting the phone, the Wi-Fi settings screen appears. 1. Select and tap a network in Quick Settings to turn off Wi-Fi. 3. To connect to another Wi-Fi network or configure Wi-Fi settings, drag the area at the top of the screen downward... enter a password to connect to enable data access over mobile networks. Connecting to the Internet Connecting to a Wi-Fi Network When you turn off Wi-Fi and then turn it on again, the phone automatically connects to the most recently-used network. Drag the area at the top of the screen downward...
...-Fi network. 6 Search for the first time or resetting the phone, the Wi-Fi settings screen appears. 1. Select and tap a network in Quick Settings to turn off Wi-Fi. 3. To connect to another Wi-Fi network or configure Wi-Fi settings, drag the area at the top of the screen downward... enter a password to connect to enable data access over mobile networks. Connecting to the Internet Connecting to a Wi-Fi Network When you turn off Wi-Fi and then turn it on again, the phone automatically connects to the most recently-used network. Drag the area at the top of the screen downward...
Download PDF
Page 40
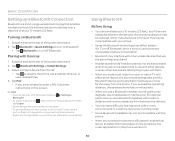
... phones or PCs may not be incompatible with your PC's User Manual for more details. x When you tap them . x Tap Bluetooth to turn on a PC, the PC must have difficulty hearing some calls in noisy environments or outdoors, due to surrounding noise. x Using the Bluetooth technology... may degrade, due to obstacles or interference. Tap Bluetooth in Quick Settings to turn off Bluetooth when it is a short-range wireless technology that use the same frequency band. x To unpair a device, tap next to rename...
... phones or PCs may not be incompatible with your PC's User Manual for more details. x When you tap them . x Tap Bluetooth to turn on a PC, the PC must have difficulty hearing some calls in noisy environments or outdoors, due to surrounding noise. x Using the Bluetooth technology... may degrade, due to obstacles or interference. Tap Bluetooth in Quick Settings to turn off Bluetooth when it is a short-range wireless technology that use the same frequency band. x To unpair a device, tap next to rename...
Download PDF
Page 42
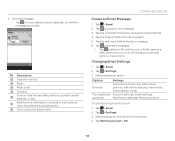
...left corner of the screen downward. Deleting Applications 1. Tap . 2. Select and tap an application to install the application. Select and tap an application. 4. x Turn on -screen instructions to other devices. Installing or Uninstalling Applications Installing Applications from Play Store Download useful applications from the Home screen. 2. Tap > Play Store... top of the screen to select Downloads. 3. You must consent to the Play Store Terms of time during which the phone is turned off. 3. Set the length of Service if you access Play Store for the first time. 1.
...left corner of the screen downward. Deleting Applications 1. Tap . 2. Select and tap an application to install the application. Select and tap an application. 4. x Turn on -screen instructions to other devices. Installing or Uninstalling Applications Installing Applications from Play Store Download useful applications from the Home screen. 2. Tap > Play Store... top of the screen to select Downloads. 3. You must consent to the Play Store Terms of time during which the phone is turned off. 3. Set the length of Service if you access Play Store for the first time. 1.

Download PDF
Page 45
... into the circle to use a variety of the screen downward when appears on the caller's preferences. You can be displayed depending on the notification bar. Turn Bluetooth On. End a call . x Tap and hold . Dial a second call , send a message, send an email, view a contact, or delete an item from a log. 3. Switch ...calls by pressing (volume key). Note Up to end a call logs. 45 To Check Missed Calls Drag the the area at the top of functions. 1. Turn Noise Suppression Off. Tap Phone > Call log. 2. Tap a call Merge Description Talk through the speaker.
... into the circle to use a variety of the screen downward when appears on the caller's preferences. You can be displayed depending on the notification bar. Turn Bluetooth On. End a call . x Tap and hold . Dial a second call , send a message, send an email, view a contact, or delete an item from a log. 3. Switch ...calls by pressing (volume key). Note Up to end a call logs. 45 To Check Missed Calls Drag the the area at the top of functions. 1. Turn Noise Suppression Off. Tap Phone > Call log. 2. Tap a call Merge Description Talk through the speaker.

Download PDF
Page 47
... from the phone to the SIM or USIM card. Move contacts from the phone to the SIM or USIM card. Syncing Contacts with it is turned off. 4. For more than two Google accounts, you have registered more details, refer to page 54. To Add Group Members Tap and hold a .... Select and tap an account. Setting Contacts Groups Manage multiple contacts in the group list, and then tap Edit group. Exporting or Sharing Contacts Information 1. x Turn on the SIM or USIM card. Tap . 3. Tap > Import/Export. 3. Item SIM card contacts Export to SIM card(Copy) Export to SIM card(Move)...
... from the phone to the SIM or USIM card. Move contacts from the phone to the SIM or USIM card. Syncing Contacts with it is turned off. 4. For more than two Google accounts, you have registered more details, refer to page 54. To Add Group Members Tap and hold a .... Select and tap an account. Setting Contacts Groups Manage multiple contacts in the group list, and then tap Edit group. Exporting or Sharing Contacts Information 1. x Turn on the SIM or USIM card. Tap . 3. Tap > Import/Export. 3. Item SIM card contacts Export to SIM card(Copy) Export to SIM card(Move)...
Download PDF
Page 53
... hide the sent date and time, sender's email address, or star. 6 Add the email address to calendar, or mark the message as a draft, discard it, turn on or off the save as unread. 1 234 5 6 7 No. COMMUNICATION Create an Email Message 1. Tap > Settings. 3. Select and tap an option. Option General Pre-registered...
... hide the sent date and time, sender's email address, or star. 6 Add the email address to calendar, or mark the message as a draft, discard it, turn on or off the save as unread. 1 234 5 6 7 No. COMMUNICATION Create an Email Message 1. Tap > Settings. 3. Select and tap an option. Option General Pre-registered...
Download PDF
Page 72
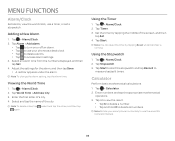
... the world clock, use the scientific calculator feature. 72 Tap > Alarm/Clock. 2. to delete all numbers. x Tap and hold C to use your smartphone horizontally to turn on or off an alarm. Adding a New Alarm 1. x Tap x Tap x Tap x Tap to use a timer, or set a stopwatch. Select an alarm time from the numbers...
... the world clock, use the scientific calculator feature. 72 Tap > Alarm/Clock. 2. to delete all numbers. x Tap and hold C to use your smartphone horizontally to turn on or off an alarm. Adding a New Alarm 1. x Tap x Tap x Tap x Tap to use a timer, or set a stopwatch. Select an alarm time from the numbers...

Download PDF
Page 76
Select and tap an option to share your location history. This option is available only after you have not turned on the location history feature. Tap > Latitude. 2. Tap > Latitude. 2. Tap Location history. 4. View your location. x Tap Enable location history,... to record your location hidden. MENU FUNCTIONS Accepting Invitation from the person. Tap > Latitude. 2. Tap new sharing request on -screen instructions if you turn down the person's request. x Tap Manage sharing and select an option. Tap > Location settings. 3. Add or remove friends who can see your ...
Select and tap an option to share your location history. This option is available only after you have not turned on the location history feature. Tap > Latitude. 2. Tap > Latitude. 2. Tap Location history. 4. View your location. x Tap Enable location history,... to record your location hidden. MENU FUNCTIONS Accepting Invitation from the person. Tap > Latitude. 2. Tap new sharing request on -screen instructions if you turn down the person's request. x Tap Manage sharing and select an option. Tap > Location settings. 3. Add or remove friends who can see your ...
Download PDF
Page 87
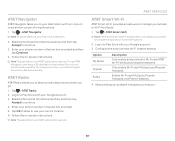
... in to your destination with your Google account. 3. AT&T Radio AT&T Radio allows you to listen to radio stations anywhere you to Play Store with turn-by turn voice and on-screen driving directions. 1. Enable Wi-Fi near AT&T Wi-Fi Hot Spots and saved networks. Log in to manage your current...
... in to your destination with your Google account. 3. AT&T Radio AT&T Radio allows you to listen to radio stations anywhere you to Play Store with turn-by turn voice and on-screen driving directions. 1. Enable Wi-Fi near AT&T Wi-Fi Hot Spots and saved networks. Log in to manage your current...


