
User Guide
Page 14
GETTING STARTED REMOVING THE BACK COVER 1 Make sure to turn off your phone and hold it clicks into place. 13 REPLACING THE BACK COVER 1 Place the back cover over the battery compartment, slide it upward until it securely with both hands with the front facing out. 2 Pull down the back cover with both thumbs.
GETTING STARTED REMOVING THE BACK COVER 1 Make sure to turn off your phone and hold it clicks into place. 13 REPLACING THE BACK COVER 1 Place the back cover over the battery compartment, slide it upward until it securely with both hands with the front facing out. 2 Pull down the back cover with both thumbs.
User Guide
Page 15
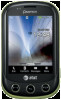
Avoid static electricity. 14 REMOVING THE 4G SIM CARD 1 Make sure to turn off your phone and remove the back cover and battery. 2 Hold the 4G SIM card carefully and slide it out from the slot. Keep it ... that the gold contacts of the card go against the metal contacts of your phone. GETTING STARTED INSTALLING THE 4G SIM CARD 1 Make sure to turn off your phone and remove the back cover and battery. 2 Insert the 4G SIM card into the slot. Make sure that houses your registration information...
Avoid static electricity. 14 REMOVING THE 4G SIM CARD 1 Make sure to turn off your phone and remove the back cover and battery. 2 Hold the 4G SIM card carefully and slide it out from the slot. Keep it ... that the gold contacts of the card go against the metal contacts of your phone. GETTING STARTED INSTALLING THE 4G SIM CARD 1 Make sure to turn off your phone and remove the back cover and battery. 2 Insert the 4G SIM card into the slot. Make sure that houses your registration information...
User Guide
Page 16
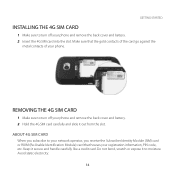
...of the phone. 3 Replace the back cover by sliding it out from the slot. Ensure that you format the microSD™ card before using the Breakout™. You can expand the external memory up until you can save data. Save pictures and contacts, and download applications to 32GB. It is a ... "CLICK." GETTING STARTED INSTALLING THE microSD™ CARD 1 Make sure to page 178. 15 For more information on erasing microSD™ card, refer to turn off your phone and remove the back cover and battery. 2 Hold the microSD™ card carefully and slide it up to the SD card. REMOVING...
...of the phone. 3 Replace the back cover by sliding it out from the slot. Ensure that you format the microSD™ card before using the Breakout™. You can expand the external memory up until you can save data. Save pictures and contacts, and download applications to 32GB. It is a ... "CLICK." GETTING STARTED INSTALLING THE microSD™ CARD 1 Make sure to page 178. 15 For more information on erasing microSD™ card, refer to turn off your phone and remove the back cover and battery. 2 Hold the microSD™ card carefully and slide it up to the SD card. REMOVING...
User Guide
Page 18
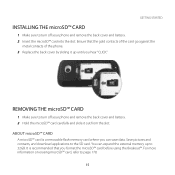
... to align the connector as indicated in your phone. 2 Press and hold the Power/Lock Key F E for a few seconds until the screen lights up. 3 To turn off the phone, press and hold the Power/Lock Key F E until the pop-up menu appears. 17 GETTING STARTED Note Make sure to fully charge... the battery before turning on your phone. 1 Ensure that the 4G SIM card and the battery are safely installed in the image. CHARGING THE BATTERY 1 Connect the USB cable...
... to align the connector as indicated in your phone. 2 Press and hold the Power/Lock Key F E for a few seconds until the screen lights up. 3 To turn off the phone, press and hold the Power/Lock Key F E until the pop-up menu appears. 17 GETTING STARTED Note Make sure to fully charge... the battery before turning on your phone. 1 Ensure that the 4G SIM card and the battery are safely installed in the image. CHARGING THE BATTERY 1 Connect the USB cable...
User Guide
Page 19
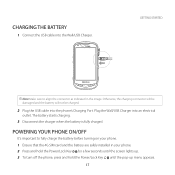
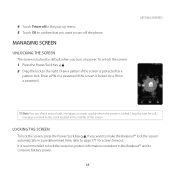
... locked by default when you want to make the Breakout™ lock the screen automatically in the Breakout™ and to confirm that you turn off in the middle of the screen. To unlock the screen: 1 Press the Power/Lock Key F E. 2 Drag the lock to turn on power. Enter a PIN or a password if the...
... locked by default when you want to make the Breakout™ lock the screen automatically in the Breakout™ and to confirm that you turn off in the middle of the screen. To unlock the screen: 1 Press the Power/Lock Key F E. 2 Drag the lock to turn on power. Enter a PIN or a password if the...
User Guide
Page 23
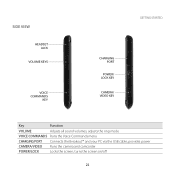
provides power CAMERA/VIDEO Runs the camera and camcorder POWER/LOCK Locks the screen; turns the screen on/off 22 SIDE VIEW HEADSET JACK VOLUME KEYS VOICE COMMANDS KEY GETTING STARTED CHARGING PORT POWER/ LOCK KEY CAMERA/ VIDEO KEY Key Function VOLUME Adjusts all sound volumes; adjusts the ring mode VOICE COMMANDS Runs the Voice Commands menu CHARGING PORT Connects the Breakout™ and your PC via the USB cable;
provides power CAMERA/VIDEO Runs the camera and camcorder POWER/LOCK Locks the screen; turns the screen on/off 22 SIDE VIEW HEADSET JACK VOLUME KEYS VOICE COMMANDS KEY GETTING STARTED CHARGING PORT POWER/ LOCK KEY CAMERA/ VIDEO KEY Key Function VOLUME Adjusts all sound volumes; adjusts the ring mode VOICE COMMANDS Runs the Voice Commands menu CHARGING PORT Connects the Breakout™ and your PC via the USB cable;
User Guide
Page 25
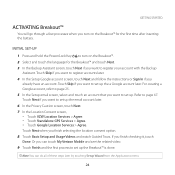
INITIAL SET-UP 1 Press and hold the Power/Lock Key F E to turn on the Breakout™. 2 Select and touch the language for the first time after inserting the battery. Touch Next when you finish checking it, touch Done. Or you ... selecting the location consent option. 8 Touch Basic Setup and Usage Videos and watch Guided Tours. GETTING STARTED ACTIVATING Breakout™ You will go through a few processes when you turn on the Breakout™ for the Breakout™ and touch Next. 3 In the Backup Assistant screen, touch Next if you want to register accounts later...
INITIAL SET-UP 1 Press and hold the Power/Lock Key F E to turn on the Breakout™. 2 Select and touch the language for the first time after inserting the battery. Touch Next when you finish checking it, touch Done. Or you ... selecting the location consent option. 8 Touch Basic Setup and Usage Videos and watch Guided Tours. GETTING STARTED ACTIVATING Breakout™ You will go through a few processes when you turn on the Breakout™ for the Breakout™ and touch Next. 3 In the Backup Assistant screen, touch Next if you want to register accounts later...
User Guide
Page 31
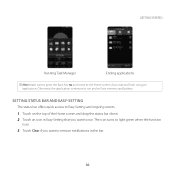
... on . 3 Touch Clear if you want to remove notifications in Easy Setting that you want to run and will use memory and battery. The icon turns to light green when the function is on the top of the Home screen and drag the status bar down. 2 Touch an icon in the...
... on . 3 Touch Clear if you want to remove notifications in Easy Setting that you want to run and will use memory and battery. The icon turns to light green when the function is on the top of the Home screen and drag the status bar down. 2 Touch an icon in the...

User Guide
Page 32
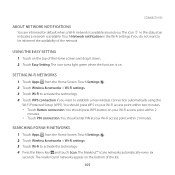
GETTING STARTED Opening Notifications EASY-SETTING ICONS Icon Description Mutes the sound Activates Wi-Fi Activates data network Adjusts Bluetooth settings Adjusts display settings Checking the status bar Icon Description Activates Bluetooth Activates GPS Adjusts sound settings Adjusts Mobile Hotspot settings Turns Airplane Mode on/off 31
GETTING STARTED Opening Notifications EASY-SETTING ICONS Icon Description Mutes the sound Activates Wi-Fi Activates data network Adjusts Bluetooth settings Adjusts display settings Checking the status bar Icon Description Activates Bluetooth Activates GPS Adjusts sound settings Adjusts Mobile Hotspot settings Turns Airplane Mode on/off 31

User Guide
Page 48
... to add to delete it, touch and hold the message and tap Delete. 47 Or touch , and touch a contact. 4 Enter a message in the Tap to turn off the function. Note A failed message remains in the To field. ADDING SHORTCUTS TO FAVORITE CONTACTS 1 Touch and hold on the empty space on . 2 Touch...
... to add to delete it, touch and hold the message and tap Delete. 47 Or touch , and touch a contact. 4 Enter a message in the Tap to turn off the function. Note A failed message remains in the To field. ADDING SHORTCUTS TO FAVORITE CONTACTS 1 Touch and hold on the empty space on . 2 Touch...

User Guide
Page 93
... see pictures with is run by default. Touch Gallery . 2 Select and touch a folder. 3 Drag to the right if you want to play videos. The screen turns to the landscape view by default to view. ARRANGING PICTURES 1 Touch Apps from the Home Screen.
... see pictures with is run by default. Touch Gallery . 2 Select and touch a folder. 3 Drag to the right if you want to play videos. The screen turns to the landscape view by default to view. ARRANGING PICTURES 1 Touch Apps from the Home Screen.

User Guide
Page 98
...) Next file: Moves to the next file (touch) Rewind: Rewinds the video (touch and hold) Previous file: Moves to the previous file (touch) Full view: Turns the screen to increase or decrease volume. Once appears on the screen, you want to make captions slower by dragging the bar to the left...
...) Next file: Moves to the next file (touch) Rewind: Rewinds the video (touch and hold) Previous file: Moves to the previous file (touch) Full view: Turns the screen to increase or decrease volume. Once appears on the screen, you want to make captions slower by dragging the bar to the left...
User Guide
Page 106
... button on your Wi-Fi access point within two minutes. xx Touch Button connection. The Breakout™ scans networks automatically every six seconds. SETTING Wi-Fi NETWORKS 1 Touch Apps from the Home Screen. The icon turns light green when the function is on the top of the Home screen and drag it...
... button on your Wi-Fi access point within two minutes. xx Touch Button connection. The Breakout™ scans networks automatically every six seconds. SETTING Wi-Fi NETWORKS 1 Touch Apps from the Home Screen. The icon turns light green when the function is on the top of the Home screen and drag it...

User Guide
Page 108
... on Mobile Hotspot. ICONS FOR Wi-Fi AND 3G/4G Icon Description Connected to see the screen in the screen on the calling plan. 5 Touch Turn on the 3G mobile hotspot feature. Touch Mobile Hotspot . 2 Touch Activate to see the screen in the future. 4 Touch Continue in the future. 107 CONNECTIVITY... is active. You can also touch the check box if you do not want to a Wi-Fi network The GPS is active, it will be turned off the Wi-Fi network connection: Wi-Fi network and the mobile hotspot cannot run at the same time. Data is being transferred through the...
... on Mobile Hotspot. ICONS FOR Wi-Fi AND 3G/4G Icon Description Connected to see the screen in the screen on the calling plan. 5 Touch Turn on the 3G mobile hotspot feature. Touch Mobile Hotspot . 2 Touch Activate to see the screen in the future. 4 Touch Continue in the future. 107 CONNECTIVITY... is active. You can also touch the check box if you do not want to a Wi-Fi network The GPS is active, it will be turned off the Wi-Fi network connection: Wi-Fi network and the mobile hotspot cannot run at the same time. Data is being transferred through the...

User Guide
Page 109
Touch Mobile Hotspot . 2 Touch Activate to activate 4G broadband. If a Wi-Fi network is active, touch Turn Wi-Fi off. xx Touch Security, select and touch a security type and take necessary steps. MANAGING DEVICES 1 Touch Apps from the Home Screen. Touch Mobile ...
Touch Mobile Hotspot . 2 Touch Activate to activate 4G broadband. If a Wi-Fi network is active, touch Turn Wi-Fi off. xx Touch Security, select and touch a security type and take necessary steps. MANAGING DEVICES 1 Touch Apps from the Home Screen. Touch Mobile ...
User Guide
Page 111
... the Home Screen. The status lasts for 60 seconds. Touch Gallery . 2 Select and touch a picture to let other people pair their devices with the Breakout™. Touch Settings . 2 Touch Wireless & networks > Bluetooth settings. 3 Touch Bluetooth to activate the technology. 4 Touch Discoverable if you want to share...other device CONNECTIVITY Icon Description Bluetooth is on the top of the Home screen and drag it down. 2 Touch Bluetooth. The icon turns light green when the function is active but not connected to other device USING THE EASY SETTING 1 Touch on . SHARING A PICTURE...
... the Home Screen. The status lasts for 60 seconds. Touch Gallery . 2 Select and touch a picture to let other people pair their devices with the Breakout™. Touch Settings . 2 Touch Wireless & networks > Bluetooth settings. 3 Touch Bluetooth to activate the technology. 4 Touch Discoverable if you want to share...other device CONNECTIVITY Icon Description Bluetooth is on the top of the Home screen and drag it down. 2 Touch Bluetooth. The icon turns light green when the function is active but not connected to other device USING THE EASY SETTING 1 Touch on . SHARING A PICTURE...
User Guide
Page 116
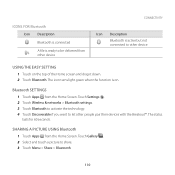
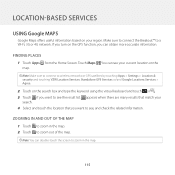
Note You can double-touch the screen to a Wi-Fi, 3G or 4G network. Touch Maps . Make sure to connect the Breakout™ to zoom in the map. 2 Touch to see the result list. appears when there are many results that match your search. 4 Select and touch ...the location that you want to zoom out of the map. If you turn on the GPS function, you want to see your region. FINDING PLACES 1 Touch Apps from the Home Screen. You can obtain more accurate information. Note...
Note You can double-touch the screen to a Wi-Fi, 3G or 4G network. Touch Maps . Make sure to connect the Breakout™ to zoom in the map. 2 Touch to see the result list. appears when there are many results that match your search. 4 Select and touch ...the location that you want to zoom out of the map. If you turn on the GPS function, you want to see your region. FINDING PLACES 1 Touch Apps from the Home Screen. You can obtain more accurate information. Note...

User Guide
Page 118
... by pressing the Menu Key B and touching Starred Places in the first screen of the screen and enter a category to add. When selected, the icon turns yellow. Note You can see related places in the map. ADDING STARRED PLACES 1 Touch Apps from the Home Screen. ADDING PLACES WIDGET 1 Touch and hold...
... by pressing the Menu Key B and touching Starred Places in the first screen of the screen and enter a category to add. When selected, the icon turns yellow. Note You can see related places in the map. ADDING STARRED PLACES 1 Touch Apps from the Home Screen. ADDING PLACES WIDGET 1 Touch and hold...

User Guide
Page 142
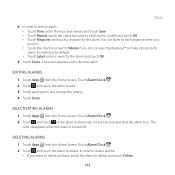
... also press the Menu Key B and touch Add alarm. 3 Touch the check box next to delete the whole number. 4 Touch Done. Touch and hold J to Turn alarm on your region including time and weather. Touch Alarm/Clock . 2 Touch and touch Add alarm. Touch J to divide the tip, type the number of...
... also press the Menu Key B and touch Add alarm. 3 Touch the check box next to delete the whole number. 4 Touch Done. Touch and hold J to Turn alarm on your region including time and weather. Touch Alarm/Clock . 2 Touch and touch Add alarm. Touch J to divide the tip, type the number of...
User Guide
Page 143
You can listen to edit. 3 Touch each ringtone when you touch it. xx Touch the check box next to Vibrate if you want the Breakout™ to deactivate. EDITING ALARMS 1 Touch Apps from the Home Screen. DEACTIVATING ALARMS 1 Touch Apps from the Home Screen. A blue bar appears under the new ... delete. Touch Alarm/Clock . 2 Touch and touch the alarm to each option and change the setting. 4 Touch Done. A blue bar indicates that the alarm is turned off. The color disappears when the alarm is on. xx Touch Repeat, touch the check box next to add an alarm: xx Touch Time, enter...
You can listen to edit. 3 Touch each ringtone when you touch it. xx Touch the check box next to Vibrate if you want the Breakout™ to deactivate. EDITING ALARMS 1 Touch Apps from the Home Screen. DEACTIVATING ALARMS 1 Touch Apps from the Home Screen. A blue bar appears under the new ... delete. Touch Alarm/Clock . 2 Touch and touch the alarm to each option and change the setting. 4 Touch Done. A blue bar indicates that the alarm is turned off. The color disappears when the alarm is on. xx Touch Repeat, touch the check box next to add an alarm: xx Touch Time, enter...

