
User Guide
Page 6
TABLE OF CONTENTS BASIC INSTRUCTIONS...2 BASIC INSTRUCTIONS...2 TABLE OF CONTENTS...5 1. GETTING STARTED GETTING STARTED...12 CHECKING PACKAGE...12 REMOVING THE BACK COVER...13 REPLACING THE BACK COVER...13 INSTALLING THE 4G SIM CARD...14 REMOVING THE 4G SIM CARD...14 INSTALLING THE microSD™ CARD...15 REMOVING THE microSD™ CARD...15 INSTALLING THE BATTERY...16 REMOVING THE BATTERY...16 CHARGING THE BATTERY...17 POWERING YOUR PHONE ON/OFF...17 MANAGING SCREEN...18 OVERVIEWING PRODUCT...20 GRIPPING Breakout™...23 ACTIVATING Breakout™...24 BACKING-UP DATA...26 5
TABLE OF CONTENTS BASIC INSTRUCTIONS...2 BASIC INSTRUCTIONS...2 TABLE OF CONTENTS...5 1. GETTING STARTED GETTING STARTED...12 CHECKING PACKAGE...12 REMOVING THE BACK COVER...13 REPLACING THE BACK COVER...13 INSTALLING THE 4G SIM CARD...14 REMOVING THE 4G SIM CARD...14 INSTALLING THE microSD™ CARD...15 REMOVING THE microSD™ CARD...15 INSTALLING THE BATTERY...16 REMOVING THE BATTERY...16 CHARGING THE BATTERY...17 POWERING YOUR PHONE ON/OFF...17 MANAGING SCREEN...18 OVERVIEWING PRODUCT...20 GRIPPING Breakout™...23 ACTIVATING Breakout™...24 BACKING-UP DATA...26 5

User Guide
Page 12
1 GETTING STARTED This chapter provides important information to know before using the Breakout™, including: CHECKING PACKAGE REMOVING THE BACK COVER REPLACING THE BACK COVER INSTALLING THE 4G SIM CARD REMOVING THE 4G SIM CARD INSTALLING THE microSD™ CARD REMOVING THE microSD™ CARD INSTALLING THE BATTERY REMOVING THE BATTERY CHARGING THE BATTERY POWERING YOUR PHONE ON/OFF MANAGING SCREEN OVERVIEWING PRODUCT GRIPPING Breakout™ ACTIVATING Breakout™ BACKING-UP DATA UNDERSTANDING HOME SCREEN CUSTOMIZING HOME SCREEN MANAGING APPLICATIONS SCREEN
1 GETTING STARTED This chapter provides important information to know before using the Breakout™, including: CHECKING PACKAGE REMOVING THE BACK COVER REPLACING THE BACK COVER INSTALLING THE 4G SIM CARD REMOVING THE 4G SIM CARD INSTALLING THE microSD™ CARD REMOVING THE microSD™ CARD INSTALLING THE BATTERY REMOVING THE BATTERY CHARGING THE BATTERY POWERING YOUR PHONE ON/OFF MANAGING SCREEN OVERVIEWING PRODUCT GRIPPING Breakout™ ACTIVATING Breakout™ BACKING-UP DATA UNDERSTANDING HOME SCREEN CUSTOMIZING HOME SCREEN MANAGING APPLICATIONS SCREEN
User Guide
Page 13
... Guide xx User Guide xx Product Safety & Warranty Brochure xx 8GB microSD™ card (pre-installed) Note You can purchase the Wireless Charging Inductive Battery Cover (FCC ID: JYCAPACHE) from the Verizon stores. xx LCD protective film xx External memory card adaptor 12 GETTING STARTED CHECKING PACKAGE Check if the package...
... Guide xx User Guide xx Product Safety & Warranty Brochure xx 8GB microSD™ card (pre-installed) Note You can purchase the Wireless Charging Inductive Battery Cover (FCC ID: JYCAPACHE) from the Verizon stores. xx LCD protective film xx External memory card adaptor 12 GETTING STARTED CHECKING PACKAGE Check if the package...

User Guide
Page 14
REPLACING THE BACK COVER 1 Place the back cover over the battery compartment, slide it upward until it securely with both hands with the front facing out. 2 Pull down the back cover with both thumbs. GETTING STARTED REMOVING THE BACK COVER 1 Make sure to turn off your phone and hold it clicks into place. 13
REPLACING THE BACK COVER 1 Place the back cover over the battery compartment, slide it upward until it securely with both hands with the front facing out. 2 Pull down the back cover with both thumbs. GETTING STARTED REMOVING THE BACK COVER 1 Make sure to turn off your phone and hold it clicks into place. 13
User Guide
Page 15
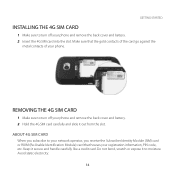
... against the metal contacts of your phone. GETTING STARTED INSTALLING THE 4G SIM CARD 1 Make sure to turn off your phone and remove the back cover and battery. 2 Insert the 4G SIM card into the slot. Keep it to turn off your registration information, PIN code, etc. Avoid static electricity. ...14 Make sure that houses your phone and remove the back cover and battery. 2 Hold the 4G SIM card carefully and slide it out from the slot. REMOVING THE 4G SIM CARD 1 Make sure to moisture....
... against the metal contacts of your phone. GETTING STARTED INSTALLING THE 4G SIM CARD 1 Make sure to turn off your phone and remove the back cover and battery. 2 Insert the 4G SIM card into the slot. Keep it to turn off your registration information, PIN code, etc. Avoid static electricity. ...14 Make sure that houses your phone and remove the back cover and battery. 2 Hold the 4G SIM card carefully and slide it out from the slot. REMOVING THE 4G SIM CARD 1 Make sure to moisture....
User Guide
Page 16
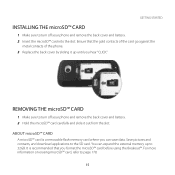
... you can expand the external memory up until you format the microSD™ card before using the Breakout™. REMOVING THE microSD™ CARD 1 Make sure to turn off your phone and remove the back cover and battery. 2 Insert the microSD™ card into the slot. ABOUT microSD™ CARD A ...microSD™ card is recommended that the gold contacts of the card go against the metal contacts of the phone. 3 Replace the back cover by sliding it out from the slot. GETTING STARTED INSTALLING THE microSD™ CARD 1 Make sure to turn off your phone and remove the back...
... you can expand the external memory up until you format the microSD™ card before using the Breakout™. REMOVING THE microSD™ CARD 1 Make sure to turn off your phone and remove the back cover and battery. 2 Insert the microSD™ card into the slot. ABOUT microSD™ CARD A ...microSD™ card is recommended that the gold contacts of the card go against the metal contacts of the phone. 3 Replace the back cover by sliding it out from the slot. GETTING STARTED INSTALLING THE microSD™ CARD 1 Make sure to turn off your phone and remove the back...

User Guide
Page 17
...compartment. 3 Press the battery down (2) until it clicks into place. 4 Replace the back cover over the battery compartment, slide it upward until it clicks into place. REMOVING THE BATTERY 1 Hold your nearest dealer. 16 ABOUT BATTERY The Breakout™ uses a Lithium Ion (Li-Ion) battery. Make sure to use the authorized battery... by lifting the top of the battery using the fingertip cutout. GETTING STARTED INSTALLING THE BATTERY 1 Hold your phone tightly after removing the back cover. 2 Remove the battery from the battery compartment by the service provider and temperatures.
...compartment. 3 Press the battery down (2) until it clicks into place. 4 Replace the back cover over the battery compartment, slide it upward until it clicks into place. REMOVING THE BATTERY 1 Hold your nearest dealer. 16 ABOUT BATTERY The Breakout™ uses a Lithium Ion (Li-Ion) battery. Make sure to use the authorized battery... by lifting the top of the battery using the fingertip cutout. GETTING STARTED INSTALLING THE BATTERY 1 Hold your phone tightly after removing the back cover. 2 Remove the battery from the battery compartment by the service provider and temperatures.

User Guide
Page 21
If the sensor is covered, you press and hold this key Ends an application; returns to the previous menu Opens a search window Note Make sure not to the Home screen; rearranges the Home screen Moves to cover the proximity sensor with the LCD protection film. OVERVIEWING PRODUCT FRONT VIEW FRONT CAMERA PROXIMITY SENSOR GETTING STARTED EARPIECE TOUCH SCREEN Key MENU B HOME A BACK C SEARCH D MENU KEY HOME KEY SEARCH KEY MICROPHONE BACK KEY Function Displays options available; runs the task manager when you might experience difficulties using the touch screen. 20
If the sensor is covered, you press and hold this key Ends an application; returns to the previous menu Opens a search window Note Make sure not to the Home screen; rearranges the Home screen Moves to cover the proximity sensor with the LCD protection film. OVERVIEWING PRODUCT FRONT VIEW FRONT CAMERA PROXIMITY SENSOR GETTING STARTED EARPIECE TOUCH SCREEN Key MENU B HOME A BACK C SEARCH D MENU KEY HOME KEY SEARCH KEY MICROPHONE BACK KEY Function Displays options available; runs the task manager when you might experience difficulties using the touch screen. 20

User Guide
Page 22
REAR VIEW SPEAKER GETTING STARTED CAMERA LENS BACK COVER INTERNAL ANTENNA AREA Name SPEAKER CAMERA LENS Description Sends sound Takes pictures and records video through this lens 21
REAR VIEW SPEAKER GETTING STARTED CAMERA LENS BACK COVER INTERNAL ANTENNA AREA Name SPEAKER CAMERA LENS Description Sends sound Takes pictures and records video through this lens 21

User Guide
Page 75
Make sure to insert a microSD™ card to transfer music files to the Breakout™ and listen to all files. Touch if you want to stop it or listen to another music file. 74 PLAYING MUSIC 1 Touch Apps from ... from the Home Screen. indicates that music is being played. Song rating Now-playing list bar Artist name Album title Song title Shuffling options Album cover Current playing time Progress bar Repeating options Note Music would run in the background if you do not end the application. ENTERTAINMENT LISTENING TO MUSIC...
Make sure to insert a microSD™ card to transfer music files to the Breakout™ and listen to all files. Touch if you want to stop it or listen to another music file. 74 PLAYING MUSIC 1 Touch Apps from ... from the Home Screen. indicates that music is being played. Song rating Now-playing list bar Artist name Album title Song title Shuffling options Album cover Current playing time Progress bar Repeating options Note Music would run in the background if you do not end the application. ENTERTAINMENT LISTENING TO MUSIC...

User Guide
Page 76
Numbers in the bar. Or swipe the album cover to decrease volume. As you adjust volume, the Media Volume on the screen changes its information. in front of a file indicates Note If you want ...
Numbers in the bar. Or swipe the album cover to decrease volume. As you adjust volume, the Media Volume on the screen changes its information. in front of a file indicates Note If you want ...
User Guide
Page 161
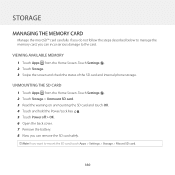
.... 3 Read the warning on unmounting the SD card and touch OK. 4 Touch and hold the Power/Lock Key F E. 5 Touch Power off > OK. 6 Open the back cover. 7 Remove the battery. 8 Now you can incur serious damage to mount the SD card, touch Apps > Settings > Storage > Mount SD card. 160 UNMOUNTING THE SD...
.... 3 Read the warning on unmounting the SD card and touch OK. 4 Touch and hold the Power/Lock Key F E. 5 Touch Power off > OK. 6 Open the back cover. 7 Remove the battery. 8 Now you can incur serious damage to mount the SD card, touch Apps > Settings > Storage > Mount SD card. 160 UNMOUNTING THE SD...
User Guide
Page 184
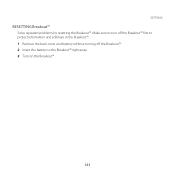
SETTINGS RESETTING Breakout™ Solve repeated problems by resetting the Breakout™. Make sure to turn off the Breakout™ first to protect information and software in the Breakout™. 1 Remove the back cover and battery without turning off the Breakout™. 2 Insert the battery to the Breakout™ right away. 3 Turn on the Breakout™. 183
SETTINGS RESETTING Breakout™ Solve repeated problems by resetting the Breakout™. Make sure to turn off the Breakout™ first to protect information and software in the Breakout™. 1 Remove the back cover and battery without turning off the Breakout™. 2 Insert the battery to the Breakout™ right away. 3 Turn on the Breakout™. 183

User Guide
Page 207
... SIG, Inc. TROUBLESHOOTING CHECKLIST WHEN AUDIO QUALITY IS POOR: End a call and try again. Or your handset. I further understand that my Voicemail messages may be covering the microphone. 206 Basic Voicemail and V CAST coverage areas are required to MUTE. Standard data usage charges shall apply. WHEN THE OTHER PARTY CANNOT HEAR...
... SIG, Inc. TROUBLESHOOTING CHECKLIST WHEN AUDIO QUALITY IS POOR: End a call and try again. Or your handset. I further understand that my Voicemail messages may be covering the microphone. 206 Basic Voicemail and V CAST coverage areas are required to MUTE. Standard data usage charges shall apply. WHEN THE OTHER PARTY CANNOT HEAR...
