User Guide
Page 4
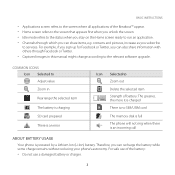
... phone is powered by a Lithium Ion (Li-Ion) battery. xx Captured images in Rearrange the selected item The battery is charging SD card prepared There is an error Icon Selected to the screen where all applications of the Breakout™ appear. Therefore, you unlock the screen. xx ...as you subscribe to the screen that appears first when you can also share information with others through which you can recharge the battery while some charge remains without reducing your phone's autonomy. BASIC INSTRUCTIONS xx Applications screen refers to Zoom out Delete the selected item ...
... phone is powered by a Lithium Ion (Li-Ion) battery. xx Captured images in Rearrange the selected item The battery is charging SD card prepared There is an error Icon Selected to the screen where all applications of the Breakout™ appear. Therefore, you unlock the screen. xx ...as you subscribe to the screen that appears first when you can also share information with others through which you can recharge the battery while some charge remains without reducing your phone's autonomy. BASIC INSTRUCTIONS xx Applications screen refers to Zoom out Delete the selected item ...

User Guide
Page 5
...remove the phone from its capacity and life. BASIC INSTRUCTIONS xx Do not disassemble, open, crush, bend, deform, puncture or shred the battery. xx Dispose of batteries by burning; xx Do not use your network's base station, the longer you move to a service center for the device per this... standard. xx Do not short circuit a battery or allow metallic conductive objects to fire, explosion or other hazard. xx Children should be supervised when they may reduce its charger once it...
...remove the phone from its capacity and life. BASIC INSTRUCTIONS xx Do not disassemble, open, crush, bend, deform, puncture or shred the battery. xx Dispose of batteries by burning; xx Do not use your network's base station, the longer you move to a service center for the device per this... standard. xx Do not short circuit a battery or allow metallic conductive objects to fire, explosion or other hazard. xx Children should be supervised when they may reduce its charger once it...

User Guide
Page 6
TABLE OF CONTENTS BASIC INSTRUCTIONS...2 BASIC INSTRUCTIONS...2 TABLE OF CONTENTS...5 1. GETTING STARTED GETTING STARTED...12 CHECKING PACKAGE...12 REMOVING THE BACK COVER...13 REPLACING THE BACK COVER...13 INSTALLING THE 4G SIM CARD...14 REMOVING THE 4G SIM CARD...14 INSTALLING THE microSD™ CARD...15 REMOVING THE microSD™ CARD...15 INSTALLING THE BATTERY...16 REMOVING THE BATTERY...16 CHARGING THE BATTERY...17 POWERING YOUR PHONE ON/OFF...17 MANAGING SCREEN...18 OVERVIEWING PRODUCT...20 GRIPPING Breakout™...23 ACTIVATING Breakout™...24 BACKING-UP DATA...26 5
TABLE OF CONTENTS BASIC INSTRUCTIONS...2 BASIC INSTRUCTIONS...2 TABLE OF CONTENTS...5 1. GETTING STARTED GETTING STARTED...12 CHECKING PACKAGE...12 REMOVING THE BACK COVER...13 REPLACING THE BACK COVER...13 INSTALLING THE 4G SIM CARD...14 REMOVING THE 4G SIM CARD...14 INSTALLING THE microSD™ CARD...15 REMOVING THE microSD™ CARD...15 INSTALLING THE BATTERY...16 REMOVING THE BATTERY...16 CHARGING THE BATTERY...17 POWERING YOUR PHONE ON/OFF...17 MANAGING SCREEN...18 OVERVIEWING PRODUCT...20 GRIPPING Breakout™...23 ACTIVATING Breakout™...24 BACKING-UP DATA...26 5
User Guide
Page 12
1 GETTING STARTED This chapter provides important information to know before using the Breakout™, including: CHECKING PACKAGE REMOVING THE BACK COVER REPLACING THE BACK COVER INSTALLING THE 4G SIM CARD REMOVING THE 4G SIM CARD INSTALLING THE microSD™ CARD REMOVING THE microSD™ CARD INSTALLING THE BATTERY REMOVING THE BATTERY CHARGING THE BATTERY POWERING YOUR PHONE ON/OFF MANAGING SCREEN OVERVIEWING PRODUCT GRIPPING Breakout™ ACTIVATING Breakout™ BACKING-UP DATA UNDERSTANDING HOME SCREEN CUSTOMIZING HOME SCREEN MANAGING APPLICATIONS SCREEN
1 GETTING STARTED This chapter provides important information to know before using the Breakout™, including: CHECKING PACKAGE REMOVING THE BACK COVER REPLACING THE BACK COVER INSTALLING THE 4G SIM CARD REMOVING THE 4G SIM CARD INSTALLING THE microSD™ CARD REMOVING THE microSD™ CARD INSTALLING THE BATTERY REMOVING THE BATTERY CHARGING THE BATTERY POWERING YOUR PHONE ON/OFF MANAGING SCREEN OVERVIEWING PRODUCT GRIPPING Breakout™ ACTIVATING Breakout™ BACKING-UP DATA UNDERSTANDING HOME SCREEN CUSTOMIZING HOME SCREEN MANAGING APPLICATIONS SCREEN
User Guide
Page 13
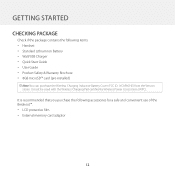
GETTING STARTED CHECKING PACKAGE Check if the package contains the following accessories for a safe and convenient use of the Breakout™. It must be used with the Wireless Charging Pad certified by Wireless Power Consortium (WPC). xx LCD protective film xx External memory card adaptor ...12 It is recommended that you purchase the following items: xx Handset xx Standard Lithium Ion Battery xx Wall/USB Charger xx Quick Start Guide xx User Guide xx Product Safety & Warranty Brochure xx 8GB microSD™ card (pre-installed) Note You...
GETTING STARTED CHECKING PACKAGE Check if the package contains the following accessories for a safe and convenient use of the Breakout™. It must be used with the Wireless Charging Pad certified by Wireless Power Consortium (WPC). xx LCD protective film xx External memory card adaptor ...12 It is recommended that you purchase the following items: xx Handset xx Standard Lithium Ion Battery xx Wall/USB Charger xx Quick Start Guide xx User Guide xx Product Safety & Warranty Brochure xx 8GB microSD™ card (pre-installed) Note You...

User Guide
Page 14
GETTING STARTED REMOVING THE BACK COVER 1 Make sure to turn off your phone and hold it clicks into place. 13 REPLACING THE BACK COVER 1 Place the back cover over the battery compartment, slide it upward until it securely with both hands with the front facing out. 2 Pull down the back cover with both thumbs.
GETTING STARTED REMOVING THE BACK COVER 1 Make sure to turn off your phone and hold it clicks into place. 13 REPLACING THE BACK COVER 1 Place the back cover over the battery compartment, slide it upward until it securely with both hands with the front facing out. 2 Pull down the back cover with both thumbs.
User Guide
Page 15
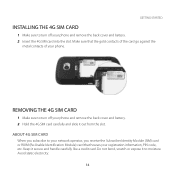
... like a credit card. Avoid static electricity. 14 Do not bend, scratch or expose it to turn off your phone and remove the back cover and battery. 2 Insert the 4G SIM card into the slot. GETTING STARTED INSTALLING THE 4G SIM CARD 1 Make sure to turn off your phone and remove the...
... like a credit card. Avoid static electricity. 14 Do not bend, scratch or expose it to turn off your phone and remove the back cover and battery. 2 Insert the 4G SIM card into the slot. GETTING STARTED INSTALLING THE 4G SIM CARD 1 Make sure to turn off your phone and remove the...
User Guide
Page 16
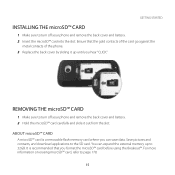
... CARD 1 Make sure to turn off your phone and remove the back cover and battery. 2 Hold the microSD™ card carefully and slide it up to turn off your phone and remove the... back cover and battery. 2 Insert the microSD™ card into the slot. Ensure that you can expand the external...the SD card. It is a removable flash memory card where you format the microSD™ card before using the Breakout™. You can save data. ABOUT microSD™ CARD A microSD™ card is recommended that the gold ...
... CARD 1 Make sure to turn off your phone and remove the back cover and battery. 2 Hold the microSD™ card carefully and slide it up to turn off your phone and remove the... back cover and battery. 2 Insert the microSD™ card into the slot. Ensure that you can expand the external...the SD card. It is a removable flash memory card where you format the microSD™ card before using the Breakout™. You can save data. ABOUT microSD™ CARD A microSD™ card is recommended that the gold ...

User Guide
Page 17
Make sure to use the authorized battery and charger only. REMOVING THE BATTERY 1 Hold your nearest dealer. 16 ABOUT BATTERY The Breakout™ uses a Lithium Ion (Li-Ion) battery. Maximum hours to use the battery might vary depending on service types offered by lifting the top of the battery using the fingertip cutout. For more details, inquire at...
Make sure to use the authorized battery and charger only. REMOVING THE BATTERY 1 Hold your nearest dealer. 16 ABOUT BATTERY The Breakout™ uses a Lithium Ion (Li-Ion) battery. Maximum hours to use the battery might vary depending on service types offered by lifting the top of the battery using the fingertip cutout. For more details, inquire at...
User Guide
Page 18
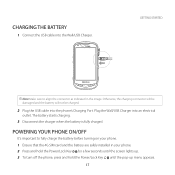
...'s important to align the connector as indicated in your phone. 1 Ensure that the 4G SIM card and the battery are safely installed in the image. Otherwise, the charging connector will be damaged and the battery will not be charged. 2 Plug the USB cable into the phone's Charging Port. GETTING STARTED Note Make... sure to fully charge the battery before turning on your phone. 2 Press and hold the Power/Lock Key F E for a few seconds until the screen lights up. 3 To turn off the phone, ...
...'s important to align the connector as indicated in your phone. 1 Ensure that the 4G SIM card and the battery are safely installed in the image. Otherwise, the charging connector will be damaged and the battery will not be charged. 2 Plug the USB cable into the phone's Charging Port. GETTING STARTED Note Make... sure to fully charge the battery before turning on your phone. 2 Press and hold the Power/Lock Key F E for a few seconds until the screen lights up. 3 To turn off the phone, ...
User Guide
Page 19
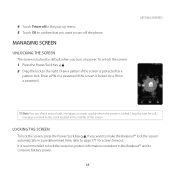
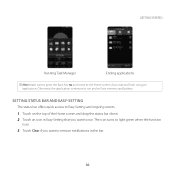
... protected by default when you turn off in the pop-up menu. 5 Touch OK to confirm that you want to conserve battery power. 18 If you want to make the Breakout™ lock the screen automatically in a predetermined time, refer to page 171 for call, message or email to the clock located... in the Breakout™ and to turn on power. LOCKING THE SCREEN To lock the screen, press the Power/Lock Key F E. MANAGING SCREEN UNLOCKING THE SCREEN The screen ...
... protected by default when you turn off in the pop-up menu. 5 Touch OK to confirm that you want to conserve battery power. 18 If you want to make the Breakout™ lock the screen automatically in a predetermined time, refer to page 171 for call, message or email to the clock located... in the Breakout™ and to turn on power. LOCKING THE SCREEN To lock the screen, press the Power/Lock Key F E. MANAGING SCREEN UNLOCKING THE SCREEN The screen ...
User Guide
Page 25
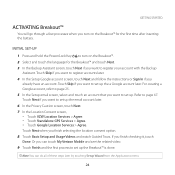
...; is done. Touch Next when you finish checking it, touch Done. GETTING STARTED ACTIVATING Breakout™ You will go through a few processes when you turn on the Breakout™ for the Breakout™ and touch Next. 3 In the Backup Assistant screen, touch Next if you want to register your account... these steps later by touching Setup Wizard from the Applications menu. 24 Or you want to turn on the Breakout™. 2 Select and touch the language for the first time after inserting the battery. INITIAL SET-UP 1 Press and hold the Power/Lock Key F E to set up the email account ...
...; is done. Touch Next when you finish checking it, touch Done. GETTING STARTED ACTIVATING Breakout™ You will go through a few processes when you turn on the Breakout™ for the Breakout™ and touch Next. 3 In the Backup Assistant screen, touch Next if you want to register your account... these steps later by touching Setup Wizard from the Applications menu. 24 Or you want to turn on the Breakout™. 2 Select and touch the language for the first time after inserting the battery. INITIAL SET-UP 1 Press and hold the Power/Lock Key F E to set up the email account ...
User Guide
Page 31
... ongoing events. 1 Touch on . 3 Touch Clear if you want to remove notifications in Easy Setting that you want to run and will use memory and battery. The icon turns to light green when the function is on the top of the Home screen and drag the status bar down. 2 Touch an...
... ongoing events. 1 Touch on . 3 Touch Clear if you want to remove notifications in Easy Setting that you want to run and will use memory and battery. The icon turns to light green when the function is on the top of the Home screen and drag the status bar down. 2 Touch an...
User Guide
Page 36
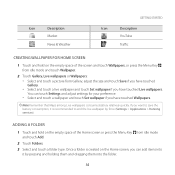
... to end the live wallpaper and touch Set wallpaper if you have touched Wallpapers. Note Remember that Maps among Live wallpapers consumes battery relatively quickly. Icon Description Market News & Weather GETTING STARTED Icon Description YouTube Traffic CREATING WALLPAPER FOR HOME SCREEN 1 Touch and ...Menu Key B from Gallery, adjust the size and touch Save if you have touched Gallery. Once a folder is recommended to save the battery consumption, it by force (Settings > Applications > Running services). xx Select and touch a live wallpaper by pressing and holding them and ...
... to end the live wallpaper and touch Set wallpaper if you have touched Wallpapers. Note Remember that Maps among Live wallpapers consumes battery relatively quickly. Icon Description Market News & Weather GETTING STARTED Icon Description YouTube Traffic CREATING WALLPAPER FOR HOME SCREEN 1 Touch and ...Menu Key B from Gallery, adjust the size and touch Save if you have touched Gallery. Once a folder is recommended to save the battery consumption, it by force (Settings > Applications > Running services). xx Select and touch a live wallpaper by pressing and holding them and ...
User Guide
Page 126
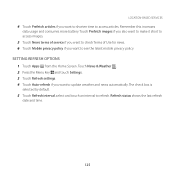
...-BASED SERVICES 4 Touch Prefetch articles if you want to shorten time to update weather and news automatically. Remember this increases data usage and consumes more battery. Touch News & Weather . 2 Press the Menu Key B and touch Settings. 3 Touch Refresh settings. 4 Touch Auto-refresh if you want to access articles. Refresh status shows...
...-BASED SERVICES 4 Touch Prefetch articles if you want to shorten time to update weather and news automatically. Remember this increases data usage and consumes more battery. Touch News & Weather . 2 Press the Menu Key B and touch Settings. 3 Touch Refresh settings. 4 Touch Auto-refresh if you want to access articles. Refresh status shows...
User Guide
Page 161
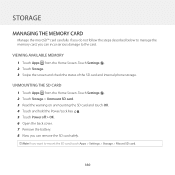
... on unmounting the SD card and touch OK. 4 Touch and hold the Power/Lock Key F E. 5 Touch Power off > OK. 6 Open the back cover. 7 Remove the battery. 8 Now you can incur serious damage to mount the SD card, touch Apps > Settings > Storage > Mount SD card. 160 VIEWING AVAILABLE MEMORY 1 Touch Apps from...
... on unmounting the SD card and touch OK. 4 Touch and hold the Power/Lock Key F E. 5 Touch Power off > OK. 6 Open the back cover. 7 Remove the battery. 8 Now you can incur serious damage to mount the SD card, touch Apps > Settings > Storage > Mount SD card. 160 VIEWING AVAILABLE MEMORY 1 Touch Apps from...

User Guide
Page 183
... INFORMATION 1 Touch Apps > Settings > About phone. 2 Touch Legal information if you want to check how the battery is being used. CHECKING BATTERY USE 1 Touch Apps > Settings > About phone. 2 Touch Battery use if you want to see the current status of the software and touch OK. 4 Touch Check New if you... want to check the current status of the phone, including battery status, battery level and your phone. CHECKING THE STATUS OF THE PHONE 1 Touch Apps > Settings > About phone. 2 Touch Status if you want to ...
... INFORMATION 1 Touch Apps > Settings > About phone. 2 Touch Legal information if you want to check how the battery is being used. CHECKING BATTERY USE 1 Touch Apps > Settings > About phone. 2 Touch Battery use if you want to see the current status of the software and touch OK. 4 Touch Check New if you... want to check the current status of the phone, including battery status, battery level and your phone. CHECKING THE STATUS OF THE PHONE 1 Touch Apps > Settings > About phone. 2 Touch Status if you want to ...
User Guide
Page 184
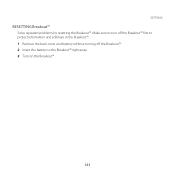
SETTINGS RESETTING Breakout™ Solve repeated problems by resetting the Breakout™. Make sure to turn off the Breakout™ first to protect information and software in the Breakout™. 1 Remove the back cover and battery without turning off the Breakout™. 2 Insert the battery to the Breakout™ right away. 3 Turn on the Breakout™. 183
SETTINGS RESETTING Breakout™ Solve repeated problems by resetting the Breakout™. Make sure to turn off the Breakout™ first to protect information and software in the Breakout™. 1 Remove the back cover and battery without turning off the Breakout™. 2 Insert the battery to the Breakout™ right away. 3 Turn on the Breakout™. 183
User Guide
Page 189
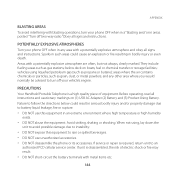
...when in any other area where you would normally be advised to follow the directions below deck on (1) USB AC Adapter (2) Battery and (3) Product Using Battery. below could cause an explosion or fire resulting in an extreme environment where high temperature or high humidity exists. fuel or ... DO NOT expose this equipment in bodily injury or even death. vehicles using , lay down the unit to avoid possible damage due to battery liquid leakage, fire or rupture. Obey all instructions and cautionary markings on boats; Failure to turn your vehicle's engine. If service or ...
...when in any other area where you would normally be advised to follow the directions below deck on (1) USB AC Adapter (2) Battery and (3) Product Using Battery. below could cause an explosion or fire resulting in an extreme environment where high temperature or high humidity exists. fuel or ... DO NOT expose this equipment in bodily injury or even death. vehicles using , lay down the unit to avoid possible damage due to battery liquid leakage, fire or rupture. Obey all instructions and cautionary markings on boats; Failure to turn your vehicle's engine. If service or ...
User Guide
Page 202
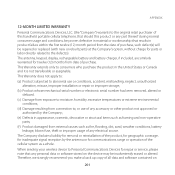
... Company disclaims liability for removal or reinstallation of any personal data or software stored on 201 The antenna, keypad, display, rechargeable battery and battery charger, if included, are similarly warranted for inadequate signal reception by the Company; (e) Defects in the United States or Canada and... by the antenna or for communications range or operation of the cellular system as fire, flooding, dirt, sand, weather conditions, battery leakage, blown fuse, theft or improper usage of the product, for geographic coverage, for twelve (12) months from external causes such as...
... Company disclaims liability for removal or reinstallation of any personal data or software stored on 201 The antenna, keypad, display, rechargeable battery and battery charger, if included, are similarly warranted for inadequate signal reception by the Company; (e) Defects in the United States or Canada and... by the antenna or for communications range or operation of the cellular system as fire, flooding, dirt, sand, weather conditions, battery leakage, blown fuse, theft or improper usage of the product, for geographic coverage, for twelve (12) months from external causes such as...


