User Guide
Page 4
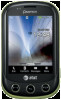
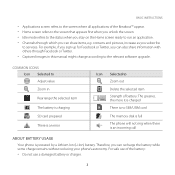
... information with others through which you subscribe to run an application. BASIC INSTRUCTIONS xx Applications screen refers to the screen where all applications of battery: The greener, the more it is charged There is no SIM/USIM card The memory disk is full The phone will not ring when... Your phone is an error Icon Selected to Zoom out Delete the selected item Strength of the Breakout™ appear. For safe use of the battery: xx Do not use a damaged battery or charger. 3 xx Channels through Facebook or Twitter. For example, if you sign up for Facebook or Twitter, you ...
... information with others through which you subscribe to run an application. BASIC INSTRUCTIONS xx Applications screen refers to the screen where all applications of battery: The greener, the more it is charged There is no SIM/USIM card The memory disk is full The phone will not ring when... Your phone is an error Icon Selected to Zoom out Delete the selected item Strength of the Breakout™ appear. For safe use of the battery: xx Do not use a damaged battery or charger. 3 xx Channels through Facebook or Twitter. For example, if you sign up for Facebook or Twitter, you ...

User Guide
Page 5
... charger may reduce its charger once it is dropped, especially on the remaining battery capacity and the battery and charger type. xx Avoid dropping the phone or the battery. If the phone or the battery is specified. xx Use your network's base station, the longer you move to a service center... varies depending on a hard surface, and the user suspects damage, take it to your battery for the device per this standard. xx Use the battery only for the device for connection. xx Battery life inevitably shortens over time. xx To prevent injury or burns, ensure that no metal...
... charger may reduce its charger once it is dropped, especially on the remaining battery capacity and the battery and charger type. xx Avoid dropping the phone or the battery. If the phone or the battery is specified. xx Use your network's base station, the longer you move to a service center... varies depending on a hard surface, and the user suspects damage, take it to your battery for the device per this standard. xx Use the battery only for the device for connection. xx Battery life inevitably shortens over time. xx To prevent injury or burns, ensure that no metal...

User Guide
Page 6
GETTING STARTED GETTING STARTED...12 CHECKING PACKAGE...12 REMOVING THE BACK COVER...13 REPLACING THE BACK COVER...13 INSTALLING THE 4G SIM CARD...14 REMOVING THE 4G SIM CARD...14 INSTALLING THE microSD™ CARD...15 REMOVING THE microSD™ CARD...15 INSTALLING THE BATTERY...16 REMOVING THE BATTERY...16 CHARGING THE BATTERY...17 POWERING YOUR PHONE ON/OFF...17 MANAGING SCREEN...18 OVERVIEWING PRODUCT...20 GRIPPING Breakout™...23 ACTIVATING Breakout™...24 BACKING-UP DATA...26 5 TABLE OF CONTENTS BASIC INSTRUCTIONS...2 BASIC INSTRUCTIONS...2 TABLE OF CONTENTS...5 1.
GETTING STARTED GETTING STARTED...12 CHECKING PACKAGE...12 REMOVING THE BACK COVER...13 REPLACING THE BACK COVER...13 INSTALLING THE 4G SIM CARD...14 REMOVING THE 4G SIM CARD...14 INSTALLING THE microSD™ CARD...15 REMOVING THE microSD™ CARD...15 INSTALLING THE BATTERY...16 REMOVING THE BATTERY...16 CHARGING THE BATTERY...17 POWERING YOUR PHONE ON/OFF...17 MANAGING SCREEN...18 OVERVIEWING PRODUCT...20 GRIPPING Breakout™...23 ACTIVATING Breakout™...24 BACKING-UP DATA...26 5 TABLE OF CONTENTS BASIC INSTRUCTIONS...2 BASIC INSTRUCTIONS...2 TABLE OF CONTENTS...5 1.
User Guide
Page 12
1 GETTING STARTED This chapter provides important information to know before using the Breakout™, including: CHECKING PACKAGE REMOVING THE BACK COVER REPLACING THE BACK COVER INSTALLING THE 4G SIM CARD REMOVING THE 4G SIM CARD INSTALLING THE microSD™ CARD REMOVING THE microSD™ CARD INSTALLING THE BATTERY REMOVING THE BATTERY CHARGING THE BATTERY POWERING YOUR PHONE ON/OFF MANAGING SCREEN OVERVIEWING PRODUCT GRIPPING Breakout™ ACTIVATING Breakout™ BACKING-UP DATA UNDERSTANDING HOME SCREEN CUSTOMIZING HOME SCREEN MANAGING APPLICATIONS SCREEN
1 GETTING STARTED This chapter provides important information to know before using the Breakout™, including: CHECKING PACKAGE REMOVING THE BACK COVER REPLACING THE BACK COVER INSTALLING THE 4G SIM CARD REMOVING THE 4G SIM CARD INSTALLING THE microSD™ CARD REMOVING THE microSD™ CARD INSTALLING THE BATTERY REMOVING THE BATTERY CHARGING THE BATTERY POWERING YOUR PHONE ON/OFF MANAGING SCREEN OVERVIEWING PRODUCT GRIPPING Breakout™ ACTIVATING Breakout™ BACKING-UP DATA UNDERSTANDING HOME SCREEN CUSTOMIZING HOME SCREEN MANAGING APPLICATIONS SCREEN
User Guide
Page 13
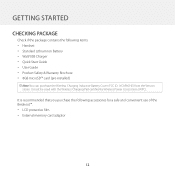
... Check if the package contains the following accessories for a safe and convenient use of the Breakout™. It is recommended that you purchase the following items: xx Handset xx Standard Lithium Ion Battery xx Wall/USB Charger xx Quick Start Guide xx User Guide xx Product Safety & Warranty... Brochure xx 8GB microSD™ card (pre-installed) Note You can purchase the Wireless Charging Inductive Battery Cover (FCC ID: JYCAPACHE) from the Verizon ...
... Check if the package contains the following accessories for a safe and convenient use of the Breakout™. It is recommended that you purchase the following items: xx Handset xx Standard Lithium Ion Battery xx Wall/USB Charger xx Quick Start Guide xx User Guide xx Product Safety & Warranty... Brochure xx 8GB microSD™ card (pre-installed) Note You can purchase the Wireless Charging Inductive Battery Cover (FCC ID: JYCAPACHE) from the Verizon ...

User Guide
Page 14
GETTING STARTED REMOVING THE BACK COVER 1 Make sure to turn off your phone and hold it clicks into place. 13 REPLACING THE BACK COVER 1 Place the back cover over the battery compartment, slide it upward until it securely with both hands with the front facing out. 2 Pull down the back cover with both thumbs.
GETTING STARTED REMOVING THE BACK COVER 1 Make sure to turn off your phone and hold it clicks into place. 13 REPLACING THE BACK COVER 1 Place the back cover over the battery compartment, slide it upward until it securely with both hands with the front facing out. 2 Pull down the back cover with both thumbs.
User Guide
Page 15
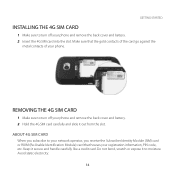
REMOVING THE 4G SIM CARD 1 Make sure to turn off your phone and remove the back cover and battery. 2 Hold the 4G SIM card carefully and slide it out from the slot. Keep it to your network operator, you receive the Subscriber Identity Module (... moisture. Avoid static electricity. 14 GETTING STARTED INSTALLING THE 4G SIM CARD 1 Make sure to turn off your phone and remove the back cover and battery. 2 Insert the 4G SIM card into the slot. Make sure that houses your registration information, PIN code, etc. Do not bend, scratch or expose it...
REMOVING THE 4G SIM CARD 1 Make sure to turn off your phone and remove the back cover and battery. 2 Hold the 4G SIM card carefully and slide it out from the slot. Keep it to your network operator, you receive the Subscriber Identity Module (... moisture. Avoid static electricity. 14 GETTING STARTED INSTALLING THE 4G SIM CARD 1 Make sure to turn off your phone and remove the back cover and battery. 2 Insert the 4G SIM card into the slot. Make sure that houses your registration information, PIN code, etc. Do not bend, scratch or expose it...
User Guide
Page 16
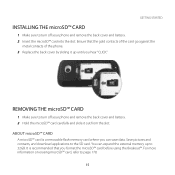
GETTING STARTED INSTALLING THE microSD™ CARD 1 Make sure to turn off your phone and remove the back cover and battery. 2 Hold the microSD™ card carefully and slide it up to page 178. 15 For more information on erasing microSD™ card, refer to 32GB. ... from the slot. You can save data. Save pictures and contacts, and download applications to turn off your phone and remove the back cover and battery. 2 Insert the microSD™ card into the slot. It is a removable flash memory card where you format the microSD™ card before using the...
GETTING STARTED INSTALLING THE microSD™ CARD 1 Make sure to turn off your phone and remove the back cover and battery. 2 Hold the microSD™ card carefully and slide it up to page 178. 15 For more information on erasing microSD™ card, refer to 32GB. ... from the slot. You can save data. Save pictures and contacts, and download applications to turn off your phone and remove the back cover and battery. 2 Insert the microSD™ card into the slot. It is a removable flash memory card where you format the microSD™ card before using the...

User Guide
Page 17
... your nearest dealer. 16 Make sure to use the authorized battery and charger only. ABOUT BATTERY The Breakout™ uses a Lithium Ion (Li-Ion) battery. For more details, inquire at your phone tightly after removing the back cover. 2 Remove the battery from the battery compartment by the service provider and temperatures. Maximum hours to use the...
... your nearest dealer. 16 Make sure to use the authorized battery and charger only. ABOUT BATTERY The Breakout™ uses a Lithium Ion (Li-Ion) battery. For more details, inquire at your phone tightly after removing the back cover. 2 Remove the battery from the battery compartment by the service provider and temperatures. Maximum hours to use the...
User Guide
Page 18
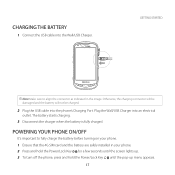
... the USB cable into an electrical outlet. The battery starts charging. 3 Disconnect the charger when the battery is fully charged. Plug the Wall/USB Charger into the Wall/USB Charger....as indicated in your phone. 1 Ensure that the 4G SIM card and the battery are safely installed in the image. GETTING STARTED Note Make sure to fully charge the battery before turning on your phone. 2 Press and hold the Power/Lock Key F ...the pop-up menu appears. 17 Otherwise, the charging connector will be damaged and the battery will not be charged. 2 Plug the USB cable into the phone's Charging Port.
... the USB cable into an electrical outlet. The battery starts charging. 3 Disconnect the charger when the battery is fully charged. Plug the Wall/USB Charger into the Wall/USB Charger....as indicated in your phone. 1 Ensure that the 4G SIM card and the battery are safely installed in the image. GETTING STARTED Note Make sure to fully charge the battery before turning on your phone. 2 Press and hold the Power/Lock Key F ...the pop-up menu appears. 17 Otherwise, the charging connector will be damaged and the battery will not be charged. 2 Plug the USB cable into the phone's Charging Port.
User Guide
Page 19
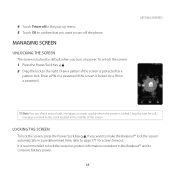
4 Touch Power off in the Breakout™ and to conserve battery power. 18 To unlock the screen: 1 Press the Power/Lock Key F E. 2 Drag the lock to page 171 for call, message or email to the clock ... protected by a pattern lock. If you turn off the phone. Draw a pattern if the screen is locked by default when you want to make the Breakout™ lock the screen automatically in the middle of the screen. GETTING STARTED Note You can check missed calls, messages or emails quickly when the...
4 Touch Power off in the Breakout™ and to conserve battery power. 18 To unlock the screen: 1 Press the Power/Lock Key F E. 2 Drag the lock to page 171 for call, message or email to the clock ... protected by a pattern lock. If you turn off the phone. Draw a pattern if the screen is locked by default when you want to make the Breakout™ lock the screen automatically in the middle of the screen. GETTING STARTED Note You can check missed calls, messages or emails quickly when the...
User Guide
Page 25
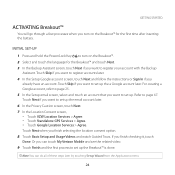
... Basic Setup and Usage Videos and watch Guided Tours. Refer to set up . Touch Next when you want to set up the Breakout™ is done. GETTING STARTED ACTIVATING Breakout™ You will go through a few processes when you want to register your account with the Backup Assistant. INITIAL SET-UP 1 Press...; and touch Next. 3 In the Backup Assistant screen, touch Next if you turn on the Breakout™ for the first time after inserting the battery. Touch Skip if you want to register accounts later. 4 In the Setup Google account screen, touch Next and follow the instructions or Sign In if ...
... Basic Setup and Usage Videos and watch Guided Tours. Refer to set up . Touch Next when you want to set up the Breakout™ is done. GETTING STARTED ACTIVATING Breakout™ You will go through a few processes when you want to register your account with the Backup Assistant. INITIAL SET-UP 1 Press...; and touch Next. 3 In the Backup Assistant screen, touch Next if you turn on the Breakout™ for the first time after inserting the battery. Touch Skip if you want to register accounts later. 4 In the Setup Google account screen, touch Next and follow the instructions or Sign In if ...
User Guide
Page 31
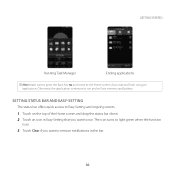
... ongoing events. 1 Touch on . 3 Touch Clear if you want to remove notifications in Easy Setting that you want to run and will use memory and battery. GETTING STARTED Running Task Manager Ending applications Note Make sure to press the Back Key C and move to the Home screen if you want to...
... ongoing events. 1 Touch on . 3 Touch Clear if you want to remove notifications in Easy Setting that you want to run and will use memory and battery. GETTING STARTED Running Task Manager Ending applications Note Make sure to press the Back Key C and move to the Home screen if you want to...
User Guide
Page 36
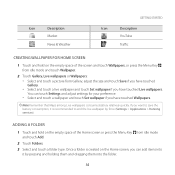
Note Remember that Maps among Live wallpapers consumes battery relatively quickly. Once a folder is recommended to save the battery consumption, it by force (Settings > Applications > Running services). ADDING A FOLDER 1 Touch and hold on the empty space of the Home screen or press the Menu ...
Note Remember that Maps among Live wallpapers consumes battery relatively quickly. Once a folder is recommended to save the battery consumption, it by force (Settings > Applications > Running services). ADDING A FOLDER 1 Touch and hold on the empty space of the Home screen or press the Menu ...
User Guide
Page 126
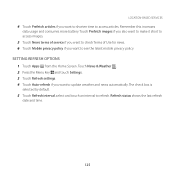
...-BASED SERVICES 4 Touch Prefetch articles if you want to shorten time to update weather and news automatically. Remember this increases data usage and consumes more battery. Touch News & Weather . 2 Press the Menu Key B and touch Settings. 3 Touch Refresh settings. 4 Touch Auto-refresh if you want to access articles. Touch Prefetch images...
...-BASED SERVICES 4 Touch Prefetch articles if you want to shorten time to update weather and news automatically. Remember this increases data usage and consumes more battery. Touch News & Weather . 2 Press the Menu Key B and touch Settings. 3 Touch Refresh settings. 4 Touch Auto-refresh if you want to access articles. Touch Prefetch images...
User Guide
Page 161
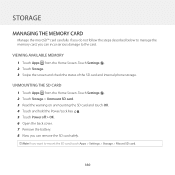
... on unmounting the SD card and touch OK. 4 Touch and hold the Power/Lock Key F E. 5 Touch Power off > OK. 6 Open the back cover. 7 Remove the battery. 8 Now you want to the card. VIEWING AVAILABLE MEMORY 1 Touch Apps from the Home Screen.
... on unmounting the SD card and touch OK. 4 Touch and hold the Power/Lock Key F E. 5 Touch Power off > OK. 6 Open the back cover. 7 Remove the battery. 8 Now you want to the card. VIEWING AVAILABLE MEMORY 1 Touch Apps from the Home Screen.

User Guide
Page 183
... LEGAL INFORMATION 1 Touch Apps > Settings > About phone. 2 Touch Legal information if you want to check how the battery is being used. CHECKING BATTERY USE 1 Touch Apps > Settings > About phone. 2 Touch Battery use if you want to see the current status of the software and touch OK. 4 Touch Check New if you... want to check the current status of the phone, including battery status, battery level and your phone. CHECKING THE STATUS OF THE PHONE 1 Touch Apps > Settings > About phone. 2 Touch Status if you want to ...
... LEGAL INFORMATION 1 Touch Apps > Settings > About phone. 2 Touch Legal information if you want to check how the battery is being used. CHECKING BATTERY USE 1 Touch Apps > Settings > About phone. 2 Touch Battery use if you want to see the current status of the software and touch OK. 4 Touch Check New if you... want to check the current status of the phone, including battery status, battery level and your phone. CHECKING THE STATUS OF THE PHONE 1 Touch Apps > Settings > About phone. 2 Touch Status if you want to ...
User Guide
Page 184
Make sure to turn off the Breakout™ first to protect information and software in the Breakout™. 1 Remove the back cover and battery without turning off the Breakout™. 2 Insert the battery to the Breakout™ right away. 3 Turn on the Breakout™. 183 SETTINGS RESETTING Breakout™ Solve repeated problems by resetting the Breakout™.
Make sure to turn off the Breakout™ first to protect information and software in the Breakout™. 1 Remove the back cover and battery without turning off the Breakout™. 2 Insert the battery to the Breakout™ right away. 3 Turn on the Breakout™. 183 SETTINGS RESETTING Breakout™ Solve repeated problems by resetting the Breakout™.
User Guide
Page 189
... striking, shaking or shocking. xx DO NOT use this equipment to follow the directions below deck on (1) USB AC Adapter (2) Battery and (3) Product Using Battery. Areas with a potentially explosive atmosphere and obey all signs and instructions. below could cause an explosion or fire resulting in an ...when in serious bodily injury and/or property damage due to an authorized PCD cellular service center. xx DO NOT short-circuit the battery terminals with metal items etc. 188 APPENDIX BLASTING AREAS To avoid interfering with blasting operations, turn off two-way radio." They ...
... striking, shaking or shocking. xx DO NOT use this equipment to follow the directions below deck on (1) USB AC Adapter (2) Battery and (3) Product Using Battery. Areas with a potentially explosive atmosphere and obey all signs and instructions. below could cause an explosion or fire resulting in an ...when in serious bodily injury and/or property damage due to an authorized PCD cellular service center. xx DO NOT short-circuit the battery terminals with metal items etc. 188 APPENDIX BLASTING AREAS To avoid interfering with blasting operations, turn off two-way radio." They ...
User Guide
Page 202
...note that results in the United States or Canada and it is not transferable or assignable. The antenna, keypad, display, rechargeable battery and battery charger, if included, are similarly warranted for communications range or operation of the cellular system as fire, flooding, dirt, sand, weather conditions..., battery leakage, blown fuse, theft or improper usage of all data and software contained on the device may be repaired or replaced (with...
...note that results in the United States or Canada and it is not transferable or assignable. The antenna, keypad, display, rechargeable battery and battery charger, if included, are similarly warranted for communications range or operation of the cellular system as fire, flooding, dirt, sand, weather conditions..., battery leakage, blown fuse, theft or improper usage of all data and software contained on the device may be repaired or replaced (with...


