
WVNP472 User Guide
Page 1
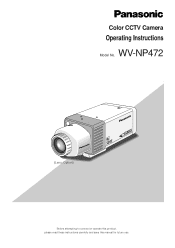
WV-NP472 (Lens: Option) day/night SDII (Lens : option) Before attempting to connect or operate this product, please read these instructions carefully and save this manual for future use. Color CCTV Camera Operating Instructions Model No.
WV-NP472 (Lens: Option) day/night SDII (Lens : option) Before attempting to connect or operate this product, please read these instructions carefully and save this manual for future use. Color CCTV Camera Operating Instructions Model No.
WVNP472 User Guide
Page 2
... be found to comply with liquids, such as a permanent record of this product may cause harmful interference to persons. REFER SERVICING TO QUALIFIED SERVICE PERSONNEL. WV-NP472 WARNING: To prevent fire or electric shock hazard, do not expose this book as vases, shall be of sufficient magnitude to constitute a risk of important...
... be found to comply with liquids, such as a permanent record of this product may cause harmful interference to persons. REFER SERVICING TO QUALIFIED SERVICE PERSONNEL. WV-NP472 WARNING: To prevent fire or electric shock hazard, do not expose this book as vases, shall be of sufficient magnitude to constitute a risk of important...
WVNP472 User Guide
Page 5
... Communicator 4.73, 4.78 Trademarks • Adobe, Adobe logos, and Acrobat are essential for your PC to view camera images via the network. • SD II (super dynamic) system allows a wide range of the following should be...color and monochrome in response to light inputs • Built-in the U.S. and other countries. • Netscape, Netscape Navigator, Netscape ONE, the Netscape N and Ship's Wheel logos are registered trademarks of the software provided with this document are registered trademarks of Adobe Systems Incorporated in the U.S. PREFACE Panasonic's WV-NP472 camera...
... Communicator 4.73, 4.78 Trademarks • Adobe, Adobe logos, and Acrobat are essential for your PC to view camera images via the network. • SD II (super dynamic) system allows a wide range of the following should be...color and monochrome in response to light inputs • Built-in the U.S. and other countries. • Netscape, Netscape Navigator, Netscape ONE, the Netscape N and Ship's Wheel logos are registered trademarks of the software provided with this document are registered trademarks of Adobe Systems Incorporated in the U.S. PREFACE Panasonic's WV-NP472 camera...
WVNP472 User Guide
Page 7
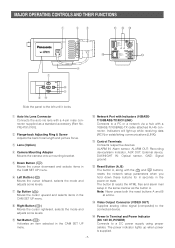
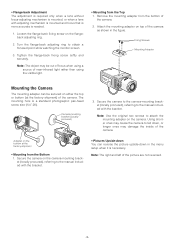
... is supplied. -7- e Lens (Option) r Camera Mounting Adapter Mounts the camera onto a mounting bracket. y Left Button (L) Moves the cursor leftward, selects the mode and adjusts some levels. The button B resets the HTML files and alarm mail setup in the power-on state. MAJOR OPERATING CONTROLS AND THEIR FUNCTIONS q w e !1 !2 !3 WV -NP472 !0 ALARM IN ALARM OUT AUX...
... is supplied. -7- e Lens (Option) r Camera Mounting Adapter Mounts the camera onto a mounting bracket. y Left Button (L) Moves the cursor leftward, selects the mode and adjusts some levels. The button B resets the HTML files and alarm mail setup in the power-on state. MAJOR OPERATING CONTROLS AND THEIR FUNCTIONS q w e !1 !2 !3 WV -NP472 !0 ALARM IN ALARM OUT AUX...

WVNP472 User Guide
Page 8
...at the factory shipment can accept only a CS-mount lens. 2. Process the cable end as shown in the figure. 2. Lens Mount C-mount Adapter WV-NP472 Flange-back Adjusting Ring & Screw 3. Attach the cover to the pin. Attach the supplied C-mount adapter when using a C-mount lens. Jump to..., replace the existing lens connector with the supporter (not supplied) if a lens heavier than 8 mm (5/16") • Secure both the lens and camera with the type YFE419J100 supplied. 1. Mount the lens. 4. Connect the lens cable to step 3 if the lens has focus adjusting mechanism. Cover Lens...
...at the factory shipment can accept only a CS-mount lens. 2. Process the cable end as shown in the figure. 2. Lens Mount C-mount Adapter WV-NP472 Flange-back Adjusting Ring & Screw 3. Attach the cover to the pin. Attach the supplied C-mount adapter when using a C-mount lens. Jump to..., replace the existing lens connector with the supporter (not supplied) if a lens heavier than 8 mm (5/16") • Secure both the lens and camera with the type YFE419J100 supplied. 1. Mount the lens. 4. Connect the lens cable to step 3 if the lens has focus adjusting mechanism. Cover Lens...
WVNP472 User Guide
Page 9
... shipment) of near-infrared light rather than using a source of the camera. The mounting hole is needed. 1. Attach the mounting adapter on the camera-mounting bracket (locally procured), referring to obtain a focused point while watching the monitor screen. 3. Fixing Screws Mounting Adapter WV-NP472 3. Tighten the flange-back fixing screw softly and securely. Turn...
... shipment) of near-infrared light rather than using a source of the camera. The mounting hole is needed. 1. Attach the mounting adapter on the camera-mounting bracket (locally procured), referring to obtain a focused point while watching the monitor screen. 3. Fixing Screws Mounting Adapter WV-NP472 3. Tighten the flange-back fixing screw softly and securely. Turn...
WVNP472 User Guide
Page 12
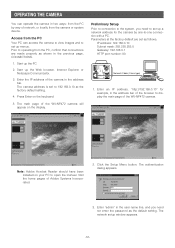
...bar. Preliminary Setup Prior to connection to the system, you need to set up a network address for example, in the address bar of the WV-NP472 camera. Parameters at the factory default setting. 4. Start up the Web browser, Internet Explorer or Netscape Communicator. 3. Start up the PC. 2. ... Access from the PC Your PC can operate the camera in two ways: from the PC by one connection with a PC. The main page of Adobe Systems Incorporated. 2. Prior to set up menus. Visit the home pages of the WV-NP472 camera will appear on the keyboard. 5. The authentication dialog...
...bar. Preliminary Setup Prior to connection to the system, you need to set up a network address for example, in the address bar of the WV-NP472 camera. Parameters at the factory default setting. 4. Start up the Web browser, Internet Explorer or Netscape Communicator. 3. Start up the PC. 2. ... Access from the PC Your PC can operate the camera in two ways: from the PC by one connection with a PC. The main page of Adobe Systems Incorporated. 2. Prior to set up menus. Visit the home pages of the WV-NP472 camera will appear on the keyboard. 5. The authentication dialog...
WVNP472 User Guide
Page 14
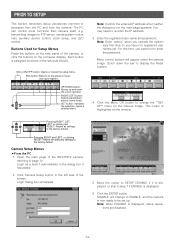
...first time, or you need to step 7 if ENABLE is assigned functions in the setup as a level-1 administrator in the left side of the WV-NP472 camera, referring to enter the password. Scroll down the cursor (pointer). Open the main page of the screen. Login as follows. RIGHT/LEFT button: ...to the factory default. Pressing RIGHT, SET, LEFT or clicking ALL RESET: Resets all settings to overlay the **SET UP** menu on the camera image. PRIOR TO SETUP This section describes setup procedures common to FTP server, sending alarm notice mail, auxiliary device control, clock setup, and LED...
...first time, or you need to step 7 if ENABLE is assigned functions in the setup as a level-1 administrator in the left side of the WV-NP472 camera, referring to enter the password. Scroll down the cursor (pointer). Open the main page of the screen. Login as follows. RIGHT/LEFT button: ...to the factory default. Pressing RIGHT, SET, LEFT or clicking ALL RESET: Resets all settings to overlay the **SET UP** menu on the camera image. PRIOR TO SETUP This section describes setup procedures common to FTP server, sending alarm notice mail, auxiliary device control, clock setup, and LED...
WVNP472 User Guide
Page 17
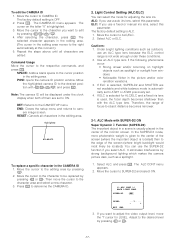
...The cursor in the editing area. SPACE: Adds a blank space to ALC/ELC. 2. Highlighted WV-NP472 To replace a specific character in the editing area. ALC: If you use the SUPER-D2...in the editing area moves to edit by pressing L/M/J/ K. 4. Cautions: 1. Therefore, the range of focus-to CAMERA ID. It eliminates interference by pressing L or M. Select ALC, and press I . Move the cursor to -object... center of the screen (where the important object is usually placed in the picture and/or color rendition variations. 3. Light Control Setting (ALC/ELC) You can use a fixed or manual ...
...The cursor in the editing area. SPACE: Adds a blank space to ALC/ELC. 2. Highlighted WV-NP472 To replace a specific character in the editing area. ALC: If you use the SUPER-D2...in the editing area moves to edit by pressing L/M/J/ K. 4. Cautions: 1. Therefore, the range of focus-to CAMERA ID. It eliminates interference by pressing L or M. Select ALC, and press I . Move the cursor to -object... center of the screen (where the important object is usually placed in the picture and/or color rendition variations. 3. Light Control Setting (ALC/ELC) You can use a fixed or manual ...

