
WVNP472 User Guide
Page 1
WV-NP472 (Lens: Option) day/night SDII (Lens : option) Before attempting to connect or operate this product, please read these instructions carefully and save this manual for future use. Color CCTV Camera Operating Instructions Model No.
WV-NP472 (Lens: Option) day/night SDII (Lens : option) Before attempting to connect or operate this product, please read these instructions carefully and save this manual for future use. Color CCTV Camera Operating Instructions Model No.

WVNP472 User Guide
Page 4
...FTP Client Setup 33 ■ User Setup 34 ■ Host Setup 35 ■ System Setup 35 INITIALIZING 36 ■ Initializing the Camera Menu 36 ■ Initializing the Setup Menu 36 ■ Initializing HTML windows 36 VIEWING PICTURES 37 ■ Image Quality Selection 37 ...5 Trademarks 5 Document Convention 5 PRECAUTIONS 6 MAJOR OPERATING CONTROLS AND THEIR FUNCTIONS 7 INSTALLATIONS 8 Mounting and Adjusting the Lens 8 Mounting the Camera 9 CONNECTIONS 10 Power-in Connections 10 Video Cable Connections 10 Control Terminal Connections 10 Network Connections 10 OPERATING THE...
...FTP Client Setup 33 ■ User Setup 34 ■ Host Setup 35 ■ System Setup 35 INITIALIZING 36 ■ Initializing the Camera Menu 36 ■ Initializing the Setup Menu 36 ■ Initializing HTML windows 36 VIEWING PICTURES 37 ■ Image Quality Selection 37 ...5 Trademarks 5 Document Convention 5 PRECAUTIONS 6 MAJOR OPERATING CONTROLS AND THEIR FUNCTIONS 7 INSTALLATIONS 8 Mounting and Adjusting the Lens 8 Mounting the Camera 9 CONNECTIONS 10 Power-in Connections 10 Video Cable Connections 10 Control Terminal Connections 10 Network Connections 10 OPERATING THE...
WVNP472 User Guide
Page 5
...allowed when using an aspherical F=0.75 large-aperture lens. • Switchable video mode between color and monochrome in response to set up parameters. A 0.4 lx illuminance is allowed when using a F=1.4 lens, thanks to view camera images via the network. • SD II (super dynamic) system allows a wide ... countries. • Microsoft, Windows, Windows NT, and Windows XP are essential for your PC to low-noise design. PREFACE Panasonic's WV-NP472 camera features functions for network access besides high-level picture quality developed for Microsoft Windows XP. -5-
...allowed when using an aspherical F=0.75 large-aperture lens. • Switchable video mode between color and monochrome in response to set up parameters. A 0.4 lx illuminance is allowed when using a F=1.4 lens, thanks to view camera images via the network. • SD II (super dynamic) system allows a wide ... countries. • Microsoft, Windows, Windows NT, and Windows XP are essential for your PC to low-noise design. PREFACE Panasonic's WV-NP472 camera features functions for network access besides high-level picture quality developed for Microsoft Windows XP. -5-

WVNP472 User Guide
Page 6
...the CCD with care. To prevent fire or electric shock hazard, use a mild detergent and wipe gently. Do not attempt to clean the camera when dirty. Otherwise, blooming or smear may be damaged by qualified service personnel or system installers. 2. PRECAUTIONS 1. Use lens tissue or ...dry cloth. 5. Then wipe off the remaining detergent with ethanol. 6. Ask qualified service personnel for the 12V DC input terminal. -6- Do not aim the camera at temperatures between -10 °C and +50 °C (14 °F - 122 °F), and humidity below 90 %. The installation should be ...
...the CCD with care. To prevent fire or electric shock hazard, use a mild detergent and wipe gently. Do not attempt to clean the camera when dirty. Otherwise, blooming or smear may be damaged by qualified service personnel or system installers. 2. PRECAUTIONS 1. Use lens tissue or ...dry cloth. 5. Then wipe off the remaining detergent with ethanol. 6. Ask qualified service personnel for the 12V DC input terminal. -6- Do not aim the camera at temperatures between -10 °C and +50 °C (14 °F - 122 °F), and humidity below 90 %. The installation should be ...
WVNP472 User Guide
Page 7
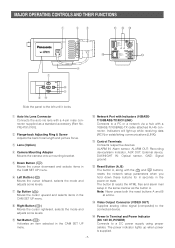
... to a PC or a network via a hub with Indicators (10BASET/100BASE-TX/RCV/LINK) Connects to a DC power supply using proper cables. e Lens (Option) r Camera Mounting Adapter Mounts the camera onto a mounting bracket. Indicators will light up when power is supplied. -7- YFE4191J100). t Down Button (K) Moves the cursor downward and selects items in the...
... to a PC or a network via a hub with Indicators (10BASET/100BASE-TX/RCV/LINK) Connects to a DC power supply using proper cables. e Lens (Option) r Camera Mounting Adapter Mounts the camera onto a mounting bracket. Indicators will light up when power is supplied. -7- YFE4191J100). t Down Button (K) Moves the cursor downward and selects items in the...

WVNP472 User Guide
Page 8
... C-mount Adapter WV-NP472 Flange-back Adjusting Ring & Screw 3. Process the cable end as shown in the figure. 2. The protrusion of the lens into the camera body should be within the length indicated in the figure. 8 mm (5/8") 2 mm (1/16") 3. Attach the supplied C-mount adapter when using a C-mount lens. ... a CS-mount lens. 2. Cover Lens C-mount: Less than 13 mm (1/2") CS-mount: Less than 8 mm (5/16") • Secure both the lens and camera with the type YFE419J100 supplied. 1. Loosen the flange-back screw, and rotate the adjusting ring down until it stops on the side of the...
... C-mount Adapter WV-NP472 Flange-back Adjusting Ring & Screw 3. Process the cable end as shown in the figure. 2. The protrusion of the lens into the camera body should be within the length indicated in the figure. 8 mm (5/8") 2 mm (1/16") 3. Attach the supplied C-mount adapter when using a C-mount lens. ... a CS-mount lens. 2. Cover Lens C-mount: Less than 13 mm (1/2") CS-mount: Less than 8 mm (5/16") • Secure both the lens and camera with the type YFE419J100 supplied. 1. Loosen the flange-back screw, and rotate the adjusting ring down until it stops on the side of the...
WVNP472 User Guide
Page 9
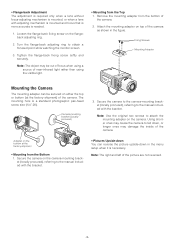
...lens with adjusting mechanism is mounted and focus that is more accurate is a standard photographic pan-head screw size (1/4"-20). CP470 Mounting the Camera The mounting adapter can reverse the picture upside-down in the figure. Attach the mounting adapter on the bottom at the factory shipment) of...near-infrared light rather than using a source of the picture are not reversed. -9- Adapter on top of the camera. Loosen the flange-back fixing screw on the camera. Secure the camera on either the top or bottom (at the factory shipment • Mounting from the Top 1. Note: The...
...lens with adjusting mechanism is mounted and focus that is more accurate is a standard photographic pan-head screw size (1/4"-20). CP470 Mounting the Camera The mounting adapter can reverse the picture upside-down in the figure. Attach the mounting adapter on the bottom at the factory shipment) of...near-infrared light rather than using a source of the picture are not reversed. -9- Adapter on top of the camera. Loosen the flange-back fixing screw on the camera. Secure the camera on either the top or bottom (at the factory shipment • Mounting from the Top 1. Note: The...

WVNP472 User Guide
Page 10
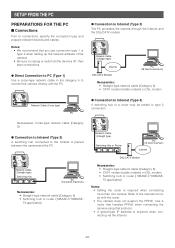
...7C-2V) (10C-2V) (m) 250 500 600 800 (ft) 825 1 650 1 980 2 640 DAY/NIGHT IN AUX OUT Optical sensor ON: B/W, OFF: Color Aux devices e.g. Fasten the screws. DC 12V IN 12 V DC (10.8 V - 16 V) Video Cable Connections The maximum extensible coaxial cable length between 10....can use the formula below to prevent fire or electric shock. Network Connections Network Connection Types • Use a router or switching hub when multiple cameras are connected. • Use a router handling PPPoE (PPP over Ethernet) when running PPPoE to connect with category5. • Direct Connection to ...
...7C-2V) (10C-2V) (m) 250 500 600 800 (ft) 825 1 650 1 980 2 640 DAY/NIGHT IN AUX OUT Optical sensor ON: B/W, OFF: Color Aux devices e.g. Fasten the screws. DC 12V IN 12 V DC (10.8 V - 16 V) Video Cable Connections The maximum extensible coaxial cable length between 10....can use the formula below to prevent fire or electric shock. Network Connections Network Connection Types • Use a router or switching hub when multiple cameras are connected. • Use a router handling PPPoE (PPP over Ethernet) when running PPPoE to connect with category5. • Direct Connection to ...
WVNP472 User Guide
Page 11
... DC 12V POWER IN 10BASE-T/ 100BASE-TX LINK Network Cable (Straight type) Internet DSL/CATV Modem PC (16 clients maximum) • Connection to protect the camera from thunderbolts if your system is possibly damaged.
... DC 12V POWER IN 10BASE-T/ 100BASE-TX LINK Network Cable (Straight type) Internet DSL/CATV Modem PC (16 clients maximum) • Connection to protect the camera from thunderbolts if your system is possibly damaged.
WVNP472 User Guide
Page 12
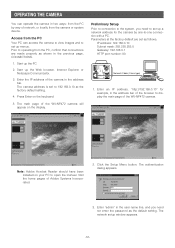
.... 2. Press Enter on the display. Note: Adobe Acrobat Reader should have been installed on your PC to display the main page of the WV-NP472 camera will appear on the keyboard. 5. The authentication dialog appears. 3. The network setup window appears. -12- Start up the PC. 2. The main page ...admin" in the user name line, and you need not enter the password as shown in the address bar of network, or locally from the camera or system device. Start up the Web browser, Internet Explorer or Netscape Communicator. 3. Click the Setup Menu button. Preliminary Setup Prior to connection ...
.... 2. Press Enter on the display. Note: Adobe Acrobat Reader should have been installed on your PC to display the main page of the WV-NP472 camera will appear on the keyboard. 5. The authentication dialog appears. 3. The network setup window appears. -12- Start up the PC. 2. The main page ...admin" in the user name line, and you need not enter the password as shown in the address bar of network, or locally from the camera or system device. Start up the Web browser, Internet Explorer or Netscape Communicator. 3. Click the Setup Menu button. Preliminary Setup Prior to connection ...
WVNP472 User Guide
Page 13
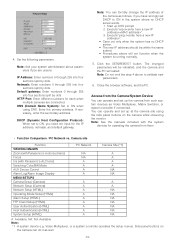
... system devices for the IP address, netmask, and default gateway. Note: See the manuals included with Panasonic's ALC lens) Switching Color/BW Mode AUX Device Control Alarm Log/Alarm Image Display MENU SETUPS Camera Setup (Camera) Network Setup (Camera) Network Setup (HTML) Operating Mode Setup (HTML) Alarm Setup (HTML) FTP Client Setup (HTML) User Authentication...
... system devices for the IP address, netmask, and default gateway. Note: See the manuals included with Panasonic's ALC lens) Switching Color/BW Mode AUX Device Control Alarm Log/Alarm Image Display MENU SETUPS Camera Setup (Camera) Network Setup (Camera) Network Setup (HTML) Operating Mode Setup (HTML) Alarm Setup (HTML) FTP Client Setup (HTML) User Authentication...
WVNP472 User Guide
Page 14
...main page appears. Click the ENTER button. Note: While DISABLE is displayed. 6. transmitting images to accesses from the PC and from the camera. Each button is highlighted on the computer display. The cursor is assigned functions in the setup as a level-1 administrator in the left ... common to FTP server, sending alarm notice mail, auxiliary device control, clock setup, and LED control. The PC can control more functions than camera itself, e.g. Menu ON/OFF button: Opens or closes the setup menu. RIGHT/LEFT button: Selects parameters, adjusts some levels. SET button: Validates...
...main page appears. Click the ENTER button. Note: While DISABLE is displayed. 6. transmitting images to accesses from the PC and from the camera. Each button is highlighted on the computer display. The cursor is assigned functions in the setup as a level-1 administrator in the left ... common to FTP server, sending alarm notice mail, auxiliary device control, clock setup, and LED control. The PC can control more functions than camera itself, e.g. Menu ON/OFF button: Opens or closes the setup menu. RIGHT/LEFT button: Selects parameters, adjusts some levels. SET button: Validates...

WVNP472 User Guide
Page 15
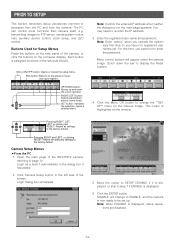
... the one in which END is displayed on the camera image. 2. Notes: • Access the camera again on the WWW-browser to step 8. 8. The changed settings will be stored in the camera, and the overlaid camera menu will disappear. ** SET UP ** CAMERA ↵ ↵ NETWORK END SET UP DISABLE ... SET UP ** will be set up. DISABLE will disappear. Move the cursor to be stored in the camera, and the overlaid camera menu will change to ENABLE, and the camera is now ready to CAMERA O, and click the ENTER button. Move the cursor to the next. 5. Notes: • Refer to...
... the one in which END is displayed on the camera image. 2. Notes: • Access the camera again on the WWW-browser to step 8. 8. The changed settings will be stored in the camera, and the overlaid camera menu will disappear. ** SET UP ** CAMERA ↵ ↵ NETWORK END SET UP DISABLE ... SET UP ** will be set up. DISABLE will disappear. Move the cursor to be stored in the camera, and the overlaid camera menu will change to ENABLE, and the camera is now ready to CAMERA O, and click the ENTER button. Move the cursor to the next. 5. Notes: • Refer to...

WVNP472 User Guide
Page 16
...cannot change it to prevent accidental setting change. Click the All Reset button while the cursor is at RET. This disablement is at CAMERA RESET. The camera ID consists of an item Hold down the L and M buttons simultaneously while the cursor is at the item. Move the cursor ...to END, and press I to camera image screen. Note: When SETUP DISABLE appears in CAM SETUP. Resetting all the settings Selecting an item Selecting a parameter Validating the selection Escaping ...
...cannot change it to prevent accidental setting change. Click the All Reset button while the cursor is at RET. This disablement is at CAMERA RESET. The camera ID consists of an item Hold down the L and M buttons simultaneously while the cursor is at the item. Move the cursor ...to END, and press I to camera image screen. Note: When SETUP DISABLE appears in CAM SETUP. Resetting all the settings Selecting an item Selecting a parameter Validating the selection Escaping ...
WVNP472 User Guide
Page 17
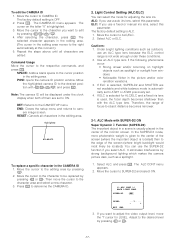
...: Cancels all characters are edited. ELC: If you use a fixed or manual iris lens, select this moment.) 5. Move the cursor to CAMERA ID. If ELC is selected for LEVEL. You can select the mode for adjusting the lens iris. The factory default setting is highlighted. 3.... If ELC is selected, SUPER-D2 and SHUTTER are set . 4. Select ALC, and press I . Adjust to the cursor position in the picture and/or color rendition variations. 3. Then move the "I . Cautions: 1. Repeat the steps above until all characters in a scene is located) than with L/M/J/K, and press I...
...: Cancels all characters are edited. ELC: If you use a fixed or manual iris lens, select this moment.) 5. Move the cursor to CAMERA ID. If ELC is selected for LEVEL. You can select the mode for adjusting the lens iris. The factory default setting is highlighted. 3.... If ELC is selected, SUPER-D2 and SHUTTER are set . 4. Select ALC, and press I . Adjust to the cursor position in the picture and/or color rendition variations. 3. Then move the "I . Cautions: 1. Repeat the steps above until all characters in a scene is located) than with L/M/J/K, and press I...

WVNP472 User Guide
Page 19
..., noise, spots or a whitening phenomenon may not be obtained under the following conditions: ** CAM SET UP ** ↵↵ CAMERA ID OFF ALC/ELC ALC SHUTTER --- The AWC menu appears on the system controller setup menu. • Automatic White Balance Control ...Mode (AWC) In this mode, accurate white balance is obtained within a color temperature range of the camera is automatically set (no operation needed). The factory default setting is selected, pressing I displays the ATW menu.) ** AWC ** R ...
..., noise, spots or a whitening phenomenon may not be obtained under the following conditions: ** CAM SET UP ** ↵↵ CAMERA ID OFF ALC/ELC ALC SHUTTER --- The AWC menu appears on the system controller setup menu. • Automatic White Balance Control ...Mode (AWC) In this mode, accurate white balance is obtained within a color temperature range of the camera is automatically set (no operation needed). The factory default setting is selected, pressing I displays the ATW menu.) ** AWC ** R ...
WVNP472 User Guide
Page 20
... select OFF for ALARM. 5. The factory default setting is DC. Move the cursor to a compatible intelligent CCTV system, the camera transmits an alarm signal by monitoring changes in a Panasonic Intelligent CCTV System, select OFF. Move the cursor to DISPLAY MODE and press I to return to a DC driven... type lens. Repeat the procedure above to see the current setting. Notes: • When the camera is not specifically intended to prevent...
... select OFF for ALARM. 5. The factory default setting is DC. Move the cursor to a compatible intelligent CCTV system, the camera transmits an alarm signal by monitoring changes in a Panasonic Intelligent CCTV System, select OFF. Move the cursor to DISPLAY MODE and press I to return to a DC driven... type lens. Repeat the procedure above to see the current setting. Notes: • When the camera is not specifically intended to prevent...

WVNP472 User Guide
Page 21
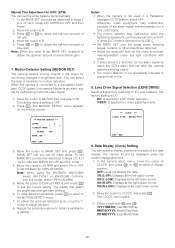
...or M. AP GAIN ....I .... PEDESTAL .I ....... - + BW OFF BURST(BW) ON CAMERA RESET /PUSH SW RET END 10-1. HUE .I ....... When choosing the AUTO2 mode, make sure to BW. 2. While observing the vectorscope or color video monitor, move the "I" cursor to adjust the chroma level. ** BW AUTO1 ** ...the "I .. The following switching times are not reversed. Select ON or OFF using L or M. 10-2. 10. Camera Picture Upside Down Positioning (UP SIDE DOWN) 1. EXT: Color picture reverts to detect the type of 800 nm or more . The AUTO1 or AUTO2 menu appears on the monitor...
...or M. AP GAIN ....I .... PEDESTAL .I ....... - + BW OFF BURST(BW) ON CAMERA RESET /PUSH SW RET END 10-1. HUE .I ....... When choosing the AUTO2 mode, make sure to BW. 2. While observing the vectorscope or color video monitor, move the "I" cursor to adjust the chroma level. ** BW AUTO1 ** ...the "I .. The following switching times are not reversed. Select ON or OFF using L or M. 10-2. 10. Camera Picture Upside Down Positioning (UP SIDE DOWN) 1. EXT: Color picture reverts to detect the type of 800 nm or more . The AUTO1 or AUTO2 menu appears on the monitor...

WVNP472 User Guide
Page 22
...192.168. 0. 1 HTTP PORT NO. 80 RET END 1. The factory default settings are set. 6. Note: The port number assigned to the factory settings (CAMERA RESET) 1. Move the cursor to the factory settings. Notes: • Access the setup menu from the PC to setup. • The assigned address should ... window and press I. The NETWORK SETUP menu opens. Select a digit using L or M. 5. Select a number in the digit using J or K. 4. The camera is highlighted. 2. Move the cursor to END and press I to close the setup menu and store new settings, or select RET to go back to...
...192.168. 0. 1 HTTP PORT NO. 80 RET END 1. The factory default settings are set. 6. Note: The port number assigned to the factory settings (CAMERA RESET) 1. Move the cursor to the factory settings. Notes: • Access the setup menu from the PC to setup. • The assigned address should ... window and press I. The NETWORK SETUP menu opens. Select a digit using L or M. 5. Select a number in the digit using J or K. 4. The camera is highlighted. 2. Move the cursor to END and press I to close the setup menu and store new settings, or select RET to go back to...
WVNP472 User Guide
Page 23
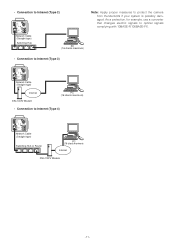
...) or DSL modem • Switching hub or router (10BASE-T/100BASETX applicable) Notes: • Setting the router is required when connecting more than one camera. ALARM IN ALARM OUT AUX OUT DAY/NIGHT IN GND A RCV B VIDEO OUT DC 12V POWER IN 10BASE-T/ 100BASE-TX LINK Network Cable (Straight... connections. ● Direct Connection to PC (Type 1) Use a cross-type network cable in the category 5 to Internet (Type 3) The PC accesses the camera through the Internet and the DSL/CATV modem. Refer to type 3 connection. ALARM IN ALARM OUT AUX OUT DAY/NIGHT IN GND A RCV B VIDEO OUT...
...) or DSL modem • Switching hub or router (10BASE-T/100BASETX applicable) Notes: • Setting the router is required when connecting more than one camera. ALARM IN ALARM OUT AUX OUT DAY/NIGHT IN GND A RCV B VIDEO OUT DC 12V POWER IN 10BASE-T/ 100BASE-TX LINK Network Cable (Straight... connections. ● Direct Connection to PC (Type 1) Use a cross-type network cable in the category 5 to Internet (Type 3) The PC accesses the camera through the Internet and the DSL/CATV modem. Refer to type 3 connection. ALARM IN ALARM OUT AUX OUT DAY/NIGHT IN GND A RCV B VIDEO OUT...


