
WVNP472 User Guide
Page 1
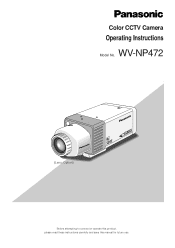
WV-NP472 (Lens: Option) day/night SDII (Lens : option) Before attempting to connect or operate this product, please read these instructions carefully and save this manual for future use. Color CCTV Camera Operating Instructions Model No.
WV-NP472 (Lens: Option) day/night SDII (Lens : option) Before attempting to connect or operate this product, please read these instructions carefully and save this manual for future use. Color CCTV Camera Operating Instructions Model No.

WVNP472 User Guide
Page 4
... Setting (MOTION DET 20 8. CONTENTS IMPORTANT SAFETY INSTRUCTIONS 3 PREFACE 5 Features 5 Computer Requirements 5 Trademarks 5 Document Convention 5 PRECAUTIONS 6 MAJOR OPERATING CONTROLS AND THEIR FUNCTIONS 7 INSTALLATIONS 8 Mounting and Adjusting the Lens 8 Mounting the Camera 9 CONNECTIONS 10 Power-in Connections 10 Video Cable Connections 10 Control Terminal Connections 10 Network Connections 10 OPERATING THE CAMERA 12 Access from the PC 12 Preliminary Setup 12 Access from the Camera/System Device 13 PRIOR TO SETUP 14 Buttons Used for Setup Menus 14 Camera Setup...
... Setting (MOTION DET 20 8. CONTENTS IMPORTANT SAFETY INSTRUCTIONS 3 PREFACE 5 Features 5 Computer Requirements 5 Trademarks 5 Document Convention 5 PRECAUTIONS 6 MAJOR OPERATING CONTROLS AND THEIR FUNCTIONS 7 INSTALLATIONS 8 Mounting and Adjusting the Lens 8 Mounting the Camera 9 CONNECTIONS 10 Power-in Connections 10 Video Cable Connections 10 Control Terminal Connections 10 Network Connections 10 OPERATING THE CAMERA 12 Access from the PC 12 Preliminary Setup 12 Access from the Camera/System Device 13 PRIOR TO SETUP 14 Buttons Used for Setup Menus 14 Camera Setup...
WVNP472 User Guide
Page 5
... to view camera images via the network. • SD II (super dynamic) system allows a wide range of Adobe Systems Incorporated in response to set up parameters. Document Convention These operating instructions use the following should be supported by a 1/3" CCD having 380 000 pixels • A 0.8 lx illuminance is allowed when using a F=1.4 lens, thanks to low-noise design. PREFACE Panasonic's WV-NP472 camera features functions for network access...
... to view camera images via the network. • SD II (super dynamic) system allows a wide range of Adobe Systems Incorporated in response to set up parameters. Document Convention These operating instructions use the following should be supported by a 1/3" CCD having 380 000 pixels • A 0.8 lx illuminance is allowed when using a F=1.4 lens, thanks to low-noise design. PREFACE Panasonic's WV-NP472 camera features functions for network access...
WVNP472 User Guide
Page 7
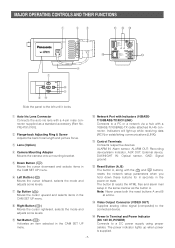
... the CAM SET UP menu. The power indicator lights up while receiving data (RCV) or establishing communications (LINK). !1 Control Terminals Connects respective devices. e Lens (Option) r Camera Mounting Adapter Mounts the camera onto a mounting bracket. Indicators will light up when power is supplied. -7- The button B resets the HTML files and alarm mail setup in the power-on state. MAJOR OPERATING CONTROLS AND THEIR FUNCTIONS q w e !1 !2 !3 WV -NP472 !0 ALARM IN ALARM OUT AUX OUT DAY/NIGHT IN GND A RCV B VIDEO OUT DC 12V POWER IN...
... the CAM SET UP menu. The power indicator lights up while receiving data (RCV) or establishing communications (LINK). !1 Control Terminals Connects respective devices. e Lens (Option) r Camera Mounting Adapter Mounts the camera onto a mounting bracket. Indicators will light up when power is supplied. -7- The button B resets the HTML files and alarm mail setup in the power-on state. MAJOR OPERATING CONTROLS AND THEIR FUNCTIONS q w e !1 !2 !3 WV -NP472 !0 ALARM IN ALARM OUT AUX OUT DAY/NIGHT IN GND A RCV B VIDEO OUT DC 12V POWER IN...
WVNP472 User Guide
Page 12
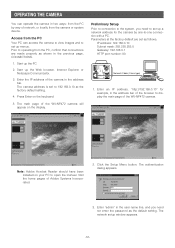
....0 Gateway: 192.168.0.1 HTTP port number: 80 ALARM IN ALARM OUT AUX OUT DAY/NIGHT IN GND A RCV B VIDEO OUT DC 12V POWER IN 10BASE-T/ 100BASE-TX LINK Network Cable (Cross type) 1. Click the Setup Menu button. The network setup window appears. -12- The camera address is set to 192.168.0.10 at the factory default are made properly as shown in the address bar of the browser to display the main page of...
....0 Gateway: 192.168.0.1 HTTP port number: 80 ALARM IN ALARM OUT AUX OUT DAY/NIGHT IN GND A RCV B VIDEO OUT DC 12V POWER IN 10BASE-T/ 100BASE-TX LINK Network Cable (Cross type) 1. Click the Setup Menu button. The network setup window appears. -12- The camera address is set to 192.168.0.10 at the factory default are made properly as shown in the address bar of the browser to display the main page of...
WVNP472 User Guide
Page 13
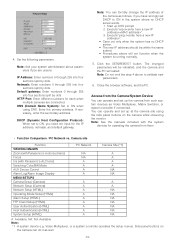
... address. DHCP (Dynamic Host Configuration Protocol): When set up the camera from them • Function Comparison / PC Network vs. Execute "ping-t". • Carry out only when the system has no DHCP server exists. 1. Note: See the manuals included with Panasonic's ALC lens) Switching Color/BW Mode AUX Device Control Alarm Log/Alarm Image Display MENU SETUPS Camera Setup (Camera) Network Setup (Camera) Network Setup (HTML) Operating Mode Setup (HTML) Alarm Setup (HTML) FTP Client Setup (HTML) User Authentication (HTML) Host Authentication (HTML) System Setup (HTML) PC Network...
... address. DHCP (Dynamic Host Configuration Protocol): When set up the camera from them • Function Comparison / PC Network vs. Execute "ping-t". • Carry out only when the system has no DHCP server exists. 1. Note: See the manuals included with Panasonic's ALC lens) Switching Color/BW Mode AUX Device Control Alarm Log/Alarm Image Display MENU SETUPS Camera Setup (Camera) Network Setup (Camera) Network Setup (HTML) Operating Mode Setup (HTML) Alarm Setup (HTML) FTP Client Setup (HTML) User Authentication (HTML) Host Authentication (HTML) System Setup (HTML) PC Network...
WVNP472 User Guide
Page 14
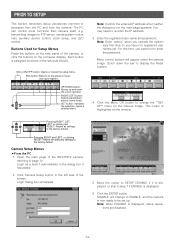
... to FTP server, sending alarm notice mail, auxiliary device control, clock setup, and LED control. Pressing RIGHT, SET, LEFT or clicking ALL RESET: Resets all settings to step 7 if ENABLE is displayed, or skip to the factory default. Enter the registered user name and password. Note: Enter "admin" when you operate the system very first time, or you need to enter the password. Move the cursor to SETUP DISABLE if it is displayed. 6. transmitting images...
... to FTP server, sending alarm notice mail, auxiliary device control, clock setup, and LED control. Pressing RIGHT, SET, LEFT or clicking ALL RESET: Resets all settings to step 7 if ENABLE is displayed, or skip to the factory default. Enter the registered user name and password. Note: Enter "admin" when you operate the system very first time, or you need to enter the password. Move the cursor to SETUP DISABLE if it is displayed. 6. transmitting images...

WVNP472 User Guide
Page 15
... on the camera image. 2. CAM SETUP opens. Notes: • Access the camera again on the bottom, then go to the next. 5. Press the I button after finishing the setup operations. The CAM SETUP opens. Move the cursor to validate the settings for setup operations. • Return the menu to the one in the camera, and the overlaid camera menu will change to ENABLE, and the camera is displayed on the WWW-browser to CAMERA O, and...
... on the camera image. 2. CAM SETUP opens. Notes: • Access the camera again on the bottom, then go to the next. 5. Press the I button after finishing the setup operations. The CAM SETUP opens. Move the cursor to validate the settings for setup operations. • Return the menu to the one in the camera, and the overlaid camera menu will change to ENABLE, and the camera is displayed on the WWW-browser to CAMERA O, and...

WVNP472 User Guide
Page 16
... ENABLE. 1. Hold down the I to return to CAMERA or NETWORK, and press I . Click the ESC button. SETUP SELECTION ** SET UP ** CAMERA ↵ ↵ NETWORK END SET UP DISABLE CAMERA SETUP MENU ** CAM SET UP ** ↵↵ CAMERA ID OFF ALC/ELC ALC SHUTTER --- AGC ON(DNR-H) SENS UP OFF SYNC INT ↵ WHITE BAL ATW1 MOTION DET OFF LENS DRIVE DC CLOCK OFF RET 1. Move the cursor to camera image screen...
... ENABLE. 1. Hold down the I to return to CAMERA or NETWORK, and press I . Click the ESC button. SETUP SELECTION ** SET UP ** CAMERA ↵ ↵ NETWORK END SET UP DISABLE CAMERA SETUP MENU ** CAM SET UP ** ↵↵ CAMERA ID OFF ALC/ELC ALC SHUTTER --- AGC ON(DNR-H) SENS UP OFF SYNC INT ↵ WHITE BAL ATW1 MOTION DET OFF LENS DRIVE DC CLOCK OFF RET 1. Move the cursor to camera image screen...
WVNP472 User Guide
Page 17
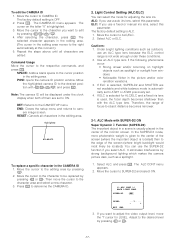
...display when both of the monitor screen. The factory default setting is ALC. 1. The selected character appears in the editing area. (The cursor in the editing area. era image screen. Command Usage Move the cursor to ATW1 or ATW2 previously set. 4. Highlighted WV-NP472 To replace a specific...is automatically set to the right automatically at this parameter. POSI: opens the camera ID position window. END: Closes the setup menu and returns to edit by strong background lighting which makes the camera picture dark, such as outdoors, use a fixed or manual iris lens, select ...
...display when both of the monitor screen. The factory default setting is ALC. 1. The selected character appears in the editing area. (The cursor in the editing area. era image screen. Command Usage Move the cursor to ATW1 or ATW2 previously set. 4. Highlighted WV-NP472 To replace a specific...is automatically set to the right automatically at this parameter. POSI: opens the camera ID position window. END: Closes the setup menu and returns to edit by strong background lighting which makes the camera picture dark, such as outdoors, use a fixed or manual iris lens, select ...
WVNP472 User Guide
Page 20
... "ALC mode with this camera is not specifically intended to the MOTION DETECT menu. 7. To raise detection sensitivity, press I . In the camera setup menu, move the "I .... - + DISPLAY MODE ↵ ↵ ALARM OFF MASK SET RET END 3. Move the cursor to CLOCK, and press I to return to prevent theft or fire. 8. Note: When you set MASK SET, re-adjust to a compatible intelligent CCTV system, the camera transmits an alarm signal by monitoring changes in...
... "ALC mode with this camera is not specifically intended to the MOTION DETECT menu. 7. To raise detection sensitivity, press I . In the camera setup menu, move the "I .... - + DISPLAY MODE ↵ ↵ ALARM OFF MASK SET RET END 3. Move the cursor to CLOCK, and press I to return to prevent theft or fire. 8. Note: When you set MASK SET, re-adjust to a compatible intelligent CCTV system, the camera transmits an alarm signal by monitoring changes in...

WVNP472 User Guide
Page 21
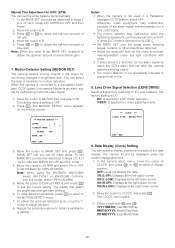
... is supplied along with F1.4 lens. PEDESTAL .I .... Camera Picture Upside Down Positioning (UP SIDE DOWN) 1. Move the cursor to alarm connections). The factory default setting is bright enough. Note: Because the type of the CAM SET UP menu and press L and M simultaneously (holding down . EXT: Color picture reverts to black-and-white picture when an external day/night switching signal is detected based on information received from the CCD image pickup...
... is supplied along with F1.4 lens. PEDESTAL .I .... Camera Picture Upside Down Positioning (UP SIDE DOWN) 1. Move the cursor to alarm connections). The factory default setting is bright enough. Note: Because the type of the CAM SET UP menu and press L and M simultaneously (holding down . EXT: Color picture reverts to black-and-white picture when an external day/night switching signal is detected based on information received from the CCD image pickup...

WVNP472 User Guide
Page 22
... 2 seconds or more. Move the cursor to the factory settings (CAMERA RESET) 1. Ask your system administrator or ISP (Internet Service Provider) about available IP address, subnet mask, and gateway, prior to the SETUP menu. IP ADDRESS: 192.168.0.10 NETMASK: 255.255.255.0 GATE WAY: 192.168.0.1 HTTP Port Number: 80 2. Select a number in the digit using J or K. 4. While holding down L and M, hold down I . Move...
... 2 seconds or more. Move the cursor to the factory settings (CAMERA RESET) 1. Ask your system administrator or ISP (Internet Service Provider) about available IP address, subnet mask, and gateway, prior to the SETUP menu. IP ADDRESS: 192.168.0.10 NETMASK: 255.255.255.0 GATE WAY: 192.168.0.1 HTTP Port Number: 80 2. Select a number in the digit using J or K. 4. While holding down L and M, hold down I . Move...
WVNP472 User Guide
Page 23
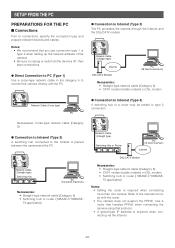
... ■ Connections Prior to type 3 connection. Notes: • We recommend that protocol. • A global-type IP address is required when connecting more than one camera. ALARM IN ALARM OUT AUX OUT DAY/NIGHT IN GND A RCV B VIDEO OUT DC 12V POWER IN 10BASE-T/ 100BASE-TX LINK Network Cable (Straight type) Switching Hub or Router PC (16 clients maximum) Internet DSL/CATV Modem Necessaries: • Straight-type network cable (Category...
... ■ Connections Prior to type 3 connection. Notes: • We recommend that protocol. • A global-type IP address is required when connecting more than one camera. ALARM IN ALARM OUT AUX OUT DAY/NIGHT IN GND A RCV B VIDEO OUT DC 12V POWER IN 10BASE-T/ 100BASE-TX LINK Network Cable (Straight type) Switching Hub or Router PC (16 clients maximum) Internet DSL/CATV Modem Necessaries: • Straight-type network cable (Category...
WVNP472 User Guide
Page 26
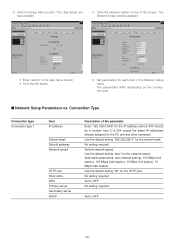
... a number from 2 to 254 except the same IP addresses already assigned to the PC and any other cameras). No setting required Set to OFF. No setting required Set to OFF. -26- Connection Type Connection type Connection type 1 Item IP address Subnet mask Default gateway Network speed HTTP port Host name DNS Primary server Secondary server DHCP Description of the screen. Use the default setting "auto" for the subnet mask. Click the Setup Menu button. Use the default setting...
... a number from 2 to 254 except the same IP addresses already assigned to the PC and any other cameras). No setting required Set to OFF. No setting required Set to OFF. -26- Connection Type Connection type Connection type 1 Item IP address Subnet mask Default gateway Network speed HTTP port Host name DNS Primary server Secondary server DHCP Description of the screen. Use the default setting "auto" for the subnet mask. Click the Setup Menu button. Use the default setting...
WVNP472 User Guide
Page 27
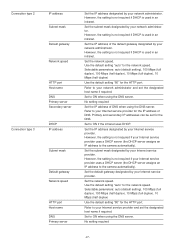
...) Use the default setting "80" for the network speed. Set the subnet mask designated by your network administrator. Set the IP address of DNS. Set the network speed. Refer to the camera automatically). Connection type 2 Connection type 3 IP address Subnet mask Default gateway Network speed HTTP port Host name DNS Primary server Secondary server DHCP IP address Subnet mask Default gateway Network speed HTTP port Host name DNS Primary server Set the IP address designated by your Internet service provider. However, the setting...
...) Use the default setting "80" for the network speed. Set the subnet mask designated by your network administrator. Set the IP address of DNS. Set the network speed. Refer to the camera automatically). Connection type 2 Connection type 3 IP address Subnet mask Default gateway Network speed HTTP port Host name DNS Primary server Secondary server DHCP IP address Subnet mask Default gateway Network speed HTTP port Host name DNS Primary server Set the IP address designated by your Internet service provider. However, the setting...

WVNP472 User Guide
Page 28
... router is set to the operating instructions of the router as follows. Port number: number already assigned to the camera automatically) after confirming that your internet Internet service provider uses a DHCP server. Set to ON if your internet Internet service provider for the network speed. Set the network speed. The setting differs depending on . For further information, refer to on the setting of the router. Primary and secondary IP addresses can be set up each camera individually. Selectable parameters: auto (default setting...
... router is set to the operating instructions of the router as follows. Port number: number already assigned to the camera automatically) after confirming that your internet Internet service provider uses a DHCP server. Set to ON if your internet Internet service provider for the network speed. Set the network speed. The setting differs depending on . For further information, refer to on the setting of the router. Primary and secondary IP addresses can be set up each camera individually. Selectable parameters: auto (default setting...
WVNP472 User Guide
Page 29
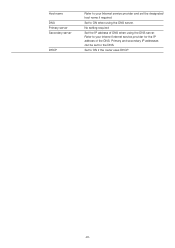
Host name DNS Primary server Secondary server DHCP Refer to ON when using the DNS server. No setting required Set the IP address of the DNS. Set to your internet Internet service provider for the DNS. Set to your Internet service provider and set for the IP address of DNS when using the DNS server. Primary and secondary IP addresses can be set the designated host name if required. Refer to ON if the router uses DHCP. -29-
Host name DNS Primary server Secondary server DHCP Refer to ON when using the DNS server. No setting required Set the IP address of the DNS. Set to your internet Internet service provider for the DNS. Set to your Internet service provider and set for the IP address of DNS when using the DNS server. Primary and secondary IP addresses can be set the designated host name if required. Refer to ON if the router uses DHCP. -29-

WVNP472 User Guide
Page 33
... cancel it . 6. Recording Setup The image fields are stored before and after selecting an unwanted destination to the FTP server within the scheduled time zone. 4. The port number is exclusively assigned to 100 is supplied from Sequential or Passive. External Terminal Output Setup The alarm output is allowed. • Click the SET&REBOOT button. 7. A number from 1 to this function, and any other usage is reset manually. • Enter...
... cancel it . 6. Recording Setup The image fields are stored before and after selecting an unwanted destination to the FTP server within the scheduled time zone. 4. The port number is exclusively assigned to 100 is supplied from Sequential or Passive. External Terminal Output Setup The alarm output is allowed. • Click the SET&REBOOT button. 7. A number from 1 to this function, and any other usage is reset manually. • Enter...

WVNP472 User Guide
Page 39
... stored pictures as an alarm sounds are stored in Panasonic Protocol Setup, using the Panasonic's original protocol. The total storage number of the pictures depends on the camera • The built-in VMD (Video Motion Detector) that detects a motion in the upper right corner of the camera. and post-alarm can be sent to the designated FTP server. • A picture file attached to a mail can be replaced with new picture...
... stored pictures as an alarm sounds are stored in Panasonic Protocol Setup, using the Panasonic's original protocol. The total storage number of the pictures depends on the camera • The built-in VMD (Video Motion Detector) that detects a motion in the upper right corner of the camera. and post-alarm can be sent to the designated FTP server. • A picture file attached to a mail can be replaced with new picture...


