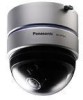
Network Camera
Page 2
... card when failed to transmit images by the FTP periodic transmission function 10 About the network security of this unit 12 Equipped security functions 12 Display the Setup Menu and Configure the Settings of the Camera using a PC 13 How to display the setup menu 13 How to operate the setup menu 14 Configure the basic settings of the camera [Basic setup 17 Configure the settings relating to images and audio [Camera setup 21 Configure the multi-screen settings [Multi-screen setup 26 Configure the alarm settings [Alarm setup 27 Configure...
... card when failed to transmit images by the FTP periodic transmission function 10 About the network security of this unit 12 Equipped security functions 12 Display the Setup Menu and Configure the Settings of the Camera using a PC 13 How to display the setup menu 13 How to operate the setup menu 14 Configure the basic settings of the camera [Basic setup 17 Configure the settings relating to images and audio [Camera setup 21 Configure the multi-screen settings [Multi-screen setup 26 Configure the alarm settings [Alarm setup 27 Configure...
Network Camera
Page 3
... how to install this product using a PC via a network and of their respective owners. Refer to a network. Install the viewer software from the Adobe web site and install it. Trademarks and Registered Trademarks • Microsoft, Windows, Internet Explorer, ActiveX and DirectX are either registered trademarks or trademarks of Microsoft Corporation in the United States and/or other countries. • SD logo is required to operate this...
... how to install this product using a PC via a network and of their respective owners. Refer to a network. Install the viewer software from the Adobe web site and install it. Trademarks and Registered Trademarks • Microsoft, Windows, Internet Explorer, ActiveX and DirectX are either registered trademarks or trademarks of Microsoft Corporation in the United States and/or other countries. • SD logo is required to operate this...

Network Camera
Page 4
... up to 8 users in the address box of the browser, for the user "admin". Step 2 Enter the IP address designated using the Panasonic IP setup software in the address box of the browser. User name: admin Password: 12345 When accessing the camera without changing the default password, the pop-up the web browser. It is possible to change the password for example, "http://192.168.0.11:8080". • Configure the web browser to monitor images from the camera on a PC...
... up to 8 users in the address box of the browser, for the user "admin". Step 2 Enter the IP address designated using the Panasonic IP setup software in the address box of the browser. User name: admin Password: 12345 When accessing the camera without changing the default password, the pop-up the web browser. It is possible to change the password for example, "http://192.168.0.11:8080". • Configure the web browser to monitor images from the camera on a PC...
Network Camera
Page 6
... the keyboard. 6 When the button is clicked, the button will disappear and the alarm output connector will be reset. (☞ page 29) !1 Full screen button Images will be displayed in this area. *1 Operable by only users whose access level is "1. i AUX buttons (*2) : The AUX connector will open. : The AUX connector will close. !5 Main area Images from the pop-up menu. !3 Audio button The [Audio] button will be displayed only when "ON" is selected...
... the keyboard. 6 When the button is clicked, the button will disappear and the alarm output connector will be reset. (☞ page 29) !1 Full screen button Images will be displayed in this area. *1 Operable by only users whose access level is "1. i AUX buttons (*2) : The AUX connector will open. : The AUX connector will close. !5 Main area Images from the pop-up menu. !3 Audio button The [Audio] button will be displayed only when "ON" is selected...
Network Camera
Page 8
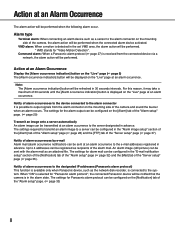
... alarm: When a motion is displayed on the mounting side of the "Alarm setup" page. (☞ page 33) 8 The settings for alarm mail can be performed when the connected alarm device activated. An alarm image (still picture) can be configured on the [Alarm] tab of the "Alarm setup" page. (☞ page 29) Transmit an image onto a server automatically An alarm image can be configured on the [Notification] tab of the camera and sound the...
... alarm: When a motion is displayed on the mounting side of the "Alarm setup" page. (☞ page 33) 8 The settings for alarm mail can be performed when the connected alarm device activated. An alarm image (still picture) can be configured on the [Alarm] tab of the "Alarm setup" page. (☞ page 29) Transmit an image onto a server automatically An alarm image can be configured on the [Notification] tab of the camera and sound the...
Network Camera
Page 10
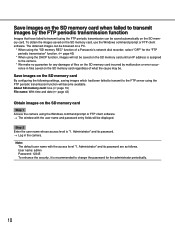
...: With time and date (☞ page 43) Obtain images on the SD memory card Step 1 Access the camera using the Windows command prompt or FTP client software. → The window with the access level "1. Note: The default user name with the user name and password entry fields will become available. The obtained images can be browsed on a PC. * When using the "SD memory REC" function of a Panasonic's network disk recorder...
...: With time and date (☞ page 43) Obtain images on the SD memory card Step 1 Access the camera using the Windows command prompt or FTP client software. → The window with the access level "1. Note: The default user name with the user name and password entry fields will become available. The obtained images can be browsed on a PC. * When using the "SD memory REC" function of a Panasonic's network disk recorder...
Network Camera
Page 11
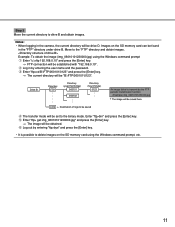
...the user name and the password. Move to transmit by entering "ftp>bye" and press the [Enter] key. • It is possible to drive B and obtain images. w Log in the camera, the current directory will be established with "192.168.0.10". t Enter "ftp> ...→ The image will be drive D. Example: To obtain the image (img_06010101230000.jpg) using the Windows command prompt, etc. 11 Images on the SD memory card using the Windows command prompt q Enter "c:\>ftp 192.168.0.10" and press the [Enter] key. → FTP connection will be saved here. Drive B Directory FTP : : :...
...the user name and the password. Move to transmit by entering "ftp>bye" and press the [Enter] key. • It is possible to drive B and obtain images. w Log in the camera, the current directory will be established with "192.168.0.10". t Enter "ftp> ...→ The image will be drive D. Example: To obtain the image (img_06010101230000.jpg) using the Windows command prompt, etc. 11 Images on the SD memory card using the Windows command prompt q Enter "c:\>ftp 192.168.0.10" and press the [Enter] key. → FTP connection will be saved here. Drive B Directory FTP : : :...
Network Camera
Page 13
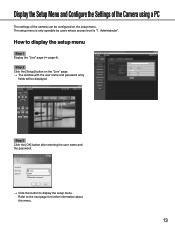
Administrator". Step 2 Click the [Setup] button on the setup menu. Display the Setup Menu and Configure the Settings of the Camera using a PC The settings of the camera can be configured on the "Live" page. → The window with the user name and password entry fields will be displayed. How to display the setup menu. Step 3 Click the [OK] button after entering the user name and the password. → Click this menu. 13 Refer to the next...
Administrator". Step 2 Click the [Setup] button on the setup menu. Display the Setup Menu and Configure the Settings of the Camera using a PC The settings of the camera can be configured on the "Live" page. → The window with the user name and password entry fields will be displayed. How to display the setup menu. Step 3 Click the [OK] button after entering the user name and the password. → Click this menu. 13 Refer to the next...
Network Camera
Page 15
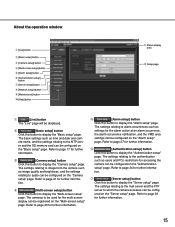
...The settings relating to audio can be registered on the "Server setup" page. Refer to the NTP serv- e [Camera setup] button Click this button to display the "Basic setup" page. About the operation window q [Live] button w [Basic setup] button e [Camera setup] button r [Multi-screen setup] button t [Alarm setup] button y [Authentication setup] button u [Server setup] button i [Network setup] button o [Maintenance] button !0 [Help] button !1 Status display area !2 Setup page q [Live] button The "Live" page will be config- er and the SD memory card can be displayed. Refer...
...The settings relating to audio can be registered on the "Server setup" page. Refer to the NTP serv- e [Camera setup] button Click this button to display the "Basic setup" page. About the operation window q [Live] button w [Basic setup] button e [Camera setup] button r [Multi-screen setup] button t [Alarm setup] button y [Authentication setup] button u [Server setup] button i [Network setup] button o [Maintenance] button !0 [Help] button !1 Status display area !2 Setup page q [Live] button The "Live" page will be config- er and the SD memory card can be displayed. Refer...
Network Camera
Page 17
... "ON" is selected, the link indicator and the access indicator inside the dome cover will be displayed as follows respectively. Click the [SET] button after selecting "24-hours" for "Time display", time and date will not light when the indicators ON/OFF switch on the camera is selected for the camera title: 0 - 20 characters Default setting: WV-NF284 [Time and date setup] Enter the current time and date. When "12...
... "ON" is selected, the link indicator and the access indicator inside the dome cover will be displayed as follows respectively. Click the [SET] button after selecting "24-hours" for "Time display", time and date will not light when the indicators ON/OFF switch on the camera is selected for the camera title: 0 - 20 characters Default setting: WV-NF284 [Time and date setup] Enter the current time and date. When "12...
Network Camera
Page 18
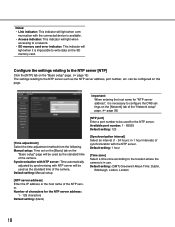
... the camera is in 1 hour intervals) of synchronization with the connected device is necessary to configure the DNS settings on the [Network] tab of the NTP server. Available port number: 1 - 65535 Default setting: 123 [Time adjustment] Select the time adjustment method from the following. Notes: • Link indicator: This indicator will light when it is available. • Access indicator: This indicator will light when accessing to a network. • SD memory card error...
... the camera is in 1 hour intervals) of synchronization with the connected device is necessary to configure the DNS settings on the [Network] tab of the NTP server. Available port number: 1 - 65535 Default setting: 123 [Time adjustment] Select the time adjustment method from the following. Notes: • Link indicator: This indicator will light when it is available. • Access indicator: This indicator will light when accessing to a network. • SD memory card error...
Network Camera
Page 19
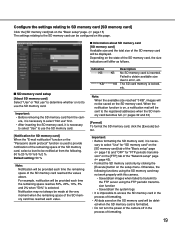
... the values above. Otherwise, the following . 50 %/20 %/10 %/5 %/2 % Default setting: 50 % Note: Notification will be displayed. For example, notification will be made at from the cam- Failed to obtain available size due to the FTP server using the SD memory card may not always be provided each time the remaining space reaches 50%, 20%, 10%, 5% and 2% when "50...
... the values above. Otherwise, the following . 50 %/20 %/10 %/5 %/2 % Default setting: 50 % Note: Notification will be displayed. For example, notification will be made at from the cam- Failed to obtain available size due to the FTP server using the SD memory card may not always be provided each time the remaining space reaches 50%, 20%, 10%, 5% and 2% when "50...
Network Camera
Page 22
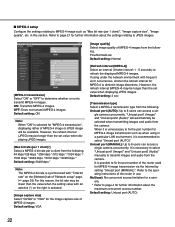
... the port number for the image capture size of MPEG-4 images. gle camera concurrently. It is possible to fix the port number of the router used for MPEG-4 to diminish image distortions. Multicast: No concurrent access limitation for a camera. * Refer to page 4 for "MPEG-4 transmission", displaying rather of MPEG-4 image or JPEG image will automatically be selected when transmitting images and audio from the camera. ■ MPEG-4 setup Configure the settings...
... the port number for the image capture size of MPEG-4 images. gle camera concurrently. It is possible to fix the port number of the router used for MPEG-4 to diminish image distortions. Multicast: No concurrent access limitation for a camera. * Refer to page 4 for "MPEG-4 transmission", displaying rather of MPEG-4 image or JPEG image will automatically be selected when transmitting images and audio from the camera. ■ MPEG-4 setup Configure the settings...
Network Camera
Page 25
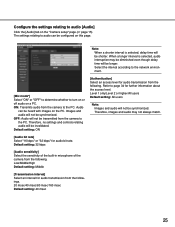
... a PC. Level 1 only/Level 2 or higher/All users Default setting: All users Note: Images and audio will be transmitted from the camera to the PC. Low/Middle/High Default setting: Middle [Transmission interval] Select an interval for further information about the access level. Select the interval according to the network environment. [Mic mode*] Select "ON" or "OFF" to determine whether to page...
... a PC. Level 1 only/Level 2 or higher/All users Default setting: All users Note: Images and audio will be transmitted from the camera to the PC. Low/Middle/High Default setting: Middle [Transmission interval] Select an interval for further information about the access level. Select the interval according to the network environment. [Mic mode*] Select "ON" or "OFF" to determine whether to page...

Network Camera
Page 29
... on the "Alarm setup" page. (☞ page 15) ■ Alarm output terminal setup The settings relating to pages 27 and 28 for "Pulse width". Default setting: Latch Note: When "Open" is detected, alarm output con- Refer to the alarm out connector can be output for around 20 seconds when the power of the camera is turned on. [Pulse width] When "Pulse" is selected for "Alarm output" until the [Alarm reset] button is detected.
... on the "Alarm setup" page. (☞ page 15) ■ Alarm output terminal setup The settings relating to pages 27 and 28 for "Pulse width". Default setting: Latch Note: When "Open" is detected, alarm output con- Refer to the alarm out connector can be output for around 20 seconds when the power of the camera is turned on. [Pulse width] When "Pulse" is selected for "Alarm output" until the [Alarm reset] button is detected.

Network Camera
Page 34
... characters Default setting: (blank) [Password] [Retype password] Enter the password. Camera control: Allowed to display images from the following. 1. Number of the [User] tab and the [Host] tab. Administrator: Allowed all users whose access level is "1. The camera setting configuration and camera control are unavailable. Administrator" is clicked, the respective user information will be impossible to configure the settings. Note: When the user name already in use is entered and the [REG] button is...
... characters Default setting: (blank) [Password] [Retype password] Enter the password. Camera control: Allowed to display images from the following. 1. Number of the [User] tab and the [Host] tab. Administrator: Allowed all users whose access level is "1. The camera setting configuration and camera control are unavailable. Administrator" is clicked, the respective user information will be impossible to configure the settings. Note: When the user name already in use is entered and the [REG] button is...

Network Camera
Page 38
... to assign the same IP addresses used for the settings of the camera. Configuring the network settings [Network setup] The network settings and the settings relating to DDNS (Dynamic DNS) and SNMP (Simple Network management Protocol) can be configured on the "Network setup" page. (☞ page 15) The following information is unique. Refer to the network administrator for the other network cameras). Configure the DHCP server not to configure the network settings. Default setting: 255.255.255.0 38...
... to assign the same IP addresses used for the settings of the camera. Configuring the network settings [Network setup] The network settings and the settings relating to DDNS (Dynamic DNS) and SNMP (Simple Network management Protocol) can be configured on the "Network setup" page. (☞ page 15) The following information is unique. Refer to the network administrator for the other network cameras). Configure the DHCP server not to configure the network settings. Default setting: 255.255.255.0 38...

Network Camera
Page 47
... the [Upgrade] button. → The confirmation window will not be saved. When "Do not reset the settings after the firmware upgrade. Important: A blank (space) cannot be used for DHCP, IP address, net mask, default gateway, HTTP port, line speed, total bit rate, time & date Step 2 Click the [Browse...] button and designate the downloaded firmware. Important: • Upgrade the firmware using a PC in the process of upgrade. • The following network settings will...
... the [Upgrade] button. → The confirmation window will not be saved. When "Do not reset the settings after the firmware upgrade. Important: A blank (space) cannot be used for DHCP, IP address, net mask, default gateway, HTTP port, line speed, total bit rate, time & date Step 2 Click the [Browse...] button and designate the downloaded firmware. Important: • Upgrade the firmware using a PC in the process of upgrade. • The following network settings will...
Network Camera
Page 51
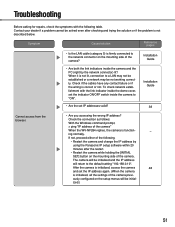
... the Windows command prompt, > ping "IP address of the following table. To check network establishment with the following . • Restart the camera and change the IP address by the network connector) lit? Troubleshooting Before asking for repairs, check the symptoms with the link indicator inside the dome cover, set the indicator ON/OFF switch inside the camera and the PC (right by using the Panasonic IP setup software within...
... the Windows command prompt, > ping "IP address of the following table. To check network establishment with the following . • Restart the camera and change the IP address by the network connector) lit? Troubleshooting Before asking for repairs, check the symptoms with the link indicator inside the dome cover, set the indicator ON/OFF switch inside the camera and the PC (right by using the Panasonic IP setup software within...
Network Camera
Page 52
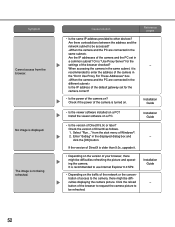
... and operating the camera. Are there contradictions between the address and the network subnet to be accessed? When accessing the camera in the same subnet, it . • Depending on ? Is the IP address of the camera in the displayed dialog box and click the [OK] button. from the browser. It is recommended to use Internet Explorer 6.0 SP2. • Depending on a PC? Installation Guide • Is the viewer software installed on...
... and operating the camera. Are there contradictions between the address and the network subnet to be accessed? When accessing the camera in the same subnet, it . • Depending on ? Is the IP address of the camera in the displayed dialog box and click the [OK] button. from the browser. It is recommended to use Internet Explorer 6.0 SP2. • Depending on a PC? Installation Guide • Is the viewer software installed on...


