
WJHDE300 User Guide
Page 1
WJ-HDE300 300 Extension Unit WJ-HDE Before attempting to connect or operate this product, please read these instructions carefully and save this manual for future use. Extension Unit Instructions Model No.
WJ-HDE300 300 Extension Unit WJ-HDE Before attempting to connect or operate this product, please read these instructions carefully and save this manual for future use. Extension Unit Instructions Model No.
WJHDE300 User Guide
Page 5
...placed in it at temperatures within +5 °C to +45 °C (41 °F to the digital disk recorder WJ-HD316/WJ-HD309. When using the RAID function, logical disk size of the disks in a room where a heater has just been turned on the rear panel, or the HDD POWER... hand. ■ General The extension unit WJ-HDE300 can contain up to four hard disk drives per unit to add available disk space to 113 °F) and humidity below . Logical disk size = Smallest size of the disk among the disks in the extension unit x (Number of the extension unit will access only the HDDs in...
...placed in it at temperatures within +5 °C to +45 °C (41 °F to the digital disk recorder WJ-HD316/WJ-HD309. When using the RAID function, logical disk size of the disks in a room where a heater has just been turned on the rear panel, or the HDD POWER... hand. ■ General The extension unit WJ-HDE300 can contain up to four hard disk drives per unit to add available disk space to 113 °F) and humidity below . Logical disk size = Smallest size of the disk among the disks in the extension unit x (Number of the extension unit will access only the HDDs in...
WJHDE300 User Guide
Page 12
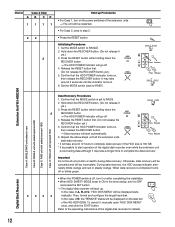
... RECOVER 3 Press 4 Release 25 Press Release O SINGLE RAID5 Extension Unit WJ-HDE300 Case A: SINGLE/RAID unit added or new Case B: SINGLE unit with added/replaced HDD Case C: RAID unit with added/removed HDD Case D: RAID unit with replaced HDD Data Recovery Procedures 1. Repeat the above steps... status will be restarted. • For Case 2, jump to OFF and press the SET button. → The digital disk recorder will start operation of the extension units . → The unit will be displayed on . 6. Otherwise, data recovery will be canceled and will be displayed auto- 3 33 3 ...
... RECOVER 3 Press 4 Release 25 Press Release O SINGLE RAID5 Extension Unit WJ-HDE300 Case A: SINGLE/RAID unit added or new Case B: SINGLE unit with added/replaced HDD Case C: RAID unit with added/removed HDD Case D: RAID unit with replaced HDD Data Recovery Procedures 1. Repeat the above steps... status will be restarted. • For Case 2, jump to OFF and press the SET button. → The digital disk recorder will start operation of the extension units . → The unit will be displayed on . 6. Otherwise, data recovery will be canceled and will be displayed auto- 3 33 3 ...
WJHDE300 User Guide
Page 14
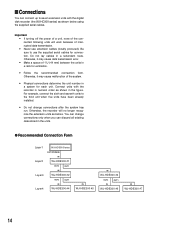
.... Connect units with the digital disk recorder (the WJ-HD300 series) as shown below using the supplied serial cables. ■ Connections You can discard all existing data stored in the units. ● Recommended Connection Form Layer1 Layer2 Layer3 Layer4 WJ-HD300 Series EXT STORAGE IN WJ-HDE300 #1 OUT2 OUT1 IN WJ-HDE300 #2 OUT2 OUT1 IN WJ-HDE300 #4 IN WJ-HDE300 #5 IN WJ-HDE300 #3 OUT2 OUT1 IN WJ-HDE300 #6 IN WJ-HDE300...
.... Connect units with the digital disk recorder (the WJ-HD300 series) as shown below using the supplied serial cables. ■ Connections You can discard all existing data stored in the units. ● Recommended Connection Form Layer1 Layer2 Layer3 Layer4 WJ-HD300 Series EXT STORAGE IN WJ-HDE300 #1 OUT2 OUT1 IN WJ-HDE300 #2 OUT2 OUT1 IN WJ-HDE300 #4 IN WJ-HDE300 #5 IN WJ-HDE300 #3 OUT2 OUT1 IN WJ-HDE300 #6 IN WJ-HDE300...
WJHDE300 User Guide
Page 15
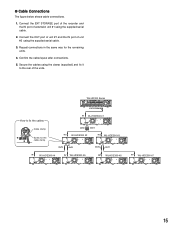
Connect the EXT STORAGE port of the recorder and the IN port of the units. WJ-HD300 Series 4 1 1 SERIAL ALARM 3 2 AUDIO IN AUDIO OUT CASCAKE OUT 2 MONITOR OUT CASCADE IN MONITOR (VGA) ALARM/CONTOROL 16 15 14 13 12 11 10 9 8 7 ... POWER AC IN How to the rear of extension unit #1 using the supplied serial cable. 2. Confirm the cable layout after connections. 5. Repeat connections in the same way for the cable clamp IN WJ-HDE300 #1 EXT IN OUT 21 SIGNAL GND POWER AC IN OUT2 OUT1 IN WJ-HDE300 #2 EXT IN OUT 21 SIGNAL GND POWER AC...
Connect the EXT STORAGE port of the recorder and the IN port of the units. WJ-HD300 Series 4 1 1 SERIAL ALARM 3 2 AUDIO IN AUDIO OUT CASCAKE OUT 2 MONITOR OUT CASCADE IN MONITOR (VGA) ALARM/CONTOROL 16 15 14 13 12 11 10 9 8 7 ... POWER AC IN How to the rear of extension unit #1 using the supplied serial cable. 2. Confirm the cable layout after connections. 5. Repeat connections in the same way for the cable clamp IN WJ-HDE300 #1 EXT IN OUT 21 SIGNAL GND POWER AC IN OUT2 OUT1 IN WJ-HDE300 #2 EXT IN OUT 21 SIGNAL GND POWER AC...


