
WJHDE300 User Guide
Page 1
Extension Unit Instructions Model No. WJ-HDE300 300 Extension Unit WJ-HDE Before attempting to connect or operate this product, please read these instructions carefully and save this manual for future use.
Extension Unit Instructions Model No. WJ-HDE300 300 Extension Unit WJ-HDE Before attempting to connect or operate this product, please read these instructions carefully and save this manual for future use.
WJHDE300 User Guide
Page 5
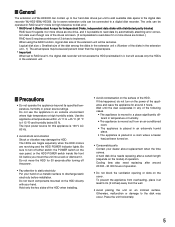
■ General The extension unit WJ-HDE300 can be connected to a digital disk recorder. When using the RAID function, logical disk size of the following cases. • The appliance is moved to static electricity Put your hand on the cover. Do not use the appliance in a ...
■ General The extension unit WJ-HDE300 can be connected to a digital disk recorder. When using the RAID function, logical disk size of the following cases. • The appliance is moved to static electricity Put your hand on the cover. Do not use the appliance in a ...
WJHDE300 User Guide
Page 12
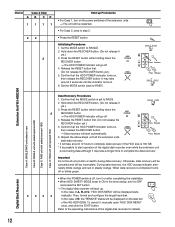
... green. • When the POWER switch is off, turn on the power switches of the digital disk recorder even while the extension unit is possible to the operating instructions of the WJ-HD316/309. Refer to start data recovery. * It will take a longer time to ON ...OFF ON RECOVER 3 Press 4 Release 25 Press Release O SINGLE RAID5 Extension Unit WJ-HDE300 Case A: SINGLE/RAID unit added or new Case B: SINGLE unit with added/replaced HDD Case C: RAID unit with added/removed HDD Case D: RAID unit with replaced HDD Data Recovery Procedures 1. Hold down the RECOVER button. ...
... green. • When the POWER switch is off, turn on the power switches of the digital disk recorder even while the extension unit is possible to the operating instructions of the WJ-HD316/309. Refer to start data recovery. * It will take a longer time to ON ...OFF ON RECOVER 3 Press 4 Release 25 Press Release O SINGLE RAID5 Extension Unit WJ-HDE300 Case A: SINGLE/RAID unit added or new Case B: SINGLE unit with added/replaced HDD Case C: RAID unit with added/removed HDD Case D: RAID unit with replaced HDD Data Recovery Procedures 1. Hold down the RECOVER button. ...
WJHDE300 User Guide
Page 14
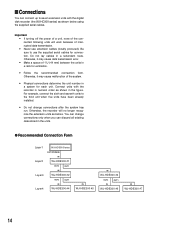
... Connect units with the digital disk recorder (the WJ-HD300 series) as shown below using the supplied serial cables. Be sure to seven extension units with the recorder in ...extension cables (locally procured). Otherwise, the recorder will work because of the system. • Physical connections determine the unit number in the units. ● Recommended Connection Form Layer1 Layer2 Layer3 Layer4 WJ-HD300 Series EXT STORAGE IN WJ-HDE300 #1 OUT2 OUT1 IN WJ-HDE300 #2 OUT2 OUT1 IN WJ-HDE300 #4 IN WJ-HDE300 #5 IN WJ-HDE300 #3 OUT2 OUT1 IN WJ-HDE300 #6 IN WJ-HDE300...
... Connect units with the digital disk recorder (the WJ-HD300 series) as shown below using the supplied serial cables. Be sure to seven extension units with the recorder in ...extension cables (locally procured). Otherwise, the recorder will work because of the system. • Physical connections determine the unit number in the units. ● Recommended Connection Form Layer1 Layer2 Layer3 Layer4 WJ-HD300 Series EXT STORAGE IN WJ-HDE300 #1 OUT2 OUT1 IN WJ-HDE300 #2 OUT2 OUT1 IN WJ-HDE300 #4 IN WJ-HDE300 #5 IN WJ-HDE300 #3 OUT2 OUT1 IN WJ-HDE300 #6 IN WJ-HDE300...
WJHDE300 User Guide
Page 15
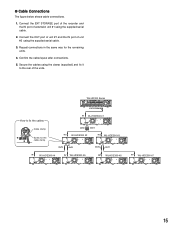
... OUT2 OUT1 OUT2 OUT1 IN EXT IN OUT 21 WJ-HDE300 #4 SIGNAL GND POWER AC IN IN WJ-HDE300 #5 EXT IN OUT 21 SIGNAL GND POWER AC IN IN EXT IN OUT 21 WJ-HDE300 #6 SIGNAL GND POWER AC IN IN WJ-HDE300 #7 EXT IN OUT 21 SIGNAL GND POWER AC ...2 1 6 5 4 3 2 1 EXT STORAGE SIGNAL GND POWER AC IN How to the rear of extension unit #1 using the supplied serial cable. 2. Secure the cables using the supplied serial cable. 3. Connect the EXT STORAGE port of the recorder and the IN port of the units. ● Cable Connections The figure below shows cable connections. 1.
... OUT2 OUT1 OUT2 OUT1 IN EXT IN OUT 21 WJ-HDE300 #4 SIGNAL GND POWER AC IN IN WJ-HDE300 #5 EXT IN OUT 21 SIGNAL GND POWER AC IN IN EXT IN OUT 21 WJ-HDE300 #6 SIGNAL GND POWER AC IN IN WJ-HDE300 #7 EXT IN OUT 21 SIGNAL GND POWER AC ...2 1 6 5 4 3 2 1 EXT STORAGE SIGNAL GND POWER AC IN How to the rear of extension unit #1 using the supplied serial cable. 2. Secure the cables using the supplied serial cable. 3. Connect the EXT STORAGE port of the recorder and the IN port of the units. ● Cable Connections The figure below shows cable connections. 1.


