

WJHD200 User Guide
Page 1
ENGLISH FRANÇAIS OPERATE ALARM TIMER SUSPEND REMOTE RESET LOCK DST SPOT MULTI OSD 1 SEQUECE 5 CAMERA SELECT 2 3 4 6 7 8 MULSTEISLECCRTEEN ZOOM HDD /SEESTCUP STOP PLAY REC FULL ERROR SAELARRCMH PLAY MODE SERECT REC STOP PUSH- PAUSE SET TISMEEA&RDCAHTE RALEACRAMLL Digital Disk Recorder WJ-HD200 Before attempting to connect or operate this product, please read these instructions carefully and save this manual for future use. Digital Disk Recorder Operating Instructions WJ-HD200 Model No.
ENGLISH FRANÇAIS OPERATE ALARM TIMER SUSPEND REMOTE RESET LOCK DST SPOT MULTI OSD 1 SEQUECE 5 CAMERA SELECT 2 3 4 6 7 8 MULSTEISLECCRTEEN ZOOM HDD /SEESTCUP STOP PLAY REC FULL ERROR SAELARRCMH PLAY MODE SERECT REC STOP PUSH- PAUSE SET TISMEEA&RDCAHTE RALEACRAMLL Digital Disk Recorder WJ-HD200 Before attempting to connect or operate this product, please read these instructions carefully and save this manual for future use. Digital Disk Recorder Operating Instructions WJ-HD200 Model No.

WJHD200 User Guide
Page 5
...cameras Controlling recorder • Miscellaneous Password protected buttons Alarm list search Trademarks Microsoft, Windows, WindowsXP and Internet Explorer are provided for use within a surveillance system and is a combination of Microsoft Corporation in the extended mode on a field basis. PREFACE The Digital Disk Recorder WJ-HD200 is designed for recording... setup, alarm setup, network setup, and so forth. Besides recording and playback, the WJ-HD200 features versatile ...
...cameras Controlling recorder • Miscellaneous Password protected buttons Alarm list search Trademarks Microsoft, Windows, WindowsXP and Internet Explorer are provided for use within a surveillance system and is a combination of Microsoft Corporation in the extended mode on a field basis. PREFACE The Digital Disk Recorder WJ-HD200 is designed for recording... setup, alarm setup, network setup, and so forth. Besides recording and playback, the WJ-HD200 features versatile ...

WJHD200 User Guide
Page 7
... specified input. PAUSE SET TIME&DATE SEARCH ALARM RECALL Digital Disk Recorder WJ-HD200 r u o !1 !5 !6 @1 @2 @3 @4 @5 @6 @7 q Operate Indicator (OPERATE) Lights up . e Alarm Suspension Indicator (SUSPEND) Lights up when the alarm suspension mode is a live image, or the recorded image of the camera input as follows. It blinks while recording during the specified start and end time. Yellow: The...
... specified input. PAUSE SET TIME&DATE SEARCH ALARM RECALL Digital Disk Recorder WJ-HD200 r u o !1 !5 !6 @1 @2 @3 @4 @5 @6 @7 q Operate Indicator (OPERATE) Lights up . e Alarm Suspension Indicator (SUSPEND) Lights up when the alarm suspension mode is a live image, or the recorded image of the camera input as follows. It blinks while recording during the specified start and end time. Yellow: The...
WJHD200 User Guide
Page 10
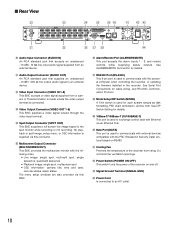
...with external devices compatible with the PSD (Panasonic Security Data) protocol based on RS485. $1 Cooling Fan Prevents the temperature of the recorder on and off. $3 Signal Ground Terminal...accepts a video signal supplied from rising. See ALARM/REMOTE Connection for such system setups as disk formatting, PSD chain termination, and so forth. See DIP Switch Setting for details. #9 10Base... sequence • Playback image: single spot, multiscreen spot • OSD information: camera title, time and date, recorder status, alarm status The menu setup windows are also provided via an Ethernet Hub...
...with external devices compatible with the PSD (Panasonic Security Data) protocol based on RS485. $1 Cooling Fan Prevents the temperature of the recorder on and off. $3 Signal Ground Terminal...accepts a video signal supplied from rising. See ALARM/REMOTE Connection for such system setups as disk formatting, PSD chain termination, and so forth. See DIP Switch Setting for details. #9 10Base... sequence • Playback image: single spot, multiscreen spot • OSD information: camera title, time and date, recorder status, alarm status The menu setup windows are also provided via an Ethernet Hub...
WJHD200 User Guide
Page 13
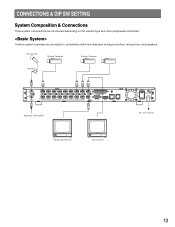
... & Connections Three system compositions are connected in combination with the multiscreen and spot monitors, microphone, and speakers. Ordinary system-cameras are introduced depending on the camera type and other peripherals connected. Microphone System Cameras System Cameras Amplifier IN OUT AUDIO IN 8 7 6 5 4 3 2 1 SPOT OUT ALARM/REMOTE OUT 8 7 6 5 4 3 2 1 VIDEO MULTI SCREEN OUT RS-232C MODE 10...
... & Connections Three system compositions are connected in combination with the multiscreen and spot monitors, microphone, and speakers. Ordinary system-cameras are introduced depending on the camera type and other peripherals connected. Microphone System Cameras System Cameras Amplifier IN OUT AUDIO IN 8 7 6 5 4 3 2 1 SPOT OUT ALARM/REMOTE OUT 8 7 6 5 4 3 2 1 VIDEO MULTI SCREEN OUT RS-232C MODE 10...
WJHD200 User Guide
Page 14
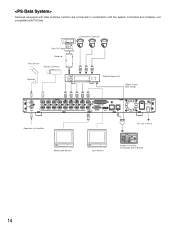
... are connected in combination with the system controllers and multiplex unit compatible with PS•Data 14 Pan/Tilt Table Receiver Microphone System Cameras POWER Amplifier ON OFF Combination Cameras ALARM ALARM SUSPEND Data Multiplex Unit WJ-MP204 Data Multiplex Unit RS485 Cable (WV-CA48) IN OUT AUDIO IN 8 7 6 5 4 3 2 1 SPOT OUT ALARM...
... are connected in combination with the system controllers and multiplex unit compatible with PS•Data 14 Pan/Tilt Table Receiver Microphone System Cameras POWER Amplifier ON OFF Combination Cameras ALARM ALARM SUSPEND Data Multiplex Unit WJ-MP204 Data Multiplex Unit RS485 Cable (WV-CA48) IN OUT AUDIO IN 8 7 6 5 4 3 2 1 SPOT OUT ALARM...
WJHD200 User Guide
Page 15
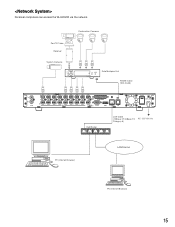
Combination Cameras Pan/Tilt Table Receiver System Cameras POWER ON OFF ALARM ALARM SUSPEND Data Multiplex Unit WJ-MP204 Data Multiplex Unit RS485 Cable (WV-CA48) IN OUT AUDIO IN 8 7 6 5 4 3 2 1 SPOT OUT ALARM/REMOTE OUT 8 7 6 5 4 3 2 1 VIDEO MULTI SCREEN OUT RS-232C MODE 10/100BASE-T DATA POWER ON SIGNAL GND OFF Hub/Router LAN Cable (10Base-T/100Base-TX Category 5) AC 120 V 60 Hz PC (Internet Browser) LAN/Internet PC (Internet Browser) 15 Personal computers can access the WJ-HD200 via the network.
Combination Cameras Pan/Tilt Table Receiver System Cameras POWER ON OFF ALARM ALARM SUSPEND Data Multiplex Unit WJ-MP204 Data Multiplex Unit RS485 Cable (WV-CA48) IN OUT AUDIO IN 8 7 6 5 4 3 2 1 SPOT OUT ALARM/REMOTE OUT 8 7 6 5 4 3 2 1 VIDEO MULTI SCREEN OUT RS-232C MODE 10/100BASE-T DATA POWER ON SIGNAL GND OFF Hub/Router LAN Cable (10Base-T/100Base-TX Category 5) AC 120 V 60 Hz PC (Internet Browser) LAN/Internet PC (Internet Browser) 15 Personal computers can access the WJ-HD200 via the network.
WJHD200 User Guide
Page 16
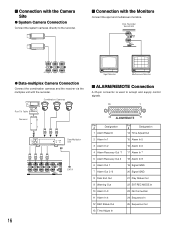
... Adjust In I Connection with the Monitors Connect the spot and multiscreen monitors. Disk Recorder WJ-HD200 SPOT OUT MULTI SCREEN OUT IN 8 7 6 OUT 8 7 6 G Data-multiplex Camera Connection Connect the combination cameras and the receiver via the multiplex unit with the recorder. Combination Cameras Pan/Tilt Table Receiver POWER ON OFF ALARM ALARM SUSPEND Data Multiplex Unit...
... Adjust In I Connection with the Monitors Connect the spot and multiscreen monitors. Disk Recorder WJ-HD200 SPOT OUT MULTI SCREEN OUT IN 8 7 6 OUT 8 7 6 G Data-multiplex Camera Connection Connect the combination cameras and the receiver via the multiplex unit with the recorder. Combination Cameras Pan/Tilt Table Receiver POWER ON OFF ALARM ALARM SUSPEND Data Multiplex Unit...

WJHD200 User Guide
Page 22
... TIME&DATE SEARCH ALARM RECALL PLAY MODE SELECT Digital Disk Recorder WJ-HD200 [D up] button: Moves the cursor upwards in a menu, and opens the previous menu page. [C down the [STOP SETUP/ESC] button for about 2 seconds until the camera image is displayed if you changed the settings and... be available. The WJHD200 MAIN MENU appears. JogDial (Clockwise): Increases the parameter value. Turn on the power switches of all system components. 3. Hold down ] button: Moves the cursor downwards in a menu, and opens the next menu page. Confirm that the camera and peripherals are connected...
... TIME&DATE SEARCH ALARM RECALL PLAY MODE SELECT Digital Disk Recorder WJ-HD200 [D up] button: Moves the cursor upwards in a menu, and opens the previous menu page. [C down the [STOP SETUP/ESC] button for about 2 seconds until the camera image is displayed if you changed the settings and... be available. The WJHD200 MAIN MENU appears. JogDial (Clockwise): Increases the parameter value. Turn on the power switches of all system components. 3. Hold down ] button: Moves the cursor downwards in a menu, and opens the next menu page. Confirm that the camera and peripherals are connected...
WJHD200 User Guide
Page 23
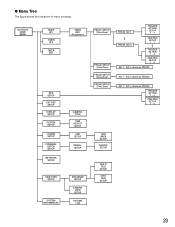
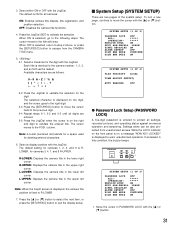
... TIMER REC (Assignment) REC SETUP EXT REC SETUP DISPLAY SETUP SYSTEM SETUP ALARM SETUP COMMUNICATION SETUP NETWORK SETUP CAMERA TITLE TIME ADJUST SETUP VMD SETUP SERIAL SETUP SWITCHER SETUP SYSTEM INFORMATION SEQUENCE SETUP CAMERA VIEW SETUP SYSTEM LOG PROG1 SETUP (Time Zone) PROG2 SETUP (Time Zone) PROG3 SETUP (Time Zone) PROG4 SETUP...
... TIMER REC (Assignment) REC SETUP EXT REC SETUP DISPLAY SETUP SYSTEM SETUP ALARM SETUP COMMUNICATION SETUP NETWORK SETUP CAMERA TITLE TIME ADJUST SETUP VMD SETUP SERIAL SETUP SWITCHER SETUP SYSTEM INFORMATION SEQUENCE SETUP CAMERA VIEW SETUP SYSTEM LOG PROG1 SETUP (Time Zone) PROG2 SETUP (Time Zone) PROG3 SETUP (Time Zone) PROG4 SETUP...
WJHD200 User Guide
Page 27
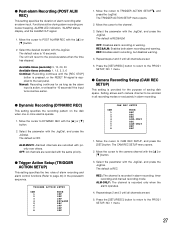
... the purpose of saving disk space. Select the parameter with the [D] or [C] button. 2. OFF: Disables alarm recording or warning. REC: Enables alarm recording, but disables warning. 4. Repeat steps 2 and 3 until all recording modes or exclusively in alarm recording. G Post-alarm Recording (POST ALM REC) ...is pressed, or the RESET IN signal is provided for 10 seconds if the input turns inactive earlier. G Camera Recording Setup (CAM REC SETUP) This setting is supplied to the camera channel with the JogDial, and press the JogDial. CAM 1 2 3 4 5 6 7 8 CAM REC ...
... the purpose of saving disk space. Select the parameter with the [D] or [C] button. 2. OFF: Disables alarm recording or warning. REC: Enables alarm recording, but disables warning. 4. Repeat steps 2 and 3 until all recording modes or exclusively in alarm recording. G Post-alarm Recording (POST ALM REC) ...is pressed, or the RESET IN signal is provided for 10 seconds if the input turns inactive earlier. G Camera Recording Setup (CAM REC SETUP) This setting is supplied to the camera channel with the JogDial, and press the JogDial. CAM 1 2 3 4 5 6 7 8 CAM REC ...

WJHD200 User Guide
Page 28
... SETUPO EXT REC SETUPO DISPLAY SETUPO SYSTEM SETUPO ALARM SETUPO COMMUNICATION SETUPO SWITCHER SETUPO SYSTEM INFORMATIONO Refer to G Recording Mode Setup PROG1-4 SETUP, NO. 14 for the recording mode parameters. 3. DISPLAY SETUP CLOCK→ JUN30.03 15:05 TIME&DATE TYPE1 24H TIME&DATE DISP..... MM DD YY HH : MM 3. Manual recording is available when OFF is selected for TIMER in WJ-HD200 MAIN MENU; G Time & Date (TIME&DATE) 1. Press the JogDial (SET) to the EXT REC terminal. 1. R-LOWER HDD FULL 1% REMOTE LED ON HDD CHECK 0:00 CAMERA TITLEO G Clock (CLOCK) 1.
... SETUPO EXT REC SETUPO DISPLAY SETUPO SYSTEM SETUPO ALARM SETUPO COMMUNICATION SETUPO SWITCHER SETUPO SYSTEM INFORMATIONO Refer to G Recording Mode Setup PROG1-4 SETUP, NO. 14 for the recording mode parameters. 3. DISPLAY SETUP CLOCK→ JUN30.03 15:05 TIME&DATE TYPE1 24H TIME&DATE DISP..... MM DD YY HH : MM 3. Manual recording is available when OFF is selected for TIMER in WJ-HD200 MAIN MENU; G Time & Date (TIME&DATE) 1. Press the JogDial (SET) to the EXT REC terminal. 1. R-LOWER HDD FULL 1% REMOTE LED ON HDD CHECK 0:00 CAMERA TITLEO G Clock (CLOCK) 1.
WJHD200 User Guide
Page 30
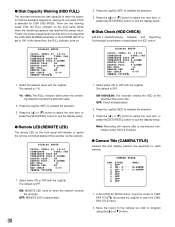
... after a one-second intermission when HDD is selected for DISK END MODE. R-LOWER HDD FULL 1% REMOTE LED ON HDD CHECK 0:00 CAMERA TITLEO 2. Note: Recording will indicate or ignore the remote controlled status of the recorder via the network. The default is deactivated. 2. ON ...0:00-23:00: The recorder checks the HDD at the specified time every day. G Disk Check (HDD CHECK) S.M.A.R.T. (...
... after a one-second intermission when HDD is selected for DISK END MODE. R-LOWER HDD FULL 1% REMOTE LED ON HDD CHECK 0:00 CAMERA TITLEO 2. Note: Recording will indicate or ignore the remote controlled status of the recorder via the network. The default is deactivated. 2. ON ...0:00-23:00: The recorder checks the HDD at the specified time every day. G Disk Check (HDD CHECK) S.M.A.R.T. (...
WJHD200 User Guide
Page 31
...recorded pictures, and operating status against erroneous operation and tampering. The cursor moves to the following steps. The selected character is RLOWER, for deleting entered characters. 6. The cursor moves to warn unauthorized operators. The default setting for cameras 1, 2, 5, and 6 is displayed on the digit... ***** OPERATION→ ***** KEYLOCK BUZZ ON SKIP ALM-RECALL 1PAGE SIMUL REC&PLAY ON ALTER DETECT OFF DISK END MODE CONTINUE DISK END BUZZ ON 1. OFF: Disables the camera title functions. 4. Press the [D] or [C] button to select the next item, or press the [...
...recorded pictures, and operating status against erroneous operation and tampering. The cursor moves to the following steps. The selected character is RLOWER, for deleting entered characters. 6. The cursor moves to warn unauthorized operators. The default setting for cameras 1, 2, 5, and 6 is displayed on the digit... ***** OPERATION→ ***** KEYLOCK BUZZ ON SKIP ALM-RECALL 1PAGE SIMUL REC&PLAY ON ALTER DETECT OFF DISK END MODE CONTINUE DISK END BUZZ ON 1. OFF: Disables the camera title functions. 4. Press the [D] or [C] button to select the next item, or press the [...

WJHD200 User Guide
Page 35
...Setup (ALARM SETUP) The digital disk recorder accepts alarm signals supplied from the rear panel. Alarm recording stops when the preset time has elapsed, the alarm [RESET] button on this menu. 1. The recorder outputs an alarm recovery signal from connected devices such as sensors or camera site equipment. The default... is active. ON: Buzzer beeps while alarm is ON. OFF: Buzzer does not beep. Rotate the JogDial to the alarmed channel when an alarm operates. 35 ON: Enables the recorder to VMD SETUPO with the ...
...Setup (ALARM SETUP) The digital disk recorder accepts alarm signals supplied from the rear panel. Alarm recording stops when the preset time has elapsed, the alarm [RESET] button on this menu. 1. The recorder outputs an alarm recovery signal from connected devices such as sensors or camera site equipment. The default... is active. ON: Buzzer beeps while alarm is ON. OFF: Buzzer does not beep. Rotate the JogDial to the alarmed channel when an alarm operates. 35 ON: Enables the recorder to VMD SETUPO with the ...
WJHD200 User Guide
Page 36
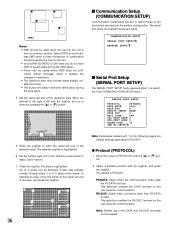
...• VMD should be used when the input to the unit is used. Select [OFF] to avoid useless VMD when a video multiplexer or combination camera supplies the input to the unit. • Set ALARM SUSPEND to ON when you do not want VMD to be activated during the area setup... the rear panel for communication. Move the asterisk to RS-232C. RS-232C: Select when a protocol other than PS•DATA is from an ordinary camera. Note: Parallel use of the detection area. Press the JogDial. G Protocol (PROTOCOL) 1. Press the JogDial to select more areas. The area is not ...
...• VMD should be used when the input to the unit is used. Select [OFF] to avoid useless VMD when a video multiplexer or combination camera supplies the input to the unit. • Set ALARM SUSPEND to ON when you do not want VMD to be activated during the area setup... the rear panel for communication. Move the asterisk to RS-232C. RS-232C: Select when a protocol other than PS•DATA is from an ordinary camera. Note: Parallel use of the detection area. Press the JogDial. G Protocol (PROTOCOL) 1. Press the JogDial to select more areas. The area is not ...

WJHD200 User Guide
Page 38
SETUP) (exclusive to the desired line with the JogDial, and press the JogDial. SETUP menu opens. Move the cursor to PS •DATA) Camera numbers will be used in the chain. 4. Assignable numbers: From 001 to control it from the DHCP server. 38 The default is OFF. The default ... HTTP port number. AUTO: The speed is the same as the CAM-PORT number. Note: When ON is AUTO. The default is selected, you select a camera to 128, each number must be displayed after the menu setup window is enabled or disabled. I Network Setup (NETWORK SETUP) NETWORK SETUP LINE SPEED AUTO...
SETUP) (exclusive to the desired line with the JogDial, and press the JogDial. SETUP menu opens. Move the cursor to PS •DATA) Camera numbers will be used in the chain. 4. Assignable numbers: From 001 to control it from the DHCP server. 38 The default is OFF. The default ... HTTP port number. AUTO: The speed is the same as the CAM-PORT number. Note: When ON is AUTO. The default is selected, you select a camera to 128, each number must be displayed after the menu setup window is enabled or disabled. I Network Setup (NETWORK SETUP) NETWORK SETUP LINE SPEED AUTO...
WJHD200 User Guide
Page 39
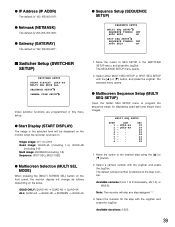
Single image: CH 1 to 8 individually, 4A(1-4), or 4B(5-8) Note: The recorder will be displayed on the monitor when the recorder is turned on the setup. SEC 2S 2S 2S 2S 2S 2S 2S 2S 1. Available cameras: From 1 to CH 8 Quad image: QUAD-4A (including 1-4), QUAD-4B (including 5-8) Multi image: ...SEQUENCE TIMING INT AUTO SKIP ON I Switcher Setup (SWITCHER SETUP) SWITCHER SETUP START DISPLAY QUAD-4A MULTI SEL MODE ALL SEQUENCE SETUPO CAMERA VIEW SETUPO Video switcher functions are programmed in the SWITCHER SETUP menu, and press the JogDial. Available durations: 2-30S 39 Move ...
Single image: CH 1 to 8 individually, 4A(1-4), or 4B(5-8) Note: The recorder will be displayed on the monitor when the recorder is turned on the setup. SEC 2S 2S 2S 2S 2S 2S 2S 2S 1. Available cameras: From 1 to CH 8 Quad image: QUAD-4A (including 1-4), QUAD-4B (including 5-8) Multi image: ...SEQUENCE TIMING INT AUTO SKIP ON I Switcher Setup (SWITCHER SETUP) SWITCHER SETUP START DISPLAY QUAD-4A MULTI SEL MODE ALL SEQUENCE SETUPO CAMERA VIEW SETUPO Video switcher functions are programmed in the SWITCHER SETUP menu, and press the JogDial. Available durations: 2-30S 39 Move ...
WJHD200 User Guide
Page 40
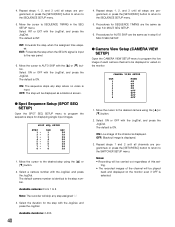
... 6 of the channel is ON. Repeat steps 1, 2, and 3 until all steps are the same as a blackout screen. ting. • The recorded images of each camera channel to the SEQUENCE SETUP menu. 5. 4. G Spot Sequence Setup (SPOT SEQ SETUP) Open the SPOT SEQ SETUP menu to program the sequence steps ...back and displayed on the monitor. Note: The recorder will be displayed or vailed on the monitor even if OFF is ON. Move the cursor to 8. ON: The sequence skips any step assigned "-". 3. G Camera View Setup (CAMERA VIEW SETUP) Open the CAMERA VIEW SETUP menu to program the live image ...
... 6 of the channel is ON. Repeat steps 1, 2, and 3 until all steps are the same as a blackout screen. ting. • The recorded images of each camera channel to the SEQUENCE SETUP menu. 5. 4. G Spot Sequence Setup (SPOT SEQ SETUP) Open the SPOT SEQ SETUP menu to program the sequence steps ...back and displayed on the monitor. Note: The recorder will be displayed or vailed on the monitor even if OFF is ON. Move the cursor to 8. ON: The sequence skips any step assigned "-". 3. G Camera View Setup (CAMERA VIEW SETUP) Open the CAMERA VIEW SETUP menu to program the live image ...
WJHD200 User Guide
Page 42
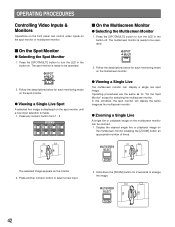
... is ready to turn the LED in the button off. Follow the descriptions below for each monitoring mode on the spot monitor. MULTISCREEN SELECT ZOOM 2. CAMERA SELECT 1 2 3 4 5 6 7 8 I On the Spot Monitor G Selecting the Spot Monitor 1. The selected image appears on the spot monitor or multiscreen monitor. MULTISCREEN SELECT ZOOM 42 OPERATING...
... is ready to turn the LED in the button off. Follow the descriptions below for each monitoring mode on the spot monitor. MULTISCREEN SELECT ZOOM 2. CAMERA SELECT 1 2 3 4 5 6 7 8 I On the Spot Monitor G Selecting the Spot Monitor 1. The selected image appears on the spot monitor or multiscreen monitor. MULTISCREEN SELECT ZOOM 42 OPERATING...