Owners Manual
Page 2
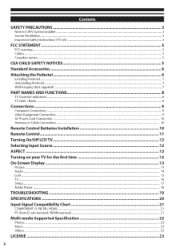
... Connection ...9 Video Equipment Connection ...9 AC Power Cord Connection ...10 Antenna or Cable Connection ...10 Remote Control Batteries installation 10 Remote Control ... 11 Turning On/Off LCD TV 12 Selecting Input Source 12 ASPECT...12 Turning on your TV for the first time 12 On-Screen Display ... 13 Picture ...13 Audio ...14 Lock ...15 TV ...16 Setup ...17 Media Player ...18 TROUBLESHOOTING...19 SPECIFICATIONS...20 input Signal Compatibility Chart 21 COMPONENT (Y, PB, PR), HDMI ...21 PC (from D-sub terminal/HDMI terminal) ...21 Multi-media Supported Specification...
... Connection ...9 Video Equipment Connection ...9 AC Power Cord Connection ...10 Antenna or Cable Connection ...10 Remote Control Batteries installation 10 Remote Control ... 11 Turning On/Off LCD TV 12 Selecting Input Source 12 ASPECT...12 Turning on your TV for the first time 12 On-Screen Display ... 13 Picture ...13 Audio ...14 Lock ...15 TV ...16 Setup ...17 Media Player ...18 TROUBLESHOOTING...19 SPECIFICATIONS...20 input Signal Compatibility Chart 21 COMPONENT (Y, PB, PR), HDMI ...21 PC (from D-sub terminal/HDMI terminal) ...21 Multi-media Supported Specification...
Owners Manual
Page 3
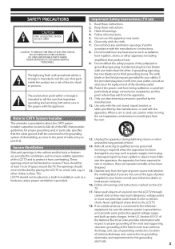
... with the manufacturer's instructions. 8+ Do not install near water. 6. specified by placing the LCD TV on the LCD TV. 18+ If an outside antenna is connected to proper grounding of the mast and supporting structure, grounding of space around the TV. Clean onlywith dry cloth. 7+ Do not block any heat sources such as power-supply cord or plug is grounded so as...
... with the manufacturer's instructions. 8+ Do not install near water. 6. specified by placing the LCD TV on the LCD TV. 18+ If an outside antenna is connected to proper grounding of the mast and supporting structure, grounding of space around the TV. Clean onlywith dry cloth. 7+ Do not block any heat sources such as power-supply cord or plug is grounded so as...
Owners Manual
Page 4
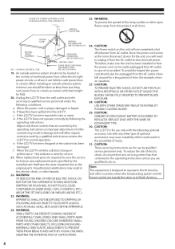
... damaged or frayed. b. When the LCD TV exhibits a distinct change in the operating instructions unless you will not completely shut off all times. ® or other electric light, power circuits, or where it from touching such power lines or circuits as in damage and will often require extensive work by qualified service personnel only. When replacement parts are required, be taken to...
... damaged or frayed. b. When the LCD TV exhibits a distinct change in the operating instructions unless you will not completely shut off all times. ® or other electric light, power circuits, or where it from touching such power lines or circuits as in damage and will often require extensive work by qualified service personnel only. When replacement parts are required, be taken to...

Owners Manual
Page 5
... (958-4372) consumerproducts@panasonic.com This device complies with Part 15 of the following measures: Reorient or relocate the receiving antenna. Carefully read and understand all cords and cables connected to the flat panel display so that a qualified the wall-mount installation. Some wall be taken to route all enclosed instructions for proper use of North America could void the user's authority to operate this device must accept...
... (958-4372) consumerproducts@panasonic.com This device complies with Part 15 of the following measures: Reorient or relocate the receiving antenna. Carefully read and understand all cords and cables connected to the flat panel display so that a qualified the wall-mount installation. Some wall be taken to route all enclosed instructions for proper use of North America could void the user's authority to operate this device must accept...
Owners Manual
Page 6
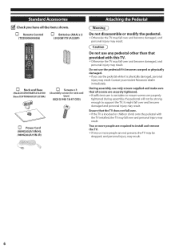
...screws are required the TV. to install and remove If two or more people are securely tightened. Otherwise the TV may fall over and become damaged, and personal injury may result. Contact your nearest Panasonic dealer immediately. Ensure that provided with the TV installed...use only screws supplied and make sure that all the items shown. [] Remote Control (TZZ000000OSA) [] Batteries (AAA) x 2 (392GB1TXIA32GP) [] Neck and Base (Neck:X34T0059AFL01L0100 Base:X34T0060AFL01 L01BA) [] Screws × 3 (AssembLy screws for neck and base) (0QIG 940 18 47 CR3) [] Power Cord ...
...screws are required the TV. to install and remove If two or more people are securely tightened. Otherwise the TV may fall over and become damaged, and personal injury may result. Contact your nearest Panasonic dealer immediately. Ensure that provided with the TV installed...use only screws supplied and make sure that all the items shown. [] Remote Control (TZZ000000OSA) [] Batteries (AAA) x 2 (392GB1TXIA32GP) [] Neck and Base (Neck:X34T0059AFL01L0100 Base:X34T0060AFL01 L01BA) [] Screws × 3 (AssembLy screws for neck and base) (0QIG 940 18 47 CR3) [] Power Cord ...
Owners Manual
Page 7
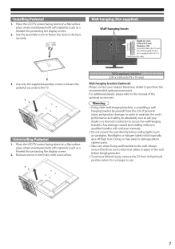
... when fixing wall brackets to the TV. 1. PpllaatwccheeheLeCmrTeDaVsicnrteafweiannicethsidndogomftwaontnaefrl(aisastuluscarhfsaace blankfoeprt)rotectthinedgispslacyreen. 2. In order to maintain the unit's performance and safety, be absolutely sure to ask your nearest Panasonic dealer to the base securely. 1 Wall-hanging Insets 0.28 i._h 17_1 _i DSciaremweter for protecting the display screen. 2. To prevent fall and injury, remove the TV from the side) 3, Use only the supplied assembly screws...
... when fixing wall brackets to the TV. 1. PpllaatwccheeheLeCmrTeDaVsicnrteafweiannicethsidndogomftwaontnaefrl(aisastuluscarhfsaace blankfoeprt)rotectthinedgispslacyreen. 2. In order to maintain the unit's performance and safety, be absolutely sure to ask your nearest Panasonic dealer to the base securely. 1 Wall-hanging Insets 0.28 i._h 17_1 _i DSciaremweter for protecting the display screen. 2. To prevent fall and injury, remove the TV from the side) 3, Use only the supplied assembly screws...
Owners Manual
Page 8
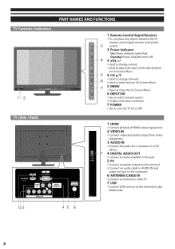
.... 1 HDMI _ Connect all kinds of HDMI output 2 VIDEO IN _ Connect video and audio output equipment. 3 AUDIO IN equipment, from video _ Connect the audio for a computer device, 4 DIGITAL AUDIO OUT or a DVI _ Connect an audio amplifier to this jack, 5 PC _ Connect computer outputs to this terminal. _ Connect an audio cable to AUDIO IN and audio out jack on the computer. 6 ANTENNA/CABLE IN _ Connect an antenna or cable TV. 7 USB _ Connect USB memory to this terminal to play Multimedia. Standby: Power indicator 3 VOL +/- 1 123 45 6 1 Remote Control Signal Receiver _ Do...
.... 1 HDMI _ Connect all kinds of HDMI output 2 VIDEO IN _ Connect video and audio output equipment. 3 AUDIO IN equipment, from video _ Connect the audio for a computer device, 4 DIGITAL AUDIO OUT or a DVI _ Connect an audio amplifier to this jack, 5 PC _ Connect computer outputs to this terminal. _ Connect an audio cable to AUDIO IN and audio out jack on the computer. 6 ANTENNA/CABLE IN _ Connect an antenna or cable TV. 7 USB _ Connect USB memory to this terminal to play Multimedia. Standby: Power indicator 3 VOL +/- 1 123 45 6 1 Remote Control Signal Receiver _ Do...

Owners Manual
Page 9
HDMI Input Digital Audio Output o Video cable (RCA x 3) Note: _ AUDIO IN: Connect the audio for a computer or a DVI device. _ DIGITAL AUDIO OUT: Connect an audio amplifier to this LCD Note: When connecting the cable, AC Power Cords of both LCD TV and external equipment should be disconnected from AC out et. Turn LCD TV and peripheral equipment on . Cable used for connection (These cables are not supplied LCD TV.) _ Component/Video, Audio Cable __ HDDigMitaIl Caaubdleio: HcDaMbleI Input with this jack. terminal by using the DVI...
HDMI Input Digital Audio Output o Video cable (RCA x 3) Note: _ AUDIO IN: Connect the audio for a computer or a DVI device. _ DIGITAL AUDIO OUT: Connect an audio amplifier to this LCD Note: When connecting the cable, AC Power Cords of both LCD TV and external equipment should be disconnected from AC out et. Turn LCD TV and peripheral equipment on . Cable used for connection (These cables are not supplied LCD TV.) _ Component/Video, Audio Cable __ HDDigMitaIl Caaubdleio: HcDaMbleI Input with this jack. terminal by using the DVI...
Owners Manual
Page 10
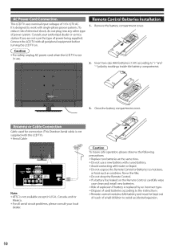
... uses nominal input voltages of power being Connect the LCD TV with all aerial circuit problems, please consult your authorized dealer or service station if you are not sure the type of 110-127V AC. Consult your local dealer. ( Caution ") To insure safe operation, precautions: please observe the following Replace two batteries at the same time. Close the battery compartment cover. Cable used for connection...
... uses nominal input voltages of power being Connect the LCD TV with all aerial circuit problems, please consult your authorized dealer or service station if you are not sure the type of 110-127V AC. Consult your local dealer. ( Caution ") To insure safe operation, precautions: please observe the following Replace two batteries at the same time. Close the battery compartment cover. Cable used for connection...
Owners Manual
Page 11
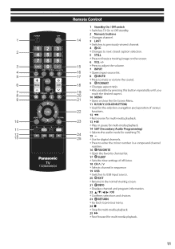
... USB _ Switches to USB input source. 20 _ EXIT _ Returns to the normal viewing screen. 21 @INFO _ Displays channel and program information. 22 AIYI_III_IOK _ Confirms selections and choices. 23 _ RETURN _Go back to previous menu. 24 [] _ Stop for multi-media 25 _1_ playback. Fast forward for digital channels. playback. 6-- 7 8 9 10-11-12-13 1 StandbyOn/Off switch ÷ Switches TV On or Off standby. 2 Numeric buttons _ Changes channel. 3 LAST Switches to previously viewed channel. 4 @cc Changes...
... USB _ Switches to USB input source. 20 _ EXIT _ Returns to the normal viewing screen. 21 @INFO _ Displays channel and program information. 22 AIYI_III_IOK _ Confirms selections and choices. 23 _ RETURN _Go back to previous menu. 24 [] _ Stop for multi-media 25 _1_ playback. Fast forward for digital channels. playback. 6-- 7 8 9 10-11-12-13 1 StandbyOn/Off switch ÷ Switches TV On or Off standby. 2 Numeric buttons _ Changes channel. 3 LAST Switches to previously viewed channel. 4 @cc Changes...
Owners Manual
Page 12
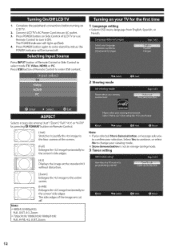
... off . -_ e 0 0 Press INPUT button of LCD TV or use Remote Control to confirm your viewing mode. @ Store demonstration is not an energy-saving mode. 3 Tuner setting Displays the image at the standard 4:3 without distortion. Connect LCD TV's AC Power Cord into an AC outlet. 3. Press POWER button on Remote Control. Press POWER button again to enter stand-by pressing _ FORMAT button on Side Control of Remote Control or Side Control to change your selection. ev e s " " 1 Language setting _ Selects OSD menu language French...
... off . -_ e 0 0 Press INPUT button of LCD TV or use Remote Control to confirm your viewing mode. @ Store demonstration is not an energy-saving mode. 3 Tuner setting Displays the image at the standard 4:3 without distortion. Connect LCD TV's AC Power Cord into an AC outlet. 3. Press POWER button on Remote Control. Press POWER button again to enter stand-by pressing _ FORMAT button on Side Control of Remote Control or Side Control to change your selection. ev e s " " 1 Language setting _ Selects OSD menu language French...
Owners Manual
Page 13
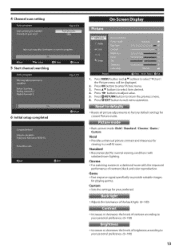
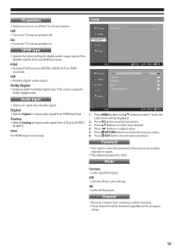
4 Channel scan setting ® -- Press OK button to exit menu operation. _ Resets all picture adjustments current Picture mode. Press _ EXIT button to enter Picture menu. 3. Game _ Fast response signal specifically for normal viewing subdued room lighting. Press _ RETURN button to select"Picture", the Picture menu will be displayed. 2. Standard _ Recommended for playing games. conditions with Cinema _ For watching performance movies in a well-lit room. Press MENU button and A T buttons to return the previous menu. 6. to provide suitable images Custom _ Sets the ...
4 Channel scan setting ® -- Press OK button to exit menu operation. _ Resets all picture adjustments current Picture mode. Press _ EXIT button to enter Picture menu. 3. Game _ Fast response signal specifically for normal viewing subdued room lighting. Press _ RETURN button to select"Picture", the Picture menu will be displayed. 2. Standard _ Recommended for playing games. conditions with Cinema _ For watching performance movies in a well-lit room. Press MENU button and A T buttons to return the previous menu. 6. to provide suitable images Custom _ Sets the ...
Owners Manual
Page 14
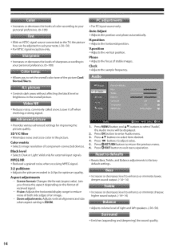
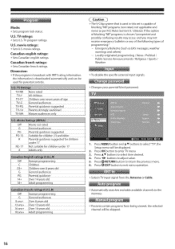
... the format of received signal. - Leave it off when _ Provides various advanced settings for optimum quality. and size 1. Press _1_ buttonsto adjust value. 5. called snow. Press AT buttons to exit menu operation. _ Resets Bass, Treble, and Balance adjustments default settings. Auto Adjust _ Adjusts the position and phase automatically. Color matrix _ Selects image resolution of stable images. Valid only for external input signals, MPEG NR _ Reduced a grained noise when receiving MPEG signal. 3:2 pulldown _ Adjusts the picture...
... the format of received signal. - Leave it off when _ Provides various advanced settings for optimum quality. and size 1. Press _1_ buttonsto adjust value. 5. called snow. Press AT buttons to exit menu operation. _ Resets Bass, Treble, and Balance adjustments default settings. Auto Adjust _ Adjusts the position and phase automatically. Color matrix _ Selects image resolution of stable images. Valid only for external input signals, MPEG NR _ Reduced a grained noise when receiving MPEG signal. 3:2 pulldown _ Adjusts the picture...
Owners Manual
Page 15
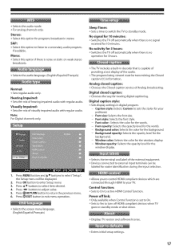
... the Lock settings. Digital _ Selects Digital to input audio signal from watching certain channels. _ These channels will be blocked regardless of the program rating. 15 Press 41_ buttonsto adjust value. 5. Press AT buttons to enter the password channel or inputs. _ The default password is 1234. Press _ RETURN button to Dolby Digital type if the source supports Dolby digital audio. _ Selects an input way of VIDEO For HDMI input source only. 1. off . Dolby Digital _ Outputs audio to return the previous menu. 6. Press MENU button and A _" buttons to turn...
... the Lock settings. Digital _ Selects Digital to input audio signal from watching certain channels. _ These channels will be blocked regardless of the program rating. 15 Press 41_ buttonsto adjust value. 5. Press AT buttons to enter the password channel or inputs. _ The default password is 1234. Press _ RETURN button to Dolby Digital type if the source supports Dolby digital audio. _ Selects an input way of VIDEO For HDMI input source only. 1. off . Dolby Digital _ Outputs audio to return the previous menu. 6. Press MENU button and A _" buttons to turn...
Owners Manual
Page 16
... may not receive emergency bulletins or any of the following types of blocking "N R" programs is downloaded automatically and can be displayed. 2. Press _ buttons to exit menu operation. Press _ EXIT button to select item desired. 4. U.S. Press OK button to return the previous menu. 6. Press _ RETURN button to enter TV menu 3. Locally originated programming Public Service Announcements Weather / News / Political / / Religious / Sports / _ To disable the specific external input signals. Changes your parental block password. Mode: _ Sets program lock status...
... may not receive emergency bulletins or any of the following types of blocking "N R" programs is downloaded automatically and can be displayed. 2. Press _ buttons to exit menu operation. Press _ EXIT button to select item desired. 4. U.S. Press OK button to return the previous menu. 6. Press _ RETURN button to enter TV menu 3. Locally originated programming Public Service Announcements Weather / News / Political / / Religious / Sports / _ To disable the specific external input signals. Changes your parental block password. Mode: _ Sets program lock status...
Owners Manual
Page 17
... MENU button and AV" buttons to standby mode. Hearing Impaired: _ Sets the mix of the external equipment. _ Devices connected to external input terminals can be labeled for viewing digital captioning. Font color: Selects the color for the background. Press 41_ buttons to select item desired. 4. Press _ RETURN button to active HDMI Control function. Power off link: _ Only available when Control function _ Sets to Yes to a secondary in stereo. No signal for 10 minutes: _ Switches...
... MENU button and AV" buttons to standby mode. Hearing Impaired: _ Sets the mix of the external equipment. _ Devices connected to external input terminals can be labeled for viewing digital captioning. Font color: Selects the color for the background. Press 41_ buttons to select item desired. 4. Press _ RETURN button to active HDMI Control function. Power off link: _ Only available when Control function _ Sets to Yes to a secondary in stereo. No signal for 10 minutes: _ Switches...

Owners Manual
Page 18
... effect + Photo size + Display interval _+R+epeat Playing music + Repeat Playing movies _+R+epeat _+B+rowsing Photos Red Green Blue Yellow A/Y/_I/t_ ++Playing Slideshow +:+Play slideshow. +:+Selects viewing type, _ Opens option menu. + Selects Photos_ Musiq _ Selects photos. media menu, you can press Blue color key to the USB port on the TV. 2. Press USB button to enter Multi-media content. Blue Yellow A/Y/_I/II_ _ Opens option menu. ++Selects Photoq Music_ or Videos. _ Selects videos. 1.
... effect + Photo size + Display interval _+R+epeat Playing music + Repeat Playing movies _+R+epeat _+B+rowsing Photos Red Green Blue Yellow A/Y/_I/t_ ++Playing Slideshow +:+Play slideshow. +:+Selects viewing type, _ Opens option menu. + Selects Photos_ Musiq _ Selects photos. media menu, you can press Blue color key to the USB port on the TV. 2. Press USB button to enter Multi-media content. Blue Yellow A/Y/_I/II_ _ Opens option menu. ++Selects Photoq Music_ or Videos. _ Selects videos. 1.
Owners Manual
Page 19
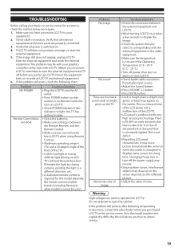
... screen depends on . 4. Check Audio cable connection from LCDTVwhen using Remote Control. ® Maximum operating range is not out of color. ( Warning High voltages are not too far from Audio input source. Press POWER button on side control or on LCD TV's Infrared Remote Receiver? Adjust the value of the Operating Temperature 32 °F - 95 °F (0 °C - 3S °C). Check the batteries. Basically, the remote control of LCD TV and external equipment.) 6, If the problem...
... screen depends on . 4. Check Audio cable connection from LCDTVwhen using Remote Control. ® Maximum operating range is not out of color. ( Warning High voltages are not too far from Audio input source. Press POWER button on side control or on LCD TV's Infrared Remote Receiver? Adjust the value of the Operating Temperature 32 °F - 95 °F (0 °C - 3S °C). Check the batteries. Basically, the remote control of LCD TV and external equipment.) 6, If the problem...

Owners Manual
Page 24
... Lithium ion batteries please visit our Web Site at the addresses listed for lost time, cost of having someone remove or re-install an installed unit if applicable, or travel to and from viewing fixed images (including, among other Authorized Servicer, or damage that the product or parts of a new product which result from state to you can be...
... Lithium ion batteries please visit our Web Site at the addresses listed for lost time, cost of having someone remove or re-install an installed unit if applicable, or travel to and from viewing fixed images (including, among other Authorized Servicer, or damage that the product or parts of a new product which result from state to you can be...
Owners Manual
Page 26
... repair, replace or refund will Panasonic Canada Inc. or the Servicer be made by Panasonic Canada Inc. _ (46" & over) _ service (under normal use and for lost time, travel to and from coverage under this product to the product by Panasonic Canada Inc., or failures which result from accidents, misuse, abuse, neglect, mishandling, misapplication, alteration, faulty installation, set-up adjustments, misadjustment of consumer controls...
... repair, replace or refund will Panasonic Canada Inc. or the Servicer be made by Panasonic Canada Inc. _ (46" & over) _ service (under normal use and for lost time, travel to and from coverage under this product to the product by Panasonic Canada Inc., or failures which result from accidents, misuse, abuse, neglect, mishandling, misapplication, alteration, faulty installation, set-up adjustments, misadjustment of consumer controls...


