
SAPM53 User Guide
Page 1
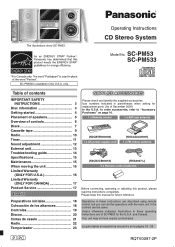
... INSTRUCTIONS 3 Disc information 3 Getting started 4 Placement of speakers 5 Overview of December 2005) In the U.S.A. Please keep this product, please read the instructions completely. SC-PM53 SC-PM533 SC-PM533 is available in these instructions are described using remote control, but you can do the operations with the main unit if the controls are of SC-PM53 for replacement parts. (As of controls 6 Discs 7 Cassette tape 9 Radio 10 Timer 11 Sound adjustment...
... INSTRUCTIONS 3 Disc information 3 Getting started 4 Placement of speakers 5 Overview of December 2005) In the U.S.A. Please keep this product, please read the instructions completely. SC-PM53 SC-PM533 SC-PM533 is available in these instructions are described using remote control, but you can do the operations with the main unit if the controls are of SC-PM53 for replacement parts. (As of controls 6 Discs 7 Cassette tape 9 Radio 10 Timer 11 Sound adjustment...
SAPM53 User Guide
Page 2
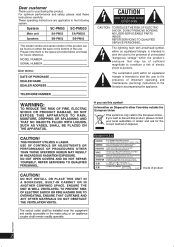
... to the presence of the unit. MODEL NUMBER SERIAL NUMBER CAUTION: TO REDUCE THE RISK OF ELECTRIC SHOCK, DO NOT REMOVE SCREWS. REFER SERVICING TO QUALIFIED SERVICE PERSONNEL. The lightning flash with arrowhead symbol, within the product s enclosure that may be found on either the back or the bottom of important operating and maintenance (servicing) instructions in the space provided below and...
... to the presence of the unit. MODEL NUMBER SERIAL NUMBER CAUTION: TO REDUCE THE RISK OF ELECTRIC SHOCK, DO NOT REMOVE SCREWS. REFER SERVICING TO QUALIFIED SERVICE PERSONNEL. The lightning flash with arrowhead symbol, within the product s enclosure that may be found on either the back or the bottom of important operating and maintenance (servicing) instructions in the space provided below and...
SAPM53 User Guide
Page 3
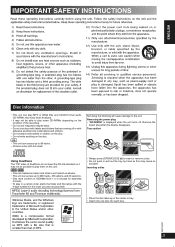
...CD-DA format audio CD-R/RWs that have been finalized. • It may not be possible to play them . • Always press [OPEN/CLOSE 0] to insert or remove a disc. • Do not push or pull out the tray by hand as this may not be able to play them on this display disappears. Inserting a disc • Place the disc...• To play in a certain order, prefix the folder and file names with the 3-digit numbers in the center or tray. • Insert only one disc into each tray. Removing the power plug • "GOODBYE" is displayed when the unit turns off or with...
...CD-DA format audio CD-R/RWs that have been finalized. • It may not be possible to play them . • Always press [OPEN/CLOSE 0] to insert or remove a disc. • Do not push or pull out the tray by hand as this may not be able to play them on this display disappears. Inserting a disc • Place the disc...• To play in a certain order, prefix the folder and file names with the 3-digit numbers in the center or tray. • Insert only one disc into each tray. Removing the power plug • "GOODBYE" is displayed when the unit turns off or with...
SAPM53 User Guide
Page 4
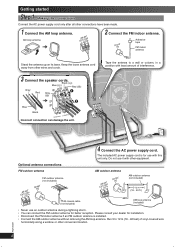
... for better reception. FM75AN T Adhesive tape FM indoor antenna Stand the antenna up on its base. The included AC power supply cord is installed. • Connect the AM outdoor antenna without removing the AM loop antenna. Making the connections Connect the AC power supply cord only after all other wires and cords. 3 Connect the speaker cords. Keep the loose antenna cord away from other connections have been made. 1 Connect the AM loop antenna. Run 5 to a wall or...
... for better reception. FM75AN T Adhesive tape FM indoor antenna Stand the antenna up on its base. The included AC power supply cord is installed. • Connect the AM outdoor antenna without removing the AM loop antenna. Making the connections Connect the AC power supply cord only after all other wires and cords. 3 Connect the speaker cords. Keep the loose antenna cord away from other connections have been made. 1 Connect the AM loop antenna. Run 5 to a wall or...

SAPM53 User Guide
Page 5
.... Step 3 - If the demo setting is not going to reduce power consumption. The display changes each time the button is necessary. DEMO OFF DEMO ON While in , a demonstration of the main unit and speakers provide the best sound. Placement of batteries in fluenced by selecting "DEMO ON". Using other devices easily in the remote control can damage the unit and sound quality will be used for a long period of...
.... Step 3 - If the demo setting is not going to reduce power consumption. The display changes each time the button is necessary. DEMO OFF DEMO ON While in , a demonstration of the main unit and speakers provide the best sound. Placement of batteries in fluenced by selecting "DEMO ON". Using other devices easily in the remote control can damage the unit and sound quality will be used for a long period of...
SAPM53 User Guide
Page 6
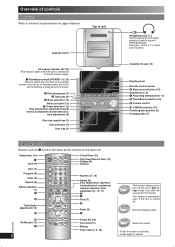
... (12) Disc skip/search, tape fast-forward/ rewind, tune/preset channel selection, time adjustment (9) Disc tray open (9) Display panel Remote control sensor 6 Music port selection (13) Stop/Demo (5, 9) 7 Recording start/pause (9, 13) 8 Tuner/Band selection (10) 9 Volume control ! Re-Master (13) 7 6 Preset EQ (12) Surround (13) Muting Play mode (7, 9, 10) This function allows you to turn off . Dims the display panel. H.BASS selection (13) Checking disc position (8) Changing disc (7) Remote control Buttons such as 1 function the same as the controls on to standby mode or vice...
... (12) Disc skip/search, tape fast-forward/ rewind, tune/preset channel selection, time adjustment (9) Disc tray open (9) Display panel Remote control sensor 6 Music port selection (13) Stop/Demo (5, 9) 7 Recording start/pause (9, 13) 8 Tuner/Band selection (10) 9 Volume control ! Re-Master (13) 7 6 Preset EQ (12) Surround (13) Muting Play mode (7, 9, 10) This function allows you to turn off . Dims the display panel. H.BASS selection (13) Checking disc position (8) Changing disc (7) Remote control Buttons such as 1 function the same as the controls on to standby mode or vice...
SAPM53 User Guide
Page 7
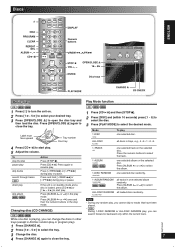
... play mode. Changing disc (CD CHANGE) CD MP3 WMA • CD During 1-DISC RANDOM or ALL-DISC RANDOM play Play Mode function CD MP3 WMA CD MP3 WMA 1 Press [y] to turn the unit on standby mode and a disc is playing, you cannot skip to tracks that have been played. Press the numeric buttons to select the track. Press [ALBUM or ] in All-Disc random play or program play . 5 Adjust the volume. ENGLISH Discs Numeric buttons English English Disc trays Basic play , you can change...
... play mode. Changing disc (CD CHANGE) CD MP3 WMA • CD During 1-DISC RANDOM or ALL-DISC RANDOM play Play Mode function CD MP3 WMA CD MP3 WMA 1 Press [y] to turn the unit on standby mode and a disc is playing, you cannot skip to tracks that have been played. Press the numeric buttons to select the track. Press [ALBUM or ] in All-Disc random play or program play . 5 Adjust the volume. ENGLISH Discs Numeric buttons English English Disc trays Basic play , you can change...
SAPM53 User Guide
Page 8
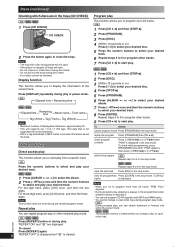
... not remove or insert discs during disc check. • Do not pull out the trays during play from a specific track. This function allows you to start play mode. Note • The tray with MP3 and WMA tracks. • You cannot change a disc or open other tracks. 7 Press [CD 6] to select your desired track. 6 Repeat steps 3 to 5 to program other trays during any random/program mode. Display function...
... not remove or insert discs during disc check. • Do not pull out the trays during play from a specific track. This function allows you to start play mode. Note • The tray with MP3 and WMA tracks. • You cannot change a disc or open other tracks. 7 Press [CD 6] to select your desired track. 6 Repeat steps 3 to 5 to program other trays during any random/program mode. Display function...
SAPM53 User Guide
Page 9
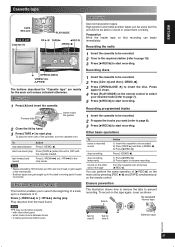
...ʼs moving parts if used , but this unit will not be recorded. 2 Press [CD 6] and then [-DEMO, 7]. 3 Press [OPEN/CLOSE 0] to start recording. Other basic operations To Action erase a recorded sound 1) Insert the cassette to start recording. stop tape playback Action Press [-DEMO, 7]. ENGLISH English English Cassette tape Top of the cassette, turn the cassette over and press [¶ REC¥8]. start play 1 Press [0] and...
...ʼs moving parts if used , but this unit will not be recorded. 2 Press [CD 6] and then [-DEMO, 7]. 3 Press [OPEN/CLOSE 0] to start recording. Other basic operations To Action erase a recorded sound 1) Insert the cassette to start recording. stop tape playback Action Press [-DEMO, 7]. ENGLISH English English Cassette tape Top of the cassette, turn the cassette over and press [¶ REC¥8]. start play 1 Press [0] and...
SAPM53 User Guide
Page 10
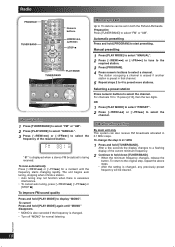
... two digits. After a few seconds the display changes to a flashing display of the required station. Radio Numeric buttons Manual tuning 1 Press [TUNER/BAND] to select "FM" or "AM". 2 Press [PLAY MODE] to select "MANUAL". 3 Press [4/REW/4] or [3/FF/¢] to select the channel. The station occupying a channel is erased if another station is changed , any previously preset frequency will be set in that channel. 5 Repeat steps 2 to 4 to hold [TUNER/BAND...
... two digits. After a few seconds the display changes to a flashing display of the required station. Radio Numeric buttons Manual tuning 1 Press [TUNER/BAND] to select "FM" or "AM". 2 Press [PLAY MODE] to select "MANUAL". 3 Press [4/REW/4] or [3/FF/¢] to select the channel. The station occupying a channel is erased if another station is changed , any previously preset frequency will be set in that channel. 5 Repeat steps 2 to 4 to hold [TUNER/BAND...
SAPM53 User Guide
Page 11
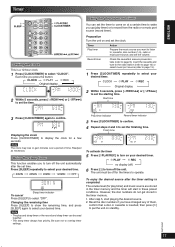
... radio station (refer to page 10) or select music port source (refer to page 13). 1 Press [CLOCK/TIMER] repeatedly to turn on standby. Finish time To activate the timer 5 Press [˚PLAY/REC] to turn off ) 6 Press [y] to select your desired timer. ˚ PLAY ˚ REC no display (off the unit. Changing the remaining time Press [SLEEP] to show the remaining time, and press [SLEEP] again to set the starting time. However, the disc numbers...
... radio station (refer to page 10) or select music port source (refer to page 13). 1 Press [CLOCK/TIMER] repeatedly to turn on standby. Finish time To activate the timer 5 Press [˚PLAY/REC] to turn off ) 6 Press [y] to select your desired timer. ˚ PLAY ˚ REC no display (off the unit. Changing the remaining time Press [SLEEP] to show the remaining time, and press [SLEEP] again to set the starting time. However, the disc numbers...

SAPM53 User Guide
Page 12
...;s play timer will start 30 seconds before the set time with the volume muted. • The timer comes on at the set time every day if the timer is on. • The unit must be in standby mode) cancel Press [˚PLAY/REC] to 4 and 6 on and engages MUSIC PORT as the source when the timer comes on, the system turns on page 11. OR To adjust bass or treble using the...
...;s play timer will start 30 seconds before the set time with the volume muted. • The timer comes on at the set time every day if the timer is on. • The unit must be in standby mode) cancel Press [˚PLAY/REC] to 4 and 6 on and engages MUSIC PORT as the source when the timer comes on, the system turns on page 11. OR To adjust bass or treble using the...

SAPM53 User Guide
Page 13
MUSIC PORT jack Audio cord (not included) Re-master - Note • All peripheral components and cables are mainly for the main unit unless indicated otherwise. Otherwise, sound from the speaker may be distorted. 1 Plug the audio cord into the MUSIC PORT jack. The buttons described for "External unit" are sold separately. • For other recording operations, refer page 9, "Other basic operations". Press [H.BASS] repeatedly to start recording. Note • Surround sound is any...
MUSIC PORT jack Audio cord (not included) Re-master - Note • All peripheral components and cables are mainly for the main unit unless indicated otherwise. Otherwise, sound from the speaker may be distorted. 1 Plug the audio cord into the MUSIC PORT jack. The buttons described for "External unit" are sold separately. • For other recording operations, refer page 9, "Other basic operations". Press [H.BASS] repeatedly to start recording. Note • Surround sound is any...
SAPM53 User Guide
Page 14
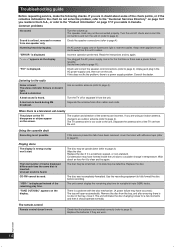
... page 4). Turn the volume up. There is unfixed, reversed or comes from the unit. The remote control Remote control doesn't work. Set the time (refer to page 4). Using the cassette deck Recording is distorted. Replace the disc. The disc was a power failure recently. The unit will open automatically. Common problems No sound. Incorrect operation performed. Keep other appliances and cords away from other cables and cords. Playing discs The display is heard...
... page 4). Turn the volume up. There is unfixed, reversed or comes from the unit. The remote control Remote control doesn't work. Set the time (refer to page 4). Using the cassette deck Recording is distorted. Replace the disc. The disc was a power failure recently. The unit will open automatically. Common problems No sound. Incorrect operation performed. Keep other appliances and cords away from other cables and cords. Playing discs The display is heard...

SAPM53 User Guide
Page 15
... power CLASS 1 Audio output (Disc) Number of channels 2-Channel Frequency response 20 Hz to 20 kHz (+1dB, -2 dB) Wow and flutter Below measurable limit Digital filter 8 fs D/A converter MASH (1 bit DAC) SPEAKER SECTION Type 2 way, 2 speaker system Speaker(s) Woofer 10cm (4˝) cone type (6 Ω) Tweeter 6 cm (23/8˝) cone type (6 Ω) Impedance 6 Ω Input power (IEC) HIGH 90 W (Max) LOW 90 W (Max) Output sound...
... power CLASS 1 Audio output (Disc) Number of channels 2-Channel Frequency response 20 Hz to 20 kHz (+1dB, -2 dB) Wow and flutter Below measurable limit Digital filter 8 fs D/A converter MASH (1 bit DAC) SPEAKER SECTION Type 2 way, 2 speaker system Speaker(s) Woofer 10cm (4˝) cone type (6 Ω) Tweeter 6 cm (23/8˝) cone type (6 Ω) Impedance 6 Ω Input power (IEC) HIGH 90 W (Max) LOW 90 W (Max) Output sound...
SAPM53 User Guide
Page 16
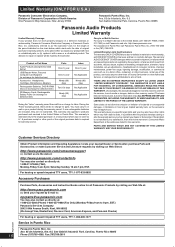
... you may also contact us directly at : 1-800-211-PANA (7262), Monday-Friday 9 am -7 pm, EST. Product or Part Name Audio Products (except items listed below , which result from accidents, misuse, abuse, neglect, mishandling, misapplication, alteration, faulty installation, set-up adjustments, misadjustment of North America One Panasonic Way Secaucus, New Jersey 07094 Panasonic Puerto Rico, Inc. If a problem with the date of...
... you may also contact us directly at : 1-800-211-PANA (7262), Monday-Friday 9 am -7 pm, EST. Product or Part Name Audio Products (except items listed below , which result from accidents, misuse, abuse, neglect, mishandling, misapplication, alteration, faulty installation, set-up adjustments, misadjustment of North America One Panasonic Way Secaucus, New Jersey 07094 Panasonic Puerto Rico, Inc. If a problem with the date of...
SAPM53 User Guide
Page 17
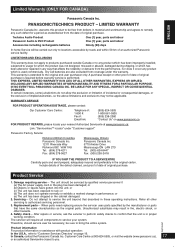
... Limited Warranty (ONLY FOR CANADA) Panasonic Canada Inc. PANASONIC/TECHNICS PRODUCT - Technics Audio Product Panasonic Audio & DVD Product Accessories including rechargeable batteries One (1) year, parts and labour One (1) year, parts and labour Ninety (90) days In-home Service will require all other hazards. 4. This warranty is used commercially. WARRANTY SERVICE FOR PRODUCT OPERATION ASSISTANCE, please contact: Our Customer Care Centre: Telephone #: 1-800 #: Fax #: Email link: (905) 624-5505 1-800...
... Limited Warranty (ONLY FOR CANADA) Panasonic Canada Inc. PANASONIC/TECHNICS PRODUCT - Technics Audio Product Panasonic Audio & DVD Product Accessories including rechargeable batteries One (1) year, parts and labour One (1) year, parts and labour Ninety (90) days In-home Service will require all other hazards. 4. This warranty is used commercially. WARRANTY SERVICE FOR PRODUCT OPERATION ASSISTANCE, please contact: Our Customer Care Centre: Telephone #: 1-800 #: Fax #: Email link: (905) 624-5505 1-800...


