

Cd Stereo System
Page 2
...model number and serial number of the unit. Table of contents Before using Dear customer Thank you for supplied accessories 6 Optional antenna connections 7 External unit connection 7 Front panel controls 8 Setting the time 9 Turning the demo function off 9 Auto-off function 9 Compact disc operations Concerning compact discs 10 Listening to compact discs 11 Direct access play 12 Repeat play 12 Random play 12 Program play 13 To listen to special CDs and tracks (CD Manager function 14 Radio operations Listening to radio broadcasts 15 Presetting radio broadcasts 16 Cassette...
...model number and serial number of the unit. Table of contents Before using Dear customer Thank you for supplied accessories 6 Optional antenna connections 7 External unit connection 7 Front panel controls 8 Setting the time 9 Turning the demo function off 9 Auto-off function 9 Compact disc operations Concerning compact discs 10 Listening to compact discs 11 Direct access play 12 Repeat play 12 Random play 12 Program play 13 To listen to special CDs and tracks (CD Manager function 14 Radio operations Listening to radio broadcasts 15 Presetting radio broadcasts 16 Cassette...
Cd Stereo System
Page 3
... shock to persons. Before using Recording operations Before recording 18 Recording the radio 19 Recording discs 20 Recording with CD Manager 20 Other functions Using the built-in sound quality/ sound field settings 21 Enhancing the sound quality 21 To mute the volume 21 Timer operations Using the timer 22 Using the play/record timer 22 Using the sleep timer 24 Reference Using an external unit 24 Troubleshooting guide 25 Servicenter List (U.S.A 26 Warranty (U.S.A 27 Specifications Back Cover Maintenance Back Cover Product Service Back Cover...
... shock to persons. Before using Recording operations Before recording 18 Recording the radio 19 Recording discs 20 Recording with CD Manager 20 Other functions Using the built-in sound quality/ sound field settings 21 Enhancing the sound quality 21 To mute the volume 21 Timer operations Using the timer 22 Using the play/record timer 22 Using the sleep timer 24 Reference Using an external unit 24 Troubleshooting guide 25 Servicenter List (U.S.A 26 Warranty (U.S.A 27 Specifications Back Cover Maintenance Back Cover Product Service Back Cover...

Cd Stereo System
Page 4
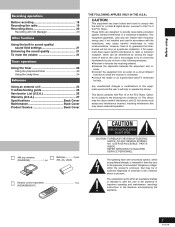
.... Before using IMPORTANT SAFETY INSTRUCTIONS Read these operating instructions carefully before cleaning. Water and moisture-Do not use abrasive pads, scouring powders, or solvents. Power lines-Take care when setting up static charges. Damage requiring service -The unit should be fatal. or (d) The unit does not operate normally or exhibits a marked change in these operating instructions. 4. GROUND CLAMP ELECTRIC SERVICE EQUIPMENT ANTENNA LEAD IN WIRE ANTENNA DISCHARGE UNIT...
.... Before using IMPORTANT SAFETY INSTRUCTIONS Read these operating instructions carefully before cleaning. Water and moisture-Do not use abrasive pads, scouring powders, or solvents. Power lines-Take care when setting up static charges. Damage requiring service -The unit should be fatal. or (d) The unit does not operate normally or exhibits a marked change in these operating instructions. 4. GROUND CLAMP ELECTRIC SERVICE EQUIPMENT ANTENNA LEAD IN WIRE ANTENNA DISCHARGE UNIT...

Cd Stereo System
Page 5
... water. • Remove the batteries if the unit is not to be used for a long time. • Do not keep the remote control signal sensor and end of the remote control unit free from the system for a lifetime. Wash thoroughly with any part of sound. One that no left or right channel orientation is installed in front of batteries can cause electrolyte leakage which...
... water. • Remove the batteries if the unit is not to be used for a long time. • Do not keep the remote control signal sensor and end of the remote control unit free from the system for a lifetime. Wash thoroughly with any part of sound. One that no left or right channel orientation is installed in front of batteries can cause electrolyte leakage which...
Cd Stereo System
Page 6
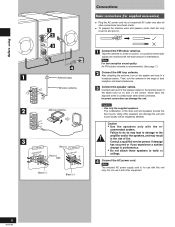
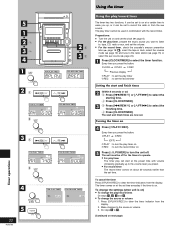
... and sound quality will be negatively affected. commended system. Consult a qualified service person if damage has occurred or if you experience a sudden change in performance. • Do not attach these speakers to a wall or column, in a position where radio signals are correct. Note The included AC power supply cord is recommended. (See page 7.) Connect the AM loop antenna. Then, turn on the system and tune...
... and sound quality will be negatively affected. commended system. Consult a qualified service person if damage has occurred or if you experience a sudden change in performance. • Do not attach these speakers to a wall or column, in a position where radio signals are correct. Note The included AC power supply cord is recommended. (See page 7.) Connect the AM loop antenna. Then, turn on the system and tune...

Cd Stereo System
Page 8
...DEMO 9, 22, 23 4 Display 5 Play timer/record timer button (rPLAY/rREC) ...... 22 6 Cassette holder 17 7 CD manager button (CD MANAGER 14, 20 8 CD tray open button (c DECK OPEN 17 & Reverse mode select button (REV MODE 17 ( Recording start/pause button (a REC/ J 19 ) Headphone jack (PHONES 24 B Center console ~ Tuner/band select button (TUNER/BAND 15 + Tape play/direction button (TAPE 17 , CD play button (CD 1 ~ CD 5 11 $ Volume control (VOLUME Down, Up 11 % Deck open /close button (c CD OPEN/CLOSE) .. 11 9 Disc tray ! In standby mode, the unit is connected to the AC power supply...
...DEMO 9, 22, 23 4 Display 5 Play timer/record timer button (rPLAY/rREC) ...... 22 6 Cassette holder 17 7 CD manager button (CD MANAGER 14, 20 8 CD tray open button (c DECK OPEN 17 & Reverse mode select button (REV MODE 17 ( Recording start/pause button (a REC/ J 19 ) Headphone jack (PHONES 24 B Center console ~ Tuner/band select button (TUNER/BAND 15 + Tape play/direction button (TAPE 17 , CD play button (CD 1 ~ CD 5 11 $ Volume control (VOLUME Down, Up 11 % Deck open /close button (c CD OPEN/CLOSE) .. 11 9 Disc tray ! In standby mode, the unit is connected to the AC power supply...

Cd Stereo System
Page 9
... [CLOCK/TIMER] to on at the time of the display is shown when the unit is switched to function normally. To display the time when system is shown on again, "AUTO OFF" is left unused for about 5 seconds and then the display will return to whatever was previously displayed. This display changes each time the button is selected as the source To save power, the unit turns off . "AUTO...
... [CLOCK/TIMER] to on at the time of the display is shown when the unit is switched to function normally. To display the time when system is shown on again, "AUTO OFF" is left unused for about 5 seconds and then the display will return to whatever was previously displayed. This display changes each time the button is selected as the source To save power, the unit turns off . "AUTO...

Cd Stereo System
Page 10
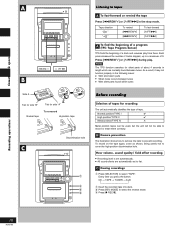
..., do not use cleaning CDs or CDs which are taking the disc from a cold to hold CDs Do not touch the recorded surface. Do not set it on top of an automobile To prevent damage Always observe the following points. • E Load only 1 CD on the tray. • F Load CDs as shown in figure The adapter is opening/closing, or when loaded. Compact disc operations xxxxxxxxxxxx xxxxxxx...
..., do not use cleaning CDs or CDs which are taking the disc from a cold to hold CDs Do not touch the recorded surface. Do not set it on top of an automobile To prevent damage Always observe the following points. • E Load only 1 CD on the tray. • F Load CDs as shown in figure The adapter is opening/closing, or when loaded. Compact disc operations xxxxxxxxxxxx xxxxxxx...

Cd Stereo System
Page 11
... playing time (Of current track number) dB A STOP Total playing Number of tracks time 1 2 3 4 5 Disc number Compact disc operations Listening to compact discs This unit can play CD-DA format audio CD-R and CD-RW that enables CD-R/ CD-RW players to tracks which have been finalized❈ upon completion of progression: Disc 4©5©1©2©3 One touch play If the unit is in standby mode and a CD is loaded, press [CD -/ J] or [(CD 1) ~ (CD 5)]. Order of recording. To pause Press [CD -/ J] during playback...
... playing time (Of current track number) dB A STOP Total playing Number of tracks time 1 2 3 4 5 Disc number Compact disc operations Listening to compact discs This unit can play CD-DA format audio CD-R and CD-RW that enables CD-R/ CD-RW players to tracks which have been finalized❈ upon completion of progression: Disc 4©5©1©2©3 One touch play If the unit is in standby mode and a CD is loaded, press [CD -/ J] or [(CD 1) ~ (CD 5)]. Order of recording. To pause Press [CD -/ J] during playback...

Cd Stereo System
Page 12
... the programmed tracks will be played, but in random order. All tracks on the CD(s) will start. Compact disc operations 2 TUNE REW/3 CLEAR FF/4 MODE MUTING FM MODE/BP REV MODE SOUND EQ 1 3 1 1 2 3 4 5 2 1 2 3 4 5 3 1 2 3 4 5 A B RANDOM 12 RQT5706 Listening to compact discs Direct access play by remote control only Press [DISC]. (within 10 seconds or so. To cancel repeat play Press [RANDOM] to select the desired track number. Press [REPEAT] and make sure " " is displayed. 3. Playback will be played in random...
... the programmed tracks will be played, but in random order. All tracks on the CD(s) will start. Compact disc operations 2 TUNE REW/3 CLEAR FF/4 MODE MUTING FM MODE/BP REV MODE SOUND EQ 1 3 1 1 2 3 4 5 2 1 2 3 4 5 3 1 2 3 4 5 A B RANDOM 12 RQT5706 Listening to compact discs Direct access play by remote control only Press [DISC]. (within 10 seconds or so. To cancel repeat play Press [RANDOM] to select the desired track number. Press [REPEAT] and make sure " " is displayed. 3. Playback will be played in random...

Cd Stereo System
Page 15
... auto tuning, press [g/REW/3] or [4/FF/f] once again. "ST" is displayed when a stereo FM broadcast is tuned. Turn off "MONO" for a moment until the frequency starts changing rapidly. "TUNED" is displayed when a radio station is being received. 2 Adjust the volume. Press and hold [g/REW/3] or [4/FF/f] for normal listening. dB Note • After changing the "allocation" setting, the frequencies you load/unload tapes while listening to select "MANUAL". This mode improves sound...
... auto tuning, press [g/REW/3] or [4/FF/f] once again. "ST" is displayed when a stereo FM broadcast is tuned. Turn off "MONO" for a moment until the frequency starts changing rapidly. "TUNED" is displayed when a radio station is being received. 2 Adjust the volume. Press and hold [g/REW/3] or [4/FF/f] for normal listening. dB Note • After changing the "allocation" setting, the frequencies you load/unload tapes while listening to select "MANUAL". This mode improves sound...

Cd Stereo System
Page 16
Manual presetting : You can receive are preset in. When finished, the last station memorized is tuned in that channel. Adjust the volume. Release the button when frequency begins to select a channel. 4 Press [PROGRAM]. Manual presetting Preset the stations one at a time. 1 Press [TUNER] to select "FM" or "AM". 2 Press [PROGRAM] then press [g, REW/3] or [f, FF/4] to tune to the require station. 3 Press [PROGRAM] then press [g, REW/3] or [f, FF/4] to change. The unit comes on automatically...
Manual presetting : You can receive are preset in. When finished, the last station memorized is tuned in that channel. Adjust the volume. Release the button when frequency begins to select a channel. 4 Press [PROGRAM]. Manual presetting Preset the stations one at a time. 1 Press [TUNER] to select "FM" or "AM". 2 Press [PROGRAM] then press [g, REW/3] or [f, FF/4] to tune to the require station. 3 Press [PROGRAM] then press [g, REW/3] or [f, FF/4] to change. The unit comes on automatically...
Cd Stereo System
Page 18
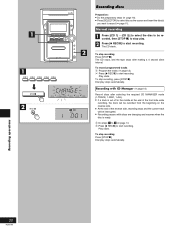
... occurs between tunes. Notes The TPS function searches for silent parts of about 4 seconds in length which are automatically set to a maximum of tracks skipped, up to flat. Recording operations 18 RQT5706 Every time you press the button: CD → TAPE → TUNER → AUX 2 Insert the recorded tape into deck. 3 Press [REV MODE] to select the reverse mode. 4 Press [[ REC/J]. Press [g/REW/3] or [4/FF/f] during play from...
... occurs between tunes. Notes The TPS function searches for silent parts of about 4 seconds in length which are automatically set to a maximum of tracks skipped, up to flat. Recording operations 18 RQT5706 Every time you press the button: CD → TAPE → TUNER → AUX 2 Insert the recorded tape into deck. 3 Press [REV MODE] to select the reverse mode. 4 Press [[ REC/J]. Press [g/REW/3] or [4/FF/f] during play from...
Cd Stereo System
Page 20
... REC/J] to start recording. The CD stops, and the tape stops after selecting the required CD MANAGER mode (1-TRACK, 1-DISC, 1-ALL) • If a track is ready. 1 Do steps 1 to 4 on page 14. 2 Press [a REC/J] to start recording. To stop recording Press [STOP L]. Recording with CD Manager (z page 14) Record discs after making a 4 second silent interval. Play starts. Recording operations 20 RQT5706 To stop recording, press [STOP L]. Disc play stops automatically. To stop recording Press [STOP L]. To record programmed tracks 1 Program the tracks (z page 13). 2 Press...
... REC/J] to start recording. The CD stops, and the tape stops after selecting the required CD MANAGER mode (1-TRACK, 1-DISC, 1-ALL) • If a track is ready. 1 Do steps 1 to 4 on page 14. 2 Press [a REC/J] to start recording. To stop recording Press [STOP L]. Recording with CD Manager (z page 14) Record discs after making a 4 second silent interval. Play starts. Recording operations 20 RQT5706 To stop recording, press [STOP L]. Disc play stops automatically. To stop recording Press [STOP L]. To record programmed tracks 1 Program the tracks (z page 13). 2 Press...
Cd Stereo System
Page 22
... Timer operations DEMO 4 PLAY / REC 5 22 RQT5706 FOR PLAY TIMER FOR RECORD TIMER PLAY REC Using the timer Using the play timer on rREC : to turn the record timer on Press [f/I, POWER] to turn the play /record timer The timer has two functions. Preparations: • Turn the unit on . Press [CLOCK/TIMER] to the source or volume. 3. Every time you press the button: CLOCK PLAY REC Previous display rPLAY : to wake you preset. • For record timer The record timer comes on about 30 seconds earlier than the set time. The play /record times...
... Timer operations DEMO 4 PLAY / REC 5 22 RQT5706 FOR PLAY TIMER FOR RECORD TIMER PLAY REC Using the timer Using the play timer on rREC : to turn the record timer on Press [f/I, POWER] to turn the play /record timer The timer has two functions. Preparations: • Turn the unit on . Press [CLOCK/TIMER] to the source or volume. 3. Every time you press the button: CLOCK PLAY REC Previous display rPLAY : to wake you preset. • For record timer The record timer comes on about 30 seconds earlier than the set time. The play /record times...

Cd Stereo System
Page 23
... you want to playback or record from a connected component, set the component's timer to the same time. (See the instruction manual that a Disc or cassette is completed The volume level (for play timer) and music source are displayed in the following order: • For play /record timer is functioning, the OFF time setting will not be activated. • If AUX is selected as the source, when the timer comes ON, the system will turn ON and...
... you want to playback or record from a connected component, set the component's timer to the same time. (See the instruction manual that a Disc or cassette is completed The volume level (for play timer) and music source are displayed in the following order: • For play /record timer is functioning, the OFF time setting will not be activated. • If AUX is selected as the source, when the timer comes ON, the system will turn ON and...

Cd Stereo System
Page 24
... MODE SOUND EQ SLEEP Using the timer SELECTOR REC Headphones (not included) A Using the sleep timer This timer turns your system OFF at the set the system to prevent hearing damage. by remote control only Preparation: Switch on the power. Start playback from an external source 1. Press [SELECTOR] to the owner's manual of the equipment.) Recording from the external source. (For details, refer to select "AUX". 3. Every time you press the button: CD → TAPE → TUNER...
... MODE SOUND EQ SLEEP Using the timer SELECTOR REC Headphones (not included) A Using the sleep timer This timer turns your system OFF at the set the system to prevent hearing damage. by remote control only Preparation: Switch on the power. Start playback from an external source 1. Press [SELECTOR] to the owner's manual of the equipment.) Recording from the external source. (For details, refer to select "AUX". 3. Every time you press the button: CD → TAPE → TUNER...

Cd Stereo System
Page 25
... of Authorized Service Centers (enclosed with this unit's cables. The stereo indicator flickers or doesn't light. Use an outdoor antenna. 7 Turn the TV off , check and correct the connections and turn the unit on your dealer for instructions. Using the cassette deck Poor quality sound. Recording is a power supply problem. Clean the heads. Set the time. 9 Check and correct the speaker cords connection. There is displayed. Check the batteries are inserted correctly. 5 Replace the batteries if...
... of Authorized Service Centers (enclosed with this unit's cables. The stereo indicator flickers or doesn't light. Use an outdoor antenna. 7 Turn the TV off , check and correct the connections and turn the unit on your dealer for instructions. Using the cassette deck Poor quality sound. Recording is a power supply problem. Clean the heads. Set the time. 9 Check and correct the speaker cords connection. There is displayed. Check the batteries are inserted correctly. 5 Replace the batteries if...

Cd Stereo System
Page 27
..., New Jersey 07094 Panasonic Sales Company, Division of Matsushita Electric Corporation of God. Non-rechargeable battery packs are not warranted. If a problem with this product with and without CD Players), CASSETTE RECORDERS, MICROCASSETTE RECORDERS/ TRANSCRIBERS, IC RECORDERS, RECEIVERS, TUNERS, AMPLIFIERS, SUBWOOFER AMPLIFIERS, TURNTABLES, CASSETTE DECKS, AUDIO PROCESSORS, EQUALIZERS, AUDIO MIXERS, REMOTE CONTROLS, HOME THEATER SYSTEMS (receiver/amplifiers, speakers), RACK SYSTEMS (receivers, tuners, amplifiers, cassette decks, CD players, equalizers, rack system speakers, EXCLUDING...
..., New Jersey 07094 Panasonic Sales Company, Division of Matsushita Electric Corporation of God. Non-rechargeable battery packs are not warranted. If a problem with this product with and without CD Players), CASSETTE RECORDERS, MICROCASSETTE RECORDERS/ TRANSCRIBERS, IC RECORDERS, RECEIVERS, TUNERS, AMPLIFIERS, SUBWOOFER AMPLIFIERS, TURNTABLES, CASSETTE DECKS, AUDIO PROCESSORS, EQUALIZERS, AUDIO MIXERS, REMOTE CONTROLS, HOME THEATER SYSTEMS (receiver/amplifiers, speakers), RACK SYSTEMS (receivers, tuners, amplifiers, cassette decks, CD players, equalizers, rack system speakers, EXCLUDING...

Cd Stereo System
Page 28
... with C-60 cassette tape CD SECTION Sampling frequency Decoding Beam source/wave length Number of channels Frequency response Wow and flutter Digital filter D/A converter 44.1 kHz 16 bit linear Semiconductor laser/780 nm Stereo 20 Hz-20 kHz (+1, -2 dB) Below measurable limit 8 fs MASH (1 bit DAC) SPEAKER SECTION Type Speaker(s) Woofer Tweeter Impedance Input power Output sound pressure level Cross over frequency Frequency range Dimensions (WxHxD) Mass 2 way speaker system 12 cm...
... with C-60 cassette tape CD SECTION Sampling frequency Decoding Beam source/wave length Number of channels Frequency response Wow and flutter Digital filter D/A converter 44.1 kHz 16 bit linear Semiconductor laser/780 nm Stereo 20 Hz-20 kHz (+1, -2 dB) Below measurable limit 8 fs MASH (1 bit DAC) SPEAKER SECTION Type Speaker(s) Woofer Tweeter Impedance Input power Output sound pressure level Cross over frequency Frequency range Dimensions (WxHxD) Mass 2 way speaker system 12 cm...


