

Home Theater
Page 3
...SC-HT56 SA-HT56 SB-HF56 SB-HS760 SB-HC760 SB-HWX50 Table of contents Before use IMPORTANT SAFETY INSTRUCTIONS 2 Supplied accessories 3 Listening caution 3 The remote control 4 Control guide 4 Remote control 4 Main unit/Display 5 STEP 1 Speaker setup 6 Placement of speakers 6 Connect the speakers to the receiver 6 Other speaker setup options 7 Wireless system connection 7 STEP 2 Home theater...speaker setup 11 Troubleshooting for auto speaker setup 12 Settings 13 Distance/Auto setup/Input mode 13 HDMI settings/DRCOMP/Attenuator/TV delay/ Adjusting speaker output level 14 ...
...SC-HT56 SA-HT56 SB-HF56 SB-HS760 SB-HC760 SB-HWX50 Table of contents Before use IMPORTANT SAFETY INSTRUCTIONS 2 Supplied accessories 3 Listening caution 3 The remote control 4 Control guide 4 Remote control 4 Main unit/Display 5 STEP 1 Speaker setup 6 Placement of speakers 6 Connect the speakers to the receiver 6 Other speaker setup options 7 Wireless system connection 7 STEP 2 Home theater...speaker setup 11 Troubleshooting for auto speaker setup 12 Settings 13 Distance/Auto setup/Input mode 13 HDMI settings/DRCOMP/Attenuator/TV delay/ Adjusting speaker output level 14 ...
Home Theater
Page 4
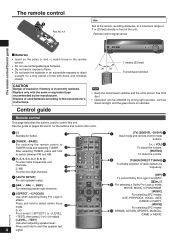
... according to adjust. [-LEVEL, ―TEST] Use when adjusting speaker level. Press and hold to start the speaker test 4 signal. 7 [TV] [BD/DVR, ―DVD-P] 7 Input mode and remote control mode buttons. [+, -, VOL] 8 To adjust the volume. [MUTING] To mute the volume. 8 [TUNER DIRECT TUNING] 9 To enable selection of radio stations...
... according to adjust. [-LEVEL, ―TEST] Use when adjusting speaker level. Press and hold to start the speaker test 4 signal. 7 [TV] [BD/DVR, ―DVD-P] 7 Input mode and remote control mode buttons. [+, -, VOL] 8 To adjust the volume. [MUTING] To mute the volume. 8 [TUNER DIRECT TUNING] 9 To enable selection of radio stations...

Home Theater
Page 5
...presetting. 4 [PCM, C.FOCUS] PCM: Lights when the PCMFIX mode is set C.FOCUS: Appears when you are using Center Focus 5 [DIGITAL INPUT] Lights when input is digital. 9 [ft, kHz, MHz] Distance and frequency unit indicators ft: feet (speaker distance) RQTX0175 kHz: AM, or PCM sampling ...frequency MHz: FM 10 [W] Lights when you are using the digital transmitter (➡ page 7). Lights when the setup finishes. 6 [INPUT SELECTOR, ] For selecting input. 7 [VOLUME] Volume control. 8 [ ] Headphone jack Plug type: Ø3.5 mm (1/8") stereo • Sound does not come from on to...
...presetting. 4 [PCM, C.FOCUS] PCM: Lights when the PCMFIX mode is set C.FOCUS: Appears when you are using Center Focus 5 [DIGITAL INPUT] Lights when input is digital. 9 [ft, kHz, MHz] Distance and frequency unit indicators ft: feet (speaker distance) RQTX0175 kHz: AM, or PCM sampling ...frequency MHz: FM 10 [W] Lights when you are using the digital transmitter (➡ page 7). Lights when the setup finishes. 6 [INPUT SELECTOR, ] For selecting input. 7 [VOLUME] Volume control. 8 [ ] Headphone jack Plug type: Ø3.5 mm (1/8") stereo • Sound does not come from on to...
Home Theater
Page 8
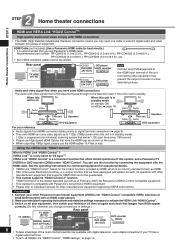
... DVD HDMI (AV OUT) DVD player Note Connect only DVD equipment to the HDMI input terminal of sounds or show distorted pictures. Connecting other Panasonic home theater equipment (VIERA Link "HDAVI Control" compatible VIERA television or DIGA DVD recorder) with Panasonic's conventional HDAVI equipment. • Please refer to activate the VIERA Link "HDAVI Control". 3. Switch...
... DVD HDMI (AV OUT) DVD player Note Connect only DVD equipment to the HDMI input terminal of sounds or show distorted pictures. Connecting other Panasonic home theater equipment (VIERA Link "HDAVI Control" compatible VIERA television or DIGA DVD recorder) with Panasonic's conventional HDAVI equipment. • Please refer to activate the VIERA Link "HDAVI Control". 3. Switch...
Home Theater
Page 9
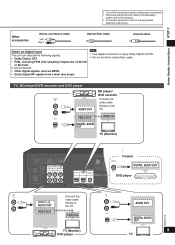
STEP 2 Home theater connections • Turn off all components before making any connections. • Peripheral equipment and cables sold separately unless otherwise indicated. • To connect equipment, refer .... • Do not bend the optical fiber cable. Other accessories Stereo connection cable Left Right Optical fiber cable Coaxial cable Notes on digital input This unit can decode the following signals: • Dolby Digital, DTS • PCM, including PCM with sampling frequencies of 96 kHz or 88.2 kHz It...
STEP 2 Home theater connections • Turn off all components before making any connections. • Peripheral equipment and cables sold separately unless otherwise indicated. • To connect equipment, refer .... • Do not bend the optical fiber cable. Other accessories Stereo connection cable Left Right Optical fiber cable Coaxial cable Notes on digital input This unit can decode the following signals: • Dolby Digital, DTS • PCM, including PCM with sampling frequencies of 96 kHz or 88.2 kHz It...
Home Theater
Page 13
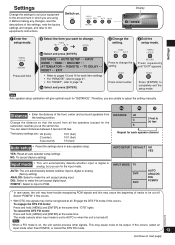
... 30 feet Repeat for "DISTANCE". Press repeatedly until "EXIT" appears. Change the distance so that the sound from the seating position. You can fix the input mode. The factory settings are: LR (front): C (center): S (surround): 10 ft (feet) 10 ft (feet) 5 ft (feet) Auto setup •...; Reset the settings done in which you are unable to the equipment's instructions. AUTO: The unit automatically detects whether input is turned off . Select "PCMFIX" if this may not be recognized at the same time. If this occurs. Switch on. 1 Enter the setup mode...
... 30 feet Repeat for "DISTANCE". Press repeatedly until "EXIT" appears. Change the distance so that the sound from the seating position. You can fix the input mode. The factory settings are: LR (front): C (center): S (surround): 10 ft (feet) 10 ft (feet) 5 ft (feet) Auto setup •...; Reset the settings done in which you are unable to the equipment's instructions. AUTO: The unit automatically detects whether input is turned off . Select "PCMFIX" if this may not be recognized at the same time. If this occurs. Switch on. 1 Enter the setup mode...
Home Theater
Page 14
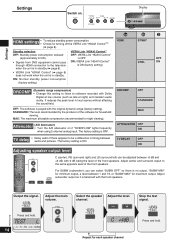
... for maximum output. Choice for turning off the VIERA Link "HDAVI ControlTM" (➡ page 8). Settings Switch on if "OVERFLOW" lights frequently when using 2-channel analog input.
... for maximum output. Choice for turning off the VIERA Link "HDAVI ControlTM" (➡ page 8). Settings Switch on if "OVERFLOW" lights frequently when using 2-channel analog input.
Home Theater
Page 15
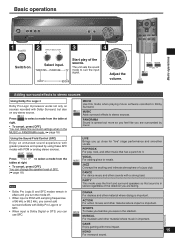
...POP/ROCK For pop, rock, and other music that sound is in Dolby Surround. MUSIC VOCAL For adding gloss to suit the input signal. DRAMA For dramas and other material where music is PCM with sampling frequencies of the direction you were in the stadium. ... right. • To cancel, press [OFF]. Press to select a mode from the tables at right. • To cancel, press [OFF]. Select input. DANCE For dance music and other material where impact is important. Basic operations Basic operations 1 2 3 4 Switch on any stereo source. MUSICAL For musicals...
...POP/ROCK For pop, rock, and other music that sound is in Dolby Surround. MUSIC VOCAL For adding gloss to suit the input signal. DRAMA For dramas and other material where music is PCM with sampling frequencies of the direction you were in the stadium. ... right. • To cancel, press [OFF]. Press to select a mode from the tables at right. • To cancel, press [OFF]. Select input. DANCE For dance music and other material where impact is important. Basic operations Basic operations 1 2 3 4 Switch on any stereo source. MUSICAL For musicals...

Home Theater
Page 17
... ≧10], then the two digits. Press [TUNER DIRECT TUNING]. 4. or 1 / +] to the frequency being received. • If the frequency has not been input correctly, "ERROR" will be displayed. Press [-MENU] to select "MONO" ➡ [ENTER]. During AM reception When... the frequency scrolls. To select channel 21: [ ≧10] → [2] → [1] Main unit 1. Automatic presetting The FM stations the unit can receive into the channels in these channels). or 1 / +] to select "TUNER". 2. Select "MANUAL" to 9, press the corresponding number. For channels 1 to ...
... ≧10], then the two digits. Press [TUNER DIRECT TUNING]. 4. or 1 / +] to the frequency being received. • If the frequency has not been input correctly, "ERROR" will be displayed. Press [-MENU] to select "MONO" ➡ [ENTER]. During AM reception When... the frequency scrolls. To select channel 21: [ ≧10] → [2] → [1] Main unit 1. Automatic presetting The FM stations the unit can receive into the channels in these channels). or 1 / +] to select "TUNER". 2. Select "MANUAL" to 9, press the corresponding number. For channels 1 to ...
Home Theater
Page 18
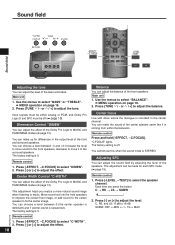
... the sound field by adjusting the level of the Dolby Pro Logic ΙΙ MUSIC and PANORAMA modes (➡ page 15). or 1 / +] to select "DIMEN". 2. Input signals must be either analog or PCM, and Dolby Pro Logic ΙΙ and SFC must be made for differences in the center channel. The...
... the sound field by adjusting the level of the Dolby Pro Logic ΙΙ MUSIC and PANORAMA modes (➡ page 15). or 1 / +] to select "DIMEN". 2. Input signals must be either analog or PCM, and Dolby Pro Logic ΙΙ and SFC must be made for differences in the center channel. The...
Home Theater
Page 20
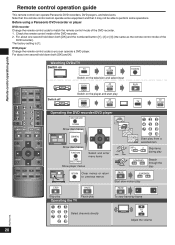
Watching DVDs/TV Switch on ^ Switch on the television and select input ^ Switch on the player and start play Switch off ^ ^ Operating the DVD recorder/DVD player DIRECT NAVIGATOR Show disc menus MENU Show disc menus FUNCTIONS ...-by-frame RQTX0175 Select channels directly Adjust the volume 20 DVD player Change the remote control code so you can operate Panasonic DVD recorders, DVD players, and televisions. Before using a Panasonic DVD recorder or player DVD recorder Change the remote control code to match the remote control mode of the DVD recorder...
Watching DVDs/TV Switch on ^ Switch on the television and select input ^ Switch on the player and start play Switch off ^ ^ Operating the DVD recorder/DVD player DIRECT NAVIGATOR Show disc menus MENU Show disc menus FUNCTIONS ...-by-frame RQTX0175 Select channels directly Adjust the volume 20 DVD player Change the remote control code so you can operate Panasonic DVD recorders, DVD players, and televisions. Before using a Panasonic DVD recorder or player DVD recorder Change the remote control code to match the remote control mode of the DVD recorder...
Home Theater
Page 21
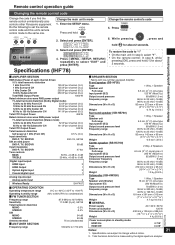
...Remote control operation guide Changing the remote control code Change the code if you find the remote control unintentionally also controls other Panasonic equipment. Enter the SETUP menu. While pressing , press and hold for about 2 seconds. 3. Press [-MENU, -SETUP, ... Hz, +6 dB to -6 dB TREBLE 20 kHz, +6 dB to -6 dB Digital input/output: HDMI Input 2 HDMI Output 1 Optical digital input 2 Coaxial digital input 1 Analog input/output Analog audio input Wireless Ready 3 SH-FX67 g OPERATING CONDITION Operating temperature range Operating humidity range g FM TUNER...
...Remote control operation guide Changing the remote control code Change the code if you find the remote control unintentionally also controls other Panasonic equipment. Enter the SETUP menu. While pressing , press and hold for about 2 seconds. 3. Press [-MENU, -SETUP, ... Hz, +6 dB to -6 dB TREBLE 20 kHz, +6 dB to -6 dB Digital input/output: HDMI Input 2 HDMI Output 1 Optical digital input 2 Coaxial digital input 1 Analog input/output Analog audio input Wireless Ready 3 SH-FX67 g OPERATING CONDITION Operating temperature range Operating humidity range g FM TUNER...
Home Theater
Page 22
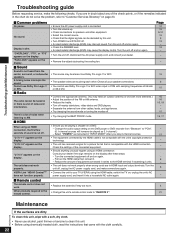
...- 8 - 8 - 4 21 RQTX0175 Maintenance If the surfaces are dirty To clean this unit, wipe with the unit's copyright protection technology. • The unit has received a signal for a picture format that is a lot of noise when listening to AM. ■ HDMI When using an HDMI connection, the first few seconds... "REMOTE 2". Pull out the HDMI cable then reinsert it into a household AC outlet again. • Replace the batteries if they are in "INPUT MODE" when you are touching each other. Select "PCMFIX" as 5.1-channel.) - Turn the unit off, unplug the AC power supply cord, and...
...- 8 - 8 - 4 21 RQTX0175 Maintenance If the surfaces are dirty To clean this unit, wipe with the unit's copyright protection technology. • The unit has received a signal for a picture format that is a lot of noise when listening to AM. ■ HDMI When using an HDMI connection, the first few seconds... "REMOTE 2". Pull out the HDMI cable then reinsert it into a household AC outlet again. • Replace the batteries if they are in "INPUT MODE" when you are touching each other. Select "PCMFIX" as 5.1-channel.) - Turn the unit off, unplug the AC power supply cord, and...


