
SADP1 User Guide
Page 1
SC-DP1 Before connecting, operating or adjusting this manual for future reference. Please keep this product, please read these instructions completely. Example: [For\U.S.A.\only] The warranty can be found on page 39. Region number ...
SC-DP1 Before connecting, operating or adjusting this manual for future reference. Please keep this product, please read these instructions completely. Example: [For\U.S.A.\only] The warranty can be found on page 39. Region number ...
SADP1 User Guide
Page 3
... in the space provided below and keep for use it with manual equalizer 27 Using the built-in parentheses when asking for replacement parts. (Only for U.S.A.) To order accessories contact 1-800-332-5368 or the website (http://www.panasonic.com). (Only for Canada) To order accessories, call the...supplied accessories. User memo: DATE OF PURCHASE DEALER NAME DEALER ADDRESS TELEPHONE NUMBER The model number and serial number of contents Getting started MODEL NUMBER SC-DP1 SERIAL NUMBER Table of this unit only. Do not use with this product can be found on DVD-RAM . . . . . 22 ...
... in the space provided below and keep for use it with manual equalizer 27 Using the built-in parentheses when asking for replacement parts. (Only for U.S.A.) To order accessories contact 1-800-332-5368 or the website (http://www.panasonic.com). (Only for Canada) To order accessories, call the...supplied accessories. User memo: DATE OF PURCHASE DEALER NAME DEALER ADDRESS TELEPHONE NUMBER The model number and serial number of contents Getting started MODEL NUMBER SC-DP1 SERIAL NUMBER Table of this unit only. Do not use with this product can be found on DVD-RAM . . . . . 22 ...
SADP1 User Guide
Page 26
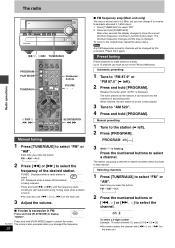
... the channels in FM Press and hold [PLAY MODE] to "FM 87.9" or "FM 87.5" (➡ left ). 2 Press [PROGRAM]. Automatic presetting 1 Tune to display "MONO". Manual presetting 1 Tune to the original step, repeat the above steps. [Note] Any FM frequencies preset in that channel. Selecting channels 1 Press [TUNER/AUX] to show... GUI DISP RETURN X SKIPW DISPLAY TV VOLs ANGLE QUICK REPLAY ZOOM X SKIP W SLOW/SEARCH SHIFT DOUBLE SURROUND SOUND RE-MASTER CINEMA D.ENH SUBWOOFER SLOW/SEARCH Manual tuning 1 Press [TUNER/AUX] to make selection simple.
... the channels in FM Press and hold [PLAY MODE] to "FM 87.9" or "FM 87.5" (➡ left ). 2 Press [PROGRAM]. Automatic presetting 1 Tune to display "MONO". Manual presetting 1 Tune to the original step, repeat the above steps. [Note] Any FM frequencies preset in that channel. Selecting channels 1 Press [TUNER/AUX] to show... GUI DISP RETURN X SKIPW DISPLAY TV VOLs ANGLE QUICK REPLAY ZOOM X SKIP W SLOW/SEARCH SHIFT DOUBLE SURROUND SOUND RE-MASTER CINEMA D.ENH SUBWOOFER SLOW/SEARCH Manual tuning 1 Press [TUNER/AUX] to make selection simple.
SADP1 User Guide
Page 27
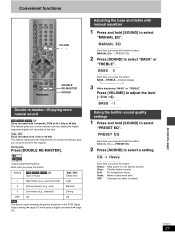
... with 2-channel LPCM at 44.1 kHz or 48 kHz This feature reproduces the frequencies lost during recording to give you press and hold the button: MANUAL EQ!#PRESET EQ 2 Press [SOUND] to select "BASS" or "TREBLE". BASS 0 Each time you press the button: Heavy: Adds punch to rock (...factory preset). BASS 1 Using the built-in sound quality settings 1 Press and hold [SOUND] to select "MANUAL EQ". OFF: Canceled (no effect is added). EQ Heavy Each time you press the button: BASS>TREBLE>Original display ^_______n 3 While displaying "BASS" or ...
... with 2-channel LPCM at 44.1 kHz or 48 kHz This feature reproduces the frequencies lost during recording to give you press and hold the button: MANUAL EQ!#PRESET EQ 2 Press [SOUND] to select "BASS" or "TREBLE". BASS 0 Each time you press the button: Heavy: Adds punch to rock (...factory preset). BASS 1 Using the built-in sound quality settings 1 Press and hold [SOUND] to select "MANUAL EQ". OFF: Canceled (no effect is added). EQ Heavy Each time you press the button: BASS>TREBLE>Original display ^_______n 3 While displaying "BASS" or ...

SADP1 User Guide
Page 29
... start time. RQT6815 29 PLAY Each time you select "AUX" as the source Set the connected equipment's timer to the same time. (See the instruction manual that came with the play timer. TIMER PLAY 6 Press [Í] to select the time (minutes). To check settings (While the unit is on and set...
... start time. RQT6815 29 PLAY Each time you select "AUX" as the source Set the connected equipment's timer to the same time. (See the instruction manual that came with the play timer. TIMER PLAY 6 Press [Í] to select the time (minutes). To check settings (While the unit is on and set...


