SCBTT190 User Guide
Page 8
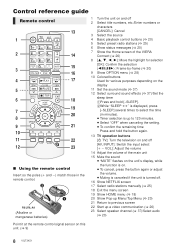
...; To confirm the remaining time Press and hold the button again. 13 TV operation buttons [Í TV]: Turn the television on and off [AV, INPUT]: Switch the input select [i j VOL]: Adjust the volume 14 Adjust the volume of the main unit 15 Mute the sound ≥ "MUTE" flashes on the unit's display...
...; To confirm the remaining time Press and hold the button again. 13 TV operation buttons [Í TV]: Turn the television on and off [AV, INPUT]: Switch the input select [i j VOL]: Adjust the volume 14 Adjust the volume of the main unit 15 Mute the sound ≥ "MUTE" flashes on the unit's display...
SCBTT190 User Guide
Page 15
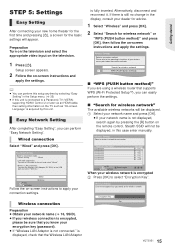
... disconnect and reconnect it. Encryption Key Set 15 VQT3X51 Getting started Preparation Turn on the television and select the appropriate video input on the remote control. Network name (SSID) XXXXXXXXXX XXXXXXXXXX XXXXXXXXXX XXXXXXXXXX XXXXXXXXXX XXXXXXXXXX XXXXXXXXXX Reception OPTION OK R Search again ...perform this setup anytime by selecting "Easy Setting" in the Setup menu. (> 35) ≥ If this unit is connected to a Panasonic TV (VIERA) supporting HDAVI Control 2 or later via an HDMI cable, then setting information on -screen instructions and apply the settings. If...
... disconnect and reconnect it. Encryption Key Set 15 VQT3X51 Getting started Preparation Turn on the television and select the appropriate video input on the remote control. Network name (SSID) XXXXXXXXXX XXXXXXXXXX XXXXXXXXXX XXXXXXXXXX XXXXXXXXXX XXXXXXXXXX XXXXXXXXXX Reception OPTION OK R Search again ...perform this setup anytime by selecting "Easy Setting" in the Setup menu. (> 35) ≥ If this unit is connected to a Panasonic TV (VIERA) supporting HDAVI Control 2 or later via an HDMI cable, then setting information on -screen instructions and apply the settings. If...
SCBTT190 User Guide
Page 16
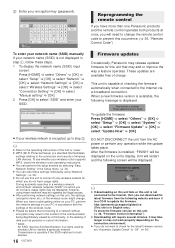
... (SSID*) for which you have usage rights. It may take longer or may result in step 1, follow these steps. 1 To display the network name (SSID) input screen: Press [HOME] > select "Others" > [OK] > select "Setup" > [OK] > select "Network" > [OK] > select "Network Settings" > [OK] > select "Wireless Settings" > [OK] > ... the latest firmware from the AC power or perform any wireless network for both products at once, you will require several minutes. http://panasonic.jp/support/global/cs/ (This site is in the Setup menu. (> 34) ≥ You can perform this setup anytime by...
... (SSID*) for which you have usage rights. It may take longer or may result in step 1, follow these steps. 1 To display the network name (SSID) input screen: Press [HOME] > select "Others" > [OK] > select "Setup" > [OK] > select "Network" > [OK] > select "Network Settings" > [OK] > select "Wireless Settings" > [OK] > ... the latest firmware from the AC power or perform any wireless network for both products at once, you will require several minutes. http://panasonic.jp/support/global/cs/ (This site is in the Setup menu. (> 34) ≥ You can perform this setup anytime by...
SCBTT190 User Guide
Page 17
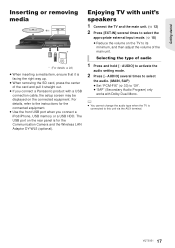
Selecting the type of audio 1 Press and hold [jAUDIO] to activate the audio setting mode. 2 Press [jAUDIO] several times to select the appropriate external input mode. (> 18) ≥ Reduce the volume on the rear panel is connected to its minimum, and then adjust the volume of the card and pull ...it straight out. ≥ If you connect a Panasonic product with Dolby Dual Mono. ≥ You cannot change the audio type when the TV is for the connected equipment. ≥ Use the front USB...
Selecting the type of audio 1 Press and hold [jAUDIO] to activate the audio setting mode. 2 Press [jAUDIO] several times to select the appropriate external input mode. (> 18) ≥ Reduce the volume on the rear panel is connected to its minimum, and then adjust the volume of the card and pull ...it straight out. ≥ If you connect a Panasonic product with Dolby Dual Mono. ≥ You cannot change the audio type when the TV is for the connected equipment. ≥ Use the front USB...
SCBTT190 User Guide
Page 18
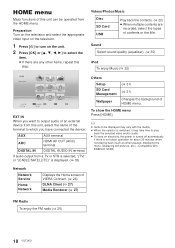
... Client (> 27) Media Renderer (> 27) FM Radio To enjoy the FM radio (> 25) 18 VQT3X51 Preparation Turn on the television and select the appropriate video input on the television. 1 Press [Í] to turn on electricity, the power is turned off automatically if there is displayed. (> 33) Others Setup SD Card Management...
... Client (> 27) Media Renderer (> 27) FM Radio To enjoy the FM radio (> 25) 18 VQT3X51 Preparation Turn on the television and select the appropriate video input on the television. 1 Press [Í] to turn on electricity, the power is turned off automatically if there is displayed. (> 33) Others Setup SD Card Management...
SCBTT190 User Guide
Page 19
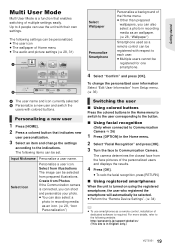
... control, installation of dedicated software is required. The camera determines the closest face from the face pictures of multiple settings easily. http://panasonic.jp/support/global/cs/ (This site is in the Home menu. 2 Select "Facial Recognition" and press [OK]. 3 Turn ... registered smartphone, the user who registered the smartphone will automatically be registered for one smartphone. 4 Select "Confirm" and press [OK]. Input Nickname Personalize a user name. Select from prepared illustrations. To change the settings according to Communication Camera > 26) 1 Press [OPTION]...
... control, installation of dedicated software is required. The camera determines the closest face from the face pictures of multiple settings easily. http://panasonic.jp/support/global/cs/ (This site is in the Home menu. 2 Select "Facial Recognition" and press [OK]. 3 Turn ... registered smartphone, the user who registered the smartphone will automatically be registered for one smartphone. 4 Select "Confirm" and press [OK]. Input Nickname Personalize a user name. Select from prepared illustrations. To change the settings according to Communication Camera > 26) 1 Press [OPTION]...
SCBTT190 User Guide
Page 23
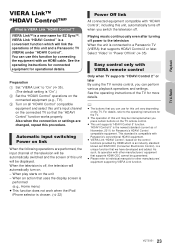
... not work when the iPod/ iPhone selector is the newest standard (current as HDMI CEC (Consumer Electronics Control), is connected to a Panasonic TV (VIERA) that supports HDAVI Control 2 or later. See the operating instructions of the TV for more details. ≥ The buttons... the "HDAVI Control" operations on the connected equipment (e.g., TV). 3 Turn on all "HDAVI Control" compatible equipment and select this unit's input channel on the connected TV so that the "HDAVI Control" function works properly. See the operating instructions for connected equipment for EZ SyncTM. ...
... not work when the iPod/ iPhone selector is the newest standard (current as HDMI CEC (Consumer Electronics Control), is connected to a Panasonic TV (VIERA) that supports HDAVI Control 2 or later. See the operating instructions of the TV for more details. ≥ The buttons... the "HDAVI Control" operations on the connected equipment (e.g., TV). 3 Turn on all "HDAVI Control" compatible equipment and select this unit's input channel on the connected TV so that the "HDAVI Control" function works properly. See the operating instructions for connected equipment for EZ SyncTM. ...

SCBTT190 User Guide
Page 24
... "Setup" and press [OK]. 4 Press [3, 4] to select "Audio" and press [OK]. 5 Press [3, 4] to select "TV Audio Input" and press [OK]. 6 Press [3, 4] to switch "AUX", "ARC" or "DIGITAL IN" and press [OK]. ≥ Select an audio input terminal connected to the unit. 1 Press [EXT-IN] to select "D-IN". 2 Press [STATUS] to enable output...
... "Setup" and press [OK]. 4 Press [3, 4] to select "Audio" and press [OK]. 5 Press [3, 4] to select "TV Audio Input" and press [OK]. 6 Press [3, 4] to switch "AUX", "ARC" or "DIGITAL IN" and press [OK]. ≥ Select an audio input terminal connected to the unit. 1 Press [EXT-IN] to select "D-IN". 2 Press [STATUS] to enable output...
SCBTT190 User Guide
Page 33
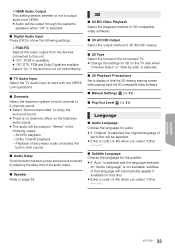
... selects whether or not to output audio from HDMI. ≥ Audio will be output through the system's speakers when "Off" is selected. ∫ Digital Audio Input Press [OK] to show the following cases: - Select "On" if the sound is cut off intermittently. ∫ TV Audio... Input Select the TV audio input to work with the VIERA Link operations. ∫ Downmix Select the downmix system of multi-channel to 2-channel sound. ≥ Select "Surround encoded" to enjoy ...
... selects whether or not to output audio from HDMI. ≥ Audio will be output through the system's speakers when "Off" is selected. ∫ Digital Audio Input Press [OK] to show the following cases: - Select "On" if the sound is cut off intermittently. ∫ TV Audio... Input Select the TV audio input to work with the VIERA Link operations. ∫ Downmix Select the downmix system of multi-channel to 2-channel sound. ≥ Select "Surround encoded" to enjoy ...
SCBTT190 User Guide
Page 40
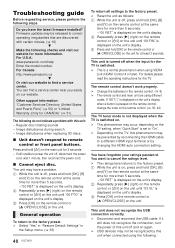
...). This unit does not recognize the USB connection correctly. ¾ Disconnect and reconnect the USB cable. For U.S.A.: www.panasonic.com/help Enter the model number. This unit is turned off when the input for the TV is switched. ¾ This is set to "On". ¾ Depending on the TV, this phenomenon... may be prevented by this unit when connected using different codes. You have the latest firmware installed? For Canada: http://www.panasonic.ca 4 Or visit our ...
...). This unit does not recognize the USB connection correctly. ¾ Disconnect and reconnect the USB cable. For U.S.A.: www.panasonic.com/help Enter the model number. This unit is turned off when the input for the TV is switched. ¾ This is set to "On". ¾ Depending on the TV, this phenomenon... may be prevented by this unit when connected using different codes. You have the latest firmware installed? For Canada: http://www.panasonic.ca 4 Or visit our ...
SCBTT190 User Guide
Page 41
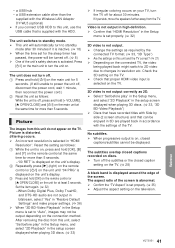
...) ¾ Adjust the aspect setting on the main unit at least 3 seconds. Check the 3D setting on the TV. ¾ Check that proper HDMI video input is selected on the main unit for 5 seconds. (If still unable to "Auto", images may not be turned off for more than 5 seconds. -"00 RET...
...) ¾ Adjust the aspect setting on the main unit at least 3 seconds. Check the 3D setting on the TV. ¾ Check that proper HDMI video input is selected on the main unit for 5 seconds. (If still unable to "Auto", images may not be turned off for more than 5 seconds. -"00 RET...

SCBTT190 User Guide
Page 45
...≠) SURROUND: 60 W per ch (3 ≠) 45 Hz to 120 Hz, 1.0 % total harmonic distortion SUBWOOFER: 100 W (3 ≠) Audio Input AUX: k1 Digital Audio Input Optical k1 Sampling frequency: Audio Format: 32 kHz, 44.1 kHz, 48 kHz PCM, Dolby Digital, DTS FM TUNER SECTION Frequency range: 87.9 MHz... to 107.9 MHz (200 kHz step), 87.5 MHz to change without notice. Reference SPEAKER SECTION* FRONT SPEAKERS [BTT196] [BTT195] Full...
...≠) SURROUND: 60 W per ch (3 ≠) 45 Hz to 120 Hz, 1.0 % total harmonic distortion SUBWOOFER: 100 W (3 ≠) Audio Input AUX: k1 Digital Audio Input Optical k1 Sampling frequency: Audio Format: 32 kHz, 44.1 kHz, 48 kHz PCM, Dolby Digital, DTS FM TUNER SECTION Frequency range: 87.9 MHz... to 107.9 MHz (200 kHz step), 87.5 MHz to change without notice. Reference SPEAKER SECTION* FRONT SPEAKERS [BTT196] [BTT195] Full...


