SCBTT190 User Guide
Page 2
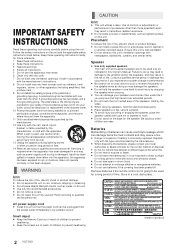
... or pinched particularly at plugs, convenience receptacles, and the point where they exit from the apparatus. 11 Only use this unit. Remove batteries if the remote control is required when the apparatus has been damaged in one wider than the other apparatus (including amplifiers) that the power cord can damage items...
... or pinched particularly at plugs, convenience receptacles, and the point where they exit from the apparatus. 11 Only use this unit. Remove batteries if the remote control is required when the apparatus has been damaged in one wider than the other apparatus (including amplifiers) that the power cord can damage items...
SCBTT190 User Guide
Page 5
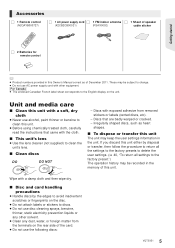
...NOT - Discs that came with exposed adhesive from the terminals on the unit. These may be recorded in the unit. Accessories ∏ 1 Remote control (N2QAYB000727) ∏ 1 AC power supply cord ∏ 1 FM indoor antenna ∏ 1 Sheet of speaker (K2CB2CB00021) (RSAX0002) cable ...sticker Getting started ∏ 2 Batteries for remote control ≥ Product numbers provided in this Owner's Manual correct as heart shapes. ∫ To dispose or transfer this unit The unit may...
...NOT - Discs that came with exposed adhesive from the terminals on the unit. These may be recorded in the unit. Accessories ∏ 1 Remote control (N2QAYB000727) ∏ 1 AC power supply cord ∏ 1 FM indoor antenna ∏ 1 Sheet of speaker (K2CB2CB00021) (RSAX0002) cable ...sticker Getting started ∏ 2 Batteries for remote control ≥ Product numbers provided in this Owner's Manual correct as heart shapes. ∫ To dispose or transfer this unit The unit may...
SCBTT190 User Guide
Page 8
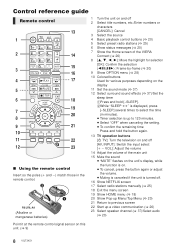
Control reference guide Remote control 13 1 モヷ 2 14 15 3 ュリヴヤ ㄊヱㄐㄅ 16 4...12526;ユ ヵ ヱ 19 7 20 8 9 21 10 11 22 12 23 ∫ Using the remote control Insert so the poles (i and j) match those in the remote control. R6/LR6, AA (Alkaline or manganese batteries) 1 Turn the unit on and off ... video communication (> 26) 23 Select speaker channel (> 37)/Select audio (> 20) Point it at the remote control signal sensor on this unit. (> 9) 8 VQT3X51
Control reference guide Remote control 13 1 モヷ 2 14 15 3 ュリヴヤ ㄊヱㄐㄅ 16 4...12526;ユ ヵ ヱ 19 7 20 8 9 21 10 11 22 12 23 ∫ Using the remote control Insert so the poles (i and j) match those in the remote control. R6/LR6, AA (Alkaline or manganese batteries) 1 Turn the unit on and off ... video communication (> 26) 23 Select speaker channel (> 37)/Select audio (> 20) Point it at the remote control signal sensor on this unit. (> 9) 8 VQT3X51
SCBTT190 User Guide
Page 9
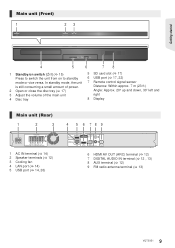
... power. 2 Open or close the disc tray (> 17) 3 Adjust the volume of the main unit 4 Disc tray 5 SD card slot (> 17) 6 USB port (> 17, 22) 7 Remote control signal sensor Distance: Within approx. 7 m (23 ft.) Angle: Approx. 20o up and down, 30o left and right 8 Display Main unit (Rear) 1 2 3 4 5 6 78 9 1 AC IN...
... power. 2 Open or close the disc tray (> 17) 3 Adjust the volume of the main unit 4 Disc tray 5 SD card slot (> 17) 6 USB port (> 17, 22) 7 Remote control signal sensor Distance: Within approx. 7 m (23 ft.) Angle: Approx. 20o up and down, 30o left and right 8 Display Main unit (Rear) 1 2 3 4 5 6 78 9 1 AC IN...
SCBTT190 User Guide
Page 15
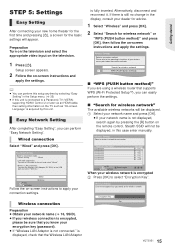
... name and press [OK]. ≥ If your connection settings. Preparation Turn on the television and select the appropriate video input on the remote control. Easy Network Setting Select a connection mode. Wired Wireless OK RETURN Follow the on -screen instructions and apply the settings. Network name...can perform this setup anytime by this unit is fully inserted. Wireless LAN connection: Connect the Wireless LAN Adaptor (DY-WL5) to a Panasonic TV (VIERA) supporting HDAVI Control 2 or later via an HDMI cable, then setting information on -screen instructions and apply the settings. &#...
... name and press [OK]. ≥ If your connection settings. Preparation Turn on the television and select the appropriate video input on the remote control. Easy Network Setting Select a connection mode. Wired Wireless OK RETURN Follow the on -screen instructions and apply the settings. Network name...can perform this setup anytime by this unit is fully inserted. Wireless LAN connection: Connect the Wireless LAN Adaptor (DY-WL5) to a Panasonic TV (VIERA) supporting HDAVI Control 2 or later via an HDMI cable, then setting information on -screen instructions and apply the settings. &#...
SCBTT190 User Guide
Page 16
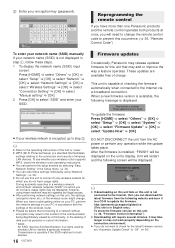
... a new firmware version is available, the following screen will require several minutes. The firmware was updated. http://panasonic.jp/support/global/cs/ (This site is displayed. Wireless Settings Enter your encryption key (password). SSID Set ...r s t u789 y z .@* 0 Alphanumeric Other Characters Delete Finish Reprogramming the remote control If you have more than one Panasonic products and the remote control operates both devices. 16 VQT3X51 Firmware updates Occasionally, Panasonic may release updated firmware for which you do not have usage rights may add or...
... a new firmware version is available, the following screen will require several minutes. The firmware was updated. http://panasonic.jp/support/global/cs/ (This site is displayed. Wireless Settings Enter your encryption key (password). SSID Set ...r s t u789 y z .@* 0 Alphanumeric Other Characters Delete Finish Reprogramming the remote control If you have more than one Panasonic products and the remote control operates both devices. 16 VQT3X51 Firmware updates Occasionally, Panasonic may release updated firmware for which you do not have usage rights may add or...
SCBTT190 User Guide
Page 19
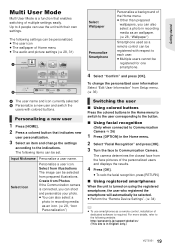
... required. Select from illustrations The image can be registered for one smartphone. 4 Select "Confirm" and press [OK]. The following website. http://panasonic.jp/support/global/cs/ (This site is in recording media as an wallpaper. (> 28, "Wallpaper") Smartphone used as an icon. (> ... also select a photo in English only.) 19 VQT3X51 Create from Photos If the Communication camera is connected, you can use smartphones as a remote control, installation of the personalized users and displays the results. 4 Press [OK]. ≥ To redo the facial recognition, press [RETURN]....
... required. Select from illustrations The image can be registered for one smartphone. 4 Select "Confirm" and press [OK]. The following website. http://panasonic.jp/support/global/cs/ (This site is in recording media as an wallpaper. (> 28, "Wallpaper") Smartphone used as an icon. (> ... also select a photo in English only.) 19 VQT3X51 Create from Photos If the Communication camera is connected, you can use smartphones as a remote control, installation of the personalized users and displays the results. 4 Press [OK]. ≥ To redo the facial recognition, press [RETURN]....
SCBTT190 User Guide
Page 23
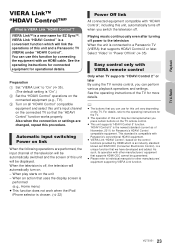
...HDMI which will automatically turn on the control functions provided by connecting the equipment with "HDAVI Control", including this unit and a Panasonic TV (VIERA) under "HDAVI Control". Playing music continuously even after turning off power to individual manuals for other manufacturers' equipment that...on the connected equipment (e.g., TV). 3 Turn on all "HDAVI Control" compatible equipment and select this unit vary depending on the TV remote control. ≥ This unit supports "HDAVI Control 5" function. Also when the connection or settings are performed, the input channel of the...
...HDMI which will automatically turn on the control functions provided by connecting the equipment with "HDAVI Control", including this unit and a Panasonic TV (VIERA) under "HDAVI Control". Playing music continuously even after turning off power to individual manuals for other manufacturers' equipment that...on the connected equipment (e.g., TV). 3 Turn on all "HDAVI Control" compatible equipment and select this unit vary depending on the TV remote control. ≥ This unit supports "HDAVI Control 5" function. Also when the connection or settings are performed, the input channel of the...

SCBTT190 User Guide
Page 27
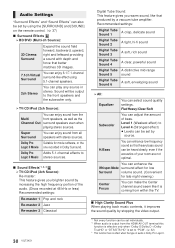
...* DMC compatible software should be played back by pressing [OPTION]. ≥ Control Panel (> 29) is displayed once the playback starts. http://panasonic.jp/support/global/cs/ (This site is not displayed, and press [RETURN] to play and press [OK]. ≥ You may not be...". 3 Select "Home Network". 4 Select "Media Renderer". 5 Operate the DMC compatible devices. Preparation Perform steps 1 to 3. (> left) 4 Perform the "Remote Device Settings". (> 34) ≥ You can share photos, videos and music stored in English only.) ≥ Depending on the content by this home theater....
...* DMC compatible software should be played back by pressing [OPTION]. ≥ Control Panel (> 29) is displayed once the playback starts. http://panasonic.jp/support/global/cs/ (This site is not displayed, and press [RETURN] to play and press [OK]. ≥ You may not be...". 3 Select "Home Network". 4 Select "Media Renderer". 5 Operate the DMC compatible devices. Preparation Perform steps 1 to 3. (> left) 4 Perform the "Remote Device Settings". (> 34) ≥ You can share photos, videos and music stored in English only.) ≥ Depending on the content by this home theater....
SCBTT190 User Guide
Page 30
... a vacuum tube amplifier. Dolby Pro Adds 5.1-channel effects to Level 4 (Strongest effect) ≥ Levels can be set by using the [SURROUND] and [SOUND] on the remote control. (> 37) ∫ Surround Effects ¾ BD/DVD (Multi-ch Source): 3D Cinema Surround Expand the sound field forward, backward, upward, right and leftward providing...
... a vacuum tube amplifier. Dolby Pro Adds 5.1-channel effects to Level 4 (Strongest effect) ≥ Levels can be set by using the [SURROUND] and [SOUND] on the remote control. (> 37) ∫ Surround Effects ¾ BD/DVD (Multi-ch Source): 3D Cinema Surround Expand the sound field forward, backward, upward, right and leftward providing...
SCBTT190 User Guide
Page 34
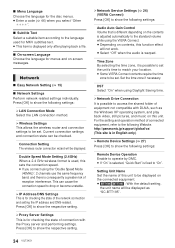
...system, and play back video, still pictures, and music on this unit. http://panasonic.jp/support/global/cs/ (This site is in English only.) ¾ Remote Device Settings (> 27) Press [OK] to show the following settings: Remote Device Operation Enable to operate by DMC. ≥ If "On" is selected,... Press [OK] to show the respective setting. ¾Proxy Server Settings This is for checking the state of connection with DLNA, such as "SC-BTT195". 34 VQT3X51 Time Zone By selecting the time zone, it is warped. Set the time zone if necessary. ∫ Menu Language Choose the language...
...system, and play back video, still pictures, and music on this unit. http://panasonic.jp/support/global/cs/ (This site is in English only.) ¾ Remote Device Settings (> 27) Press [OK] to show the following settings: Remote Device Operation Enable to operate by DMC. ≥ If "On" is selected,... Press [OK] to show the respective setting. ¾Proxy Server Settings This is for checking the state of connection with DLNA, such as "SC-BTT195". 34 VQT3X51 Time Zone By selecting the time zone, it is warped. Set the time zone if necessary. ∫ Menu Language Choose the language...
SCBTT190 User Guide
Page 35
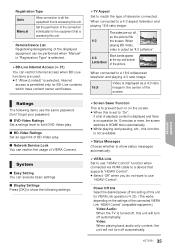
... the equipment that is accessing this unit for BD-Live contents which have content owner certificates. ¾TV Aspect Set to use the same password. Remote Device List Registering/deregistering of the displayed equipment can be performed when "Manual" in on the settings of VIERA Connect. When connected to all the...
... the equipment that is accessing this unit for BD-Live contents which have content owner certificates. ¾TV Aspect Set to use the same password. Remote Device List Registering/deregistering of the displayed equipment can be performed when "Manual" in on the settings of VIERA Connect. When connected to all the...
SCBTT190 User Guide
Page 36
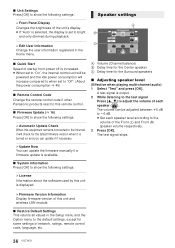
...speaker ( dB 0 ). A Volume (Channel balance) B Delay time for the Center speaker C Delay time for some settings of network, ratings, remote control code, language, etc. 36 VQT3X51 ∫ Unit Settings Press [OK] to show the following settings: ¾Front Panel Display Changes the ... "Auto" is selected, the display is set to "Off". (About the power consumption > 45) ∫ Remote Control Code Change the remote control code if other Panasonic products react to this remote control. ∫ Firmware Update (> 16) Press [OK] to show the following settings: ¾ License Information...
...speaker ( dB 0 ). A Volume (Channel balance) B Delay time for the Center speaker C Delay time for some settings of network, ratings, remote control code, language, etc. 36 VQT3X51 ∫ Unit Settings Press [OK] to show the following settings: ¾Front Panel Display Changes the ... "Auto" is selected, the display is set to "Off". (About the power consumption > 45) ∫ Remote Control Code Change the remote control code if other Panasonic products react to this remote control. ∫ Firmware Update (> 16) Press [OK] to show the following settings: ¾ License Information...
SCBTT190 User Guide
Page 40
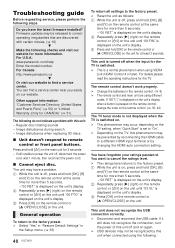
... this unit: - Regular disc rotating sounds. - This unit is a normal phenomenon when using different codes. For Canada: http://www.panasonic.ca 4 Or visit our website to remote control or front panel buttons. General operation To return to the factory preset. ¾ Reset the unit as follows: 1 While the...the unit's display. 3 Press [OK] on the remote control or [< OPEN/CLOSE] on the unit for the TV is switched. ¾ This is turned off when the input for at the same time for 3 seconds. - For U.S.A.: www.panasonic.com/help Enter the model number. Image disturbance when ...
... this unit: - Regular disc rotating sounds. - This unit is a normal phenomenon when using different codes. For Canada: http://www.panasonic.ca 4 Or visit our website to remote control or front panel buttons. General operation To return to the factory preset. ¾ Reset the unit as follows: 1 While the...the unit's display. 3 Press [OK] on the remote control or [< OPEN/CLOSE] on the unit for the TV is switched. ¾ This is turned off when the input for at the same time for 3 seconds. - For U.S.A.: www.panasonic.com/help Enter the model number. Image disturbance when ...
SCBTT190 User Guide
Page 41
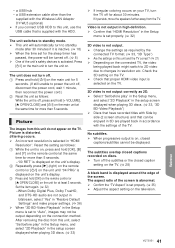
.... 1 Press and hold [Í/I] on the main unit for more than 5 seconds. -"00 RET" is displayed on the unit's display. 2 Repeatedly press [1] (right) on the remote control or [Í/I] on the unit until "04 PRG" is displayed on the unit's display. 3 Press and hold [OK] on the... Setup menu is selected in resolution etc. Reference 41 VQT3X51 a USB hub - Picture is on, press and hold [+ VOLUME], [< OPEN/CLOSE] and [Í/I ] on the remote control at the same time for 5 seconds. (If still unable to power the unit off, disconnect the power cord, wait 1 minute, then reconnect the power...
.... 1 Press and hold [Í/I] on the main unit for more than 5 seconds. -"00 RET" is displayed on the unit's display. 2 Repeatedly press [1] (right) on the remote control or [Í/I] on the unit until "04 PRG" is displayed on the unit's display. 3 Press and hold [OK] on the... Setup menu is selected in resolution etc. Reference 41 VQT3X51 a USB hub - Picture is on, press and hold [+ VOLUME], [< OPEN/CLOSE] and [Í/I ] on the remote control at the same time for 5 seconds. (If still unable to power the unit off, disconnect the power cord, wait 1 minute, then reconnect the power...
SCBTT190 User Guide
Page 44
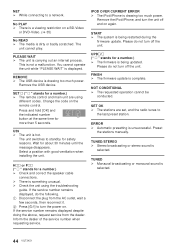
... WAIT ¾ The unit is displayed. NET ¾ While connecting to turn the power on the remote control. No PLAY ¾ There is dirty or badly scratched. SET (" " stands for a number.) ¾ The remote control and main unit are set, and the radio tunes to standby for a number.) ¾ Check...
... WAIT ¾ The unit is displayed. NET ¾ While connecting to turn the power on the remote control. No PLAY ¾ There is dirty or badly scratched. SET (" " stands for a number.) ¾ The remote control and main unit are set, and the radio tunes to standby for a number.) ¾ Check...


