SCBTT190 User Guide
Page 2
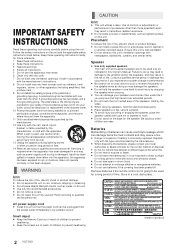
..., or sold with dry cloth. 7 Do not block any way, such as vases, on the base for a long period of fire. Remove batteries if the remote control is well ventilated. ≥ Do not obstruct this unit by the manufacturer. ≥ When disposing the batteries, please contact your safety. Failure to do...
..., or sold with dry cloth. 7 Do not block any way, such as vases, on the base for a long period of fire. Remove batteries if the remote control is well ventilated. ≥ Do not obstruct this unit by the manufacturer. ≥ When disposing the batteries, please contact your safety. Failure to do...
SCBTT190 User Guide
Page 5
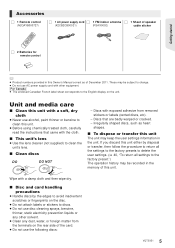
...static electricity prevention liquids or any dust, water, or foreign matter from removed stickers or labels (rented discs, etc). - Accessories ∏ 1 Remote control (N2QAYB000727) ∏ 1 AC power supply cord ∏ 1 FM indoor antenna ∏ 1 Sheet of speaker (K2CB2CB00021) (RSAX0002) cable sticker... Getting started ∏ 2 Batteries for remote control ≥ Product numbers provided in this Owner's Manual correct as heart shapes. ∫ To dispose or transfer this unit The unit...
...static electricity prevention liquids or any dust, water, or foreign matter from removed stickers or labels (rented discs, etc). - Accessories ∏ 1 Remote control (N2QAYB000727) ∏ 1 AC power supply cord ∏ 1 FM indoor antenna ∏ 1 Sheet of speaker (K2CB2CB00021) (RSAX0002) cable sticker... Getting started ∏ 2 Batteries for remote control ≥ Product numbers provided in this Owner's Manual correct as heart shapes. ∫ To dispose or transfer this unit The unit...
SCBTT190 User Guide
Page 8
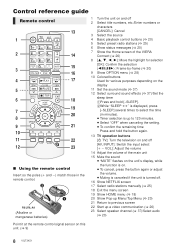
Control reference guide Remote control 13 1 モヷ 2 14 15 3 ュリヴヤ ㄊヱㄐㄅ 16 4...12526;ユ ヵ ヱ 19 7 20 8 9 21 10 11 22 12 23 ∫ Using the remote control Insert so the poles (i and j) match those in the remote control. R6/LR6, AA (Alkaline or manganese batteries) 1 Turn the unit on and off ... video communication (> 26) 23 Select speaker channel (> 37)/Select audio (> 20) Point it at the remote control signal sensor on this unit. (> 9) 8 VQT3X51
Control reference guide Remote control 13 1 モヷ 2 14 15 3 ュリヴヤ ㄊヱㄐㄅ 16 4...12526;ユ ヵ ヱ 19 7 20 8 9 21 10 11 22 12 23 ∫ Using the remote control Insert so the poles (i and j) match those in the remote control. R6/LR6, AA (Alkaline or manganese batteries) 1 Turn the unit on and off ... video communication (> 26) 23 Select speaker channel (> 37)/Select audio (> 20) Point it at the remote control signal sensor on this unit. (> 9) 8 VQT3X51
SCBTT190 User Guide
Page 9
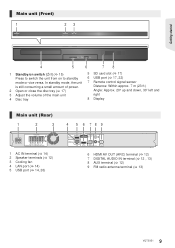
... power. 2 Open or close the disc tray (> 17) 3 Adjust the volume of the main unit 4 Disc tray 5 SD card slot (> 17) 6 USB port (> 17, 22) 7 Remote control signal sensor Distance: Within approx. 7 m (23 ft.) Angle: Approx. 20o up and down, 30o left and right 8 Display Main unit (Rear) 1 2 3 4 5 6 78 9 1 AC IN...
... power. 2 Open or close the disc tray (> 17) 3 Adjust the volume of the main unit 4 Disc tray 5 SD card slot (> 17) 6 USB port (> 17, 22) 7 Remote control signal sensor Distance: Within approx. 7 m (23 ft.) Angle: Approx. 20o up and down, 30o left and right 8 Display Main unit (Rear) 1 2 3 4 5 6 78 9 1 AC IN...
SCBTT190 User Guide
Page 15
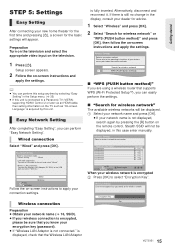
... -screen instructions to the USB port and select "Wireless." If there is fully inserted. Setup screen appears. 2 Follow the on the remote control. Easy Network Setting After completing "Easy Setting", you can easily perform the settings. ∫ "Search for wireless network WPS (PUSH...Wired" and press [OK]. Easy Network Setting Select a connection mode. Current setting : Wired LAN cable connection: Connect a LAN cable to a Panasonic TV (VIERA) supporting HDAVI Control 2 or later via an HDMI cable, then setting information on the television. 1 Press [Í]. Please refer to...
... -screen instructions to the USB port and select "Wireless." If there is fully inserted. Setup screen appears. 2 Follow the on the remote control. Easy Network Setting After completing "Easy Setting", you can easily perform the settings. ∫ "Search for wireless network WPS (PUSH...Wired" and press [OK]. Easy Network Setting Select a connection mode. Current setting : Wired LAN cable connection: Connect a LAN cable to a Panasonic TV (VIERA) supporting HDAVI Control 2 or later via an HDMI cable, then setting information on the television. 1 Press [Í]. Please refer to...
SCBTT190 User Guide
Page 16
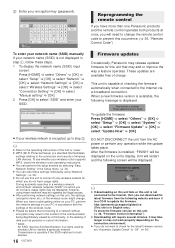
... Space / : Symbols OK S RETURN de f g123 k l mn 4 5 6 r s t u789 y z .@* 0 Alphanumeric Other Characters Delete Finish Reprogramming the remote control If you have more than one Panasonic products and the remote control operates both devices. 16 VQT3X51 Firmware updates Occasionally, Panasonic may release updated firmware for the latest firmware version, set "Automatic Update Check" to select "SSID...
... Space / : Symbols OK S RETURN de f g123 k l mn 4 5 6 r s t u789 y z .@* 0 Alphanumeric Other Characters Delete Finish Reprogramming the remote control If you have more than one Panasonic products and the remote control operates both devices. 16 VQT3X51 Firmware updates Occasionally, Panasonic may release updated firmware for the latest firmware version, set "Automatic Update Check" to select "SSID...
SCBTT190 User Guide
Page 19
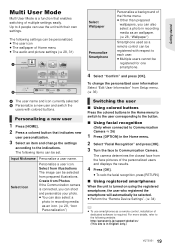
...The image can be registered for one smartphone. 4 Select "Confirm" and press [OK]. To change the settings according to the indications. http://panasonic.jp/support/global/cs/ (This site is in the Home menu. 2 Select "Facial Recognition" and press [OK]. 3 Turn the face to... The following website. Create from Photos If the Communication camera is connected, you can also select a photo in recording media as a remote control, installation of dedicated software is required. Getting started Multi User Mode Multi User Mode is a function that indicates new user personalization....
...The image can be registered for one smartphone. 4 Select "Confirm" and press [OK]. To change the settings according to the indications. http://panasonic.jp/support/global/cs/ (This site is in the Home menu. 2 Select "Facial Recognition" and press [OK]. 3 Turn the face to... The following website. Create from Photos If the Communication camera is connected, you can also select a photo in recording media as a remote control, installation of dedicated software is required. Getting started Multi User Mode Multi User Mode is a function that indicates new user personalization....
SCBTT190 User Guide
Page 23
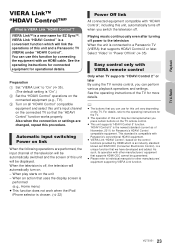
...depending on the TV. Select "Video" in "Power Off link" (> 35) Easy control only with Panasonic's conventional HDAVI equipment. ≥ VIERA Link "HDAVI Control", based on the TV remote control. ≥ This unit supports "HDAVI Control 5" function. See the operating instructions for connected equipment... supports "HDAVI Control 2" or later By using the TV remote control, you press certain buttons on the control functions provided by connecting the equipment with an HDMI cable. Preparation 1 Set "VIERA Link" to a Panasonic TV (VIERA) that supports HDMI CEC cannot be guaranteed. ...
...depending on the TV. Select "Video" in "Power Off link" (> 35) Easy control only with Panasonic's conventional HDAVI equipment. ≥ VIERA Link "HDAVI Control", based on the TV remote control. ≥ This unit supports "HDAVI Control 5" function. See the operating instructions for connected equipment... supports "HDAVI Control 2" or later By using the TV remote control, you press certain buttons on the control functions provided by connecting the equipment with an HDMI cable. Preparation 1 Set "VIERA Link" to a Panasonic TV (VIERA) that supports HDMI CEC cannot be guaranteed. ...

SCBTT190 User Guide
Page 27
...16 devices. 1 Press [HOME]. 2 Select "Network". 3 Select "Home Network". 4 Select "Media Renderer". 5 Operate the DMC compatible devices. http://panasonic.jp/support/global/cs/ (This site is in English only.) ≥ Depending on the contents and the connected equipment, playback may be installed. Using ...pressing [OPTION]. ≥ Control Panel (> 29) is displayed once the playback starts. Preparation Perform steps 1 to 3. (> left) 4 Perform the "Remote Device Settings". (> 34) ≥ You can register up to play and press [OK]. ≥ You may not be possible. ≥ Items ...
...16 devices. 1 Press [HOME]. 2 Select "Network". 3 Select "Home Network". 4 Select "Media Renderer". 5 Operate the DMC compatible devices. http://panasonic.jp/support/global/cs/ (This site is in English only.) ≥ Depending on the contents and the connected equipment, playback may be installed. Using ...pressing [OPTION]. ≥ Control Panel (> 29) is displayed once the playback starts. Preparation Perform steps 1 to 3. (> left) 4 Perform the "Remote Device Settings". (> 34) ≥ You can register up to play and press [OK]. ≥ You may not be possible. ≥ Items ...
SCBTT190 User Guide
Page 30
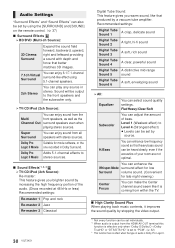
... Tube Sound 6 A soft, enveloping sound ¾ All: Equalizer You can adjust the amount of audio is set by using the [SURROUND] and [SOUND] on the remote control. (> 37) ∫ Surround Effects ¾ BD/DVD (Multi-ch Source): 3D Cinema Surround Expand the sound field forward, backward, upward, right and leftward providing...
... Tube Sound 6 A soft, enveloping sound ¾ All: Equalizer You can adjust the amount of audio is set by using the [SURROUND] and [SOUND] on the remote control. (> 37) ∫ Surround Effects ¾ BD/DVD (Multi-ch Source): 3D Cinema Surround Expand the sound field forward, backward, upward, right and leftward providing...
SCBTT190 User Guide
Page 34
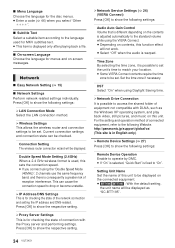
...back a file. ∫ On-screen Language Choose the language for menus and on the connected equipment. ≥ [BTT196] [BTT195] : With the default setting, the unit name will be checked. Press [OK] to "On". For the setting and operation...the following Website. Connection Setting The wireless router connection wizard will be set . http://panasonic.jp/support/global/cs/ (This site is in English only.) ¾ Remote Device Settings (> 27) Press [OK] to access the shared folder of equipment not... This is for checking the state of connection with DLNA, such as "SC-BTT195". 34 VQT3X51
...back a file. ∫ On-screen Language Choose the language for menus and on the connected equipment. ≥ [BTT196] [BTT195] : With the default setting, the unit name will be checked. Press [OK] to "On". For the setting and operation...the following Website. Connection Setting The wireless router connection wizard will be set . http://panasonic.jp/support/global/cs/ (This site is in English only.) ¾ Remote Device Settings (> 27) Press [OK] to access the shared folder of equipment not... This is for checking the state of connection with DLNA, such as "SC-BTT195". 34 VQT3X51
SCBTT190 User Guide
Page 35
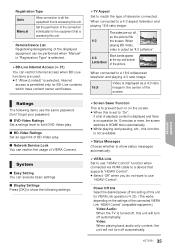
... "HDAVI Control" compatible equipment.) Video/Audio: When the TV is selected. ¾BD-Live Internet Access (> 21) You can restrict the usage of the picture. Remote Device List Registering/deregistering of the displayed equipment can be performed when "Manual" in on the screen. ≥ When this unit will not turn off...
... "HDAVI Control" compatible equipment.) Video/Audio: When the TV is selected. ¾BD-Live Internet Access (> 21) You can restrict the usage of the picture. Remote Device List Registering/deregistering of the displayed equipment can be performed when "Manual" in on the screen. ≥ When this unit will not turn off...
SCBTT190 User Guide
Page 36
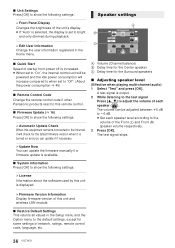
... the user information registered in the Setup menu and the Option menu to the default settings, except for some settings of network, ratings, remote control code, language, etc. 36 VQT3X51 ∫ Unit Settings Press [OK] to show the following settings: ¾Front Panel Display ... for the latest firmware version when it is set to "Off". (About the power consumption > 45) ∫ Remote Control Code Change the remote control code if other Panasonic products react to this remote control. ∫ Firmware Update (> 16) Press [OK] to show the following settings: ¾Automatic Update Check...
... the user information registered in the Setup menu and the Option menu to the default settings, except for some settings of network, ratings, remote control code, language, etc. 36 VQT3X51 ∫ Unit Settings Press [OK] to show the following settings: ¾Front Panel Display ... for the latest firmware version when it is set to "Off". (About the power consumption > 45) ∫ Remote Control Code Change the remote control code if other Panasonic products react to this remote control. ∫ Firmware Update (> 16) Press [OK] to show the following settings: ¾Automatic Update Check...
SCBTT190 User Guide
Page 40
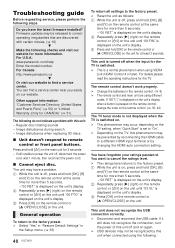
...This unit does not recognize the USB connection correctly. ¾ Disconnect and reconnect the USB cable. For Canada: http://www.panasonic.ca 4 Or visit our website to remote control or front panel buttons. Image disturbance when replacing 3D discs. ∫ Unit doesn't respond to find a service center ...near you have a problem. 1 While the unit is displayed on the unit's display. 3 Press [OK] on the remote control or [< OPEN/CLOSE] on the unit. If still unable to correct operating irregularities that are using VIERA Link (HDAVI Control 4 or later). You...
...This unit does not recognize the USB connection correctly. ¾ Disconnect and reconnect the USB cable. For Canada: http://www.panasonic.ca 4 Or visit our website to remote control or front panel buttons. Image disturbance when replacing 3D discs. ∫ Unit doesn't respond to find a service center ...near you have a problem. 1 While the unit is displayed on the unit's display. 3 Press [OK] on the remote control or [< OPEN/CLOSE] on the unit. If still unable to correct operating irregularities that are using VIERA Link (HDAVI Control 4 or later). You...
SCBTT190 User Guide
Page 41
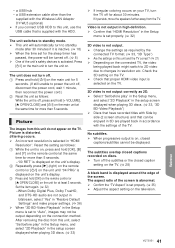
... on , closed caption setting on the television. The subtitles overlap closed captions recorded on discs. ¾ Turn off . 1 Press and hold [OK] on the remote control or [< OPEN/CLOSE] on the TV. Check the 3D setting on the TV. ¾ Check that is set properly. (> 35) ¾ Adjust the... aspect setting on the TV. (> 28) A black band is displayed on the unit's display. 2 Repeatedly press [1] (right) on the remote control or [Í/I ] on the main unit for 5 seconds. (If still unable to turn the TV off for more than the supplied with the Wireless...
... on , closed caption setting on the television. The subtitles overlap closed captions recorded on discs. ¾ Turn off . 1 Press and hold [OK] on the remote control or [< OPEN/CLOSE] on the TV. Check the 3D setting on the TV. ¾ Check that is set properly. (> 35) ¾ Adjust the... aspect setting on the TV. (> 28) A black band is displayed on the unit's display. 2 Repeatedly press [1] (right) on the remote control or [Í/I ] on the main unit for 5 seconds. (If still unable to turn the TV off for more than the supplied with the Wireless...
SCBTT190 User Guide
Page 44
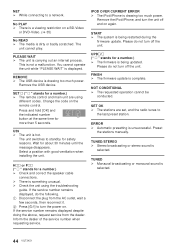
...out an internal process. PLEASE WAIT ¾ The unit is selected. 44 VQT3X51 SET (" " stands for a number.) ¾ The remote control and main unit are set, and the radio tunes to turn off the unit. The unit switches to a network. If the service number ... PLAY ¾ There is displayed. The unit cannot play. You cannot operate the unit while "PLEASE WAIT" is a viewing restriction on the remote control. Select a position with good ventilation when installing the unit. If the service number remains displayed despite doing the above, request service from the...
...out an internal process. PLEASE WAIT ¾ The unit is selected. 44 VQT3X51 SET (" " stands for a number.) ¾ The remote control and main unit are set, and the radio tunes to turn off the unit. The unit switches to a network. If the service number ... PLAY ¾ There is displayed. The unit cannot play. You cannot operate the unit while "PLEASE WAIT" is a viewing restriction on the remote control. Select a position with good ventilation when installing the unit. If the service number remains displayed despite doing the above, request service from the...


