

PT52LCX16 User Guide
Page 1
... us continue to design products that conform to any and all of the video formats described in case your needs. Help us at www.panasonic.com/register ATSC CERTIFIED * DIGITAL TELEVISION * The presence of North America has determined that this manual for use with models PT-52LCX66, PT-56LCX66, PT-61LCX66, PT-52LCX16, PT-56LCX16 and PT-61LCX16...
... us continue to design products that conform to any and all of the video formats described in case your needs. Help us at www.panasonic.com/register ATSC CERTIFIED * DIGITAL TELEVISION * The presence of North America has determined that this manual for use with models PT-52LCX66, PT-56LCX66, PT-61LCX66, PT-52LCX16, PT-56LCX16 and PT-61LCX16...

PT52LCX16 User Guide
Page 2
... water. This symbol alerts the user that the cable ground shall be read carefully in this Operating Instructions manual. 4) Follow all instructions carefully. 5) Do not use attachments/accessories specified by the manufacturer. 12) Use only with the cart, stand,...power cord from the apparatus. 11) Only use this product. 2) Keep these instructions before using, connecting or adjusting this apparatus near a swimming pool, and the like , on a bed, sofa or similar surfaces. 8) Do not install near any heat source such as power-supply cord or plug is provided to call : 1-888-VIEW...
... water. This symbol alerts the user that the cable ground shall be read carefully in this Operating Instructions manual. 4) Follow all instructions carefully. 5) Do not use attachments/accessories specified by the manufacturer. 12) Use only with the cart, stand,...power cord from the apparatus. 11) Only use this product. 2) Keep these instructions before using, connecting or adjusting this apparatus near a swimming pool, and the like , on a bed, sofa or similar surfaces. 8) Do not install near any heat source such as power-supply cord or plug is provided to call : 1-888-VIEW...

PT52LCX16 User Guide
Page 4
... measures: • Reorient or relocate the receiving antenna. • Increase the separation between the equipment and receiver. • Connect the equipment into an outlet on a circuit different from your set , please read these instructions. FCC Caution: To assure continued compliance, follow the attached installation instructions and use only shielded interface cables when connecting to the Panasonic family of the following two conditions...
... measures: • Reorient or relocate the receiving antenna. • Increase the separation between the equipment and receiver. • Connect the equipment into an outlet on a circuit different from your set , please read these instructions. FCC Caution: To assure continued compliance, follow the attached installation instructions and use only shielded interface cables when connecting to the Panasonic family of the following two conditions...

PT52LCX16 User Guide
Page 5
Replacing the lamp unit 64 Troubleshooting 66 Specifications 68 Cleaning 69 Customer Services Directory 70 Limited Warranty 71 Other Information 72 Index ...79 5 Information Table of Controls 9 Installation 12 Getting Started Basic Operation Advanced Operation Use Now ! Picture Adjustments 37 Audio Adjustments 40 Sleep Timer Feature 42 Lock Feature 43 Photo Viewer 47 Setup Features 52 Operating Peripheral Equipment 58 Other Remote Control Operation/Code List 59 Warning Indicators 63 Information ! IMPORTANT SAFETY INSTRUCTIONS 2 Before Using 6 ...
Replacing the lamp unit 64 Troubleshooting 66 Specifications 68 Cleaning 69 Customer Services Directory 70 Limited Warranty 71 Other Information 72 Index ...79 5 Information Table of Controls 9 Installation 12 Getting Started Basic Operation Advanced Operation Use Now ! Picture Adjustments 37 Audio Adjustments 40 Sleep Timer Feature 42 Lock Feature 43 Photo Viewer 47 Setup Features 52 Operating Peripheral Equipment 58 Other Remote Control Operation/Code List 59 Warning Indicators 63 Information ! IMPORTANT SAFETY INSTRUCTIONS 2 Before Using 6 ...

PT52LCX16 User Guide
Page 7
... to reset Remote Control infrared codes. Battery replacement is done. • POWER indicator flashes red. We suggest making a note of new ones. 2. Install batteries in direction of arrow. Always replace batteries with the device connected, set . Do not mix battery types (example: "Zinc Carbon" with an old one. 3. button on the unit and OK button on page 58 prior to "Off" and then "On" using "Control with HDMI (HDAVI Control)", with a pair of the codes on the Remote Control...
... to reset Remote Control infrared codes. Battery replacement is done. • POWER indicator flashes red. We suggest making a note of new ones. 2. Install batteries in direction of arrow. Always replace batteries with the device connected, set . Do not mix battery types (example: "Zinc Carbon" with an old one. 3. button on the unit and OK button on page 58 prior to "Off" and then "On" using "Control with HDMI (HDAVI Control)", with a pair of the codes on the Remote Control...
PT52LCX16 User Guide
Page 9
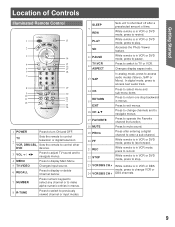
... menus. 8 R-TUNE Press to switch to make alpha-numeric entries in menus. TV Sets the remote to control television or digital television. 2 VCR, DBS/CBL, Sets the remote to control other DVD devices. 3 VOL -+ / ◄► Press to adjust TV sound and to navigate menus. 4 MENU Press to display Main Menu. 5 TV/VIDEO Changes Input source. 6 RECALL Press to display or delete Channel banner. 7 NUMBER Press numeric keypad to...
... menus. 8 R-TUNE Press to switch to make alpha-numeric entries in menus. TV Sets the remote to control television or digital television. 2 VCR, DBS/CBL, Sets the remote to control other DVD devices. 3 VOL -+ / ◄► Press to adjust TV sound and to navigate menus. 4 MENU Press to display Main Menu. 5 TV/VIDEO Changes Input source. 6 RECALL Press to display or delete Channel banner. 7 NUMBER Press numeric keypad to...

PT52LCX16 User Guide
Page 18
... (Low Frequency Effect) subwoofer channel, For a full Home Theater sound experience, an external Dolby Digital decoder and a multichannel amplifier must be PCM. • Depending on your Projection Display to a Dolby Digital decoder. Installation (continued) Digital Audio Out Use the diagram below to connect the Digital Audio Output of your DVD player and DVD-Audio software the copyright protection function may operate and disable optical output. Dolby Digital 5.1 channel surround sound delivers digital-quality sound. Dolby Digital provides...
... (Low Frequency Effect) subwoofer channel, For a full Home Theater sound experience, an external Dolby Digital decoder and a multichannel amplifier must be PCM. • Depending on your Projection Display to a Dolby Digital decoder. Installation (continued) Digital Audio Out Use the diagram below to connect the Digital Audio Output of your DVD player and DVD-Audio software the copyright protection function may operate and disable optical output. Dolby Digital 5.1 channel surround sound delivers digital-quality sound. Dolby Digital provides...

PT52LCX16 User Guide
Page 20
... operating instruction manuals. • When audio from other equipment connected to this unit via HDMI is output using "DIGITAL AUDIO OUT" of this unit, the system switches to 2CH audio. (When connected to an AV amp via HDMI, you will enjoy higher sound quality.) (Current as of January 2006.) 20 For assistance, please call : 1-888-VIEW PTV(843-9788) or, contact us via the web at: http://www.panasonic...
... operating instruction manuals. • When audio from other equipment connected to this unit via HDMI is output using "DIGITAL AUDIO OUT" of this unit, the system switches to 2CH audio. (When connected to an AV amp via HDMI, you will enjoy higher sound quality.) (Current as of January 2006.) 20 For assistance, please call : 1-888-VIEW PTV(843-9788) or, contact us via the web at: http://www.panasonic...
PT52LCX16 User Guide
Page 22
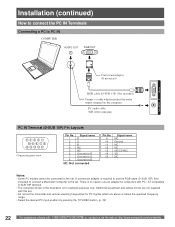
... 13 12 11 Connection port view Pin No. There is no need to use the RGB cable (D-SUB 15P) (Not included) to connect a Macintosh computer to the set . A conversion adapter is required to use an adapter for computers with this set. • Do not set the horizontal and vertical scanning frequencies for PC signals which matches the audio output terminal on the computer. Installation (continued) How to connect the PC IN...
... 13 12 11 Connection port view Pin No. There is no need to use the RGB cable (D-SUB 15P) (Not included) to connect a Macintosh computer to the set . A conversion adapter is required to use an adapter for computers with this set. • Do not set the horizontal and vertical scanning frequencies for PC signals which matches the audio output terminal on the computer. Installation (continued) How to connect the PC IN...
PT52LCX16 User Guide
Page 25
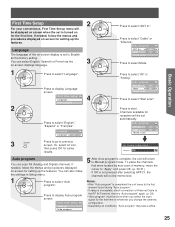
... Auto program is incomplete, check connection of the on conditions, "Auto program" may take a while. 25 Basic Operation To place the channels that were located by auto scan in Setup menu. 1 Press to Manual program mode. Press to start. Press to select "Cable" or "Antenna". You can scan All (Analog and Digital) channels. Notes: • After "Auto program" is completed the unit tunes to "Apply" and press OK. (p. 30-31) If OK is set...
... Auto program is incomplete, check connection of the on conditions, "Auto program" may take a while. 25 Basic Operation To place the channels that were located by auto scan in Setup menu. 1 Press to Manual program mode. Press to start. Press to select "Cable" or "Antenna". You can scan All (Analog and Digital) channels. Notes: • After "Auto program" is completed the unit tunes to "Apply" and press OK. (p. 30-31) If OK is set...
PT52LCX16 User Guide
Page 29
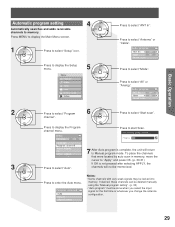
Basic Operation Automatic program setting 4 Automatically searches and adds receivable channels to select "ANT In". Press to display the Setup menu. 5 Menu Picture Audio Timer Lock Memory card Setup Press to memory. Press to enter the Auto menu. channels will return to display the Program channel menu. Press to select "All" or "Analog". Press MENU to display the Main Menu screen. 1 Press to select "Start scan". Auto program ANT In Cable Mode ◄ All ► Start scan 2 Press to select "Program 6 Press to select "Setup" icon. If desired...
Basic Operation Automatic program setting 4 Automatically searches and adds receivable channels to select "ANT In". Press to display the Setup menu. 5 Menu Picture Audio Timer Lock Memory card Setup Press to memory. Press to enter the Auto menu. channels will return to display the Program channel menu. Press to select "All" or "Analog". Press MENU to display the Main Menu screen. 1 Press to select "Start scan". Auto program ANT In Cable Mode ◄ All ► Start scan 2 Press to select "Program 6 Press to select "Setup" icon. If desired...

PT52LCX16 User Guide
Page 32
... select the input of source connected to INPUT 1 is displayed. Video 1 Signal of your choice. Signal of source connected to HDMI IN 2 is displayed. HDMI 2*2 Signal of source connected to INPUT 3 is displayed. Projection Display operation Selecting Input Mode 1 Press to display the Input select menu. • Pressing TV/VIDEO while viewing PC input will not be changed. (p. 53) Card input mode (Photo Viewer) is selected. 2 Press corresponding NUMBER keys on the Remote Control to select the Press to display Photo Viewer mode. Component 2 Signal of...
... select the input of source connected to INPUT 1 is displayed. Video 1 Signal of your choice. Signal of source connected to HDMI IN 2 is displayed. HDMI 2*2 Signal of source connected to INPUT 3 is displayed. Projection Display operation Selecting Input Mode 1 Press to display the Input select menu. • Pressing TV/VIDEO while viewing PC input will not be changed. (p. 53) Card input mode (Photo Viewer) is selected. 2 Press corresponding NUMBER keys on the Remote Control to select the Press to display Photo Viewer mode. Component 2 Signal of...

PT52LCX16 User Guide
Page 33
... ◄. These channels behave as sub-channels within a single 6 MHz channel. Unit Status display Press the Channel ▲▼ or RECALL button, except when the MENU screen is turned off. 4 • Power consumption can exist within a single channel. Channel Banner: Minimized Press CH ▲▼ to directly enter the channel number using the NUMBER keys. HD CC SAP TV-G 1080i STANDARD 4 : 3 30 Closed Caption Rating Picture mode Time remaining setting in digital television differs...
... ◄. These channels behave as sub-channels within a single 6 MHz channel. Unit Status display Press the Channel ▲▼ or RECALL button, except when the MENU screen is turned off. 4 • Power consumption can exist within a single channel. Channel Banner: Minimized Press CH ▲▼ to directly enter the channel number using the NUMBER keys. HD CC SAP TV-G 1080i STANDARD 4 : 3 30 Closed Caption Rating Picture mode Time remaining setting in digital television differs...
PT52LCX16 User Guide
Page 34
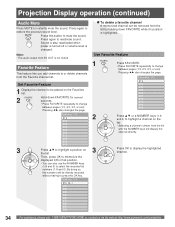
...). Sound is also reactivated when power is turned off or volume level is highlighted. Set Favorite Feature 1 Display the channel to be placed on the Favorites list. 2 Hold down FAVORITE while it's position is changed. By doing so, the numbers will display the channel directly. 3 Press OK to restore the previous sound level. Favorite Feature This feature lets you add channels to press the OK key...
...). Sound is also reactivated when power is turned off or volume level is highlighted. Set Favorite Feature 1 Display the channel to be placed on the Favorites list. 2 Hold down FAVORITE while it's position is changed. By doing so, the numbers will display the channel directly. 3 Press OK to restore the previous sound level. Favorite Feature This feature lets you add channels to press the OK key...

PT52LCX16 User Guide
Page 35
..., the sleep time setting mode will flash 3, 2 and 1 to indicate the last three (3) remaining minutes prior to turn off. 35 SAP broadcast Secondary Audio Program (sub language.) Select SAP audio mode for TV Viewing Digital mode Press SAP to zero. Stereo SAP Mono Sleep Timer Feature Switches the unit OFF in a preset amount of SAP button. MTS Stereo and SAP broadcast Multi-channel Television Sound Stereo (main language) and Secondary Audio Program (sub language...
..., the sleep time setting mode will flash 3, 2 and 1 to indicate the last three (3) remaining minutes prior to turn off. 35 SAP broadcast Secondary Audio Program (sub language.) Select SAP audio mode for TV Viewing Digital mode Press SAP to zero. Stereo SAP Mono Sleep Timer Feature Switches the unit OFF in a preset amount of SAP button. MTS Stereo and SAP broadcast Multi-channel Television Sound Stereo (main language) and Secondary Audio Program (sub language...

PT52LCX16 User Guide
Page 41
... TV programs including news, music, dramas, movies, sports and electronic games. Press to turn TV speakers On or Off. • On - TV speakers operate normally. • Off - HDMI2 in / terminal. Other Adjust Other detailed audio adjustments can hear a deeper, 3-D sound effect using the HDMI HDMI1 in *2 Auto : Automatically performs digital/ analog input switching according to select "Other adjust". Press to the sound. Press to select BBE setting. BBE...
... TV programs including news, music, dramas, movies, sports and electronic games. Press to turn TV speakers On or Off. • On - TV speakers operate normally. • Off - HDMI2 in / terminal. Other Adjust Other detailed audio adjustments can hear a deeper, 3-D sound effect using the HDMI HDMI1 in *2 Auto : Automatically performs digital/ analog input switching according to select "Other adjust". Press to the sound. Press to select BBE setting. BBE...
PT52LCX16 User Guide
Page 52
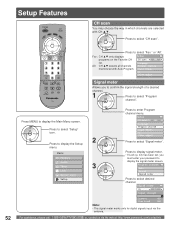
... your password to select "Program channel". Press to select "Setup" icon. 2 Press to enter Program channel menu. Press to display signal meter. • If Lock (p. 43) has been set, you to confirm the signal strength of a desired channel. 1 Press to display the signal meter screen. Signal meter CH ◄ 2-1 ► Signal strength Current 85% Peak level 85% Note: • The signal meter works only for digital signals input via the web at: http://www.panasonic.com/contactinfo Menu Picture Audio Timer 3 Lock Memory card Setup...
... your password to select "Program channel". Press to select "Setup" icon. 2 Press to enter Program channel menu. Press to display signal meter. • If Lock (p. 43) has been set, you to confirm the signal strength of a desired channel. 1 Press to display the signal meter screen. Signal meter CH ◄ 2-1 ► Signal strength Current 85% Peak level 85% Note: • The signal meter works only for digital signals input via the web at: http://www.panasonic.com/contactinfo Menu Picture Audio Timer 3 Lock Memory card Setup...

PT52LCX16 User Guide
Page 56
... HDMI (without "Control with HDMI". Setup CH scan All Language Program channel Input labels CC Other adjust 2 Press to select "Ctrl with HDMI") is used, set . Press to display the Other adjust menu. Refer to the individual instruction manuals for compatibility information. • Non-HDMI-compliant cables cannot be displayed when adjusting the volume of the equipment. • Easy playback is also available by the TV's remote, with one-button operation using a single remote. Note: • When the HDMI connection is changed...
... HDMI (without "Control with HDMI". Setup CH scan All Language Program channel Input labels CC Other adjust 2 Press to select "Ctrl with HDMI") is used, set . Press to display the Other adjust menu. Refer to the individual instruction manuals for compatibility information. • Non-HDMI-compliant cables cannot be displayed when adjusting the volume of the equipment. • Easy playback is also available by the TV's remote, with one-button operation using a single remote. Note: • When the HDMI connection is changed...

PT52LCX16 User Guide
Page 57
... unit - Press to mute the sound. Setup CH scan All Language Program channel Input labels CC Other adjust 2 Press to select "Prog-out stop When connecting external equipment to TV speakers. Stops output of operations is set to "On". • Limited to newer Panasonic Home Theater, RAM theater and DIGA/DVD models with "Control with HDMI". 1 Press to theater. Other adjust Prog-out stop Ctrl with HDMI Power off link Power on . • Turning...
... unit - Press to mute the sound. Setup CH scan All Language Program channel Input labels CC Other adjust 2 Press to select "Prog-out stop When connecting external equipment to TV speakers. Stops output of operations is set to "On". • Limited to newer Panasonic Home Theater, RAM theater and DIGA/DVD models with "Control with HDMI". 1 Press to theater. Other adjust Prog-out stop Ctrl with HDMI Power off link Power on . • Turning...

PT52LCX16 User Guide
Page 66
... before turning power ON. Image is turned ON. • Please replace lamp with a new one . If the connected device has a format selection switch, set the format to TV? - • Is the antenna facing the right direction? - • Is the antenna receiving any signals reflected off at the top and bottom. • Please adjust the V-Size. If the steps above do not function. The TEMP indicator flashes...
... before turning power ON. Image is turned ON. • Please replace lamp with a new one . If the connected device has a format selection switch, set the format to TV? - • Is the antenna facing the right direction? - • Is the antenna receiving any signals reflected off at the top and bottom. • Please adjust the V-Size. If the steps above do not function. The TEMP indicator flashes...


