
PTD6000U User Guide
Page 1
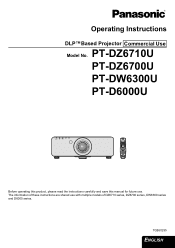
PT-DZ6710U PT-DZ6700U PT-DW6300U PT-D6000U STANDBY(RED)/ ON(GREEN) LAMP TEMP FILTER Before operating this product, please read the instructions carefully and save this manual for future use with multiple models of these instructions are shared use . TQBJ0295 ENGLISH Operating Instructions DLP™Based Projector Commercial Use Model No. The information of DZ6710 series, DZ6700 series, DW6300 series and D6000 series.
PT-DZ6710U PT-DZ6700U PT-DW6300U PT-D6000U STANDBY(RED)/ ON(GREEN) LAMP TEMP FILTER Before operating this product, please read the instructions carefully and save this manual for future use with multiple models of these instructions are shared use . TQBJ0295 ENGLISH Operating Instructions DLP™Based Projector Commercial Use Model No. The information of DZ6710 series, DZ6700 series, DW6300 series and D6000 series.
PTD6000U User Guide
Page 2
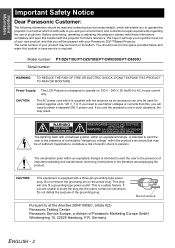
... read and understood as an accessory can only be used for future reference. If you and your Panasonic DLP™Based Projector. Do not remove the grounding pin on 100 V - 240 V, 50 Hz/60 Hz AC, house current only. Do not remove Pursuant to get the ...shock to the presence of important operating and maintenance (servicing) instructions in such situations, fire may be found on its bottom. Model number: PT-DZ6710U/PT-DZ6700U/PT-DW6300U/PT-D6000U Serial number: WARNING: TO REDUCE THE RISK OF FIRE OR ELECTRIC SHOCK, DONOT EXPOSE THIS PRODUCT TO RAIN OR MOISTURE. Important Information...
... read and understood as an accessory can only be used for future reference. If you and your Panasonic DLP™Based Projector. Do not remove the grounding pin on 100 V - 240 V, 50 Hz/60 Hz AC, house current only. Do not remove Pursuant to get the ...shock to the presence of important operating and maintenance (servicing) instructions in such situations, fire may be found on its bottom. Model number: PT-DZ6710U/PT-DZ6700U/PT-DW6300U/PT-D6000U Serial number: WARNING: TO REDUCE THE RISK OF FIRE OR ELECTRIC SHOCK, DONOT EXPOSE THIS PRODUCT TO RAIN OR MOISTURE. Important Information...
PTD6000U User Guide
Page 5
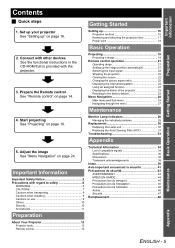
...screen 22 Changing the picture aspect ratio 22 Displaying the internal test pattern 22 Using an assigned function 23 Displaying the status of the projector 23 Resetting to safety 6 WARNINGS 6 CAUTIONS 7 Cautions when transporting 9 Cautions when installing 9 Cautions on use 9 Others 10 ...cautions lors de l'installation 46 Précautions lors de l'utilisation 46 Autres 46 Sécurit 47 Remplacement 48 About Your Projector 12 Projector body 12 Remote control 14 Maintenance Appendix ENGLISH - 5 Connect with other devices See the functional instructions in the CD-ROM...
...screen 22 Changing the picture aspect ratio 22 Displaying the internal test pattern 22 Using an assigned function 23 Displaying the status of the projector 23 Resetting to safety 6 WARNINGS 6 CAUTIONS 7 Cautions when transporting 9 Cautions when installing 9 Cautions on use 9 Others 10 ...cautions lors de l'installation 46 Précautions lors de l'utilisation 46 Autres 46 Sécurit 47 Remplacement 48 About Your Projector 12 Projector body 12 Remote control 14 Maintenance Appendix ENGLISH - 5 Connect with other devices See the functional instructions in the CD-ROM...
PTD6000U User Guide
Page 6
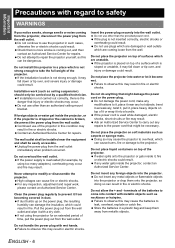
...should only be installed near any inspection, adjustment and repair work (such as this may cause the batteries to the projector. Do not use the projector in fire or electric shocks. Failure to observe this can result in such cases, otherwise fire or electric shocks could ...carried out correctly, there is not inserted correctly, electric shocks or overheating could result. If foreign objects or water get inside the projector, contact an Authorized Service Center. Contact an Authorized Service Center for example, by a qualified technician. The wall outlet shall be carried...
...should only be installed near any inspection, adjustment and repair work (such as this may cause the batteries to the projector. Do not use the projector in fire or electric shocks. Failure to observe this can result in such cases, otherwise fire or electric shocks could ...carried out correctly, there is not inserted correctly, electric shocks or overheating could result. If foreign objects or water get inside the projector, contact an Authorized Service Center. Contact an Authorized Service Center for example, by a qualified technician. The wall outlet shall be carried...
PTD6000U User Guide
Page 7
...malfunctions may cause injury. Do not place your hands or face, or objects which can hurt or damage your skin into the lens while the projector is not done. The lamp can cause death by a qualified technician. Electric shocks or explosions can result. Do not place your skin. ...Do not look directly into this is being used . If improperly handled, explosion might result. Do not place the projector on top of space], otherwise burns or damage could be carried out by suffocation if swallowed. Keep the remote control unit out of the reach...
...malfunctions may cause injury. Do not place your hands or face, or objects which can hurt or damage your skin into the lens while the projector is not done. The lamp can cause death by a qualified technician. Electric shocks or explosions can result. Do not place your skin. ...Do not look directly into this is being used . If improperly handled, explosion might result. Do not place the projector on top of space], otherwise burns or damage could be carried out by suffocation if swallowed. Keep the remote control unit out of the reach...
PTD6000U User Guide
Page 8
...from the remote control. If the lamp has broken, ventilate the room immediately. Ask your nearest Authorized Service Center to clean the projector when required. Ask an Authorized Service Center to become damaged, and fire, short-circuits or serious electric shocks may cause liquid leaking,... can result if this may result in plastic distortion or deterioration. Important Information Precautions with regard to safety Do not set up the projector in a high temperature environment, such as near a heater or in direct sunlight. Do not place any cleaning. When inserting the ...
...from the remote control. If the lamp has broken, ventilate the room immediately. Ask your nearest Authorized Service Center to clean the projector when required. Ask an Authorized Service Center to become damaged, and fire, short-circuits or serious electric shocks may cause liquid leaking,... can result if this may result in plastic distortion or deterioration. Important Information Precautions with regard to safety Do not set up the projector in a high temperature environment, such as near a heater or in direct sunlight. Do not place any cleaning. When inserting the ...
PTD6000U User Guide
Page 9
... will be subject to electromagnetic interference. Do not set the HIGH ALTITUDE MODE to ON. Cautions when installing Avoid setting up the projector near high-voltage power lines or near the screen to prevent outside light or light from indoor lamps from fingerprints or anything else,... this not done, dust will collect inside the projector and problems with the projector will need to be shortened. Failure to observe this may cause injury. We are constantly making efforts to excessive vibration or...
... will be subject to electromagnetic interference. Do not set the HIGH ALTITUDE MODE to ON. Cautions when installing Avoid setting up the projector near high-voltage power lines or near the screen to prevent outside light or light from indoor lamps from fingerprints or anything else,... this not done, dust will collect inside the projector and problems with the projector will need to be shortened. Failure to observe this may cause injury. We are constantly making efforts to excessive vibration or...
PTD6000U User Guide
Page 10
...Do not share your password regularly. Do not use . DLP chips The DLP chips are made using the projector. The brightness of the lamp depends on the duration of use projectors with the adjustable feet or projection lens cover removed. The lamp may explode or shorten the lamp life by ... follows. The Authorized Service Center will never ask you use of your nearest municipality or dealer to confirm the correct procedure for use the projector consecutively 22 hours every day, the optical components may need to be replaced in less than 22 hours, or the frequent switching on or...
...Do not share your password regularly. Do not use . DLP chips The DLP chips are made using the projector. The brightness of the lamp depends on the duration of use projectors with the adjustable feet or projection lens cover removed. The lamp may explode or shorten the lamp life by ... follows. The Authorized Service Center will never ask you use of your nearest municipality or dealer to confirm the correct procedure for use the projector consecutively 22 hours every day, the optical components may need to be replaced in less than 22 hours, or the frequent switching on or...

PTD6000U User Guide
Page 11
ENGLISH - 11 Remote control (x1) N2QAYB000371 AA batteries for remote control (x2) Safety cable TTRA0214 Attachment screw (x1) Safety cable (x1) Power cord (x1) K2CG3FZ00008 Projector lens cover (x1) TKKL5244-1 CD-ROM (x1) TQBH9013 Power cord secure lock (x1) TTRA0182 * The protectors for lost accessories. Important Information Precautions with regard to an Authorized Service Center for enclosed products, such as a plug cover or foam cartons, must be treated properly. * Contact to safety Accessories Make sure the following accessories are provided with your projector.
ENGLISH - 11 Remote control (x1) N2QAYB000371 AA batteries for remote control (x2) Safety cable TTRA0214 Attachment screw (x1) Safety cable (x1) Power cord (x1) K2CG3FZ00008 Projector lens cover (x1) TKKL5244-1 CD-ROM (x1) TQBH9013 Power cord secure lock (x1) TTRA0182 * The protectors for lost accessories. Important Information Precautions with regard to an Authorized Service Center for enclosed products, such as a plug cover or foam cartons, must be treated properly. * Contact to safety Accessories Make sure the following accessories are provided with your projector.
PTD6000U User Guide
Page 12
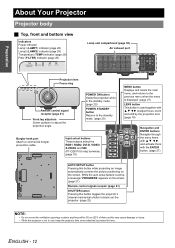
... buttons Navigate through the menu items with the ENTER button. (page 27) AUTO SETUP button Pressing this may cause damage or injury. • While the projector is not in the standby mode. (page 20) POWER STANDBY button Returns to adjust the projection angle. ENGLISH - 12 While the auto setup feature is... mechanical shutter to protect the lens. Input select buttons These buttons select the RGB1, RGB2, DVI-D, VIDEO, S-VIDEO and SDI (PT-DZ6710U only) terminals. (page 19) MENU button Displays and clears the main menu, and returns to the previous menu when the menu is displayed. (page ...
... buttons Navigate through the menu items with the ENTER button. (page 27) AUTO SETUP button Pressing this may cause damage or injury. • While the projector is not in the standby mode. (page 20) POWER STANDBY button Returns to adjust the projection angle. ENGLISH - 12 While the auto setup feature is... mechanical shutter to protect the lens. Input select buttons These buttons select the RGB1, RGB2, DVI-D, VIDEO, S-VIDEO and SDI (PT-DZ6710U only) terminals. (page 19) MENU button Displays and clears the main menu, and returns to the previous menu when the menu is displayed. (page ...
PTD6000U User Guide
Page 13
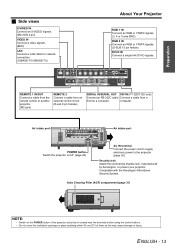
... compartment (page 31) NOTE: • Switch on /off. (page 20) AC IN terminal Connect the power cord to supply electronic power to the projector. (page 20) Security lock Attach the commercial shackle lock, manufactured by Kensington, to a computer. REMOTE 1 IN/OUT Connect a cable from the remote... control or another projector. (M3 jack) REMOTE 2 Connect a cable from an external control circuit. (D-sub 9 pin female) SERIAL IN/SERIAL OUT SDI IN (PT-DZ6710U only) Connect an RS-232C cable Connect a cable from a from/to protect ...
... compartment (page 31) NOTE: • Switch on /off. (page 20) AC IN terminal Connect the power cord to supply electronic power to the projector. (page 20) Security lock Attach the commercial shackle lock, manufactured by Kensington, to a computer. REMOTE 1 IN/OUT Connect a cable from the remote... control or another projector. (M3 jack) REMOTE 2 Connect a cable from an external control circuit. (D-sub 9 pin female) SERIAL IN/SERIAL OUT SDI IN (PT-DZ6710U only) Connect an RS-232C cable Connect a cable from a from/to protect ...
PTD6000U User Guide
Page 14
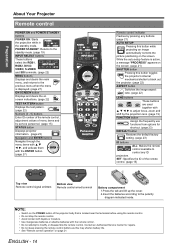
...Numeric (0 - 9) buttons Enter ID number of the remote control, adjustment values of menu items and by service personnel. (page 15) STATUS button Displays projector information. (page 23) Navigation and ENTER buttons Navigate through the menu items with F G I H, and activate them with F G I H to ...control operation" on the screen. NOTE: • Switch on the screen. (page 21) SHUTTER button Pressing this button toggles the projector's internal mechanical shutter to the polarity diagram indicated inside. Contact an Authorized Service Center for shortcut. (page 23) DEFAULT button Restores...
...Numeric (0 - 9) buttons Enter ID number of the remote control, adjustment values of menu items and by service personnel. (page 15) STATUS button Displays projector information. (page 23) Navigation and ENTER buttons Navigate through the menu items with F G I H, and activate them with F G I H to ...control operation" on the screen. NOTE: • Switch on the screen. (page 21) SHUTTER button Pressing this button toggles the projector's internal mechanical shutter to the polarity diagram indicated inside. Contact an Authorized Service Center for shortcut. (page 23) DEFAULT button Restores...
PTD6000U User Guide
Page 15
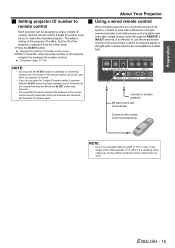
...on the remote control can be assigned a unique 2 digits ID number, and the remote control 2 digits ID number must be set to match the intended projector. NOTE: • Do not press the ID SET button accidentally or carelessly because the ID number on the screen. 2.Within 5 seconds, enter the ...mini jack commercial cable to simultaneously control multiple main units with a single remote control through the REMOTE 1 IN/OUT terminal. The default setting of the projector ID is around. • If you do not enter the 2 digits ID number within 5 seconds after the ID SET button has been pressed, ...
...on the remote control can be assigned a unique 2 digits ID number, and the remote control 2 digits ID number must be set to match the intended projector. NOTE: • Do not press the ID SET button accidentally or carelessly because the ID number on the screen. 2.Within 5 seconds, enter the ...mini jack commercial cable to simultaneously control multiple main units with a single remote control through the REMOTE 1 IN/OUT terminal. The default setting of the projector ID is around. • If you do not enter the 2 digits ID number within 5 seconds after the ID SET button has been pressed, ...
PTD6000U User Guide
Page 16
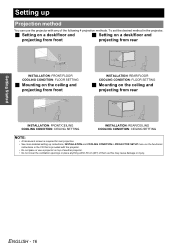
...• A translucent screen is required for rear projection. • See more detailed setting up Projection method You can use a projector on top of another projector. • Do not cover the ventilation openings or place anything within 50 cm (20") of the following 4 projection methods. ...Getting Started Setting up instructions, INSTALLATION and COOLING CONDITION in PROJECTOR SETUP menu on the functional instructions in the CD that is provided with the projector. • Do not place or use the projector with any of them as this may cause damage or injury.
...• A translucent screen is required for rear projection. • See more detailed setting up Projection method You can use a projector on top of another projector. • Do not cover the ventilation openings or place anything within 50 cm (20") of the following 4 projection methods. ...Getting Started Setting up instructions, INSTALLATION and COOLING CONDITION in PROJECTOR SETUP menu on the functional instructions in the CD that is provided with the projector. • Do not place or use the projector with any of them as this may cause damage or injury.
PTD6000U User Guide
Page 17
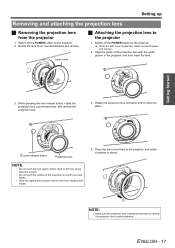
...your bare hands. • Store the replaced lens where it clicks into place. Place the lens cover back to the projector, and rotate clockwise to the projector 1. NOTE: • Make sure the projection lens is attached, rotate counterclockwise and remove. 2. While pressing the lens ...release button, rotate the projection lens counterclockwise, and remove the projection lens. 3. Switch off the POWER button on the projector. 2. Lens release button Projection lens NOTE: • Do not touch the lens signal contact. When the lens cover is attached securely ...
...your bare hands. • Store the replaced lens where it clicks into place. Place the lens cover back to the projector, and rotate clockwise to the projector 1. NOTE: • Make sure the projection lens is attached, rotate counterclockwise and remove. 2. While pressing the lens ...release button, rotate the projection lens counterclockwise, and remove the projection lens. 3. Switch off the POWER button on the projector. 2. Lens release button Projection lens NOTE: • Do not touch the lens signal contact. When the lens cover is attached securely ...
PTD6000U User Guide
Page 18
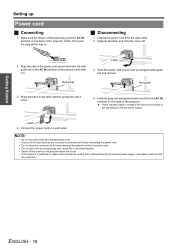
...indicator lights in . J Disconnecting 1. Align the side of the power cord secure lock with the side guide rail of the AC IN terminal of the projector. Hold the plug and unplug the power cord from the wall outlet. 2. Getting Started Setting up along the side guide rail and remove. Latch 3. ...Unplug the power cord from the AC IN terminal on again while the internal cooling fan is switched on the back of the projector and slide it in orange if the internal cooling fan is still operating by the internal power supply, it clicks. 4. Connect the power cord...
...indicator lights in . J Disconnecting 1. Align the side of the power cord secure lock with the side guide rail of the AC IN terminal of the projector. Hold the plug and unplug the power cord from the wall outlet. 2. Getting Started Setting up along the side guide rail and remove. Latch 3. ...Unplug the power cord from the AC IN terminal on again while the internal cooling fan is switched on the back of the projector and slide it in orange if the internal cooling fan is still operating by the internal power supply, it clicks. 4. Connect the power cord...
PTD6000U User Guide
Page 19
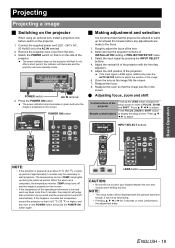
.... 7. Switch the POWER switch on that is RGB signal, additionally press the AUTO SETUP button to warm up for 3 seconds or more than 5 minutes, the projector will judge that it will not be functioning. • Pressing F G I or H for at about 0 °C (32 °F), a warm- Select ...powered up period. NOTE: • The setup screen will be displayed with the front leg adjusters. 5. Adjust the vertical tilt of the projector Pressing the LENS button changes the setup screen in green and soon the image is low and warm-up takes more , performance the adjustment ...
.... 7. Switch the POWER switch on that is RGB signal, additionally press the AUTO SETUP button to warm up for 3 seconds or more than 5 minutes, the projector will judge that it will not be functioning. • Pressing F G I or H for at about 0 °C (32 °F), a warm- Select ...powered up period. NOTE: • The setup screen will be displayed with the front leg adjusters. 5. Adjust the vertical tilt of the projector Pressing the LENS button changes the setup screen in green and soon the image is low and warm-up takes more , performance the adjustment ...
PTD6000U User Guide
Page 20
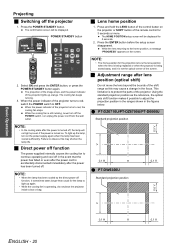
... continue operating and cool off in the event that the power has failed or even after the power cord is operating, do not place the projector inside a box or bag. The HOME POSITION setup screen will not light up again. • While the cooling fan is accidentally disconnected immediately .../PT-DZ6700U/PT-D6000U Standard projection position NOTE: • In the cooling state after lens position (optical shift) Do not move the lens beyond the bounds of the projector turns to protect the parts of the remote control for the projection lens is the lens position when the lens is being ...
... continue operating and cool off in the event that the power has failed or even after the power cord is operating, do not place the projector inside a box or bag. The HOME POSITION setup screen will not light up again. • While the cooling fan is accidentally disconnected immediately .../PT-DZ6700U/PT-D6000U Standard projection position NOTE: • In the cooling state after lens position (optical shift) Do not move the lens beyond the bounds of the projector turns to protect the parts of the remote control for the projection lens is the lens position when the lens is being ...
PTD6000U User Guide
Page 21
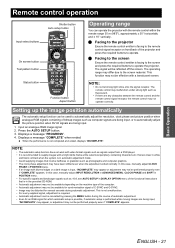
... used to automatically adjust the resolution, clock phase and picture position when analogue RGB signals consisting of the projector and press the required buttons to operate the projector. Q Facing to the screen Ensure the remote control emitter is facing to the remote control signal receptor... within the remote range 30 m (98'5"), approximately ± 30° horizontally and ± 15° vertically. Q Facing to the projector Ensure the remote control emitter is facing to the screen and press the required buttons to operate. NOTE: • The automatic setup function does...
... used to automatically adjust the resolution, clock phase and picture position when analogue RGB signals consisting of the projector and press the required buttons to operate the projector. Q Facing to the screen Ensure the remote control emitter is facing to the remote control signal receptor... within the remote range 30 m (98'5"), approximately ± 30° horizontally and ± 15° vertically. Q Facing to the projector Ensure the remote control emitter is facing to the screen and press the required buttons to operate. NOTE: • The automatic setup function does...
PTD6000U User Guide
Page 22
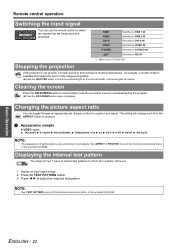
...a certain period of the functional instructions that allows the user to hide images temporarily. Basic Operation ENGLISH - 22 Stopping the projection If the projector is not used for example, a shutter mode is available that is in the provided CD-ROM. The setting will change each time the ... of the set of the functional instructions that are being input and projected. NOTE: • See TEST PATTERN menu of aspect ratios for PT-DZ6710U. Press the TEST PATTERN button. 3. Display an input signal image. 2. Clearing the screen Press the ON SCREEN button to electronically mute...
...a certain period of the functional instructions that allows the user to hide images temporarily. Basic Operation ENGLISH - 22 Stopping the projection If the projector is not used for example, a shutter mode is available that is in the provided CD-ROM. The setting will change each time the ... of the set of the functional instructions that are being input and projected. NOTE: • See TEST PATTERN menu of aspect ratios for PT-DZ6710U. Press the TEST PATTERN button. 3. Display an input signal image. 2. Clearing the screen Press the ON SCREEN button to electronically mute...


