Operating Instructions
Page 3
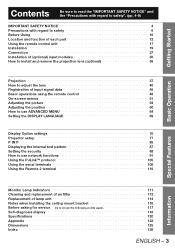
... remote control unit 17 Installation 19 Connection 27 Installation of (optional) input modules 30 How to install and remove the projection lens (optional 36 Projection 37 How to adjust the lens 40 Registration of input signal data 45 Basic operations using the remote control 48 On-screen menus 51 Adjusting the picture...
... remote control unit 17 Installation 19 Connection 27 Installation of (optional) input modules 30 How to install and remove the projection lens (optional 36 Projection 37 How to adjust the lens 40 Registration of input signal data 45 Basic operations using the remote control 48 On-screen menus 51 Adjusting the picture...
Operating Instructions
Page 7
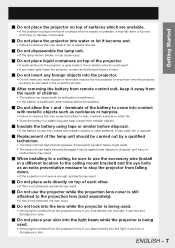
...Do not place sets directly on top of the projector. • If water spills onto the projector or gets inside it away from the projector's lens. If you place directly into the light beam while the projector is being used . • Strong light is emitted from metallic objects. „...insert any metal objects or flammable objects into the projector or drop them onto the projector, as necklaces or hairpins. • Failure to the projection lens (sold separately). • If this is not observed, fire may occur. „ Do not look directly into contact with metallic objects such as...
...Do not place sets directly on top of the projector. • If water spills onto the projector or gets inside it away from the projector's lens. If you place directly into the light beam while the projector is being used . • Strong light is emitted from metallic objects. „...insert any metal objects or flammable objects into the projector or drop them onto the projector, as necklaces or hairpins. • Failure to the projection lens (sold separately). • If this is not observed, fire may occur. „ Do not look directly into contact with metallic objects such as...

Operating Instructions
Page 9
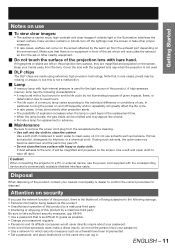
Please discuss with the adjustable feet or projection lens cover removed. • If this is a injury hazard. „ An effort to keep our environment clean, please bring the non-repairable unit to clean the ... a Recycling Company. „ Do not use projectors with the Authorized Service Center regarding cleaning costs. „ Do not reach for the openings beside the optical lens, during horizontal or vertical movements of the lens there is not observed, the sets may not operate correctly or accidents may result.
Please discuss with the adjustable feet or projection lens cover removed. • If this is a injury hazard. „ An effort to keep our environment clean, please bring the non-repairable unit to clean the ... a Recycling Company. „ Do not use projectors with the Authorized Service Center regarding cleaning costs. „ Do not reach for the openings beside the optical lens, during horizontal or vertical movements of the lens there is not observed, the sets may not operate correctly or accidents may result.

Operating Instructions
Page 10
...× 1] [K2CH3YY00001 × 1] Drop-prevention bracket Eye bolt Wire [TPAHE86 × 4] [TTRA0143 × 4] Caution when moving the projector The projection lens is to vibrations and impacts. If the product is susceptible to be exposed to a ceiling. When operating between 1 400 m (4605.3´) and 2 700 m...Cautions regarding setup Be sure to observe the following precautions when installing the product. „ Be sure to always remove the lens during transport. ET-PKD100S) and call a specialized technician for low ceiling: Model No. If this is installed in the ...
...× 1] [K2CH3YY00001 × 1] Drop-prevention bracket Eye bolt Wire [TPAHE86 × 4] [TTRA0143 × 4] Caution when moving the projector The projection lens is to vibrations and impacts. If the product is susceptible to be exposed to a ceiling. When operating between 1 400 m (4605.3´) and 2 700 m...Cautions regarding setup Be sure to observe the following precautions when installing the product. „ Be sure to always remove the lens during transport. ET-PKD100S) and call a specialized technician for low ceiling: Model No. If this is installed in the ...
Operating Instructions
Page 11
... like smoke. • Provide a lamp for replacement in advance. „ Maintenance Be sure to the individual difference or conditions of the projection lens with a loud sound or end its affiliate companies would never directly inquire about your nearest municipality or dealer to wipe off . • Do ...with the supplied lens cap when the projector is used . „ DLP chips The DLP chips are magnified and projected on security If you use the network function of this product, there is as difficult to guess as possible. • Change your password regularly. • Panasonic and its ...
... like smoke. • Provide a lamp for replacement in advance. „ Maintenance Be sure to the individual difference or conditions of the projection lens with a loud sound or end its affiliate companies would never directly inquire about your nearest municipality or dealer to wipe off . • Do ...with the supplied lens cap when the projector is used . „ DLP chips The DLP chips are magnified and projected on security If you use the network function of this product, there is as difficult to guess as possible. • Change your password regularly. • Panasonic and its ...
Operating Instructions
Page 13
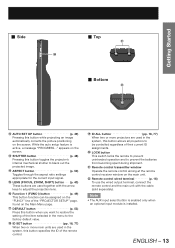
... wired terminal p. 18) To use the wired output terminal, connect the remote control and the main unit with the arrow keys to adjust the projection lens. ENGLISH - 13 Getting Started „ Side t „ Top u „ Bottom v l AUTO SET UP button p. 49) Pressing this button ...unit. p Function 1 (FUNC1) button p. 49) This button function can be controlled regardless of the "PROJECTOR SETUP" page, found on the screen. o LENS (FOCUS, ZOOM, SHIFT) buttonŋŋŋ (p. 40) These buttons are used in the system, this button toggles the projector's internal mechanical shutter to...
... wired terminal p. 18) To use the wired output terminal, connect the remote control and the main unit with the arrow keys to adjust the projection lens. ENGLISH - 13 Getting Started „ Side t „ Top u „ Bottom v l AUTO SET UP button p. 49) Pressing this button ...unit. p Function 1 (FUNC1) button p. 49) This button function can be controlled regardless of the "PROJECTOR SETUP" page, found on the screen. o LENS (FOCUS, ZOOM, SHIFT) buttonŋŋŋ (p. 40) These buttons are used in the system, this button toggles the projector's internal mechanical shutter to...

Operating Instructions
Page 14
... lamp p. 37) The lamp lights in red when the MAIN POWER switch is used to secure the lamp unit cover. Centering the lens first may ease removal. n Air exhaust vents During installation do not allow these vents. m Filter cleaning unit fixing screw p. 112)...each part (continued) Projector Main Unit „ Front „ Rear 1 2 3 45 6 n o 7 89j k l m pq rs 1 Projection lens cover p. 36) 2 Projection lens (optional) Lens for projecting images on the screen. 3 Remote control receiver window (front p. 17) This window receives the signal beam emitted from the remote control...
... lamp p. 37) The lamp lights in red when the MAIN POWER switch is used to secure the lamp unit cover. Centering the lens first may ease removal. n Air exhaust vents During installation do not allow these vents. m Filter cleaning unit fixing screw p. 112)...each part (continued) Projector Main Unit „ Front „ Rear 1 2 3 45 6 n o 7 89j k l m pq rs 1 Projection lens cover p. 36) 2 Projection lens (optional) Lens for projecting images on the screen. 3 Remote control receiver window (front p. 17) This window receives the signal beam emitted from the remote control...

Operating Instructions
Page 15
... canceled. 7 Arrow buttons pp. 53, 88) Use these buttons to select menu items, change settings, adjust levels, and to enter the "SECURITY" password. 8 LENS button p. 40) Toggles through the lens Zoom, Focus, and Shift (H & V) adjustment modes. 9 ENTER button p. 53) Press to activate a menu selection or to the projector. 3 Slot cover p. 31) Install...
... canceled. 7 Arrow buttons pp. 53, 88) Use these buttons to select menu items, change settings, adjust levels, and to enter the "SECURITY" password. 8 LENS button p. 40) Toggles through the lens Zoom, Focus, and Shift (H & V) adjustment modes. 9 ENTER button p. 53) Press to activate a menu selection or to the projector. 3 Slot cover p. 31) Install...

Operating Instructions
Page 20
...10˝) L H Screen L Projection distance SH Height of the image SW Image width H Vertical distance between the lens center level and the bottom edge of the projected image * For PT-D12000U: H = 0 to SH For PT-DZ12000U: H = -0.1 × SH to 1.1 × SH * However, if the ET-D75LE5 has been installed...installed, the values will be H = 0.1 × SH to 0.9 × SH for the PT-D12000U, and H = 0 to the figures below and the information on the next page for the PT-DZ12000U. Use the INSTALLATION menu to choose the desired projection scheme. (p. 78) Installation geometry When planning...
...10˝) L H Screen L Projection distance SH Height of the image SW Image width H Vertical distance between the lens center level and the bottom edge of the projected image * For PT-D12000U: H = 0 to SH For PT-DZ12000U: H = -0.1 × SH to 1.1 × SH * However, if the ET-D75LE5 has been installed...installed, the values will be H = 0.1 × SH to 0.9 × SH for the PT-D12000U, and H = 0 to the figures below and the information on the next page for the PT-DZ12000U. Use the INSTALLATION menu to choose the desired projection scheme. (p. 78) Installation geometry When planning...

Operating Instructions
Page 21
... circle Center of the circle Screen R3 L3 : Projection distance R3 : Radius of the circle Screen R3 L3 : Projection distance R3 : Radius of the circle Lens ET-D75LE1 ET-D75LE2 ET-D75LE3 ET-D75LE4 ET-D75LE5 ET-D75LE6 ET-D75LE8 Keystone correction only Vertical Keystone Correction Angle Ћ( ˃) Horizontal Keystone...
... circle Center of the circle Screen R3 L3 : Projection distance R3 : Radius of the circle Screen R3 L3 : Projection distance R3 : Radius of the circle Lens ET-D75LE1 ET-D75LE2 ET-D75LE3 ET-D75LE4 ET-D75LE5 ET-D75LE6 ET-D75LE8 Keystone correction only Vertical Keystone Correction Angle Ћ( ˃) Horizontal Keystone...
Operating Instructions
Page 22
...12´4˝) 4.53 (14´10˝) 22 - ENGLISH Select the appropriate lens model for PT-DZ12000U) z For the screen aspect ratio of 16:10 (Units: m (feet/inches)) Lens type Model number of projection lenses (optional) The available lenses have been designed with ...different projector-distance to screen-width ratios ("throw ratios"). Max. Consult the following tables and Panasonics's online Lens...
...12´4˝) 4.53 (14´10˝) 22 - ENGLISH Select the appropriate lens model for PT-DZ12000U) z For the screen aspect ratio of 16:10 (Units: m (feet/inches)) Lens type Model number of projection lenses (optional) The available lenses have been designed with ...different projector-distance to screen-width ratios ("throw ratios"). Max. Consult the following tables and Panasonics's online Lens...

Operating Instructions
Page 23
...11´1˝) 4.27 (14´) 5.14 (16´10˝) *1: "Throw ratio" is the approximate measurement range of projection lens ET-D75LE1 Throw ratio*1 1.6-2.2 : 1 Screen dimensions Screen Effective Effective size height width Min. Max. (inch) (SH) (SW) ...number of the screen width to the projection distance. Getting Started z For the screen aspect ratio of 16:9 (Units: m (feet/inches)) Lens type Zoom lens Fixed-focus lens Model number of projection lens ET-D75LE1 ET-D75LE2 ET-D75LE3 ET-D75LE4 ET-D75LE8 ET-D75LE6 ET-D75LE5 Throw ratio*1 1.4-1.8 : 1 1.8-2.8 : 1 2.8-4.6 : 1...
...11´1˝) 4.27 (14´) 5.14 (16´10˝) *1: "Throw ratio" is the approximate measurement range of projection lens ET-D75LE1 Throw ratio*1 1.6-2.2 : 1 Screen dimensions Screen Effective Effective size height width Min. Max. (inch) (SH) (SW) ...number of the screen width to the projection distance. Getting Started z For the screen aspect ratio of 16:9 (Units: m (feet/inches)) Lens type Zoom lens Fixed-focus lens Model number of projection lens ET-D75LE1 ET-D75LE2 ET-D75LE3 ET-D75LE4 ET-D75LE8 ET-D75LE6 ET-D75LE5 Throw ratio*1 1.4-1.8 : 1 1.8-2.8 : 1 2.8-4.6 : 1...

Operating Instructions
Page 24
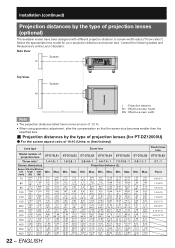
... Installation (continued) „ Projection distances by the type of projection lenses (for PT-D12000U) z For the screen aspect ratio of 4:3 (Units: m (feet/inches)) Lens type Zoom lens Fixed-focus lens Model number of projection lens ET-D75LE1 ET-D75LE2 ET-D75LE3 ET-D75LE4 ET-D75LE8 ET-D75LE6 Throw ratio*1 1.5-2.0...2.29 (7´6˝) 3.08 (10´1˝) 3.87 (12´8˝) 4.66 (15´3˝) Lens type Zoom lens Fixed-focus lens Model number of projection lens ET-D75LE1 ET-D75LE2 ET-D75LE3 ET-D75LE4 ET-D75LE8 ET-D75LE6 Throw ratio*1 1.5-2.0 : 1 2.0-3.0 : 1 ...
... Installation (continued) „ Projection distances by the type of projection lenses (for PT-D12000U) z For the screen aspect ratio of 4:3 (Units: m (feet/inches)) Lens type Zoom lens Fixed-focus lens Model number of projection lens ET-D75LE1 ET-D75LE2 ET-D75LE3 ET-D75LE4 ET-D75LE8 ET-D75LE6 Throw ratio*1 1.5-2.0...2.29 (7´6˝) 3.08 (10´1˝) 3.87 (12´8˝) 4.66 (15´3˝) Lens type Zoom lens Fixed-focus lens Model number of projection lens ET-D75LE1 ET-D75LE2 ET-D75LE3 ET-D75LE4 ET-D75LE8 ET-D75LE6 Throw ratio*1 1.5-2.0 : 1 2.0-3.0 : 1 ...

Operating Instructions
Page 25
... the diagonal dimension (inch) of your screen and calculate the projection distance using the following formulas. „ Calculation formulas for projection distance by lens types (for PT-DZ12000U) Model number of projection lens Throw ratio Aspect ratio 1.4-1.8 : 1 16:10 ET-D75LE1 1.4-1.8 : 1 16:9 1.6-2.2 : 1 4:3 1.8-2.8 : 1 16:10 ET-D75LE2 1.8-2.8 : 1 16:9 2.2-3.3 : 1 4:3 2.8-4.6 : 1 16:10 ET-D75LE3 2.8-4.6 : 1 16:9 Zoom...
... the diagonal dimension (inch) of your screen and calculate the projection distance using the following formulas. „ Calculation formulas for projection distance by lens types (for PT-DZ12000U) Model number of projection lens Throw ratio Aspect ratio 1.4-1.8 : 1 16:10 ET-D75LE1 1.4-1.8 : 1 16:9 1.6-2.2 : 1 4:3 1.8-2.8 : 1 16:10 ET-D75LE2 1.8-2.8 : 1 16:9 2.2-3.3 : 1 4:3 2.8-4.6 : 1 16:10 ET-D75LE3 2.8-4.6 : 1 16:9 Zoom...
Operating Instructions
Page 26
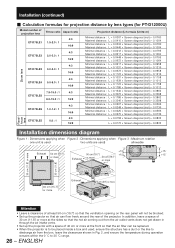
ENGLISH Installation (continued) „ Calculation formulas for projection distance by lens types (for PT-D12000U) Model number of projection lens ET-D75LE1 Throw ratio Aspect ratio 4:3 1.5-2.0 : 1 16:9 4:3 ET-D75LE2 2.0-3.0 : 1 16:9 Zoom lens 4:3 ET-D75LE3 3.0-5.0 : 1 16:9 4:3 ET-D75LE4 5.0-8.0 : 1 16:9 7.9-15.0 : 1 4:3 ET-D75LE8...0158 × Screen diagonal (inch) - 0.0835 L = 0.0172 × Screen diagonal (inch) - 0.0835 Fixedfocus lens Installation dimensions diagram Figure 1 : Dimensions applying when Figure 2 : Dimensions applying when Figure 3 : Maximum rotation one unit ...
ENGLISH Installation (continued) „ Calculation formulas for projection distance by lens types (for PT-D12000U) Model number of projection lens ET-D75LE1 Throw ratio Aspect ratio 4:3 1.5-2.0 : 1 16:9 4:3 ET-D75LE2 2.0-3.0 : 1 16:9 Zoom lens 4:3 ET-D75LE3 3.0-5.0 : 1 16:9 4:3 ET-D75LE4 5.0-8.0 : 1 16:9 7.9-15.0 : 1 4:3 ET-D75LE8...0158 × Screen diagonal (inch) - 0.0835 L = 0.0172 × Screen diagonal (inch) - 0.0835 Fixedfocus lens Installation dimensions diagram Figure 1 : Dimensions applying when Figure 2 : Dimensions applying when Figure 3 : Maximum rotation one unit ...

Operating Instructions
Page 31
... S-VIDEO IN R/PR G/Y SYNC/HD RGB 1 IN B/PB VD RGB 2 IN DVI-D IN MENU POWER ON STANDBY VIDEO S-VIDEO RGB1 RGB2 AUTO SETUP DVI-D AUX LENS ENTER SHUTTER LIGHT ON OFF AC IN OFF ON MAIN POWER 1.
... S-VIDEO IN R/PR G/Y SYNC/HD RGB 1 IN B/PB VD RGB 2 IN DVI-D IN MENU POWER ON STANDBY VIDEO S-VIDEO RGB1 RGB2 AUTO SETUP DVI-D AUX LENS ENTER SHUTTER LIGHT ON OFF AC IN OFF ON MAIN POWER 1.

Operating Instructions
Page 32
... S-VIDEO IN R/PR G/Y SYNC/HD RGB 1 IN B/PB VD RGB 2 IN DVI-D IN MENU POWER ON STANDBY VIDEO S-VIDEO RGB1 RGB2 AUTO SETUP DVI-D AUX LENS ENTER SHUTTER LIGHT ON OFF AC IN OFF ON MAIN POWER PC Note • Insert the input module suitable for the input signal specifications. •...
... S-VIDEO IN R/PR G/Y SYNC/HD RGB 1 IN B/PB VD RGB 2 IN DVI-D IN MENU POWER ON STANDBY VIDEO S-VIDEO RGB1 RGB2 AUTO SETUP DVI-D AUX LENS ENTER SHUTTER LIGHT ON OFF AC IN OFF ON MAIN POWER PC Note • Insert the input module suitable for the input signal specifications. •...

Operating Instructions
Page 36
...cover forward to remove it. 3. How to remove the projection lens 1. While holding down the projection lens lock button, turn it clockwise until it clicks into place. How to install and remove the projection lens (optional) Adjust the lens shift position so that it is at the home position (p.... 41) before installing the projection lens. (Keep the dust-proof sponge in a safe place for later use if needed.)...
...cover forward to remove it. 3. How to remove the projection lens 1. While holding down the projection lens lock button, turn it clockwise until it clicks into place. How to install and remove the projection lens (optional) Adjust the lens shift position so that it is at the home position (p.... 41) before installing the projection lens. (Keep the dust-proof sponge in a safe place for later use if needed.)...

Operating Instructions
Page 38
...projector will flash in front and rear or right and left. (p. 20) 8 Adjust the H & V Lens shift as required. (p. 40) 9 Press AUTO SETUP if the input signal is RGB signal. (p. 49) j Zoom the lens so the image fills the screen. (p. 40) k Adjust the focus. (p. 40) l Readjust the ...green and soon the image is completed, the temperature monitor (TEMP) lamp turns off automatically. Making adjustment and selection 4 Roughly adjust the focus of the lens. (p. 40) 5 Select and set the projection scheme. (p. 78) 6 Select the input signal by pressing the input selector button RGB1, RGB2, DVI-D,...
...projector will flash in front and rear or right and left. (p. 20) 8 Adjust the H & V Lens shift as required. (p. 40) 9 Press AUTO SETUP if the input signal is RGB signal. (p. 49) j Zoom the lens so the image fills the screen. (p. 40) k Adjust the focus. (p. 40) l Readjust the ...green and soon the image is completed, the temperature monitor (TEMP) lamp turns off automatically. Making adjustment and selection 4 Roughly adjust the focus of the lens. (p. 40) 5 Select and set the projection scheme. (p. 78) 6 Select the input signal by pressing the input selector button RGB1, RGB2, DVI-D,...

Operating Instructions
Page 40
CAUTION: Be careful not to select an item and adjust it . Press to catch your fingers between the lens and shroud when shifting the lens. Note • Only "FOCUS" is displayed with the background colors set with OSD DESIGN, to select an item and adjust it . Press... characters cannot be displayed only when a lens with zoom function is installed. 40 - LENS SHIFT ADJUST LENS FOCUS ADJUST LENS ZOOM ADJUST LENS SHIFT ADJUST „ Using the remote control 1. ENGLISH How to adjust the lens How to adjust the focus, zoom and shift Use the Lens Shift, Zoom, and Focus controls to ...
CAUTION: Be careful not to select an item and adjust it . Press to catch your fingers between the lens and shroud when shifting the lens. Note • Only "FOCUS" is displayed with the background colors set with OSD DESIGN, to select an item and adjust it . Press... characters cannot be displayed only when a lens with zoom function is installed. 40 - LENS SHIFT ADJUST LENS FOCUS ADJUST LENS ZOOM ADJUST LENS SHIFT ADJUST „ Using the remote control 1. ENGLISH How to adjust the lens How to adjust the focus, zoom and shift Use the Lens Shift, Zoom, and Focus controls to ...

