
Operating Instructions
Page 1
PT-DZ12000U Read these instructions completely before operating this unit. TQBJ 0263-1 Operating Instructions 3-chip DLP®-based Projector Commercial Use PT-D12000U Models No.
PT-DZ12000U Read these instructions completely before operating this unit. TQBJ 0263-1 Operating Instructions 3-chip DLP®-based Projector Commercial Use PT-D12000U Models No.

Operating Instructions
Page 2
Model number: PT-D12000U/PT-DZ12000U Serial number: 2 - The serial number of your new product, and that you to get the most performance out of your product may be pleased with your Panasonic DLP® based projector. You should note it will be found on an attached label. ENGLISH Dear Panasonic Customer: This instruction booklet provides all the necessary operating information that you will help you might require. We hope it in the space provided below and retain this booklet in case service is required.
Model number: PT-D12000U/PT-DZ12000U Serial number: 2 - The serial number of your new product, and that you to get the most performance out of your product may be pleased with your Panasonic DLP® based projector. You should note it will be found on an attached label. ENGLISH Dear Panasonic Customer: This instruction booklet provides all the necessary operating information that you will help you might require. We hope it in the space provided below and retain this booklet in case service is required.
Operating Instructions
Page 3
... menus 51 Adjusting the picture 54 Adjusting the position 60 How to use ADVANCED MENU 64 Setting the DISPLAY LANGUAGE 69 Display Option settings 70 Projector setup 77 P IN P 85 Displaying the internal test pattern 87 Setting the security 88 How to use network functions 91 Using the PJLink™ protocol...
... menus 51 Adjusting the picture 54 Adjusting the position 60 How to use ADVANCED MENU 64 Setting the DISPLAY LANGUAGE 69 Display Option settings 70 Projector setup 77 P IN P 85 Displaying the internal test pattern 87 Setting the security 88 How to use network functions 91 Using the PJLink™ protocol...

Operating Instructions
Page 6
...carried out correctly, there is the danger that injury or electric shocks may occur. „ If foreign objects or water get inside the projector, or if the projector is dropped or the cabinet is broken, turn off the power and disconnect the power cord from the wall outlet. • Do not...location is not strong enough, it from the wall outlet. • Continued use plugs which are damaged or wall outlets which are present inside the projector. • For any way. • High voltages which can cause fire or electric shocks are coming out, and then contact an Authorized Service Center...
...carried out correctly, there is the danger that injury or electric shocks may occur. „ If foreign objects or water get inside the projector, or if the projector is dropped or the cabinet is broken, turn off the power and disconnect the power cord from the wall outlet. • Do not...location is not strong enough, it from the wall outlet. • Continued use plugs which are damaged or wall outlets which are present inside the projector. • For any way. • High voltages which can cause fire or electric shocks are coming out, and then contact an Authorized Service Center...
Operating Instructions
Page 7
...; If the battery comes into contact with metallic objects or other . • If this is not observed, accidents may result. „ Do not use the projector while the projection lens cover is still attached to leak, overheat, explode or catch fire. • Store the battery in a plastic bag and keep it... use the accessory wire (install in a different location to the ceiling mount bracket) and the eye bolts as an extra preventative measure to stop the projector from falling down or tip over, and injury or damage could result. • If any water gets inside the...
...; If the battery comes into contact with metallic objects or other . • If this is not observed, accidents may result. „ Do not use the projector while the projection lens cover is still attached to leak, overheat, explode or catch fire. • Store the battery in a plastic bag and keep it... use the accessory wire (install in a different location to the ceiling mount bracket) and the eye bolts as an extra preventative measure to stop the projector from falling down or tip over, and injury or damage could result. • If any water gets inside the...

Operating Instructions
Page 8
..., not the cord. • If the power cord itself is pulled, the cord will become unbalanced and fall, which could result in places where the projector may come into contact with cables still attached can damage the cables, which could cause fire or electric shocks to occur. „ Do not place... done. „ If the lamp has broken, ventilate the room immediately. ENGLISH Precautions with regard to safety (continued) CAUTION „ Do not set up the projector in humid or dusty places or in damage or injury. „ Do not short-circuit, heat or disassemble the battery or place it into your...
..., not the cord. • If the power cord itself is pulled, the cord will become unbalanced and fall, which could result in places where the projector may come into contact with cables still attached can damage the cables, which could cause fire or electric shocks to occur. „ Do not place... done. „ If the lamp has broken, ventilate the room immediately. ENGLISH Precautions with regard to safety (continued) CAUTION „ Do not set up the projector in humid or dusty places or in damage or injury. „ Do not short-circuit, heat or disassemble the battery or place it into your...

Operating Instructions
Page 9
... for the openings beside the optical lens, during horizontal or vertical movements of the lens there is a good idea to clean the inside of the projector before the season for humid weather arrives. Getting Started „ Ask an Authorized Service Center to clean inside the... projector at least once a year. • If dust is left to build up inside the projector without being cleaned out, it can result in fire or problems with operation. • It is a injury hazard...
... for the openings beside the optical lens, during horizontal or vertical movements of the lens there is a good idea to clean the inside of the projector before the season for humid weather arrives. Getting Started „ Ask an Authorized Service Center to clean inside the... projector at least once a year. • If dust is left to build up inside the projector without being cleaned out, it can result in fire or problems with operation. • It is a injury hazard...

Operating Instructions
Page 10
...impacts. Cautions regarding setup Be sure to observe the following precautions when installing the product. „ Be sure to a ceiling. If the projector is installed in a place where vibrations are transmitted from a source of driving power and others or mounted in a car, vibrations or impacts...the projection lens. The product may be installed hanging from the ceiling, purchase an optional hanging attachment (for installation. „ Do not operate the projector over 2 700 m (8881.5´) above sea level, set "DIRECTION", described on page 78, to "VERTICAL". 10 - Otherwise the life ...
...impacts. Cautions regarding setup Be sure to observe the following precautions when installing the product. „ Be sure to a ceiling. If the projector is installed in a place where vibrations are transmitted from a source of driving power and others or mounted in a car, vibrations or impacts...the projection lens. The product may be installed hanging from the ceiling, purchase an optional hanging attachment (for installation. „ Do not operate the projector over 2 700 m (8881.5´) above sea level, set "DIRECTION", described on page 78, to "VERTICAL". 10 - Otherwise the life ...
Operating Instructions
Page 11
...appear like smoke. • Provide a lamp for which will be magnified and projected on the screen. Note that in . Caution: When connecting the projector to clean away oil. Draw window curtains or blinds, turn off frequently and/or repeatedly will greatly affect the life cycle. • In rare cases...sufficient security measures. (pp. 88-94) • Use a password that is as difficult to guess as possible. • Change your password regularly. • Panasonic and its life cycle by the warm air from the exhaust port depending on the screen. In the event that there is used for the...
...appear like smoke. • Provide a lamp for which will be magnified and projected on the screen. Note that in . Caution: When connecting the projector to clean away oil. Draw window curtains or blinds, turn off frequently and/or repeatedly will greatly affect the life cycle. • In rare cases...sufficient security measures. (pp. 88-94) • Use a password that is as difficult to guess as possible. • Change your password regularly. • Panasonic and its life cycle by the warm air from the exhaust port depending on the screen. In the event that there is used for the...
Operating Instructions
Page 12
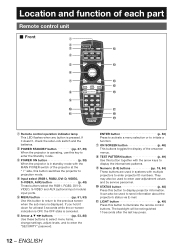
...display the internal test patterns. 9 Numeric (0-9) buttons pp. 18, 84) These buttons are used in standby mode with multiple projectors to enter projector ID numbers. It can also be used to illuminate the remote control buttons. ENTER button p. 53) Press to activate a ... 5 m 6 7 n o 8 p 9 j q k r s 1 Remote control operation indicator lamp This LED flashes when any button is in systems with the MAIN POWER switch of the projector at least 3 seconds while the on-screen indication is OFF, the OFF state is canceled. 6 Arrow buttons pp. 53, 88) Use these buttons to select...
...display the internal test patterns. 9 Numeric (0-9) buttons pp. 18, 84) These buttons are used in standby mode with multiple projectors to enter projector ID numbers. It can also be used to illuminate the remote control buttons. ENTER button p. 53) Press to activate a ... 5 m 6 7 n o 8 p 9 j q k r s 1 Remote control operation indicator lamp This LED flashes when any button is in systems with the MAIN POWER switch of the projector at least 3 seconds while the on-screen indication is OFF, the OFF state is canceled. 6 Arrow buttons pp. 53, 88) Use these buttons to select...
Operating Instructions
Page 13
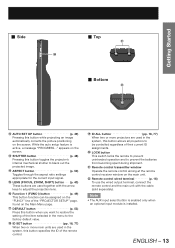
...FUNC1) button p. 49) This button function can be controlled regardless of their current ID assignments. r ID SET button pp. 18, 77) When two or more projectors are used together with the cable (sold separately). Getting Started „ Side t „ Top u „ Bottom v l AUTO SET UP button p. ...49) Pressing this button allows all projectors to be assigned on the "FUNC1" line of the "PROJECTOR SETUP" page, found on the Main Menu page. t LOCK button This switch locks the remote to prevent unintended operation and ...
...FUNC1) button p. 49) This button function can be controlled regardless of their current ID assignments. r ID SET button pp. 18, 77) When two or more projectors are used together with the cable (sold separately). Getting Started „ Side t „ Top u „ Bottom v l AUTO SET UP button p. ...49) Pressing this button allows all projectors to be assigned on the "FUNC1" line of the "PROJECTOR SETUP" page, found on the Main Menu page. t LOCK button This switch locks the remote to prevent unintended operation and ...

Operating Instructions
Page 14
... to " l ". q Remote control receiver window (bottom p. 17) This also receives the signal beam coming from the remote control. Location and function of each part (continued) Projector Main Unit „ Front „ Rear 1 2 3 45 6 n o 7 89j k l m pq rs 1 Projection lens cover p. 36) 2 Projection lens (optional) ...LAMP2, LAMP3, LAMP4) monitor p. 111) These LEDS indicate the status of each lamp GREEN for "In Use", RED for "End-of the projector. (Adjustable feet are provided at the front and rear, right and left.) j Projection lens cover lock button p. 36) Press these side buttons...
... to " l ". q Remote control receiver window (bottom p. 17) This also receives the signal beam coming from the remote control. Location and function of each part (continued) Projector Main Unit „ Front „ Rear 1 2 3 45 6 n o 7 89j k l m pq rs 1 Projection lens cover p. 36) 2 Projection lens (optional) ...LAMP2, LAMP3, LAMP4) monitor p. 111) These LEDS indicate the status of each lamp GREEN for "In Use", RED for "End-of the projector. (Adjustable feet are provided at the front and rear, right and left.) j Projection lens cover lock button p. 36) Press these side buttons...

Operating Instructions
Page 15
...) m LIGHT ON/OFF button This switch is used for at least 3 seconds while the on "I" and off "○" the commercial line power applied to the projector. 3 Slot cover p. 31) Install the optional input modules here. 4 POWER ON ( I ) button pp. 37, 38) When the..., 53) Use this button to return to the previous screen when the sub menu is displayed. k AUTO SETUP button p. 49) Pressing this button toggles the projector's internal mechanical shutter to select the VIDEO, S-VIDEO, RGB1, RGB2, DVI-D and AUX (optional input module) input ports. n SHUTTER button p. 48) Pressing this button while...
...) m LIGHT ON/OFF button This switch is used for at least 3 seconds while the on "I" and off "○" the commercial line power applied to the projector. 3 Slot cover p. 31) Install the optional input modules here. 4 POWER ON ( I ) button pp. 37, 38) When the..., 53) Use this button to return to the previous screen when the sub menu is displayed. k AUTO SETUP button p. 49) Pressing this button toggles the projector's internal mechanical shutter to select the VIDEO, S-VIDEO, RGB1, RGB2, DVI-D and AUX (optional input module) input ports. n SHUTTER button p. 48) Pressing this button while...
Operating Instructions
Page 16
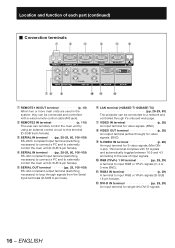
... terminal (switching necessary) to loop through signals from the Serial Input terminals (D-SUB 9-pin male). 6 LAN terminal (10BASE-T/100BASE-TX pp. 28-29, 93) The projector can be connected to a network and controlled through it's onboard web page. 7 VIDEO IN terminal p. 28) An input terminal for video signals. (BNC) 8 VIDEO OUT...
... terminal (switching necessary) to loop through signals from the Serial Input terminals (D-SUB 9-pin male). 6 LAN terminal (10BASE-T/100BASE-TX pp. 28-29, 93) The projector can be connected to a network and controlled through it's onboard web page. 7 VIDEO IN terminal p. 28) An input terminal for video signals. (BNC) 8 VIDEO OUT...

Operating Instructions
Page 17
... 15° Remote 15° Control 15° 15° Remote Control 30° 30° Figure 2 Screen Remote Control Projector Remote Control Remote Control Remote Control receiver window receiver (front) window (rear) ENGLISH - 17 Getting Started Using the remote control unit Loading... into the battery compartment of remote control operation The Remote Control should normally be aimed at the screen, which will reflect commands back to the projector's front receiver window as indicated (⾜,⾚) in the order 1 and then 2. $ # 2. Insert the batteries. • Into battery...
... 15° Remote 15° Control 15° 15° Remote Control 30° 30° Figure 2 Screen Remote Control Projector Remote Control Remote Control Remote Control receiver window receiver (front) window (rear) ENGLISH - 17 Getting Started Using the remote control unit Loading... into the battery compartment of remote control operation The Remote Control should normally be aimed at the screen, which will reflect commands back to the projector's front receiver window as indicated (⾜,⾚) in the order 1 and then 2. $ # 2. Insert the batteries. • Into battery...

Operating Instructions
Page 18
... • Use a two-wire shielded cable with a length of 15 m or less. Press ID SET, and the projector(s) will remain at the number that of the desired projector. Within 5 seconds, use the numeric keys (0-9) to intense light. When the batteries are left exhausted. Connect to the ... ID SET button has been pressed, the ID number will display it's current ID number onscreen. Using a wired remote control When multiple projectors are susceptible to simultaneously control multiple main units with that was pressed. • Your specified ID number is stored in the remote control...
... • Use a two-wire shielded cable with a length of 15 m or less. Press ID SET, and the projector(s) will remain at the number that of the desired projector. Within 5 seconds, use the numeric keys (0-9) to intense light. When the batteries are left exhausted. Connect to the ... ID SET button has been pressed, the ID number will display it's current ID number onscreen. Using a wired remote control When multiple projectors are susceptible to simultaneously control multiple main units with that was pressed. • Your specified ID number is stored in the remote control...

Operating Instructions
Page 19
The following are some examples of terminals and optional accessories to a computer via the DVI-D IN terminal or DVI-D input module (optional). or low-ceiling mount brackets enable flexible installation. Panasonic ENGLISH - 19 System 3 Built-in keystone and geometric correction can compensate for offset projector mounting and curved screens. System 2 Connection to enable various system expansions. Getting Started Installation Examples of system expansion The projector is provided with a number of system expansion: System 1 The optional high-
The following are some examples of terminals and optional accessories to a computer via the DVI-D IN terminal or DVI-D input module (optional). or low-ceiling mount brackets enable flexible installation. Panasonic ENGLISH - 19 System 3 Built-in keystone and geometric correction can compensate for offset projector mounting and curved screens. System 2 Connection to enable various system expansions. Getting Started Installation Examples of system expansion The projector is provided with a number of system expansion: System 1 The optional high-

Operating Instructions
Page 20
...˝) L H Screen L Projection distance SH Height of the image SW Image width H Vertical distance between the lens center level and the bottom edge of the projector are available. Installation (continued) Adjusting the feet The four adjustable feet (p. 14) mounted at H=SH/2 for both the PT-D12000U and PT-DZ12000U.
...˝) L H Screen L Projection distance SH Height of the image SW Image width H Vertical distance between the lens center level and the bottom edge of the projector are available. Installation (continued) Adjusting the feet The four adjustable feet (p. 14) mounted at H=SH/2 for both the PT-D12000U and PT-DZ12000U.
Operating Instructions
Page 22
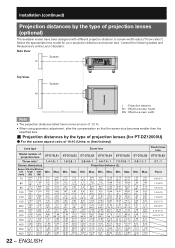
... the appropriate lens model for PT-DZ12000U) z For the screen aspect ratio of 16:10 (Units: m (feet/inches)) Lens type Model number of projection lenses (optional) The available lenses have been designed with different projector-distance to screen-width ratios ("throw ratios"). Consult the following tables and Panasonics's online Lens Calculator. Max. Min...
... the appropriate lens model for PT-DZ12000U) z For the screen aspect ratio of 16:10 (Units: m (feet/inches)) Lens type Model number of projection lenses (optional) The available lenses have been designed with different projector-distance to screen-width ratios ("throw ratios"). Consult the following tables and Panasonics's online Lens Calculator. Max. Min...

Operating Instructions
Page 25
Getting Started If the projector is used with a screen size not listed in this manual, check the diagonal dimension (inch) of your screen and calculate the projection distance using the following formulas. „ Calculation formulas for projection distance by lens types (for PT-DZ12000U) Model number of projection lens Throw ratio Aspect ratio...
Getting Started If the projector is used with a screen size not listed in this manual, check the diagonal dimension (inch) of your screen and calculate the projection distance using the following formulas. „ Calculation formulas for projection distance by lens types (for PT-DZ12000U) Model number of projection lens Throw ratio Aspect ratio...


