
Operating Instructions
Page 3
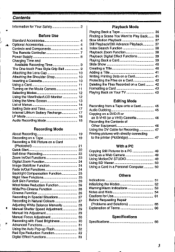
... The Remote Controller Power Supply Charging Time and Available Recording Time The One-touch Free Style Grip Belt Attaching the Lens Cap Attaching the Shoulder Strap Inserting a Cassette Using a Card Turning on the Movie Camera Selecting Modes Using the Viewfinder/LCD Monitor Using the Menu Screen List of Menus Setting Date and Time Internal Lithium Battery Recharge LP Mode Audio Recording Mode Recording Mode About Recording Recording on a Tape Recording a Still Picture on a Card (Photoshot) Quick Start Self-timer Recording Zoom In/Out Functions Digital Zoom Function Image Stabilizer Function...
... The Remote Controller Power Supply Charging Time and Available Recording Time The One-touch Free Style Grip Belt Attaching the Lens Cap Attaching the Shoulder Strap Inserting a Cassette Using a Card Turning on the Movie Camera Selecting Modes Using the Viewfinder/LCD Monitor Using the Menu Screen List of Menus Setting Date and Time Internal Lithium Battery Recharge LP Mode Audio Recording Mode Recording Mode About Recording Recording on a Tape Recording a Still Picture on a Card (Photoshot) Quick Start Self-timer Recording Zoom In/Out Functions Digital Zoom Function Image Stabilizer Function...
Operating Instructions
Page 5
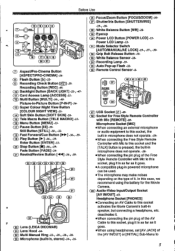
...] -13(20) Stop Button [M] -36-, -34- C) Card Access Lamp [ACCESS] -u- f•A compatible plug-in powered microphone can be used. •The microphone may make noises depending on the type of the [AV IN/OUT] or [INITIAL] Sub-Menu to this socket activates the Movie Camera's built-in as far as It goes. 'When using the battery for Free Style Remote Controller with Mic [REMOTE] -20Microphone Socket [MIC] •When connecting an external microphone or audio equipment to...
...] -13(20) Stop Button [M] -36-, -34- C) Card Access Lamp [ACCESS] -u- f•A compatible plug-in powered microphone can be used. •The microphone may make noises depending on the type of the [AV IN/OUT] or [INITIAL] Sub-Menu to this socket activates the Movie Camera's built-in as far as It goes. 'When using the battery for Free Style Remote Controller with Mic [REMOTE] -20Microphone Socket [MIC] •When connecting an external microphone or audio equipment to...
Operating Instructions
Page 9
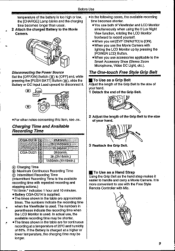
... charged Battery to the Movie Camera. • In the following cases, the available recording time becomes shorter. •You use both of Viewfinder and LCD Monitor simultaneously when using the 0 Lux Night View function, rotating the LCD Monitor frontward to record yourself. • When you set [EVF ON/AUTO] to [ON]. • When you use the Movie Camera with lighting the LCD Monitor up by pressing the [POWER LCD] Button. •When you use...
... charged Battery to the Movie Camera. • In the following cases, the available recording time becomes shorter. •You use both of Viewfinder and LCD Monitor simultaneously when using the 0 Lux Night View function, rotating the LCD Monitor frontward to record yourself. • When you set [EVF ON/AUTO] to [ON]. • When you use the Movie Camera with lighting the LCD Monitor up by pressing the [POWER LCD] Button. •When you use...

Operating Instructions
Page 12
... Viewfinder at the Same Time as the LCD Monitor Set [LCD/EVF] » [EVF ON/AUTO] » [ON]. •The Viewfinder does not turn off even If the LCD Monitor is opened. •When you turn the Movie Camera off the Power 1 Set the [OFF/ON) Switch ( .4i to [OFF] while pressing the button 0. MI : Tape Recording Mode Use this mode when recording pictures on a tape. Forcefully rotating the LCD Monitor beyond these ranges...
... Viewfinder at the Same Time as the LCD Monitor Set [LCD/EVF] » [EVF ON/AUTO] » [ON]. •The Viewfinder does not turn off even If the LCD Monitor is opened. •When you turn the Movie Camera off the Power 1 Set the [OFF/ON) Switch ( .4i to [OFF] while pressing the button 0. MI : Tape Recording Mode Use this mode when recording pictures on a tape. Forcefully rotating the LCD Monitor beyond these ranges...

Operating Instructions
Page 15
..., It cannot reset the Time Code. 7) [LCD/EVF] LCD/EVF Setup Sub-Menu [LCD Al] Intelligent LCD Monitor -ix [LCD/EVF SET] LCD and Viewfinder Adjustment -13[SELF REC] Recording Yourself -20. [EVF ON/AUTO] Using the Viewfinder -12B) [INITIAL] Initial Setup Sub-Menu [BLANK SEARCH] Blank Search -20[DEMO MODE] Demonstration Mode • If no operation takes place for introducing its functions. E E [TAPE PLAYBACK MENU] Tape Playback Mode 0.8 ARO 800 1) [PLAYBACK] Playback Functions Sub-Menu [12bIt AUDIO] Audio Selector -45[AUDIO OUT] Audio Output Mode -59[USB FUNCTION] USB Functions Mode -492) [AV...
..., It cannot reset the Time Code. 7) [LCD/EVF] LCD/EVF Setup Sub-Menu [LCD Al] Intelligent LCD Monitor -ix [LCD/EVF SET] LCD and Viewfinder Adjustment -13[SELF REC] Recording Yourself -20. [EVF ON/AUTO] Using the Viewfinder -12B) [INITIAL] Initial Setup Sub-Menu [BLANK SEARCH] Blank Search -20[DEMO MODE] Demonstration Mode • If no operation takes place for introducing its functions. E E [TAPE PLAYBACK MENU] Tape Playback Mode 0.8 ARO 800 1) [PLAYBACK] Playback Functions Sub-Menu [12bIt AUDIO] Audio Selector -45[AUDIO OUT] Audio Output Mode -59[USB FUNCTION] USB Functions Mode -492) [AV...

Operating Instructions
Page 16
...the use of titles. recorded using the Stereo Zoom [REMOTE] Microphone (VW-VMH3E; Remote Controller Mode -8- 6) [DISPLAY] [BEEP SOUND] Display Setup Sub-Menu Beep Sound -54- [DISPLAY] Cp [CARD RECORDING MENU] Card Recording Mode Display Mode -52[DATE/TIME] Date and Time Indication -52- 7) [LCD/EVF] LCD/EVF Setup Sub-Menu 01. •All of the items on the [LCD/EVF] Sub-Menu are the same as those on the [LCD/EVF] Sub-Menu III SELELT of this Movie Picture Adjustment -31- displayed during playback. [---] appears on other equipment. 3) [DIGITAL] •The camera data...
...the use of titles. recorded using the Stereo Zoom [REMOTE] Microphone (VW-VMH3E; Remote Controller Mode -8- 6) [DISPLAY] [BEEP SOUND] Display Setup Sub-Menu Beep Sound -54- [DISPLAY] Cp [CARD RECORDING MENU] Card Recording Mode Display Mode -52[DATE/TIME] Date and Time Indication -52- 7) [LCD/EVF] LCD/EVF Setup Sub-Menu 01. •All of the items on the [LCD/EVF] Sub-Menu are the same as those on the [LCD/EVF] Sub-Menu III SELELT of this Movie Picture Adjustment -31- displayed during playback. [---] appears on other equipment. 3) [DIGITAL] •The camera data...

Operating Instructions
Page 19
... need to be adjusted manually. (-28-, -3,9-) Recording on a card, set to Tape Recording Mode. However, this is displayed. When recording pictures on a tape, set the Mode Dial to Tape Recording Mode When recording still pictures on a Tape 1 Set the [OFF/ON] Switch OA) to [ON]. •The Power Lamp 4s lights up. (5) o 48 O O 2 Set the Mode Dial (D to [AUTO], the Movie Camera automatically adjusts the focus and white balance. After checking, the Movie Camera resumes the Recording Pause Mode. • For other notes concerning this condition, turn on the power, remove the Lens...
... need to be adjusted manually. (-28-, -3,9-) Recording on a card, set to Tape Recording Mode. However, this is displayed. When recording pictures on a tape, set the Mode Dial to Tape Recording Mode When recording still pictures on a Tape 1 Set the [OFF/ON] Switch OA) to [ON]. •The Power Lamp 4s lights up. (5) o 48 O O 2 Set the Mode Dial (D to [AUTO], the Movie Camera automatically adjusts the focus and white balance. After checking, the Movie Camera resumes the Recording Pause Mode. • For other notes concerning this condition, turn on the power, remove the Lens...

Operating Instructions
Page 20
... [PHOTO SHOT] Button after 20 While the [TALK] Button C) is pressed, the [8] Indication is displayed and the sound is recorded from [MIC] 88 NEC •While the [TALK] Button is displayed, Progressive Photoshot Function works. Progressive Photoshot When the [E] Indication is pressed the built-in a mirror, set o [AUTO] and the LCD Monitor is In progress. •When the [EVF ON/AUTO] Is set [SELF REC] on the Cassette quickly. 1 Set [TAPE RECORDING MENU...
... [PHOTO SHOT] Button after 20 While the [TALK] Button C) is pressed, the [8] Indication is displayed and the sound is recorded from [MIC] 88 NEC •While the [TALK] Button is displayed, Progressive Photoshot Function works. Progressive Photoshot When the [E] Indication is pressed the built-in a mirror, set o [AUTO] and the LCD Monitor is In progress. •When the [EVF ON/AUTO] Is set [SELF REC] on the Cassette quickly. 1 Set [TAPE RECORDING MENU...
Operating Instructions
Page 23
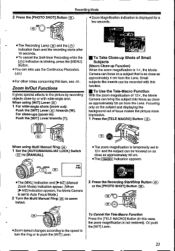
... Functions It gives special effects to 12x and the subject can be recorded with wide-angle shot. When using Multi Manual Ring (24) 1 Set the [AUTO/MANUAL/AE LOCK] Switch C) to [MANUAL]. •The zoom magnification is temporarily set to Auto Focus Mode.) 2 Turn the Multi Manual Ring ( 24 ) to zoom In/out. 2 Press the Recording Start/Stop Button (47) or the [PHOTO SHOT] Button C. (C170 (24) •Zoom speed changes according to the speed to turn...
... Functions It gives special effects to 12x and the subject can be recorded with wide-angle shot. When using Multi Manual Ring (24) 1 Set the [AUTO/MANUAL/AE LOCK] Switch C) to [MANUAL]. •The zoom magnification is temporarily set to Auto Focus Mode.) 2 Turn the Multi Manual Ring ( 24 ) to zoom In/out. 2 Press the Recording Start/Stop Button (47) or the [PHOTO SHOT] Button C. (C170 (24) •Zoom speed changes according to the speed to turn...

Operating Instructions
Page 32
...;The Auto Pop-up Flash is not activated depending on the setting on it to [-] (the [S-] Indication appears). 32 Recording Mode the sound will not light red. (Otherwise, the Sound is too much, set it . a 16 •The colour bars are useful for adjusting the picture quality of the [LEVEL (MIC)] will not be distorted at the maximum volume level. a C4 II To Cancel the Bass Enhancer Function Set [TAPE RECORDING MENU...
...;The Auto Pop-up Flash is not activated depending on the setting on it to [-] (the [S-] Indication appears). 32 Recording Mode the sound will not light red. (Otherwise, the Sound is too much, set it . a 16 •The colour bars are useful for adjusting the picture quality of the [LEVEL (MIC)] will not be distorted at the maximum volume level. a C4 II To Cancel the Bass Enhancer Function Set [TAPE RECORDING MENU...

Operating Instructions
Page 48
.... •When the Movie Camera and the printer is connected to select a desired number of prints. (21-) C •You can set the paper size which Is not supported on the LCD Monitor. However, images cannot be printed. 3 Select the desired picture. • Images cannot be printed properly. • Disconnecting the USB cable • Removing the Card •Switching the operation mode •If the Movie Camera is disabled while it . •...
.... •When the Movie Camera and the printer is connected to select a desired number of prints. (21-) C •You can set the paper size which Is not supported on the LCD Monitor. However, images cannot be printed. 3 Select the desired picture. • Images cannot be printed properly. • Disconnecting the USB cable • Removing the Card •Switching the operation mode •If the Movie Camera is disabled while it . •...

Operating Instructions
Page 49
... MotionDV STUDIO for the Movie Camera. (The Card or its contents may be destroyed if battery power is lost while transmitting data.) • Mode cannot be used with USB 2.0 Hi-Speed. • Do not connect the USB Cable until the Video Stream driver Is installed. 1 Install the supplied Video Stream driver and MotionDV STUDIO. 2 Set the Mode Dial to Tape Recording Mode or Tape Playback Mode. • If you wish to capture data from the Movie Camera to other parties via...
... MotionDV STUDIO for the Movie Camera. (The Card or its contents may be destroyed if battery power is lost while transmitting data.) • Mode cannot be used with USB 2.0 Hi-Speed. • Do not connect the USB Cable until the Video Stream driver Is installed. 1 Install the supplied Video Stream driver and MotionDV STUDIO. 2 Set the Mode Dial to Tape Recording Mode or Tape Playback Mode. • If you wish to capture data from the Movie Camera to other parties via...

Operating Instructions
Page 50
... the tape. 3 Set [CAMERA] or [PLAYBACK] » [USB FUNCTION] » [MOTION DV]. • It enters MotionDV STUDIO Mode. 4 Connect the DV Cable to DV Terminal ( ),. 5 Start the MotlonDV STUDIO. •You cannot output the video input from the DV terminal to the display of the capacity available as a conventional memory for Camera File system) stipulated by using the software without indication function, indication data, such as date, are not displayed. MISC - The file numbers are recorded...
... the tape. 3 Set [CAMERA] or [PLAYBACK] » [USB FUNCTION] » [MOTION DV]. • It enters MotionDV STUDIO Mode. 4 Connect the DV Cable to DV Terminal ( ),. 5 Start the MotlonDV STUDIO. •You cannot output the video input from the DV terminal to the display of the capacity available as a conventional memory for Camera File system) stipulated by using the software without indication function, indication data, such as date, are not displayed. MISC - The file numbers are recorded...
Operating Instructions
Page 53
... are recording on a Tape with setting the Movie Camera in PC Mode with this Movie Cable while the DV Cable Is connected. REMOTE (CHECK REMOTE MODE): UNABLE TO WRITE: Wrong Remote Controller Mode has been The [PHOTO SHOT] Button is not inserted. LP Mode, audio dubbing cannot be recorded Camera. signal (with connecting the USB Cable to [SAVE]. An irregularity in Select Picture Playback Mode and delete PC Mode with aspect ratio 16:9) by a copy flashes, please check the condition of the following indications lights up...
... are recording on a Tape with setting the Movie Camera in PC Mode with this Movie Cable while the DV Cable Is connected. REMOTE (CHECK REMOTE MODE): UNABLE TO WRITE: Wrong Remote Controller Mode has been The [PHOTO SHOT] Button is not inserted. LP Mode, audio dubbing cannot be recorded Camera. signal (with connecting the USB Cable to [SAVE]. An irregularity in Select Picture Playback Mode and delete PC Mode with aspect ratio 16:9) by a copy flashes, please check the condition of the following indications lights up...
Operating Instructions
Page 54
... the during recording [PHOTO SHOT] Button with setting the Wide/Pro-Cinema Function in Tape Recording Mode. Check the connected printer. Check the connected printer. IN Recording Check • For Recording Check, the recording speed mode (SP/LP) must be the same as a cable of [EFFECT1]. (-33-) • Set [REC MODE] to [NORMAL] for recording, mosaic-pattern noise may appear on a playback image depending on a Card • Pictures with Mic. [640x480]. Others (AE LOCK MODE): •When you start recording You are...
... the during recording [PHOTO SHOT] Button with setting the Wide/Pro-Cinema Function in Tape Recording Mode. Check the connected printer. Check the connected printer. IN Recording Check • For Recording Check, the recording speed mode (SP/LP) must be the same as a cable of [EFFECT1]. (-33-) • Set [REC MODE] to [NORMAL] for recording, mosaic-pattern noise may appear on a playback image depending on a Card • Pictures with Mic. [640x480]. Others (AE LOCK MODE): •When you start recording You are...

Operating Instructions
Page 56
... Night View Functions, you cannot use the Auto Pop-up Flash. •The shutter speed cannot be adjusted. •The Programme AE or Digital Effect Modes In [EFFECT1] cannot be set. •When recording with the Night View Functions, it is recommended that you use the tripod. •The Night View Functions make the signal charging time of 4:3, it is not recommended to use these modes when recording on a wide-screen (16:9) format TV, playback size...
... Night View Functions, you cannot use the Auto Pop-up Flash. •The shutter speed cannot be adjusted. •The Programme AE or Digital Effect Modes In [EFFECT1] cannot be set. •When recording with the Night View Functions, it is recommended that you use the tripod. •The Night View Functions make the signal charging time of 4:3, it is not recommended to use these modes when recording on a wide-screen (16:9) format TV, playback size...
Operating Instructions
Page 59
... [AUDIO OUT] setting on the Movie Camera. Picture-in speaker of the image deteriorates. • During a Playback Zoom, the Variable Speed Search Function cannot be changed with the Photoshot recording although the Digital Effect Functions are set. Others •The Video Flash VW-FLH3E (optional) and the Auto Pop-up Flash cannot be used simultaneously. •When using the Video Flash VW-FLH3E (optional), the shutter speed, the iris and the white balance are fixed. •When the Video Flash...
... [AUDIO OUT] setting on the Movie Camera. Picture-in speaker of the image deteriorates. • During a Playback Zoom, the Variable Speed Search Function cannot be changed with the Photoshot recording although the Digital Effect Functions are set. Others •The Video Flash VW-FLH3E (optional) and the Auto Pop-up Flash cannot be used simultaneously. •When using the Video Flash VW-FLH3E (optional), the shutter speed, the iris and the white balance are fixed. •When the Video Flash...
Operating Instructions
Page 61
... output to the digital video equipment through its DV Terminal, images recorded in the same audio and sound. charged equipment and does not function • Even if you record pictures near radio equipment does not support the display transmitters or high-voltage cables. be damaged, or Cassette. function. • If you use . may be displayed if the software of the connected Do not use it is not intended for external 4 Detach the power...
... output to the digital video equipment through its DV Terminal, images recorded in the same audio and sound. charged equipment and does not function • Even if you record pictures near radio equipment does not support the display transmitters or high-voltage cables. be damaged, or Cassette. function. • If you use . may be displayed if the software of the connected Do not use it is not intended for external 4 Detach the power...

Operating Instructions
Page 62
.... When [mDEW] blinks in yellow: Dews are adhering on the head or the tape. 1 Remove the tape If it to 3 hours. 3 Turn the Movie Camera on again, set it is extremely high or extremely low, the [CHARGE] Lamp may continue flashing, and the Battery may be disturbed. In this is left in yellow •You cannot use the Tape Recording/ Playback Mode. When the Lens is not Inserted...
.... When [mDEW] blinks in yellow: Dews are adhering on the head or the tape. 1 Remove the tape If it to 3 hours. 3 Turn the Movie Camera on again, set it is extremely high or extremely low, the [CHARGE] Lamp may continue flashing, and the Battery may be disturbed. In this is left in yellow •You cannot use the Tape Recording/ Playback Mode. When the Lens is not Inserted...
Operating Instructions
Page 66
... not function, the screen has frozen or the indication has disappeared. • Turn the Movie Camera off after operating the [OFF/ON] switch, press the [RESET] Button (-6-) first. As a result, the original sound and sound that matches the Input sockets used . • Either the Movie Camera or the Card may be erased. J Others 2: Mosaic-pattern noise appears on images during Cue, Review or Slow Motion Playback. • This phenomenon is characteristic of digital video...
... not function, the screen has frozen or the indication has disappeared. • Turn the Movie Camera off after operating the [OFF/ON] switch, press the [RESET] Button (-6-) first. As a result, the original sound and sound that matches the Input sockets used . • Either the Movie Camera or the Card may be erased. J Others 2: Mosaic-pattern noise appears on images during Cue, Review or Slow Motion Playback. • This phenomenon is characteristic of digital video...


