

Operating Instructions
Page 1
Operating Instructions LCD Projector Commercial Use Model No. TQBJ0244-3 ENGLISH PT-LB80NTU PT-LB80U PT-LB78U PT-LB75NTU PT-LB75U Before operating this product, please read the instructions carefully and save this manual for future use.
Operating Instructions LCD Projector Commercial Use Model No. TQBJ0244-3 ENGLISH PT-LB80NTU PT-LB80U PT-LB78U PT-LB75NTU PT-LB75U Before operating this product, please read the instructions carefully and save this manual for future use.

Operating Instructions
Page 2
... power supplies up to 125 V, 7 A. For disposal or recycling information, please contact your product may result. Model number: PT-LB80NTU / PT-LB80U / PT-LB78U / PT-LB75NTU / PT-LB75U Serial number: WARNING: TO REDUCE THE RISK OF FIRE OR ELECTRIC SHOCK, DONOT EXPOSE THIS PRODUCT TO ... in such situations, fire may be found on its bottom. If you need to obtain a separate 250 V power cord. If you and your Panasonic LCD projector. The exclamation point within the product's enclosure that may be regulated in your new product, and that contains mercury. This is intended to alert the...
... power supplies up to 125 V, 7 A. For disposal or recycling information, please contact your product may result. Model number: PT-LB80NTU / PT-LB80U / PT-LB78U / PT-LB75NTU / PT-LB75U Serial number: WARNING: TO REDUCE THE RISK OF FIRE OR ELECTRIC SHOCK, DONOT EXPOSE THIS PRODUCT TO ... in such situations, fire may be found on its bottom. If you need to obtain a separate 250 V power cord. If you and your Panasonic LCD projector. The exclamation point within the product's enclosure that may be regulated in your new product, and that contains mercury. This is intended to alert the...

Operating Instructions
Page 4
... when installing 9 Cautions on use 9 Security 9 Accessories 10 Preparation Read this first 11 Minimum required setting screen 11 About Your Projector 12 Projector body 12 Remote control 14 Getting Started Setting up 15 Screen size and throw distance 15 Projection method 16 Front leg adjusters and ...for the first time, the minimum required setting screen for projection will be displayed. Start projecting See "Switching the projector on/off the projector 20 POWER and POWER LOCK indicators 21 Projecting an image 22 Selecting the input signal 22 Positioning the image 22 Remote...
... when installing 9 Cautions on use 9 Security 9 Accessories 10 Preparation Read this first 11 Minimum required setting screen 11 About Your Projector 12 Projector body 12 Remote control 14 Getting Started Setting up 15 Screen size and throw distance 15 Projection method 16 Front leg adjusters and ...for the first time, the minimum required setting screen for projection will be displayed. Start projecting See "Switching the projector on/off the projector 20 POWER and POWER LOCK indicators 21 Projecting an image 22 Selecting the input signal 22 Positioning the image 22 Remote...

Operating Instructions
Page 6
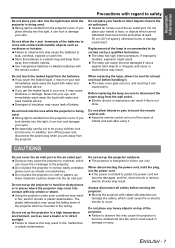
...too many adapters), overheating may occur and fire may result in electric shocks. Important Information Precautions with regard to modify or disassemble the projector. Never attempt to safety WARNINGS If you notice smoke, strange smells or noise coming out, and then contact an Authorized Service Center ...for an extended period of the projector. If any inspection, adjustment and repair work (such as carpets or sponge mats. Do not handle the power plug with a dry cloth...
...too many adapters), overheating may occur and fire may result in electric shocks. Important Information Precautions with regard to modify or disassemble the projector. Never attempt to safety WARNINGS If you notice smoke, strange smells or noise coming out, and then contact an Authorized Service Center ...for an extended period of the projector. If any inspection, adjustment and repair work (such as carpets or sponge mats. Do not handle the power plug with a dry cloth...
Operating Instructions
Page 7
...short-circuits or serious electric shocks may result. Electric shocks or explosions can result if this light, it can cause burns. Do not place the projector in damage or injury. When disconnecting the power cord, hold the plug, not the power cord. If the power cord itself is emitted from...medical advice. Do not touch the leaked liquid from metallic objects. Damaged of the batteries to let young children look into the lens while the projector is being used . If you place directly into this port [allow infants or pets to touch the remote control unit. The lamp cover ...
...short-circuits or serious electric shocks may result. Electric shocks or explosions can result if this light, it can cause burns. Do not place the projector in damage or injury. When disconnecting the power cord, hold the plug, not the power cord. If the power cord itself is emitted from...medical advice. Do not touch the leaked liquid from metallic objects. Damaged of the batteries to let young children look into the lens while the projector is being used . If you place directly into this port [allow infants or pets to touch the remote control unit. The lamp cover ...
Operating Instructions
Page 8
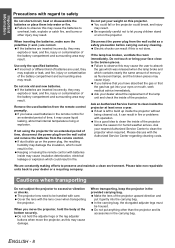
...are inserted incorrectly, they may explode or leak, and fire, injury or contamination of time, it may result. If not using the projector for humid weather arrives. Electric shocks can result in the carrying bag. Cover the lens with the Authorized Service Center regarding cleaning costs...in fire. If dust builds up inside of mercury as fluorescent lamps, and the broken pieces may result. When transporting, keep the projector in fire. Failure to observe this may cause the batteries to observe this is not done. When inserting the batteries, make sure ...
...are inserted incorrectly, they may explode or leak, and fire, injury or contamination of time, it may result. If not using the projector for humid weather arrives. Electric shocks can result in the carrying bag. Cover the lens with the Authorized Service Center regarding cleaning costs...in fire. If dust builds up inside of mercury as fluorescent lamps, and the broken pieces may result. When transporting, keep the projector in fire. Failure to observe this may cause the batteries to observe this is not done. When inserting the batteries, make sure ...

Operating Instructions
Page 9
... Information Precautions with the general public. The internal parts can be damaged, which should only be shortened. The life of the projector for more than 1 year. Furthermore, all installation work is should cover the following envisioned incidents. It is built with your password...is characterized as an afterimage on the liquid crystal panel. Security instruction Change your LCD. The lamp may greatly affect on the screen as fixed points of use the projector consecutively 6 hours every day, the optical components may remain as follows: The...
... Information Precautions with the general public. The internal parts can be damaged, which should only be shortened. The life of the projector for more than 1 year. Furthermore, all installation work is should cover the following envisioned incidents. It is built with your password...is characterized as an afterimage on the liquid crystal panel. Security instruction Change your LCD. The lamp may greatly affect on the screen as fixed points of use the projector consecutively 6 hours every day, the optical components may remain as follows: The...
Operating Instructions
Page 10
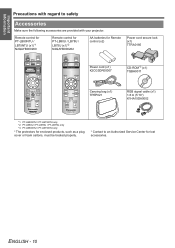
ENGLISH - 10 Remote control for PT-LB80NTU / LB75NTU (x1)*1 N2QAYB000260 Remote control for PT-LB80U / LB78U / LB75U (x1)*2 N2QAYB000262 AA batteries for Remote control (x2) Power cord secure lock (x1) TTRA0185 Power cord (x1) K2CG3DR00007 CD-ROM*3 (x1) TQBH9011 ...products, such as a plug cover or foam cartons, must be treated properly. * Contact to safety Accessories Make sure the following accessories are provided with your projector. PT-LB80U / PT-LB78U / PT-LB75U only *3. Important Information Precautions with regard to an Authorized Service Center for lost accessories.
ENGLISH - 10 Remote control for PT-LB80NTU / LB75NTU (x1)*1 N2QAYB000260 Remote control for PT-LB80U / LB78U / LB75U (x1)*2 N2QAYB000262 AA batteries for Remote control (x2) Power cord secure lock (x1) TTRA0185 Power cord (x1) K2CG3DR00007 CD-ROM*3 (x1) TQBH9011 ...products, such as a plug cover or foam cartons, must be treated properly. * Contact to safety Accessories Make sure the following accessories are provided with your projector. PT-LB80U / PT-LB78U / PT-LB75U only *3. Important Information Precautions with regard to an Authorized Service Center for lost accessories.

Operating Instructions
Page 11
...ALTITUDE setting. See "Menu Navigation" on page 36. Press G to proceed to start the projection for the first time or after the projector is initialized, the minimum required setting screen for projection will not be HIGH to select the required installation method. J OPTION Select the ... from front Mounting in the ceiling and projecting from front Setting on a desk/floor and projecting from rear ALTITUDE If you use the projector at high elevation, the ALTITUDE setting need return to the next setting. HIGH The fan speed is low. LANGUAGE INSTALLATION Press I H...
...ALTITUDE setting. See "Menu Navigation" on page 36. Press G to proceed to start the projection for the first time or after the projector is initialized, the minimum required setting screen for projection will not be HIGH to select the required installation method. J OPTION Select the ... from front Mounting in the ceiling and projecting from front Setting on a desk/floor and projecting from rear ALTITUDE If you use the projector at high elevation, the ALTITUDE setting need return to the next setting. HIGH The fan speed is low. LANGUAGE INSTALLATION Press I H...

Operating Instructions
Page 12
About Your Projector Projector body J Top and front view Zoom-Focus ring cover Cover the zoom and focus rings to cycle through the menus with FGIH, and activate the ...) Ambient Luminance Sensor (ALS) (page 30) Remote control signal receptor (page 23) RELEASE button Press to release the locked POWER button when turning on the projector. (page 19) POWER button Switch between stand-by mode and projection mode. (page 19/ page 20) Navigation buttons Navigate through the input method. (page 22...
About Your Projector Projector body J Top and front view Zoom-Focus ring cover Cover the zoom and focus rings to cycle through the menus with FGIH, and activate the ...) Ambient Luminance Sensor (ALS) (page 30) Remote control signal receptor (page 23) RELEASE button Press to release the locked POWER button when turning on the projector. (page 19) POWER button Switch between stand-by mode and projection mode. (page 19/ page 20) Navigation buttons Navigate through the input method. (page 22...
Operating Instructions
Page 13
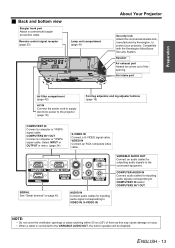
.... Air intake port Preparation Air filter compartment (page 40) AC IN Connect the power cord to supply electronic power to protect your projector. VIDEO IN Connect an RCA composite video cable. ENGLISH - 13 NOTE: • Do not cover the ventilation openings or place anything..., S-VIDEO IN. Remote control signal receptor (page 23) Lamp unit compartment (page 41) About Your Projector Security lock Attach the commercial shackle lock, manufactured by Kensington, to the projector. (page 18) Font leg adjusters and leg adjuster buttons (page 16) COMPUTER1 IN Connect a computer ...
.... Air intake port Preparation Air filter compartment (page 40) AC IN Connect the power cord to supply electronic power to protect your projector. VIDEO IN Connect an RCA composite video cable. ENGLISH - 13 NOTE: • Do not cover the ventilation openings or place anything..., S-VIDEO IN. Remote control signal receptor (page 23) Lamp unit compartment (page 41) About Your Projector Security lock Attach the commercial shackle lock, manufactured by Kensington, to the projector. (page 18) Font leg adjusters and leg adjuster buttons (page 16) COMPUTER1 IN Connect a computer ...
Operating Instructions
Page 14
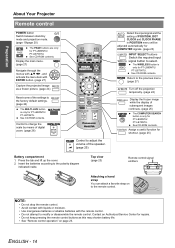
... POSITION menu will be adjusted automatically for shortcut. (page 25) Battery compartment 1. See CD-ROM contents. Insert the batteries according to select. Preparation About Your Projector Remote control POWER button Switch between stand-by means of digital zoom. (page 26) Control to adjust the volume of the speaker. (page 25) Detect...
... POSITION menu will be adjusted automatically for shortcut. (page 25) Battery compartment 1. See CD-ROM contents. Insert the batteries according to select. Preparation About Your Projector Remote control POWER button Switch between stand-by means of digital zoom. (page 26) Control to adjust the volume of the speaker. (page 25) Detect...
Operating Instructions
Page 15
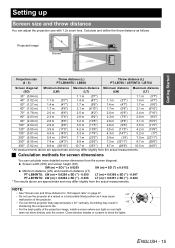
...You can calculate more detailed screen dimension from the screen diagonal. Projected image SD SW Screen Projection size (4 : 3) Throw distance (L) PT-LB80NTU / LB80U Throw distance (L) PT-LB78U / LB75NTU / LB75U Screen diagonal Minimum distance Maximum distance Minimum distance Maximum distance (SD) (LW) (LT) (LW) ...All measurements above are approximate and may result in shortening the component's life. • For the best quality of the projector. • You can adjust the projection size with 1.2x zoom lens. Overtilting may differ slightly from the actual measurements. ...
...You can calculate more detailed screen dimension from the screen diagonal. Projected image SD SW Screen Projection size (4 : 3) Throw distance (L) PT-LB80NTU / LB80U Throw distance (L) PT-LB78U / LB75NTU / LB75U Screen diagonal Minimum distance Maximum distance Minimum distance Maximum distance (SD) (LW) (LT) (LW) ...All measurements above are approximate and may result in shortening the component's life. • For the best quality of the projector. • You can adjust the projection size with 1.2x zoom lens. Overtilting may differ slightly from the actual measurements. ...
Operating Instructions
Page 16
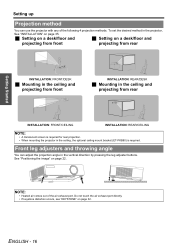
...the air exhaust port directly. • If keystone distortion occurs, see "KEYSTONE" on page 35. To set the desired method in the projector, See "INSTALLATION" on page 32. J Setting on a desk/floor and J Setting on page 22. Front leg adjusters and throwing angle You ... rear INSTALLATION: FRONT/CEILING INSTALLATION: REAR/CEILING NOTE: • A translucent screen is required for rear projection. • When mounting the projector in the ceiling, the optional ceiling mount bracket (ET-PKB80) is required. Getting Started Setting up Projection method You can adjust the projection ...
...the air exhaust port directly. • If keystone distortion occurs, see "KEYSTONE" on page 35. To set the desired method in the projector, See "INSTALLATION" on page 32. J Setting on a desk/floor and J Setting on page 22. Front leg adjusters and throwing angle You ... rear INSTALLATION: FRONT/CEILING INSTALLATION: REAR/CEILING NOTE: • A translucent screen is required for rear projection. • When mounting the projector in the ceiling, the optional ceiling mount bracket (ET-PKB80) is required. Getting Started Setting up Projection method You can adjust the projection ...
Operating Instructions
Page 17
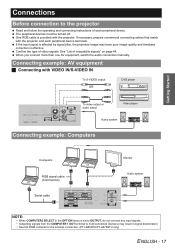
... turned off. One RGB cable is set to OUTPUT, do not connect any input signals. • Outputting signals from the COMPUTER 1 OUT terminal to the projector Read and follow the operating and connecting instructions of each peripheral device terminals. If necessary, prepare commercial connecting cables that match with the...
... turned off. One RGB cable is set to OUTPUT, do not connect any input signals. • Outputting signals from the COMPUTER 1 OUT terminal to the projector Read and follow the operating and connecting instructions of each peripheral device terminals. If necessary, prepare commercial connecting cables that match with the...

Operating Instructions
Page 18
.../or the power cord. • Dirt or dust build-up along the side guide rail and remove. NOTE: • Do not use . • If the projector is switched on again while the internal cooling fan is still operating by switching off the electric power supply any time by unplugging the power... latch and slide the cover off Power cord J Connecting 1. ENGLISH - 18 Unplug the power cord from the AC IN terminal on the back of the projector match, then push the plug all the input devices are connected and turned off before connecting the power cord. • Do not force the connector...
.../or the power cord. • Dirt or dust build-up along the side guide rail and remove. NOTE: • Do not use . • If the projector is switched on again while the internal cooling fan is still operating by switching off the electric power supply any time by unplugging the power... latch and slide the cover off Power cord J Connecting 1. ENGLISH - 18 Unplug the power cord from the AC IN terminal on the back of the projector match, then push the plug all the input devices are connected and turned off before connecting the power cord. • Do not force the connector...

Operating Instructions
Page 19
...You can switch on page 18. The POWER button beeps once. 3. Q By remote control operation 1. RETURN NOTE: • When starting up the projector, some small rattling or tinkling sound may be heard, or the display may flicker for 30 seconds. Basic Operation ENGLISH - 19 The POWER button ...in green and displays the startup logo for the characteristics of the operational sound depends on the external temperature. • If the projector is switched on the projector, make sure the power cord and all the other devices are normal and will be heard. See "Connections" on page 17 ...
...You can switch on page 18. The POWER button beeps once. 3. Q By remote control operation 1. RETURN NOTE: • When starting up the projector, some small rattling or tinkling sound may be heard, or the display may flicker for 30 seconds. Basic Operation ENGLISH - 19 The POWER button ...in green and displays the startup logo for the characteristics of the operational sound depends on the external temperature. • If the projector is switched on the projector, make sure the power cord and all the other devices are normal and will be heard. See "Connections" on page 17 ...
Operating Instructions
Page 20
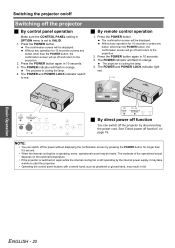
...J By remote control operation 1. The POWER indicator will flash in OPTION menu is set to VALID. 1. See "Direct power off the projector J By control panel operation Make sure the CONTROL PANEL setting in orange. The loudness of the operational sound depends on the external temperature. ...press any button other than 0.5 second. • When the internal cooling fan is operating, some, operational sound may take a while to red. The projector is cooling the lamp. 4. NOTE: • You can switch off and return to the projection. 2. The POWER and POWER LOCK indicator light red....
...J By remote control operation 1. The POWER indicator will flash in OPTION menu is set to VALID. 1. See "Direct power off the projector J By control panel operation Make sure the CONTROL PANEL setting in orange. The loudness of the operational sound depends on the external temperature. ...press any button other than 0.5 second. • When the internal cooling fan is operating, some, operational sound may take a while to red. The projector is cooling the lamp. 4. NOTE: • You can switch off and return to the projection. 2. The POWER and POWER LOCK indicator light red....

Operating Instructions
Page 21
... and the internal cooling fan is unlocked. The RELEASE button is pressed and the POWER button is not operating. Recovery may take a while. *1. Switching the projector on and preparing for projection.
... and the internal cooling fan is unlocked. The RELEASE button is pressed and the POWER button is not operating. Recovery may take a while. *1. Switching the projector on and preparing for projection.

Operating Instructions
Page 22
... ring Screen 2. Open the Zoom-Focus ring cover. Adjust the vertical angle of the required device. 2. Basic Operation ENGLISH - 22 Place the projector at the right angle from the screen. You can confirm the adjusted effect with the TEST PATTERN in OPTION menu is deactivated, select the required...to adjust the projected image. Projecting an image Selecting the input signal 1. Turn the zoom and focus rings to adjust the focus of the projector several times. See "Zoom-Focus ring cover" on page 12. Press the front leg adjuster buttons and adjust the vertical angle. See "...
... ring Screen 2. Open the Zoom-Focus ring cover. Adjust the vertical angle of the required device. 2. Basic Operation ENGLISH - 22 Place the projector at the right angle from the screen. You can confirm the adjusted effect with the TEST PATTERN in OPTION menu is deactivated, select the required...to adjust the projected image. Projecting an image Selecting the input signal 1. Turn the zoom and focus rings to adjust the focus of the projector several times. See "Zoom-Focus ring cover" on page 12. Press the front leg adjuster buttons and adjust the vertical angle. See "...


