
Operating Instructions
Page 2
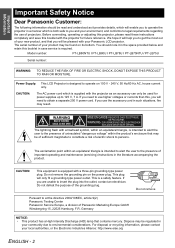
...: This equipment is a safety feature. The lightning flash with your new product, and that you use of the grounding plug. You should be read these instructions completely and save this booklet in case service is required. CAUTION: The AC power cord which is supplied with the projector for power supplies up to persons. Do not remove the grounding pin on its bottom.
...: This equipment is a safety feature. The lightning flash with your new product, and that you use of the grounding plug. You should be read these instructions completely and save this booklet in case service is required. CAUTION: The AC power cord which is supplied with the projector for power supplies up to persons. Do not remove the grounding pin on its bottom.
Operating Instructions
Page 3
... determined by Panasonic Corp. Declaration of Conformity Model Number: PT-LB80NTU / PT-LB80U / PT-LB78U / PT-LB75NTU / PT-LB75U Trade Name: Panasonic Responsible party: Panasonic Corporation of North America Address: One Panasonic Way, Secaucus, New Jersey 07094 Telephone number: (888) 411 - 1996 E-mail: projectorsupport@us.panasonic.com This device complies with the limits for use only shielded interface cables when connecting to operate this device...
... determined by Panasonic Corp. Declaration of Conformity Model Number: PT-LB80NTU / PT-LB80U / PT-LB78U / PT-LB75NTU / PT-LB75U Trade Name: Panasonic Responsible party: Panasonic Corporation of North America Address: One Panasonic Way, Secaucus, New Jersey 07094 Telephone number: (888) 411 - 1996 E-mail: projectorsupport@us.panasonic.com This device complies with the limits for use only shielded interface cables when connecting to operate this device...

Operating Instructions
Page 4
Start projecting See "Switching the projector on/off the projector 20 POWER and POWER LOCK indicators 21 Projecting an image 22 Selecting the input signal 22 Positioning the image 22 Remote control operation 23 Operating range 23 Setting up the image position automatically 23 Switching the input signal 24 Capturing an image 24 Stopping the projection temporary 24 Resetting to the factory default settings 24 Projecting an image in INDEX-WINDOW mode 25 Using an assigned function 25 Controlling the volume of the speaker 25 Enlarging...
Start projecting See "Switching the projector on/off the projector 20 POWER and POWER LOCK indicators 21 Projecting an image 22 Selecting the input signal 22 Positioning the image 22 Remote control operation 23 Operating range 23 Setting up the image position automatically 23 Switching the input signal 24 Capturing an image 24 Stopping the projection temporary 24 Resetting to the factory default settings 24 Projecting an image in INDEX-WINDOW mode 25 Using an assigned function 25 Controlling the volume of the speaker 25 Enlarging...
Operating Instructions
Page 9
... the instructed lamp replacement timing. If the surface of Authorized Service Centers will never ask you use . The leakage of the projector for more than 1 year. Any of the lens cover becomes dirty from using this may result in less than 10 hours, or the frequent switching on the lamp life. Display the white screen test pattern for more than 2 700 m (8 858 ft). The projector has a high pressure mercury lamp...
... the instructed lamp replacement timing. If the surface of Authorized Service Centers will never ask you use . The leakage of the projector for more than 1 year. Any of the lens cover becomes dirty from using this may result in less than 10 hours, or the frequent switching on the lamp life. Display the white screen test pattern for more than 2 700 m (8 858 ft). The projector has a high pressure mercury lamp...

Operating Instructions
Page 12
Preparation Zoom ring (page 22) Focus ring (page 22) Air intake port Indicators POWER LOCK indicator (page 21) POWER indicator (page 21) LAMP indicator (page 39) TEMP indicator (page 39) Ambient Luminance Sensor (ALS) (page 30) Remote control signal receptor (page 23) RELEASE button Press to release the locked POWER button when turning on the projector. (page 19) POWER button Switch between stand-by mode and projection mode. (page 19/ page 20) Navigation buttons Navigate through the menus with FGIH, and...
Preparation Zoom ring (page 22) Focus ring (page 22) Air intake port Indicators POWER LOCK indicator (page 21) POWER indicator (page 21) LAMP indicator (page 39) TEMP indicator (page 39) Ambient Luminance Sensor (ALS) (page 30) Remote control signal receptor (page 23) RELEASE button Press to release the locked POWER button when turning on the projector. (page 19) POWER button Switch between stand-by mode and projection mode. (page 19/ page 20) Navigation buttons Navigate through the menus with FGIH, and...
Operating Instructions
Page 14
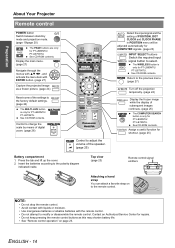
... battery life. • See "Remote control operation" on to the previous menu. (page 27) Turn off the projection temporarily. (page 24) Display the frozen image while the display of the settings to modify or disassemble the remote control. ENGLISH - 14 See CD-ROM contents. Assign a useful function for PT-LB80NTU/ PT-LB75NTU. Preparation About Your Projector Remote control POWER button Switch between stand-by means of digital zoom. (page 26) Control to adjust the...
... battery life. • See "Remote control operation" on to the previous menu. (page 27) Turn off the projection temporarily. (page 24) Display the frozen image while the display of the settings to modify or disassemble the remote control. ENGLISH - 14 See CD-ROM contents. Assign a useful function for PT-LB80NTU/ PT-LB75NTU. Preparation About Your Projector Remote control POWER button Switch between stand-by means of digital zoom. (page 26) Control to adjust the...
Operating Instructions
Page 16
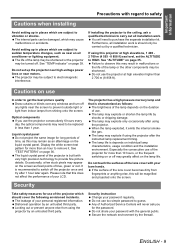
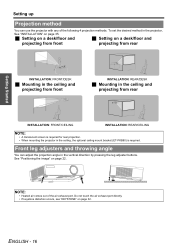
... adjuster buttons. See "Positioning the image" on page 32. To set the desired method in the ceiling, the optional ceiling mount bracket (ET-PKB80) is required for rear projection. • When mounting the projector in the projector, See "INSTALLATION" on a desk/floor and projecting from front projecting from rear INSTALLATION: FRONT/DESK J Mounting in the ceiling and projecting from front INSTALLATION: REAR/DESK J Mounting in the ceiling and projecting from rear INSTALLATION: FRONT/CEILING INSTALLATION...
... adjuster buttons. See "Positioning the image" on page 32. To set the desired method in the ceiling, the optional ceiling mount bracket (ET-PKB80) is required for rear projection. • When mounting the projector in the projector, See "INSTALLATION" on a desk/floor and projecting from front projecting from rear INSTALLATION: FRONT/DESK J Mounting in the ceiling and projecting from front INSTALLATION: REAR/DESK J Mounting in the ceiling and projecting from rear INSTALLATION: FRONT/CEILING INSTALLATION...

Operating Instructions
Page 18
... projector match, then push the plug all the input devices are connected and turned off the power to start even when the control panel is disabled or the POWER button is still operating by internal power supply. Slide the power cord secure lock up around plugs may cause fire or electrical hazards. • Switch off before connecting the power cord. • Do not force the connector as last unplugged, standby mode or projection mode. 4. POWER indicator lights...
... projector match, then push the plug all the input devices are connected and turned off the power to start even when the control panel is disabled or the POWER button is still operating by internal power supply. Slide the power cord secure lock up around plugs may cause fire or electrical hazards. • Switch off before connecting the power cord. • Do not force the connector as last unplugged, standby mode or projection mode. 4. POWER indicator lights...

Operating Instructions
Page 19
... tinkling sound may be displayed. Q By control panel operation Make sure CONTROL PANEL in green several times. 3. The POWER LOCK indicator goes off Switching on the projector Before switching on the projector, make sure the power cord and all the other devices are normal and will not be locked again. 2. Press the POWER button in green and displays the startup logo for 30 seconds. The POWER indicator flashes in OPTION menu is still operating by connecting the power cord. Q By remote control operation 1. The...
... tinkling sound may be displayed. Q By control panel operation Make sure CONTROL PANEL in green several times. 3. The POWER LOCK indicator goes off Switching on the projector Before switching on the projector, make sure the power cord and all the other devices are normal and will not be locked again. 2. Press the POWER button in green and displays the startup logo for 30 seconds. The POWER indicator flashes in OPTION menu is still operating by connecting the power cord. Q By remote control operation 1. The...

Operating Instructions
Page 21
...Network connection standby: Only when NETWORK STANDBY in NETWORK menu is ON. (PT-LB80NTU/PT-LB75NTU only) The power is supplied. Orange Lit Flashing No power supply and the internal fan is not operating. Basic Operation ENGLISH - 21 POWER LOCK indicator POWER indicator J POWER LOCK indicator status Indicator status No illumination or flashing Lit Red Flashing Status No power is on again while cooling the lamp and recovering to the projection mode. Pressing the locked POWER button. When the LAMP and/or TEMP indicators are flashing, the POWER and POWER LOCK indicators...
...Network connection standby: Only when NETWORK STANDBY in NETWORK menu is ON. (PT-LB80NTU/PT-LB75NTU only) The power is supplied. Orange Lit Flashing No power supply and the internal fan is not operating. Basic Operation ENGLISH - 21 POWER LOCK indicator POWER indicator J POWER LOCK indicator status Indicator status No illumination or flashing Lit Red Flashing Status No power is on again while cooling the lamp and recovering to the projection mode. Pressing the locked POWER button. When the LAMP and/or TEMP indicators are flashing, the POWER and POWER LOCK indicators...
Operating Instructions
Page 23
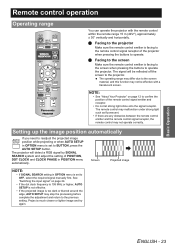
... signal manually first. The projector will be effective with the remote control within the remote range 15 m (49'2"), approximately ± 30° vertically and horizontally. Setting up the image position automatically If you need to readjust the projected image position while projecting or when AUTO SETUP in OPTION menu is set to BUTTON, press the AUTO SETUP button. Basic Operation Remote control operation Operating range You can operate the projector with a translucent screen. Project a much clearer or lighter image...
... signal manually first. The projector will be effective with the remote control within the remote range 15 m (49'2"), approximately ± 30° vertically and horizontally. Setting up the image position automatically If you need to readjust the projected image position while projecting or when AUTO SETUP in OPTION menu is set to BUTTON, press the AUTO SETUP button. Basic Operation Remote control operation Operating range You can operate the projector with a translucent screen. Project a much clearer or lighter image...

Operating Instructions
Page 27
... be disappear after 5 seconds without any operation and return to adjust. For items indicated in orange and displays the sub-menu on the remote control. J Operating procedure 1. PICTURE REALTIME KEYSTONE ON POSITION KEYSTONE LANGUAGE POSITION OPTION DOT CLOCK SECURITY CLOCK PHASE WIRELESS ASPECT 4:3 FRAME LOCK RETURN OFF SELECT ENTER 2. KEYSTONE 4. NOTE: • See "Resetting to the factory default settings" on page 24 to reset each menu items. • See "INITIALIZE ALL" on...
... be disappear after 5 seconds without any operation and return to adjust. For items indicated in orange and displays the sub-menu on the remote control. J Operating procedure 1. PICTURE REALTIME KEYSTONE ON POSITION KEYSTONE LANGUAGE POSITION OPTION DOT CLOCK SECURITY CLOCK PHASE WIRELESS ASPECT 4:3 FRAME LOCK RETURN OFF SELECT ENTER 2. KEYSTONE 4. NOTE: • See "Resetting to the factory default settings" on page 24 to reset each menu items. • See "INITIALIZE ALL" on...

Operating Instructions
Page 29
...-WINDOW ASPECT PICTURE MODE CLOSED CAPTION SETTING TEST PATTERN page 36 Menu Navigation DETAILED SETUP OSD DESIGN TYPE1 TYPE3 TYPE2 SXGA MODE SXGA+ SXGA BLACKBOARD ON OFF BACK COLOR BLUE BLACK VOLUME (Default: 20) AUDIO BALANCE (Default: 0) INITIALIZE ALL page 36 SECURITY INPUT PASSWORD OFF ON PASSWORD CHANGE TEXT DISPLAY OFF ON TEXT CHANGE page 37 page 37 page 37 page 37 WIRELESS (PT-LB80NTU/PT-LB75NTU only) NETWORK NAME CHANGE INPUT PASSWORD PASSWORD CHANGE NETWORK STANDBY...
...-WINDOW ASPECT PICTURE MODE CLOSED CAPTION SETTING TEST PATTERN page 36 Menu Navigation DETAILED SETUP OSD DESIGN TYPE1 TYPE3 TYPE2 SXGA MODE SXGA+ SXGA BLACKBOARD ON OFF BACK COLOR BLUE BLACK VOLUME (Default: 20) AUDIO BALANCE (Default: 0) INITIALIZE ALL page 36 SECURITY INPUT PASSWORD OFF ON PASSWORD CHANGE TEXT DISPLAY OFF ON TEXT CHANGE page 37 page 37 page 37 page 37 WIRELESS (PT-LB80NTU/PT-LB75NTU only) NETWORK NAME CHANGE INPUT PASSWORD PASSWORD CHANGE NETWORK STANDBY...

Operating Instructions
Page 30
... INSTALLATION setting in the projected image. (Available with signals of VIDEO/S-VIDEO/ YPBPR only) See "Navigating through the MENU" on page 36. Lighter Darker PICTURE MODE Depending on the input signal. Press I H to REAR/DESK or REAR/CEILING. TINT You can adjust the skin tone in OPTION menu is stabilised. Adjust the BRIGHTNESS in well-lit rooms where the ambient light sources cannot be controlled, such as when a door opens...
... INSTALLATION setting in the projected image. (Available with signals of VIDEO/S-VIDEO/ YPBPR only) See "Navigating through the MENU" on page 36. Lighter Darker PICTURE MODE Depending on the input signal. Press I H to REAR/DESK or REAR/CEILING. TINT You can adjust the skin tone in OPTION menu is stabilised. Adjust the BRIGHTNESS in well-lit rooms where the ambient light sources cannot be controlled, such as when a door opens...

Operating Instructions
Page 35
... is replaced with the new unit, the setting need to save electricity, prolong the lamp life and reduce the noise. ON Detect the input signal from rear Mounting in POSITION menu for COMPUTER signals. INSTALLATION When installing the projector, select the projection method according to switch off the automatic AUTO SETUP adjustment system. LAMP RUNTIME You can turn off the function of the lamp to be HIGH. • The loudness of POSITION, DOT...
... is replaced with the new unit, the setting need to save electricity, prolong the lamp life and reduce the noise. ON Detect the input signal from rear Mounting in POSITION menu for COMPUTER signals. INSTALLATION When installing the projector, select the projection method according to switch off the automatic AUTO SETUP adjustment system. LAMP RUNTIME You can turn off the function of the lamp to be HIGH. • The loudness of POSITION, DOT...

Operating Instructions
Page 36
... PICTURE MODE in PICTURE menu. Press I H to the factory defaults except WIRELESS and LAMP RUNTIME menu settings. 1. I Decrease H Increase J AUDIO BALANCE You can adjust to hear the sound played equally through the left external stereo speakers, or shift the balance so more detailed setting in various items. J OSD DESIGN You can reset all of the customized settings to select the required option. Reset the projector by pressing the POWER button...
... PICTURE MODE in PICTURE menu. Press I H to the factory defaults except WIRELESS and LAMP RUNTIME menu settings. 1. I Decrease H Increase J AUDIO BALANCE You can adjust to hear the sound played equally through the left external stereo speakers, or shift the balance so more detailed setting in various items. J OSD DESIGN You can reset all of the customized settings to select the required option. Reset the projector by pressing the POWER button...

Operating Instructions
Page 39
... the projector, the LAMP and/or TEMP indicators will run out soon and needs to HIGH. Maintenance ENGLISH - 39 Lamp unit is 1 400 - 2 700 m (4 593 - Remove the object(s) from the ventilation openings or clear around the projector. Clean the filter in proper way. J LAMP indicator Indicator Problem Cause Remedy Illuminating red Flashing red LAMP RUNTIME has reached 2 800 hours. The projector is abnormally high. Let the lamp unit cool See "Replacing the Lamp down and turn...
... the projector, the LAMP and/or TEMP indicators will run out soon and needs to HIGH. Maintenance ENGLISH - 39 Lamp unit is 1 400 - 2 700 m (4 593 - Remove the object(s) from the ventilation openings or clear around the projector. Clean the filter in proper way. J LAMP indicator Indicator Problem Cause Remedy Illuminating red Flashing red LAMP RUNTIME has reached 2 800 hours. The projector is abnormally high. Let the lamp unit cool See "Replacing the Lamp down and turn...

Operating Instructions
Page 42
... button for approximately 3 seconds. 6. The confirmation screen will be turned on. • Do not switch the power on the back of the lamp unit are not installed securely, it clicks and make sure the unit is a glass product. Care and Replacement J Replacement procedure Q Removing and replacing the lamp unit 1. Lamp unit cover 3. Grip the handle and keep the lamp unit paralleled when you remove the lamp. Lamp unit cover fixing screws 2. Replace the new lamp...
... button for approximately 3 seconds. 6. The confirmation screen will be turned on. • Do not switch the power on the back of the lamp unit are not installed securely, it clicks and make sure the unit is a glass product. Care and Replacement J Replacement procedure Q Removing and replacing the lamp unit 1. Lamp unit cover 3. Grip the handle and keep the lamp unit paralleled when you remove the lamp. Lamp unit cover fixing screws 2. Replace the new lamp...

Operating Instructions
Page 43
... picture appears. The AV MUTE function may not have tripped. The projector may not be dirty. Problem Cause Power does not turn on the type of the projector do not operate. No sound can be at the wall outlet. The signal input source may be in OPTION menu is connected to a terminal properly. The lens focus may not be at the minimum setting. The lens may be connected...
... picture appears. The AV MUTE function may not have tripped. The projector may not be dirty. Problem Cause Power does not turn on the type of the projector do not operate. No sound can be at the wall outlet. The signal input source may be in OPTION menu is connected to a terminal properly. The lens focus may not be at the minimum setting. The lens may be connected...

Operating Instructions
Page 51
...18 Menu 35 DOT CLOCK 32 E ENTER Control panel button 12 Remote control button 14 F Focus ring 12, 22 FRAME LOCK 33 FREEZE Remote control 24 Remote control button 14 Front leg adjusters 13, 16, 22 Buttons 22 FUNCTION Control panel button 12 FUNCTION BUTTON 36 Remote control 25 Remote control button 14 H Hand strap 14 I INDEX-WINDOW Remote control 25 Remote control button 14 INITIALIZE ALL 36 INPUT GUIDE 34 INPUT PASSWORD 37 INPUT SELECT Control panel button 12 Remote control button 14 Selecting 24 INSTALLATION Menu 35 Projection method 16 K KEYSTONE 32 L LAMP Indicator...
...18 Menu 35 DOT CLOCK 32 E ENTER Control panel button 12 Remote control button 14 F Focus ring 12, 22 FRAME LOCK 33 FREEZE Remote control 24 Remote control button 14 Front leg adjusters 13, 16, 22 Buttons 22 FUNCTION Control panel button 12 FUNCTION BUTTON 36 Remote control 25 Remote control button 14 H Hand strap 14 I INDEX-WINDOW Remote control 25 Remote control button 14 INITIALIZE ALL 36 INPUT GUIDE 34 INPUT PASSWORD 37 INPUT SELECT Control panel button 12 Remote control button 14 Selecting 24 INSTALLATION Menu 35 Projection method 16 K KEYSTONE 32 L LAMP Indicator...


