Operating Instructions
Page 4
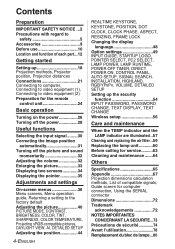
...to safety 5 Accessories 9 Before use 10 Location and function of each part...12 Getting started Setting-up 18 Projection methods, Projector position, Projection distances Connections 21 Connecting to computer, Connecting to video equipment (1), Connecting to video equipment (2) Preparation for the ... ASPECT, RESIZING, FRAME LOCK Changing the display language 48 Option settings 49 INPUT GUIDE, STARTUP LOGO, POINTER SELECT, PC2 SELECT, LAMP POWER, LAMP RUNTIME, POWER OFF TIMER, DIRECT POWER ON, CONTROL PANEL, AUTO SETUP, SIGNAL SEARCH, INSTALLATION, HIGHLAND, RGB/YPBPR, VOLUME, DETAILED...
...to safety 5 Accessories 9 Before use 10 Location and function of each part...12 Getting started Setting-up 18 Projection methods, Projector position, Projection distances Connections 21 Connecting to computer, Connecting to video equipment (1), Connecting to video equipment (2) Preparation for the ... ASPECT, RESIZING, FRAME LOCK Changing the display language 48 Option settings 49 INPUT GUIDE, STARTUP LOGO, POINTER SELECT, PC2 SELECT, LAMP POWER, LAMP RUNTIME, POWER OFF TIMER, DIRECT POWER ON, CONTROL PANEL, AUTO SETUP, SIGNAL SEARCH, INSTALLATION, HIGHLAND, RGB/YPBPR, VOLUME, DETAILED...
Operating Instructions
Page 7
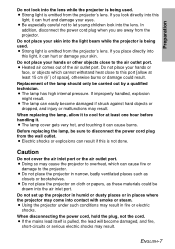
...the mains lead itself is emitted from the projector's lens. Preparation Do not look into the lens while the projector is emitted from the projector's lens. B Strong light is being used . If improperly handled, explosion might result. Before replacing the lamp, be carried out by a qualified technician. ...place your hands or other objects close to disconnect the power cord plug from the wall outlet. B The lamp has high internal pressure. B Do not place the projector on cloth or papers, as closets or bookshelves. When disconnecting the power cord, hold the plug, not ...
...the mains lead itself is emitted from the projector's lens. Preparation Do not look into the lens while the projector is emitted from the projector's lens. B Strong light is being used . If improperly handled, explosion might result. Before replacing the lamp, be carried out by a qualified technician. ...place your hands or other objects close to disconnect the power cord plug from the wall outlet. B The lamp has high internal pressure. B Do not place the projector on cloth or papers, as closets or bookshelves. When disconnecting the power cord, hold the plug, not ...
Operating Instructions
Page 8
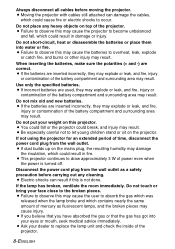
...especially careful not to let young children stand or sit on this may cause the batteries to occur. B This projector continues to absorb the gas which was released when the lamp broke and which could cause fire or electric shocks to overheat, leak, explode or catch fire, and burns ...the mains plug, the resulting humidity may damage the insulation, which could result in fire. If the lamp has broken, ventilate the room immediately. B Failure to become unbalanced and fall or the projector could result in damage or injury. B If the batteries are used, they may explode or leak,...
...especially careful not to let young children stand or sit on this may cause the batteries to occur. B This projector continues to absorb the gas which was released when the lamp broke and which could cause fire or electric shocks to overheat, leak, explode or catch fire, and burns ...the mains plug, the resulting humidity may damage the insulation, which could result in fire. If the lamp has broken, ventilate the room immediately. B Failure to become unbalanced and fall or the projector could result in damage or injury. B If the batteries are used, they may explode or leak,...

Operating Instructions
Page 9
...* (PT-LB60NTU: N2QAYA000001 x1 PT-LB60U: N2QAYA000002 x1) AAA batteries for remote control unit (x2) RGB signal cable [1.8 m (5´10˝), K1HA15DA0002 x1] *The illustration above is left to build up inside the projector at least once a year. NOTICE: B This product has a High Intensity Discharge (HID) lamp that all of mercury. Please take...
...* (PT-LB60NTU: N2QAYA000001 x1 PT-LB60U: N2QAYA000002 x1) AAA batteries for remote control unit (x2) RGB signal cable [1.8 m (5´10˝), K1HA15DA0002 x1] *The illustration above is left to build up inside the projector at least once a year. NOTICE: B This product has a High Intensity Discharge (HID) lamp that all of mercury. Please take...
Operating Instructions
Page 10
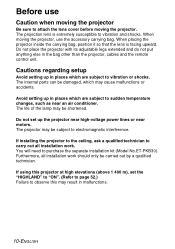
... high elevations (above 1 400 m), set up in places which may result in the bag other than the projector, cables and the remote control unit. The life of the lamp may be shortened. Furthermore, all installation work should only be damaged, which are subject to purchase the separate installation kit (Model No.ET...
... high elevations (above 1 400 m), set up in places which may result in the bag other than the projector, cables and the remote control unit. The life of the lamp may be shortened. Furthermore, all installation work should only be damaged, which are subject to purchase the separate installation kit (Model No.ET...
Operating Instructions
Page 11
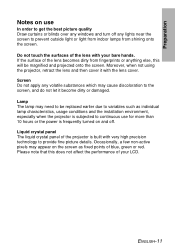
... which may cause discoloration to the screen, and do not let it with your LCD. Screen Do not apply any lights near the screen to prevent outside light or light from indoor lamps from fingerprints or anything else, this does not affect the performance of blue, green... fine picture details. Please note that this will be replaced earlier due to variables such as individual lamp characteristics, usage conditions and the installation environment, especially when the projector is subjected to continuous use In order to get the best picture quality Draw curtains or blinds over...
... which may cause discoloration to the screen, and do not let it with your LCD. Screen Do not apply any lights near the screen to prevent outside light or light from indoor lamps from fingerprints or anything else, this does not affect the performance of blue, green... fine picture details. Please note that this will be replaced earlier due to variables such as individual lamp characteristics, usage conditions and the installation environment, especially when the projector is subjected to continuous use In order to get the best picture quality Draw curtains or blinds over...
Operating Instructions
Page 13
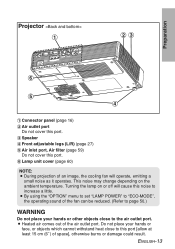
... Do not place your hands or other objects close to the air outlet port. ENGLISH-13 B By using the "OPTION" menu to set "LAMP POWER" to increase a little. Preparation Projector # $% ( ' & # Connector panel (page 16) $ Air outlet port Do not cover this port. % Speaker & Front adjustable legs... (L/R) (page 27) ' Air inlet port, Air filter (page 59) Do not cover this port. ( Lamp unit cover (page 60) NOTE: B During projection of...
... Do not place your hands or other objects close to the air outlet port. ENGLISH-13 B By using the "OPTION" menu to set "LAMP POWER" to increase a little. Preparation Projector # $% ( ' & # Connector panel (page 16) $ Air outlet port Do not cover this port. % Speaker & Front adjustable legs... (L/R) (page 27) ' Air inlet port, Air filter (page 59) Do not cover this port. ( Lamp unit cover (page 60) NOTE: B During projection of...
Operating Instructions
Page 15
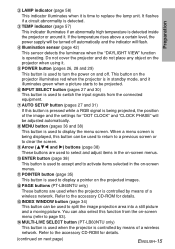
...turn the power on the projected images. . Do not cover the projector and do not place any object on the projector when using it. ' POWER button (pages 26, 28 and 29) This button is operating. Preparation $ LAMP indicator (page 58) This indicator illuminates when it is detected inside the... projector or around it. When a menu screen is controlled by means of a wireless network. You can be used to split ...
...turn the power on the projected images. . Do not cover the projector and do not place any object on the projector when using it. ' POWER button (pages 26, 28 and 29) This button is operating. Preparation $ LAMP indicator (page 58) This indicator illuminates when it is detected inside the... projector or around it. When a menu screen is controlled by means of a wireless network. You can be used to split ...
Operating Instructions
Page 26
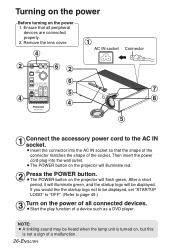
BInsert the connector into the wall outlet. If you would like the startup logo not to be heard when the lamp unit is turned on, but this is not a sign of the socket. NOTE: B A tinkling sound ...displayed, set "STARTUP LOGO" to "OFF". (Refer to the AC IN socket. Turning on the power Before turning on the projector will illuminate red. $Press the POWER button. BThe POWER button on the power 1. Then insert the power cord plug into ...& # AC IN socket Connector $ ($ ( ' ) & & * ' #Connect the accessory power cord to page 49.) %Turn on the projector will be displayed.
BInsert the connector into the wall outlet. If you would like the startup logo not to be heard when the lamp unit is turned on, but this is not a sign of the socket. NOTE: B A tinkling sound ...displayed, set "STARTUP LOGO" to "OFF". (Refer to the AC IN socket. Turning on the power Before turning on the projector will illuminate red. $Press the POWER button. BThe POWER button on the power 1. Then insert the power cord plug into ...& # AC IN socket Connector $ ($ ( ' ) & & * ' #Connect the accessory power cord to page 49.) %Turn on the projector will be displayed.
Operating Instructions
Page 28
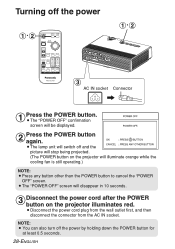
... the picture will switch off the power by holding down the POWER button for at least 0.5 seconds. 28-ENGLISH BThe lamp unit will stop being projected. (The POWER button on the projector illuminates red. BThe "POWER OFF" screen will disappear in 10 seconds. %Disconnect the power cord after the POWER button... on the projector will be displayed. $Press the POWER button again. BThe "POWER OFF" confirmation screen will illuminate orange while the cooling fan is still operating.) NOTE:...
... the picture will switch off the power by holding down the POWER button for at least 0.5 seconds. 28-ENGLISH BThe lamp unit will stop being projected. (The POWER button on the projector illuminates red. BThe "POWER OFF" screen will disappear in 10 seconds. %Disconnect the power cord after the POWER button... on the projector will be displayed. $Press the POWER button again. BThe "POWER OFF" confirmation screen will illuminate orange while the cooling fan is still operating.) NOTE:...
Operating Instructions
Page 29
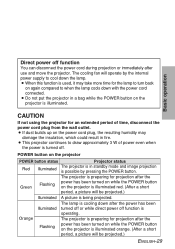
... projection or immediately after the power has been Illuminated turned off or while direct power off . The projector is preparing for the lamp to turn back on the projector is illuminated orange. (After a short period, a picture will be projected.) Illuminated A picture is ...possible by the internal power supply to when the lamp cools down after use and move the projector. B Do not put the projector in fire. The lamp is operating. B This projector continues to draw approximately 3 W of time, disconnect the power cord plug from...
... projection or immediately after the power has been Illuminated turned off or while direct power off . The projector is preparing for the lamp to turn back on the projector is illuminated orange. (After a short period, a picture will be projected.) Illuminated A picture is ...possible by the internal power supply to when the lamp cools down after use and move the projector. B Do not put the projector in fire. The lamp is operating. B This projector continues to draw approximately 3 W of time, disconnect the power cord plug from...
Operating Instructions
Page 42
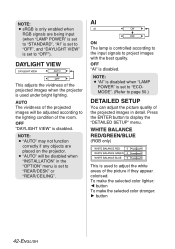
...bright lighting. B "AUTO" will be disabled when "INSTALLATION" in detail. DAYLIGHT VIEW This adjusts the vividness of the projected images when the projector is set to project images with the best quality. To make the selected color lighter: I button To make the selected color stronger: H ..."DAYLIGHT VIEW" is controlled according to the input signals to "REAR/DESK" or "REAR/CEILING". AI ON The lamp is disabled. NOTE: B sRGB is only enabled when RGB signals are placed on the projector. NOTE: B "AI" is disabled when "LAMP POWER" is set to display the "DETAILED SETUP" menu.
...bright lighting. B "AUTO" will be disabled when "INSTALLATION" in detail. DAYLIGHT VIEW This adjusts the vividness of the projected images when the projector is set to project images with the best quality. To make the selected color lighter: I button To make the selected color stronger: H ..."DAYLIGHT VIEW" is controlled according to the input signals to "REAR/DESK" or "REAR/CEILING". AI ON The lamp is disabled. NOTE: B sRGB is only enabled when RGB signals are placed on the projector. NOTE: B "AI" is disabled when "LAMP POWER" is set to display the "DETAILED SETUP" menu.
Operating Instructions
Page 50
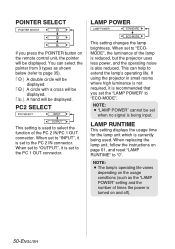
...1 OUT connector. This setting changes the lamp brightness. NOTE: B "LAMP POWER" cannot be set to extend the lamp's operating life. When set to "OUTPUT", it is set the "LAMP POWER" to select the function of times the power is set to "0". If using the projector in small rooms where high luminance is ...not required, it is being used to "ECO-MODE". NOTE: B The lamp's operating life varies depending on the usage conditions (such as shown below (refer to the ...
...1 OUT connector. This setting changes the lamp brightness. NOTE: B "LAMP POWER" cannot be set to extend the lamp's operating life. When set to "OUTPUT", it is set the "LAMP POWER" to select the function of times the power is set to "0". If using the projector in small rooms where high luminance is ...not required, it is being used to "ECO-MODE". NOTE: B The lamp's operating life varies depending on the usage conditions (such as shown below (refer to the ...

Operating Instructions
Page 57
... dangerously high, causing the lamp unit to warn you about the operating condition of the indicators is between 20% and 80% (with no condensation). [If you notice that have occurred inside the projector has become unusually projector has become Problem high. B... Uncover the ventilation holes. Care and maintenance LAMP indicator TEMP indicator TEMP indicator Indicator display Illuminated (red) (Lamp unit on the control panel of the projector which give information about problems that one of the projector. B Set up the projector in a place where the temperature is between ...
... dangerously high, causing the lamp unit to warn you about the operating condition of the indicators is between 20% and 80% (with no condensation). [If you notice that have occurred inside the projector has become unusually projector has become Problem high. B... Uncover the ventilation holes. Care and maintenance LAMP indicator TEMP indicator TEMP indicator Indicator display Illuminated (red) (Lamp unit on the control panel of the projector which give information about problems that one of the projector. B Set up the projector in a place where the temperature is between ...
Operating Instructions
Page 58
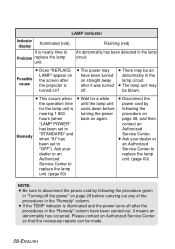
...procedure given in "Turning off after the procedures in the "Remedy" column have been turned on straight away after the projector is turned on? page 28, and then "LAMP POWER" contact an has been set to Authorized Remedy "STANDARD" and when "AI" has Service Center. B There ...may be blown. Ask your dealer or been set to an Authorized "OFF"). B Does "REPLACE Possible cause LAMP" appear on again. LAMP indicator Indicator display Illuminated (red) It is cools down before carrying out any of the procedures in the "Remedy" column. B The...
...procedure given in "Turning off after the procedures in the "Remedy" column have been turned on straight away after the projector is turned on? page 28, and then "LAMP POWER" contact an has been set to Authorized Remedy "STANDARD" and when "AI" has Service Center. B There ...may be blown. Ask your dealer or been set to an Authorized "OFF"). B Does "REPLACE Possible cause LAMP" appear on again. LAMP indicator Indicator display Illuminated (red) It is cools down before carrying out any of the procedures in the "Remedy" column. B The...
Operating Instructions
Page 59
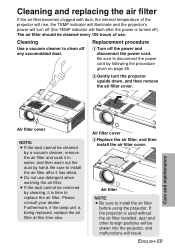
...replace the air filter. The air filter should be drawn into the projector, and malfunctions will be cleaned every 100 hours of the projector will rise, the TEMP indicator will illuminate and the projector's power will turn the projector upside down, and then remove the air filter cover. Be sure ...cover. If the projector is being replaced, replace the air filter at this time also. B Do not use . ENGLISH-59 Care and maintenance Air filter cover NOTE: B If the dust cannot be removed by cleaning, it has dried. Please consult your dealer. Furthermore, if the lamp unit is used...
...replace the air filter. The air filter should be drawn into the projector, and malfunctions will be cleaned every 100 hours of the projector will rise, the TEMP indicator will illuminate and the projector's power will turn the projector upside down, and then remove the air filter cover. Be sure ...cover. If the projector is being replaced, replace the air filter at this time also. B Do not use . ENGLISH-59 Care and maintenance Air filter cover NOTE: B If the dust cannot be removed by cleaning, it has dried. Please consult your dealer. Furthermore, if the lamp unit is used...
Operating Instructions
Page 60
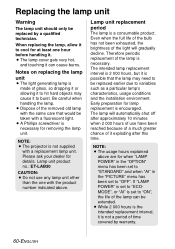
...to "ECOMODE", or "AI" is not supplied with the product number indicated above are for details. Early preparation for removing the lamp unit. Please ask your dealer for when "LAMP POWER" in the "OPTION" menu has been set to "STANDARD" and when "AI" in the "PICTURE" menu has ... not use have been reached because of a much greater chance of it to "OFF". NOTE: B The projector is set to cool for at least one with a replacement lamp unit. Be careful when handling the lamp. When replacing the lamp, allow it exploding after approximately 10 minutes when 2 000 hours of use any...
...to "ECOMODE", or "AI" is not supplied with the product number indicated above are for details. Early preparation for removing the lamp unit. Please ask your dealer for when "LAMP POWER" in the "OPTION" menu has been set to "STANDARD" and when "AI" in the "PICTURE" menu has ... not use have been reached because of a much greater chance of it to "OFF". NOTE: B The projector is set to cool for at least one with a replacement lamp unit. Be careful when handling the lamp. When replacing the lamp, allow it exploding after approximately 10 minutes when 2 000 hours of use any...
Operating Instructions
Page 61
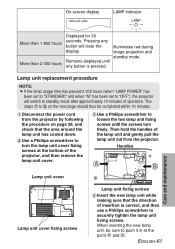
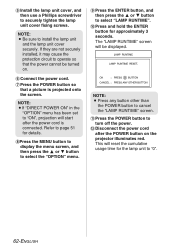
... set to turn freely. Handles A B Lamp unit cover Lamp unit cover fixing screws Lamp unit fixing screws & Insert the new lamp unit while making sure that the area around the lamp unit has cooled down. $ Use a Phillips screwdriver to "OFF"), the projector will clear the display. Remains displayed until ...the point A and B. When inserting the new lamp unit, be completed within 10 minutes. # Disconnect the power cord from the projector. Then hold the handles of the lamp unit and gently pull the lamp unit out from the projector by following the procedure on the next page should...
... set to turn freely. Handles A B Lamp unit cover Lamp unit cover fixing screws Lamp unit fixing screws & Insert the new lamp unit while making sure that the area around the lamp unit has cooled down. $ Use a Phillips screwdriver to "OFF"), the projector will clear the display. Remains displayed until ...the point A and B. When inserting the new lamp unit, be completed within 10 minutes. # Disconnect the power cord from the projector. Then hold the handles of the lamp unit and gently pull the lamp unit out from the projector by following the procedure on the next page should...
Operating Instructions
Page 62
...power cord is projected onto the screen. NOTE: B Be sure to cancel the "LAMP RUNTIME" screen. - Press the POWER button to select "LAMP RUNTIME". , Press and hold the ENTER button for approximately 3 seconds. The "LAMP RUNTIME" screen will reset the cumulative usage time for details. *Press the MENU ...the ENTER button, and then press the F or G button to turn off the power. . This will be turned on the projector illuminates red. Refer to page 51 for the lamp unit to "ON", projection will start after the POWER button on . ( Connect the power cord. ) Press the POWER button ...
...power cord is projected onto the screen. NOTE: B Be sure to cancel the "LAMP RUNTIME" screen. - Press the POWER button to select "LAMP RUNTIME". , Press and hold the ENTER button for approximately 3 seconds. The "LAMP RUNTIME" screen will reset the cumulative usage time for details. *Press the MENU ...the ENTER button, and then press the F or G button to turn off the power. . This will be turned on the projector illuminates red. Refer to page 51 for the lamp unit to "ON", projection will start after the POWER button on . ( Connect the power cord. ) Press the POWER button ...
Operating Instructions
Page 63
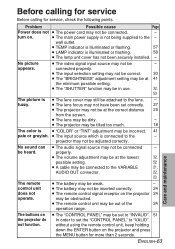
... to the - B The lens may be connected to "VALID" without using the remote control unit, keep holding down the ENTER button on the projector 24 may be heard. be dirty. - B The lens focus may not have been set the "CONTROL PANEL" to the VARIABLE 21, AUDIO ...B The lamp unit cover has not been securely installed. - Before calling for service Before calling for more than 2 seconds. B The volume adjustment may be at the lowest 32, possible setting. 52 B A cable may not be inserted correctly. 24 B The remote control signal receptor on the projector and press ...
... to the - B The lens may be connected to "VALID" without using the remote control unit, keep holding down the ENTER button on the projector 24 may be heard. be dirty. - B The lens focus may not have been set the "CONTROL PANEL" to the VARIABLE 21, AUDIO ...B The lamp unit cover has not been securely installed. - Before calling for service Before calling for more than 2 seconds. B The volume adjustment may be at the lowest 32, possible setting. 52 B A cable may not be inserted correctly. 24 B The remote control signal receptor on the projector and press ...


