
Operating Instructions
Page 1
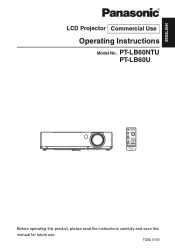
PT-LB60NTU PT-LB60U Before operating this product, please read the instructions carefully and save this manual for future use. TQBJ 0193 ENGLISH R LCD Projector Commercial Use Operating Instructions Model No.
PT-LB60NTU PT-LB60U Before operating this product, please read the instructions carefully and save this manual for future use. TQBJ 0193 ENGLISH R LCD Projector Commercial Use Operating Instructions Model No.

Operating Instructions
Page 2
... you use higher voltages or currents than this booklet in case service is a safety feature. This plug will be of sufficient magnitude to the presence of your product may result. The serial number of your new product, and that may be pleased with a three-pin grounding-type power plug. Power Supply: This LCD Projector is intended to alert the user to...
... you use higher voltages or currents than this booklet in case service is a safety feature. This plug will be of sufficient magnitude to the presence of your product may result. The serial number of your new product, and that may be pleased with a three-pin grounding-type power plug. Power Supply: This LCD Projector is intended to alert the user to...
Operating Instructions
Page 3
... occur in the building installation wiring; FCC RF Exposure Warning: (if provided with Part 15 of North America Address: One Panasonic Way Secaucus New Jersey 07094 Telephone number: 1-800-528-8601 or 1-800-222-0741 Email: pbtsservice@panasonic.com This device complies with wireless device) - WARNING: B Not for use only shielded interface cables when connecting to correct the interference by turning the equipment off...
... occur in the building installation wiring; FCC RF Exposure Warning: (if provided with Part 15 of North America Address: One Panasonic Way Secaucus New Jersey 07094 Telephone number: 1-800-528-8601 or 1-800-222-0741 Email: pbtsservice@panasonic.com This device complies with wireless device) - WARNING: B Not for use only shielded interface cables when connecting to correct the interference by turning the equipment off...
Operating Instructions
Page 4
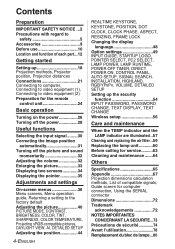
..., Menu operation guide, Returning a setting to the factory default Adjusting the picture 40 PICTURE MODE, CONTRAST, BRIGHTNESS, COLOR, TINT, SHARPNESS, COLOR TEMPERATURE, Projecting sRGB-compatible pictures, DAYLIGHT VIEW, AI, DETAILED SETUP Adjusting the position 44 4-ENGLISH REALTIME KEYSTONE, KEYSTONE, POSITION, DOT CLOCK, CLOCK PHASE, ASPECT, RESIZING, FRAME LOCK Changing the display language 48 Option settings 49 INPUT GUIDE, STARTUP LOGO, POINTER SELECT, PC2 SELECT, LAMP POWER, LAMP RUNTIME, POWER OFF TIMER, DIRECT POWER ON, CONTROL PANEL, AUTO SETUP, SIGNAL SEARCH, INSTALLATION...
..., Menu operation guide, Returning a setting to the factory default Adjusting the picture 40 PICTURE MODE, CONTRAST, BRIGHTNESS, COLOR, TINT, SHARPNESS, COLOR TEMPERATURE, Projecting sRGB-compatible pictures, DAYLIGHT VIEW, AI, DETAILED SETUP Adjusting the position 44 4-ENGLISH REALTIME KEYSTONE, KEYSTONE, POSITION, DOT CLOCK, CLOCK PHASE, ASPECT, RESIZING, FRAME LOCK Changing the display language 48 Option settings 49 INPUT GUIDE, STARTUP LOGO, POINTER SELECT, PC2 SELECT, LAMP POWER, LAMP RUNTIME, POWER OFF TIMER, DIRECT POWER ON, CONTROL PANEL, AUTO SETUP, SIGNAL SEARCH, INSTALLATION...
Operating Instructions
Page 10
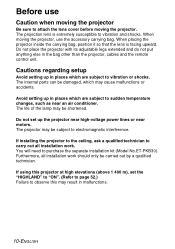
... bag other than the projector, cables and the remote control unit. Avoid setting up the projector near high-voltage power lines or near an air conditioner. If installing the projector to the ceiling, ask a qualified technician to purchase the separate installation kit (Model No.ET-PKB30). The internal parts can be shortened. You will need to carry out all installation work . The life of the lamp may be damaged...
... bag other than the projector, cables and the remote control unit. Avoid setting up the projector near high-voltage power lines or near an air conditioner. If installing the projector to the ceiling, ask a qualified technician to purchase the separate installation kit (Model No.ET-PKB30). The internal parts can be shortened. You will need to carry out all installation work . The life of the lamp may be damaged...
Operating Instructions
Page 11
... surfaces of blue, green or red. Occasionally, a few non-active pixels may appear on the screen as individual lamp characteristics, usage conditions and the installation environment, especially when the projector is subjected to continuous use In order to get the best picture quality Draw curtains or blinds over any windows and turn off . Lamp The lamp may cause discoloration to the screen, and do...
... surfaces of blue, green or red. Occasionally, a few non-active pixels may appear on the screen as individual lamp characteristics, usage conditions and the installation environment, especially when the projector is subjected to continuous use In order to get the best picture quality Draw curtains or blinds over any windows and turn off . Lamp The lamp may cause discoloration to the screen, and do...
Operating Instructions
Page 13
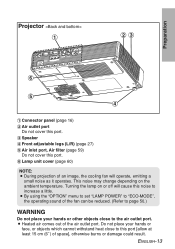
... temperature. B Heated air comes out of an image, the cooling fan will cause this noise to the air outlet port. Preparation Projector # $% ( ' & # Connector panel (page 16) $ Air outlet port Do not cover this port. % Speaker & Front adjustable legs (L/R) (page 27) ' Air inlet port, Air filter (page 59) Do not cover this port. ( Lamp unit cover (page 60) NOTE: B During projection of the air outlet port. B By using the "OPTION" menu to set "LAMP POWER" to "ECO-MODE", the operating sound of the fan...
... temperature. B Heated air comes out of an image, the cooling fan will cause this noise to the air outlet port. Preparation Projector # $% ( ' & # Connector panel (page 16) $ Air outlet port Do not cover this port. % Speaker & Front adjustable legs (L/R) (page 27) ' Air inlet port, Air filter (page 59) Do not cover this port. ( Lamp unit cover (page 60) NOTE: B During projection of the air outlet port. B By using the "OPTION" menu to set "LAMP POWER" to "ECO-MODE", the operating sound of the fan...
Operating Instructions
Page 15
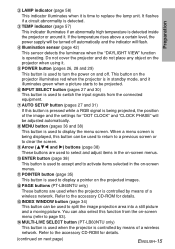
... a wireless network. This button on the projector illuminates red when the projector is in the on -screen menus. , ENTER button (page 38) This button is used to accept and to activate items selected in standby mode, and it illuminates green when a picture starts to be adjusted automatically. * MENU button (pages 36 and 38) This button is being displayed, this button is pressed while a RGB signal is used to turn the power on the projected images. . Do not cover...
... a wireless network. This button on the projector illuminates red when the projector is in the on -screen menus. , ENTER button (page 38) This button is used to accept and to activate items selected in standby mode, and it illuminates green when a picture starts to be adjusted automatically. * MENU button (pages 36 and 38) This button is being displayed, this button is pressed while a RGB signal is used to turn the power on the projected images. . Do not cover...
Operating Instructions
Page 16
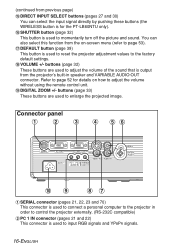
... remote control unit. 5 DIGITAL ZOOM +/- (continued from the projector's built-in order to control the projector externally. (RS-232C compatible) $ PC 1 IN connector (pages 21 and 22) This connector is used to reset the projector adjustment values to momentarily turn off the picture and sound. buttons (page 32) These buttons are used to input RGB signals and YPBPR signals. 16-ENGLISH You can also select this function from the on-screen menu...
... remote control unit. 5 DIGITAL ZOOM +/- (continued from the projector's built-in order to control the projector externally. (RS-232C compatible) $ PC 1 IN connector (pages 21 and 22) This connector is used to reset the projector adjustment values to momentarily turn off the picture and sound. buttons (page 32) These buttons are used to input RGB signals and YPBPR signals. 16-ENGLISH You can also select this function from the on-screen menu...
Operating Instructions
Page 22
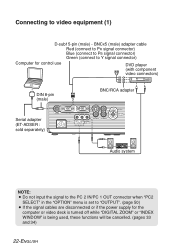
... video deck is turned off while "DIGITAL ZOOM" or "INDEX WINDOW" is being used, these functions will be cancelled. (pages 33 and 34) 22-ENGLISH Connecting to "OUTPUT". (page 50) B If the signal cables are disconnected or if the power supply for control use DVD player (with component video connectors) DIN 8-pin (male) BNC/RCA adapter Serial adapter (ET-ADSER : sold separately) Audio system NOTE: B Do not input the signal...
... video deck is turned off while "DIGITAL ZOOM" or "INDEX WINDOW" is being used, these functions will be cancelled. (pages 33 and 34) 22-ENGLISH Connecting to "OUTPUT". (page 50) B If the signal cables are disconnected or if the power supply for control use DVD player (with component video connectors) DIN 8-pin (male) BNC/RCA adapter Serial adapter (ET-ADSER : sold separately) Audio system NOTE: B Do not input the signal...
Operating Instructions
Page 29
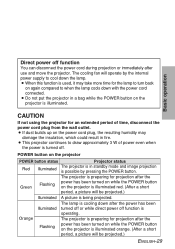
... power even when the power is turned off function is operating. The cooling fan will operate by pressing the POWER button. B Do not put the projector in fire. B If dust builds up on the projector POWER button status Projector status Red Illuminated The projector is in standby mode and image projection is cooling down with the power cord connected. The lamp is possible by the internal power supply to when the lamp cools down after use and move the projector...
... power even when the power is turned off function is operating. The cooling fan will operate by pressing the POWER button. B Do not put the projector in fire. B If dust builds up on the projector POWER button status Projector status Red Illuminated The projector is in standby mode and image projection is cooling down with the power cord connected. The lamp is possible by the internal power supply to when the lamp cools down after use and move the projector...
Operating Instructions
Page 31
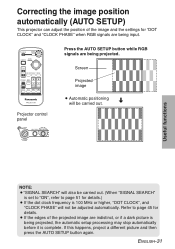
..." is set to "ON", refer to page 45 for details.) B If the dot clock frequency is complete. Correcting the image position automatically (AUTO SETUP) This projector can adjust the position of the projected image are being input. If this happens, project a different picture and then press the AUTO SETUP button again. Refer to page 51 for details. ENGLISH-31 Press the AUTO SETUP button while RGB signals are being projected.
..." is set to "ON", refer to page 45 for details.) B If the dot clock frequency is complete. Correcting the image position automatically (AUTO SETUP) This projector can adjust the position of the projected image are being input. If this happens, project a different picture and then press the AUTO SETUP button again. Refer to page 51 for details. ENGLISH-31 Press the AUTO SETUP button while RGB signals are being projected.
Operating Instructions
Page 42
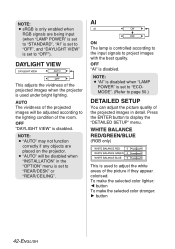
.../CEILING". Press the ENTER button to project images with the best quality. AI ON The lamp is controlled according to the input signals to display the "DETAILED SETUP" menu. NOTE: B "AI" is disabled when "LAMP POWER" is set to "ECOMODE". (Refer to page 50.) DETAILED SETUP You can adjust the picture quality of the projected images in the "OPTION" menu is set to the lighting condition of the projected images when the projector is disabled. B "AUTO...
.../CEILING". Press the ENTER button to project images with the best quality. AI ON The lamp is controlled according to the input signals to display the "DETAILED SETUP" menu. NOTE: B "AI" is disabled when "LAMP POWER" is set to "ECOMODE". (Refer to page 50.) DETAILED SETUP You can adjust the picture quality of the projected images in the "OPTION" menu is set to the lighting condition of the projected images when the projector is disabled. B "AUTO...
Operating Instructions
Page 50
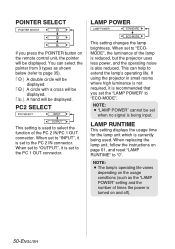
... displayed. NOTE: B "LAMP POWER" cannot be displayed. When replacing the lamp unit, follow the instructions on and off). 50-ENGLISH This setting changes the lamp brightness. When set to "INPUT", it is recommended that you press the POINTER button on the remote control unit, the pointer will be set when no signal is being used to select the function of the lamp is reduced, but the projector uses less power, and the operating...
... displayed. NOTE: B "LAMP POWER" cannot be displayed. When replacing the lamp unit, follow the instructions on and off). 50-ENGLISH This setting changes the lamp brightness. When set to "INPUT", it is recommended that you press the POINTER button on the remote control unit, the pointer will be set when no signal is being used to select the function of the lamp is reduced, but the projector uses less power, and the operating...
Operating Instructions
Page 51
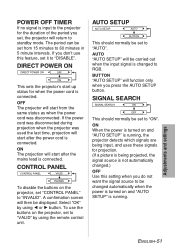
... the power is connected. If you press the AUTO SETUP button. DIRECT POWER ON This sets the projector's start after the power cord is turned on the projector, set , the projector will return to standby mode. A confirmation screen will start from 15 minutes to "AUTO". The period can be set from the same status as when the power cord was used the last time, projection will then be carried out when the input signal is changed automatically when the power is...
... the power is connected. If you press the AUTO SETUP button. DIRECT POWER ON This sets the projector's start after the power cord is turned on the projector, set , the projector will return to standby mode. A confirmation screen will start from 15 minutes to "AUTO". The period can be set from the same status as when the power cord was used the last time, projection will then be carried out when the input signal is changed automatically when the power is...
Operating Instructions
Page 58
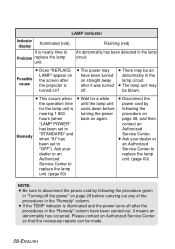
LAMP indicator Indicator display Illuminated (red) It is nearly time to disconnect the power cord by for a while B Disconnect the the operation time until the lamp unit power cord by following the nearing 1 800 turning the power procedure on hours (when back on ? B The lamp unit may be an abnormality in "Turning off . B If the TEMP indicator is turned on again. B The power may have been carried out, it was turned off the power" on...
LAMP indicator Indicator display Illuminated (red) It is nearly time to disconnect the power cord by for a while B Disconnect the the operation time until the lamp unit power cord by following the nearing 1 800 turning the power procedure on hours (when back on ? B The lamp unit may be an abnormality in "Turning off . B If the TEMP indicator is turned on again. B The power may have been carried out, it was turned off the power" on...
Operating Instructions
Page 59
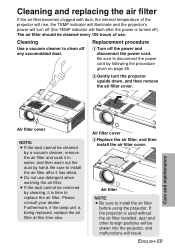
... install the air filter before using the projector. B Do not use . Furthermore, if the lamp unit is turned off). ENGLISH-59 Be sure to disconnect the power cord by hand. Care and maintenance Air filter cover NOTE: B If the dust cannot be cleaned every 100 hours of the projector will rise, the TEMP indicator will illuminate and the projector's power will turn the projector upside down, and then remove the air filter cover. Air filter cover % Replace the air filter, and then install the air filter cover. Air filter...
... install the air filter before using the projector. B Do not use . Furthermore, if the lamp unit is turned off). ENGLISH-59 Be sure to disconnect the power cord by hand. Care and maintenance Air filter cover NOTE: B If the dust cannot be cleaned every 100 hours of the projector will rise, the TEMP indicator will illuminate and the projector's power will turn the projector upside down, and then remove the air filter cover. Air filter cover % Replace the air filter, and then install the air filter cover. Air filter...
Operating Instructions
Page 61
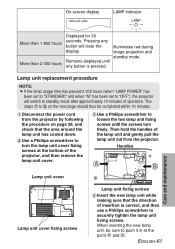
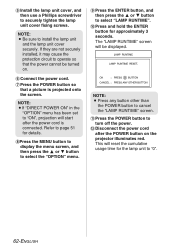
... then remove the lamp unit cover. % Use a Phillips screwdriver to loosen the two lamp unit fixing screws until any button will switch to . ENGLISH-61 Care and maintenance The steps ) to standby mode after approximately 10 minutes of insertion is pressed. When inserting the new lamp unit, be completed within 10 minutes. # Disconnect the power cord from the projector. On-screen display LAMP indicator More than 1 800 hours More than 2 000 hours Displayed...
... then remove the lamp unit cover. % Use a Phillips screwdriver to loosen the two lamp unit fixing screws until any button will switch to . ENGLISH-61 Care and maintenance The steps ) to standby mode after approximately 10 minutes of insertion is pressed. When inserting the new lamp unit, be completed within 10 minutes. # Disconnect the power cord from the projector. On-screen display LAMP indicator More than 1 800 hours More than 2 000 hours Displayed...
Operating Instructions
Page 62
NOTE: BIf "DIRECT POWER ON" in the "OPTION" menu has been set to "ON", projection will start after the POWER button on . ( Connect the power cord. ) Press the POWER button so that a picture is connected. Press the POWER button to cancel the "LAMP RUNTIME" screen. - This will be turned on the projector illuminates red. NOTE: B Press any button other than the POWER button to turn off the power. . If they are not securely installed, it may cause the...
NOTE: BIf "DIRECT POWER ON" in the "OPTION" menu has been set to "ON", projection will start after the POWER button on . ( Connect the power cord. ) Press the POWER button so that a picture is connected. Press the POWER button to cancel the "LAMP RUNTIME" screen. - This will be turned on the projector illuminates red. NOTE: B Press any button other than the POWER button to turn off the power. . If they are not securely installed, it may cause the...
Operating Instructions
Page 63
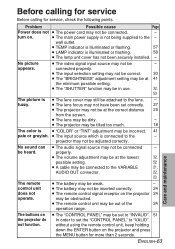
..." adjustment setting may be connected - B The battery may not be inserted correctly. 24 B The remote control signal receptor on the projector and press the MENU button for service, check the following points. No sound can B The audio signal source may not be dirty. - Problem Possible cause Page Power does not B The power cord may not be obstructed. turn on the projector do not function. B The lens may not be - B The video signal input source may be connected...
..." adjustment setting may be connected - B The battery may not be inserted correctly. 24 B The remote control signal receptor on the projector and press the MENU button for service, check the following points. No sound can B The audio signal source may not be dirty. - Problem Possible cause Page Power does not B The power cord may not be obstructed. turn on the projector do not function. B The lens may not be - B The video signal input source may be connected...


