
Operating Instructions
Page 1
TQBJ 0193 ENGLISH R LCD Projector Commercial Use Operating Instructions Model No. PT-LB60NTU PT-LB60U Before operating this product, please read the instructions carefully and save this manual for future use.
TQBJ 0193 ENGLISH R LCD Projector Commercial Use Operating Instructions Model No. PT-LB60NTU PT-LB60U Before operating this product, please read the instructions carefully and save this manual for future use.

Operating Instructions
Page 2
...LB60NTU / PT-LB60U Serial number: IMPORTANT SAFETY NOTICE WARNING: TO REDUCE THE RISK OF FIRE OR ELECTRIC SHOCK, DO NOT EXPOSE THIS PRODUCT TO RAIN OR MOISTURE. This plug will be used for power supplies up to 125 V, 7 A. The serial number of your Panasonic LCD projector. If you...risk of important operating and maintenance (servicing) instructions in case service is designed to operate on the power plug. Power Supply: This LCD Projector is required. The exclamation point within the product's enclosure that may result. If you might require. You should note it will ...
...LB60NTU / PT-LB60U Serial number: IMPORTANT SAFETY NOTICE WARNING: TO REDUCE THE RISK OF FIRE OR ELECTRIC SHOCK, DO NOT EXPOSE THIS PRODUCT TO RAIN OR MOISTURE. This plug will be used for power supplies up to 125 V, 7 A. The serial number of your Panasonic LCD projector. If you...risk of important operating and maintenance (servicing) instructions in case service is designed to operate on the power plug. Power Supply: This LCD Projector is required. The exclamation point within the product's enclosure that may result. If you might require. You should note it will ...
Operating Instructions
Page 4
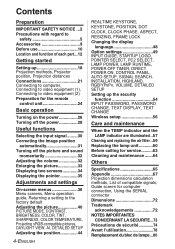
... SAFETY NOTICE ...2 Precautions with regard to safety 5 Accessories 9 Before use 10 Location and function of each part...12 Getting started Setting-up 18 Projection methods, Projector position, Projection distances Connections 21 Connecting to computer, Connecting to video equipment (1), Connecting to video equipment (2) Preparation for the remote control unit 24 Basic operation...
... SAFETY NOTICE ...2 Precautions with regard to safety 5 Accessories 9 Before use 10 Location and function of each part...12 Getting started Setting-up 18 Projection methods, Projector position, Projection distances Connections 21 Connecting to computer, Connecting to video equipment (1), Connecting to video equipment (2) Preparation for the remote control unit 24 Basic operation...

Operating Instructions
Page 5
...in such cases, otherwise fire or electric shocks could result. B High voltages can be carried out by using the projector for repairs. B Do not attempt to repair the projector yourself, as ceiling suspension) should only be dangerous. B If the installation location is broken, disconnect the power cord...any inspection, adjustment and repair work (such as this condition may occur. If foreign objects or water get inside the projector, or if the projector is dropped or the cabinet is not strong enough, it with regard to safety WARNING If you notice smoke, strange smells...
...in such cases, otherwise fire or electric shocks could result. B High voltages can be carried out by using the projector for repairs. B Do not attempt to repair the projector yourself, as ceiling suspension) should only be dangerous. B If the installation location is broken, disconnect the power cord...any inspection, adjustment and repair work (such as this condition may occur. If foreign objects or water get inside the projector, or if the projector is dropped or the cabinet is not strong enough, it with regard to safety WARNING If you notice smoke, strange smells...

Operating Instructions
Page 6
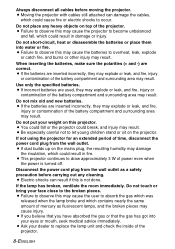
...which can result in a bath or shower. Do not allow the + and - During a thunderstorm, do not touch the projector or the cable. Do not place the projector into water or let it , fire or electric shocks could result. B Failure to observe this may result in fire or...from the wall. B If any foreign objects into the wall outlet. B Ask an Authorized Service Center to the projector. B If water spills onto the projector or gets inside the projector, contact an Authorized Service Center. Keep the batteries out of the reach of a surface which are swallowed, death...
...which can result in a bath or shower. Do not allow the + and - During a thunderstorm, do not touch the projector or the cable. Do not place the projector into water or let it , fire or electric shocks could result. B Failure to observe this may result in fire or...from the wall. B If any foreign objects into the wall outlet. B Ask an Authorized Service Center to the projector. B If water spills onto the projector or gets inside the projector, contact an Authorized Service Center. Keep the batteries out of the reach of a surface which are swallowed, death...
Operating Instructions
Page 7
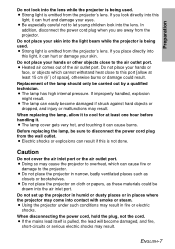
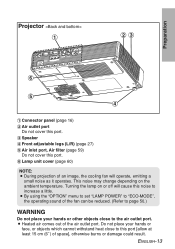
... directly into this light, it can cause burns. Do not place your hands or other objects close to disconnect the power cord plug from the projector's lens. B The lamp has high internal pressure. B Electric shocks or explosions can hurt and damage your hands or face, or objects which can ...shocks. B Be especially careful not to cool for at least 15 cm (6˝ ) of the air outlet port. If you are away from the projector's lens. B If the mains lead itself is pulled, the lead will become damaged if struck against hard objects or dropped, and injury or malfunctions ...
... directly into this light, it can cause burns. Do not place your hands or other objects close to disconnect the power cord plug from the projector's lens. B The lamp has high internal pressure. B Electric shocks or explosions can hurt and damage your hands or face, or objects which can ...shocks. B Be especially careful not to cool for at least 15 cm (6˝ ) of the air outlet port. If you are away from the projector's lens. B If the mains lead itself is pulled, the lead will become damaged if struck against hard objects or dropped, and injury or malfunctions ...
Operating Instructions
Page 8
...incorrectly, they may explode or leak, and fire, injury or contamination of mercury as a safety precaution before moving the projector. If not using the projector for an extended period of the battery compartment and surrounding area may explode or leak, and fire, injury or contamination ..., and injury may result. B If incorrect batteries are correct. Do not put your dealer to draw approximately 3 W of the projector. B Failure to observe this projector. B You could fall , which could result in fire. B Failure to observe this is turned off. Use only the specified ...
...incorrectly, they may explode or leak, and fire, injury or contamination of mercury as a safety precaution before moving the projector. If not using the projector for an extended period of the battery compartment and surrounding area may explode or leak, and fire, injury or contamination ..., and injury may result. B If incorrect batteries are correct. Do not put your dealer to draw approximately 3 W of the projector. B Failure to observe this projector. B You could fall , which could result in fire. B Failure to observe this is turned off. Use only the specified ...

Operating Instructions
Page 9
Ask your community due to environmental considerations. It also contains lead in fire or problems with your projector. Card remote control unit* (PT-LB60NTU: N2QAYA000001 x1 PT-LB60U: N2QAYA000002 x1) AAA batteries for remote control unit (x2) RGB signal cable [1.8 m (5´10˝), K1HA15DA0002 x1...] *The illustration above is a good idea to clean the inside the projector at least once a year. We are ...
Ask your community due to environmental considerations. It also contains lead in fire or problems with your projector. Card remote control unit* (PT-LB60NTU: N2QAYA000001 x1 PT-LB60U: N2QAYA000002 x1) AAA batteries for remote control unit (x2) RGB signal cable [1.8 m (5´10˝), K1HA15DA0002 x1...] *The illustration above is a good idea to clean the inside the projector at least once a year. We are ...
Operating Instructions
Page 10
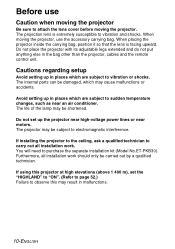
...10-ENGLISH Do not set the "HIGHLAND" to "ON". (Refer to page 52.) Failure to attach the lens cover before moving the projector. Furthermore, all installation work should only be shortened. Before use the accessory carrying bag. The projection lens is facing upward. Cautions regarding setup... Avoid setting up the projector near high-voltage power lines or near an air conditioner. The life of the lamp may result in places which are subject ...
...10-ENGLISH Do not set the "HIGHLAND" to "ON". (Refer to page 52.) Failure to attach the lens cover before moving the projector. Furthermore, all installation work should only be shortened. Before use the accessory carrying bag. The projection lens is facing upward. Cautions regarding setup... Avoid setting up the projector near high-voltage power lines or near an air conditioner. The life of the lamp may result in places which are subject ...
Operating Instructions
Page 11
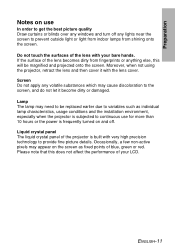
... not apply any volatile substances which may appear on the screen as individual lamp characteristics, usage conditions and the installation environment, especially when the projector is subjected to continuous use In order to the screen, and do not let it with the lens cover. Occasionally, a few non-active ...to be magnified and projected onto the screen. Preparation Notes on use for more than 10 hours or the power is built with your LCD. ENGLISH-11 If the surface of the lens becomes dirty from shining onto the screen. Please note that this will be replaced earlier due...
... not apply any volatile substances which may appear on the screen as individual lamp characteristics, usage conditions and the installation environment, especially when the projector is subjected to continuous use In order to the screen, and do not let it with the lens cover. Occasionally, a few non-active ...to be magnified and projected onto the screen. Preparation Notes on use for more than 10 hours or the power is built with your LCD. ENGLISH-11 If the surface of the lens becomes dirty from shining onto the screen. Please note that this will be replaced earlier due...
Operating Instructions
Page 12
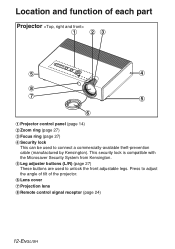
Press to adjust the angle of tilt of each part Projector # $% ' & * ) ' ( # Projector control panel (page 14) $ Zoom ring (page 27) % Focus ring (page 27) & Security lock This can be used to unlock the front adjustable legs. This ... Kensington. ' Leg adjuster buttons (L/R) (page 27) These buttons are used to connect a commercially-available theft-prevention cable (manufactured by Kensington). Location and function of the projector. ( Lens cover ) Projection lens * Remote control signal receptor (page 24) 12-ENGLISH
Press to adjust the angle of tilt of each part Projector # $% ' & * ) ' ( # Projector control panel (page 14) $ Zoom ring (page 27) % Focus ring (page 27) & Security lock This can be used to unlock the front adjustable legs. This ... Kensington. ' Leg adjuster buttons (L/R) (page 27) These buttons are used to connect a commercially-available theft-prevention cable (manufactured by Kensington). Location and function of the projector. ( Lens cover ) Projection lens * Remote control signal receptor (page 24) 12-ENGLISH
Operating Instructions
Page 13
Preparation Projector # $% ( ' & # Connector panel (page 16) $ Air outlet port Do not cover this port. % Speaker & Front adjustable legs (L/R) (page 27) ' Air inlet port, Air filter (page 59) ...
Preparation Projector # $% ( ' & # Connector panel (page 16) $ Air outlet port Do not cover this port. % Speaker & Front adjustable legs (L/R) (page 27) ' Air inlet port, Air filter (page 59) ...
Operating Instructions
Page 14
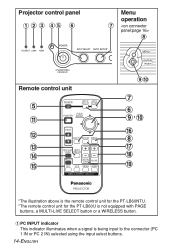
Projector control panel # $ % &' ( Menu operation ) * Remote control unit ' - . / 0 1 +, ) ( +ɾ, 2 * 3 4 5 *The illustration above is the remote control unit for the PT-LB60NTU. *The remote control unit for the PT-LB60U is not equipped with PAGE buttons, a MULTI-LIVE SELECT button or a WIRELESS button. # PC INPUT indicator This indicator illuminates when a signal is being input to the connector (PC 1 IN or PC 2 IN) selected using the input select buttons. 14-ENGLISH
Projector control panel # $ % &' ( Menu operation ) * Remote control unit ' - . / 0 1 +, ) ( +ɾ, 2 * 3 4 5 *The illustration above is the remote control unit for the PT-LB60NTU. *The remote control unit for the PT-LB60U is not equipped with PAGE buttons, a MULTI-LIVE SELECT button or a WIRELESS button. # PC INPUT indicator This indicator illuminates when a signal is being input to the connector (PC 1 IN or PC 2 IN) selected using the input select buttons. 14-ENGLISH
Operating Instructions
Page 15
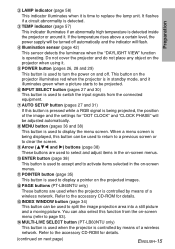
...used to display the menu screen. Preparation $ LAMP indicator (page 58) This indicator illuminates when it . This button on the projector illuminates red when the projector is in the on-screen menus. - PAGE buttons (PT-LB60NTU only) These buttons are used to select and adjust items in ...It flashes if a circuit abnormality is detected. % TEMP indicator (page 57) This indicator illuminates if an abnormally high temperature is detected inside the projector or around it is operating. Refer to replace the lamp unit. When a menu screen is being displayed, this button can also select this ...
...used to display the menu screen. Preparation $ LAMP indicator (page 58) This indicator illuminates when it . This button on the projector illuminates red when the projector is in the on-screen menus. - PAGE buttons (PT-LB60NTU only) These buttons are used to select and adjust items in ...It flashes if a circuit abnormality is detected. % TEMP indicator (page 57) This indicator illuminates if an abnormally high temperature is detected inside the projector or around it is operating. Refer to replace the lamp unit. When a menu screen is being displayed, this button can also select this ...
Operating Instructions
Page 16
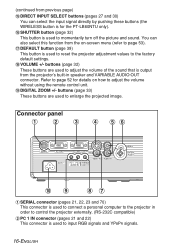
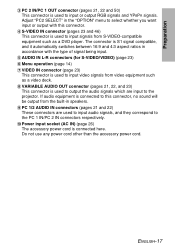
... only). 2 SHUTTER button (page 32) This button is used to enlarge the projected image. buttons (page 33) These buttons are used to reset the projector adjustment values to the factory default settings. 4 VOLUME +/- Connector panel # $ % & '( ,+ *) # SERIAL connector (pages 21, 22, 23 and... 70) This connector is used to connect a personal computer to the projector in speaker and VARIABLE AUDIO OUT connector. You can select the input signal directly by pushing these buttons (the WIRELESS button is for details on...
... only). 2 SHUTTER button (page 32) This button is used to enlarge the projected image. buttons (page 33) These buttons are used to reset the projector adjustment values to the factory default settings. 4 VOLUME +/- Connector panel # $ % & '( ,+ *) # SERIAL connector (pages 21, 22, 23 and... 70) This connector is used to connect a personal computer to the projector in speaker and VARIABLE AUDIO OUT connector. You can select the input signal directly by pushing these buttons (the WIRELESS button is for details on...
Operating Instructions
Page 17
... signals from video equipment such as a DVD player. Preparation % PC 2 IN/PC 1 OUT connector (pages 21, 22 and 50) This connector is used to the projector.
... signals from video equipment such as a DVD player. Preparation % PC 2 IN/PC 1 OUT connector (pages 21, 22 and 50) This connector is used to the projector.
Operating Instructions
Page 18
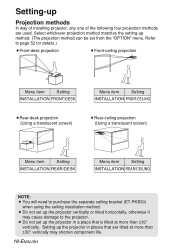
...ceiling bracket (ET-PKB30) when using the ceiling installation method. Setting up the projector vertically or tilted horizontally, otherwise it may shorten component life. 18-ENGLISH B Do not set up the projector in a place that are used. Refer to page 52 for details.) BFront-... (Using a translucent screen) Menu item Setting INSTALLATION REAR/DESK Menu item Setting INSTALLATION REAR/CEILING NOTE: B You will need to the projector. Setting-up method. (The projection method can be set from the "OPTION" menu. Select whichever projection method matches the setting-up Projection...
...ceiling bracket (ET-PKB30) when using the ceiling installation method. Setting up the projector vertically or tilted horizontally, otherwise it may shorten component life. 18-ENGLISH B Do not set up the projector in a place that are used. Refer to page 52 for details.) BFront-... (Using a translucent screen) Menu item Setting INSTALLATION REAR/DESK Menu item Setting INSTALLATION REAR/CEILING NOTE: B You will need to the projector. Setting-up method. (The projection method can be set from the "OPTION" menu. Select whichever projection method matches the setting-up Projection...
Operating Instructions
Page 19
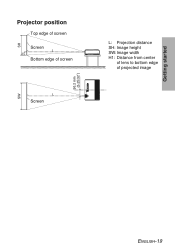
Getting started SW SH H1 Projector position Top edge of screen Screen L Bottom edge of screen L Screen 96.2 mm (3-25/32˝) L: Projection distance SH: Image height SW:Image width H1: Distance from center of lens to bottom edge of projected image ENGLISH-19
Getting started SW SH H1 Projector position Top edge of screen Screen L Bottom edge of screen L Screen 96.2 mm (3-25/32˝) L: Projection distance SH: Image height SW:Image width H1: Distance from center of lens to bottom edge of projected image ENGLISH-19
Operating Instructions
Page 21
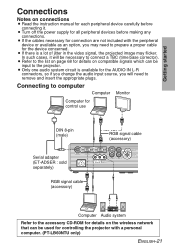
... a proper cable for the device concerned. In such cases, it . B If there is available for controlling the projector with the peripheral device or available as an option, you will be input to the projector. Connecting to computer Computer Monitor Computer for control use DIN 8-pin (male) Serial adapter (ET-ADSER : sold separately...
... a proper cable for the device concerned. In such cases, it . B If there is available for controlling the projector with the peripheral device or available as an option, you will be input to the projector. Connecting to computer Computer Monitor Computer for control use DIN 8-pin (male) Serial adapter (ET-ADSER : sold separately...
Operating Instructions
Page 24
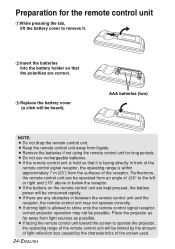
... if not using the remote control unit for the remote control unit #While pressing the tab, lift the battery cover to operate the projector, the operating range of the remote control signal receptor, the operating range is facing directly in between the remote control unit and the receptor..., the remote control unit may not be consumed rapidly. Place the projector as possible. B If the buttons on the remote control unit are any obstacles in front of the remote control unit will be possible....
... if not using the remote control unit for the remote control unit #While pressing the tab, lift the battery cover to operate the projector, the operating range of the remote control signal receptor, the operating range is facing directly in between the remote control unit and the receptor..., the remote control unit may not be consumed rapidly. Place the projector as possible. B If the buttons on the remote control unit are any obstacles in front of the remote control unit will be possible....


