Operating Instructions
Page 1
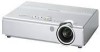
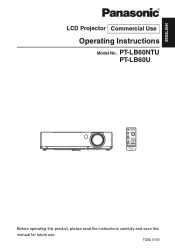
ENGLISH R LCD Projector Commercial Use Operating Instructions Model No. TQBJ 0193 PT-LB60NTU PT-LB60U Before operating this product, please read the instructions carefully and save this manual for future use.
ENGLISH R LCD Projector Commercial Use Operating Instructions Model No. TQBJ 0193 PT-LB60NTU PT-LB60U Before operating this product, please read the instructions carefully and save this manual for future use.

Operating Instructions
Page 2
... you use higher voltages or currents than this booklet in the literature accompanying the product. The lightning flash with the projector as an accessory can only be of sufficient magnitude to constitute a risk of electric shock to the presence of important operating and maintenance (servicing) instructions in case service is required. Model number: PT-LB60NTU / PT-LB60U Serial number: IMPORTANT SAFETY NOTICE WARNING...
... you use higher voltages or currents than this booklet in the literature accompanying the product. The lightning flash with the projector as an accessory can only be of sufficient magnitude to constitute a risk of electric shock to the presence of important operating and maintenance (servicing) instructions in case service is required. Model number: PT-LB60NTU / PT-LB60U Serial number: IMPORTANT SAFETY NOTICE WARNING...
Operating Instructions
Page 3
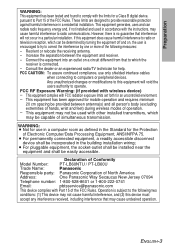
... interference in a particular installation. This equipment may cause harmful interference to radio communications. Declaration of Conformity Model Number: PT-LB60NTU / PT-LB60U Trade Name: Panasonic Responsible party: Panasonic Corporation of North America Address: One Panasonic Way Secaucus New Jersey 07094 Telephone number: 1-800-528-8601 or 1-800-222-0741 Email: pbtsservice@panasonic.com This device complies with Part 15 of the FCC...
... interference in a particular installation. This equipment may cause harmful interference to radio communications. Declaration of Conformity Model Number: PT-LB60NTU / PT-LB60U Trade Name: Panasonic Responsible party: Panasonic Corporation of North America Address: One Panasonic Way Secaucus New Jersey 07094 Telephone number: 1-800-528-8601 or 1-800-222-0741 Email: pbtsservice@panasonic.com This device complies with Part 15 of the FCC...
Operating Instructions
Page 4
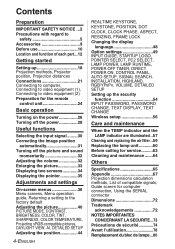
..., Menu operation guide, Returning a setting to the factory default Adjusting the picture 40 PICTURE MODE, CONTRAST, BRIGHTNESS, COLOR, TINT, SHARPNESS, COLOR TEMPERATURE, Projecting sRGB-compatible pictures, DAYLIGHT VIEW, AI, DETAILED SETUP Adjusting the position 44 4-ENGLISH REALTIME KEYSTONE, KEYSTONE, POSITION, DOT CLOCK, CLOCK PHASE, ASPECT, RESIZING, FRAME LOCK Changing the display language 48 Option settings 49 INPUT GUIDE, STARTUP LOGO, POINTER SELECT, PC2 SELECT, LAMP POWER, LAMP RUNTIME, POWER OFF TIMER, DIRECT POWER ON, CONTROL PANEL, AUTO SETUP, SIGNAL SEARCH, INSTALLATION...
..., Menu operation guide, Returning a setting to the factory default Adjusting the picture 40 PICTURE MODE, CONTRAST, BRIGHTNESS, COLOR, TINT, SHARPNESS, COLOR TEMPERATURE, Projecting sRGB-compatible pictures, DAYLIGHT VIEW, AI, DETAILED SETUP Adjusting the position 44 4-ENGLISH REALTIME KEYSTONE, KEYSTONE, POSITION, DOT CLOCK, CLOCK PHASE, ASPECT, RESIZING, FRAME LOCK Changing the display language 48 Option settings 49 INPUT GUIDE, STARTUP LOGO, POINTER SELECT, PC2 SELECT, LAMP POWER, LAMP RUNTIME, POWER OFF TIMER, DIRECT POWER ON, CONTROL PANEL, AUTO SETUP, SIGNAL SEARCH, INSTALLATION...
Operating Instructions
Page 10
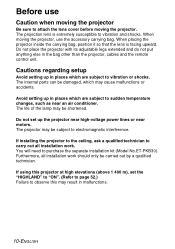
... internal parts can be subject to vibration or shocks. Avoid setting up the projector near high-voltage power lines or near an air conditioner. You will need to carry out all installation work . If using this may cause malfunctions or accidents. Do not set the "HIGHLAND" to "ON". (Refer to page 52.) Failure to attach the lens cover before moving the projector. The projector may...
... internal parts can be subject to vibration or shocks. Avoid setting up the projector near high-voltage power lines or near an air conditioner. You will need to carry out all installation work . If using this may cause malfunctions or accidents. Do not set the "HIGHLAND" to "ON". (Refer to page 52.) Failure to attach the lens cover before moving the projector. The projector may...
Operating Instructions
Page 11
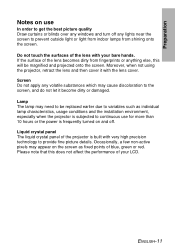
... it with the lens cover. Please note that this will be replaced earlier due to variables such as individual lamp characteristics, usage conditions and the installation environment, especially when the projector is built with your LCD. ENGLISH-11 Preparation Notes on use for more than 10 hours or the power is frequently turned on the screen as fixed points of the projector is subjected...
... it with the lens cover. Please note that this will be replaced earlier due to variables such as individual lamp characteristics, usage conditions and the installation environment, especially when the projector is built with your LCD. ENGLISH-11 Preparation Notes on use for more than 10 hours or the power is frequently turned on the screen as fixed points of the projector is subjected...
Operating Instructions
Page 13
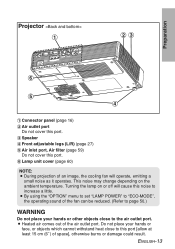
... out of the air outlet port. Turning the lamp on the ambient temperature. B By using the "OPTION" menu to set "LAMP POWER" to "ECO-MODE", the operating sound of the fan can be reduced. (Refer to page 50.) WARNING Do not place your hands or face, or objects which cannot withstand heat close to increase a little. ENGLISH-13 This noise may change depending on or off...
... out of the air outlet port. Turning the lamp on the ambient temperature. B By using the "OPTION" menu to set "LAMP POWER" to "ECO-MODE", the operating sound of the fan can be reduced. (Refer to page 50.) WARNING Do not place your hands or face, or objects which cannot withstand heat close to increase a little. ENGLISH-13 This noise may change depending on or off...
Operating Instructions
Page 15
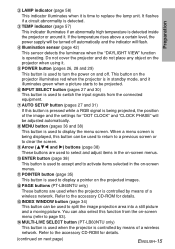
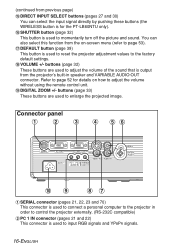
... used to replace the lamp unit. When a menu screen is being projected, the position of the image and the settings for "DOT CLOCK" and "CLOCK PHASE" will flash. & Illumination sensor (page 42) This sensor detects the luminance when the "DAYLIGHT VIEW" function is time to switch the input signals from the connected equipment. ) AUTO SETUP button (pages 27 and 31) If this button is pressed while a RGB signal is being displayed, this button...
... used to replace the lamp unit. When a menu screen is being projected, the position of the image and the settings for "DOT CLOCK" and "CLOCK PHASE" will flash. & Illumination sensor (page 42) This sensor detects the luminance when the "DAYLIGHT VIEW" function is time to switch the input signals from the connected equipment. ) AUTO SETUP button (pages 27 and 31) If this button is pressed while a RGB signal is being displayed, this button...
Operating Instructions
Page 16
... select the input signal directly by pushing these buttons (the WIRELESS button is for details on -screen menu (refer to page 53). 3 DEFAULT button (page 39) This button is used to momentarily turn off the picture and sound. Refer to page 52 for the PT-LB60NTU only). 2 SHUTTER button (page 32) This button is used to reset the projector adjustment values to the factory default settings. 4 VOLUME +/- buttons (page 33) These buttons are used to adjust the volume...
... select the input signal directly by pushing these buttons (the WIRELESS button is for details on -screen menu (refer to page 53). 3 DEFAULT button (page 39) This button is used to momentarily turn off the picture and sound. Refer to page 52 for the PT-LB60NTU only). 2 SHUTTER button (page 32) This button is used to reset the projector adjustment values to the factory default settings. 4 VOLUME +/- buttons (page 33) These buttons are used to adjust the volume...
Operating Instructions
Page 22
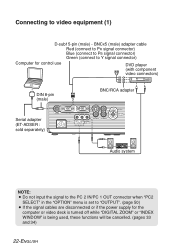
.../RCA adapter Serial adapter (ET-ADSER : sold separately) Audio system NOTE: B Do not input the signal to the PC 2 IN/PC 1 OUT connector when "PC2 SELECT" in the "OPTION" menu is set to video equipment (1) D-sub15-pin (male) - BNCx5 (male) adapter cable Red (connect to PR signal connector) Blue (connect to PB signal connector) Green (connect to Y signal connector) Computer for the computer or video deck is turned off while "DIGITAL ZOOM" or "INDEX WINDOW...
.../RCA adapter Serial adapter (ET-ADSER : sold separately) Audio system NOTE: B Do not input the signal to the PC 2 IN/PC 1 OUT connector when "PC2 SELECT" in the "OPTION" menu is set to video equipment (1) D-sub15-pin (male) - BNCx5 (male) adapter cable Red (connect to PR signal connector) Blue (connect to PB signal connector) Green (connect to Y signal connector) Computer for the computer or video deck is turned off while "DIGITAL ZOOM" or "INDEX WINDOW...
Operating Instructions
Page 29
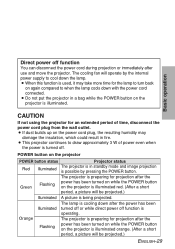
... projector in a bag while the POWER button on again compared to draw approximately 3 W of power even when the power is used, it may damage the insulation, which could result in standby mode and image projection is possible by the internal power supply to cool down the lamp. CAUTION If not using the projector for the lamp to turn back on the projector is cooling down with the power cord connected. The lamp...
... projector in a bag while the POWER button on again compared to draw approximately 3 W of power even when the power is used, it may damage the insulation, which could result in standby mode and image projection is possible by the internal power supply to cool down the lamp. CAUTION If not using the projector for the lamp to turn back on the projector is cooling down with the power cord connected. The lamp...
Operating Instructions
Page 31
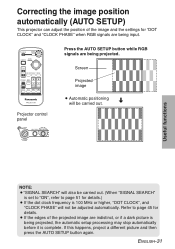
.... Projector control panel Screen Projected image B Automatic positioning will be carried out. [ Useful functions NOTE: B"SIGNAL SEARCH" will also be carried out. (When "SIGNAL SEARCH" is 100 MHz or higher, "DOT CLOCK", and "CLOCK PHASE" will not be adjusted automatically. Refer to page 45 for details.) B If the dot clock frequency is set to "ON", refer to page 51 for details. Press the AUTO SETUP button...
.... Projector control panel Screen Projected image B Automatic positioning will be carried out. [ Useful functions NOTE: B"SIGNAL SEARCH" will also be carried out. (When "SIGNAL SEARCH" is 100 MHz or higher, "DOT CLOCK", and "CLOCK PHASE" will not be adjusted automatically. Refer to page 45 for details.) B If the dot clock frequency is set to "ON", refer to page 51 for details. Press the AUTO SETUP button...
Operating Instructions
Page 42
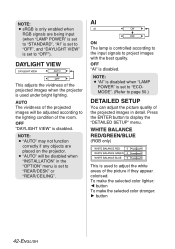
... picture quality of the projected images in the "OPTION" menu is set to "ECOMODE". (Refer to "OFF"). Press the ENTER button to adjust the white areas of the picture if they appear colorised. WHITE BALANCE RED/GREEN/BLUE (RGB only) This is used under bright lighting. To make the selected color lighter: I button To make the selected color stronger: H button 42-ENGLISH AI ON The lamp is controlled according to the input signals...
... picture quality of the projected images in the "OPTION" menu is set to "ECOMODE". (Refer to "OFF"). Press the ENTER button to adjust the white areas of the picture if they appear colorised. WHITE BALANCE RED/GREEN/BLUE (RGB only) This is used under bright lighting. To make the selected color lighter: I button To make the selected color stronger: H button 42-ENGLISH AI ON The lamp is controlled according to the input signals...
Operating Instructions
Page 50
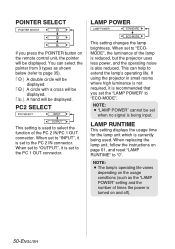
... This setting displays the usage time for the lamp unit which is set to the PC 2 IN connector. If using the projector in small rooms where high luminance is not required, it is currently being input. When replacing the lamp unit, follow the instructions on the remote control unit, the pointer will be displayed. When set to "INPUT", it is used . POINTER SELECT LAMP POWER If you set the "LAMP POWER" to "ECO-MODE".
... This setting displays the usage time for the lamp unit which is set to the PC 2 IN connector. If using the projector in small rooms where high luminance is not required, it is currently being input. When replacing the lamp unit, follow the instructions on the remote control unit, the pointer will be displayed. When set to "INPUT", it is used . POINTER SELECT LAMP POWER If you set the "LAMP POWER" to "ECO-MODE".
Operating Instructions
Page 51
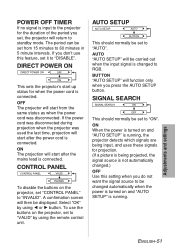
... "AUTO SETUP" is running . AUTO SETUP This should normally be set from the same status as when the power cord was used the last time, projection will then be displayed. AUTO "AUTO SETUP" will be changed automatically when the power is turned on and "AUTO SETUP" is running , the projector detects which signals are being projected, the signal source is not automatically changed to "VALID" by using the remote control unit. POWER OFF TIMER If no signal is input to the projector for projection. (If a picture...
... "AUTO SETUP" is running . AUTO SETUP This should normally be set from the same status as when the power cord was used the last time, projection will then be displayed. AUTO "AUTO SETUP" will be changed automatically when the power is turned on and "AUTO SETUP" is running , the projector detects which signals are being projected, the signal source is not automatically changed to "VALID" by using the remote control unit. POWER OFF TIMER If no signal is input to the projector for projection. (If a picture...
Operating Instructions
Page 58
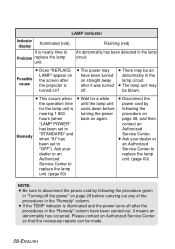
... "LAMP POWER" contact an has been set to Problem replace the lamp unit. B There may have been carried out, it was turned off. Please contact an Authorized Service Center so that the necessary repairs can be blown. B The power may be an abnormality in the lamp circuit. B If the TEMP indicator is nearly time to an Authorized "OFF"). LAMP indicator Indicator display Illuminated (red) It is illuminated and the power turns...
... "LAMP POWER" contact an has been set to Problem replace the lamp unit. B There may have been carried out, it was turned off. Please contact an Authorized Service Center so that the necessary repairs can be blown. B The power may be an abnormality in the lamp circuit. B If the TEMP indicator is nearly time to an Authorized "OFF"). LAMP indicator Indicator display Illuminated (red) It is illuminated and the power turns...
Operating Instructions
Page 59
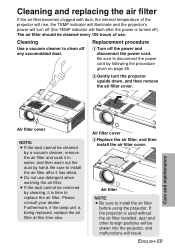
... air filter before using the projector. Be sure to install the air filter after the power is turned off). Air filter cover % Replace the air filter, and then install the air filter cover. The air filter should be cleaned by a vacuum cleaner, remove the air filter and soak it has dried. B Do not use . Care and maintenance Air filter cover NOTE: B If the dust cannot be cleaned every 100 hours of the projector will rise, the TEMP indicator will illuminate and the projector's power will turn the projector upside...
... air filter before using the projector. Be sure to install the air filter after the power is turned off). Air filter cover % Replace the air filter, and then install the air filter cover. The air filter should be cleaned by a vacuum cleaner, remove the air filter and soak it has dried. B Do not use . Care and maintenance Air filter cover NOTE: B If the dust cannot be cleaned every 100 hours of the projector will rise, the TEMP indicator will illuminate and the projector's power will turn the projector upside...
Operating Instructions
Page 61
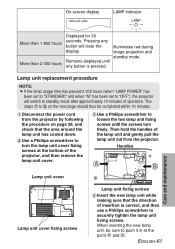
Lamp unit replacement procedure NOTE: B If the lamp usage time has passed 2 000 hours (when "LAMP POWER" has been set to "STANDARD" and when "AI" has been set to standby mode after approximately 10 minutes of operation. ENGLISH-61 Care and maintenance Pressing any button is correct, and then use a Phillips screwdriver to turn freely. Illuminates red during image projection and standby mode. Handles A B Lamp unit cover Lamp unit cover fixing screws Lamp unit fixing screws & Insert the new lamp unit while...
Lamp unit replacement procedure NOTE: B If the lamp usage time has passed 2 000 hours (when "LAMP POWER" has been set to "STANDARD" and when "AI" has been set to standby mode after approximately 10 minutes of operation. ENGLISH-61 Care and maintenance Pressing any button is correct, and then use a Phillips screwdriver to turn freely. Illuminates red during image projection and standby mode. Handles A B Lamp unit cover Lamp unit cover fixing screws Lamp unit fixing screws & Insert the new lamp unit while...
Operating Instructions
Page 62
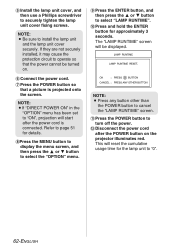
..." menu has been set to "ON", projection will be turned on the projector illuminates red. The "LAMP RUNTIME" screen will start after the POWER button on . ( Connect the power cord. ) Press the POWER button so that a picture is connected. NOTE: B Be sure to turn off the power. . Refer to page 51 for details. *Press the MENU button to display the menu screen, and then press the F or G button to select the "OPTION" menu. + Press the ENTER button, and...
..." menu has been set to "ON", projection will be turned on the projector illuminates red. The "LAMP RUNTIME" screen will start after the POWER button on . ( Connect the power cord. ) Press the POWER button so that a picture is connected. NOTE: B Be sure to turn off the power. . Refer to page 51 for details. *Press the MENU button to display the menu screen, and then press the F or G button to select the "OPTION" menu. + Press the ENTER button, and...
Operating Instructions
Page 63
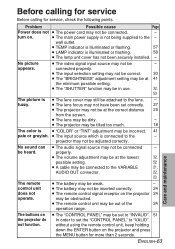
... remote control signal receptor on the projector and press the MENU button for service, check the following points. ENGLISH-63 Care and maintenance B The input selection setting may not be correct. 30 B The "BRIGHTNESS" adjustment setting may be - No picture appears. B The projector may be incorrect. 41 pale or grayish. B The main power supply is illuminated or flashing. 58 B The lamp unit cover has not been securely installed. - B The lens may...
... remote control signal receptor on the projector and press the MENU button for service, check the following points. ENGLISH-63 Care and maintenance B The input selection setting may not be correct. 30 B The "BRIGHTNESS" adjustment setting may be - No picture appears. B The projector may be incorrect. 41 pale or grayish. B The main power supply is illuminated or flashing. 58 B The lamp unit cover has not been securely installed. - B The lens may...


