Operating Instructions
Page 4
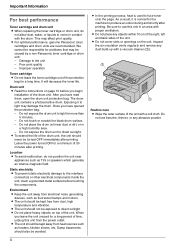
.... Location L To avoid malfunction, do not allow dust, water, or liquids to light may damage the drum. L The unit should not be caused by a non-Panasonic toner cartridge or drum unit: - L The unit should be kept away from dust, high temperature and vibration. When you have read them, open the drum unit...
.... Location L To avoid malfunction, do not allow dust, water, or liquids to light may damage the drum. L The unit should not be caused by a non-Panasonic toner cartridge or drum unit: - L The unit should be kept away from dust, high temperature and vibration. When you have read them, open the drum unit...
Operating Instructions
Page 5
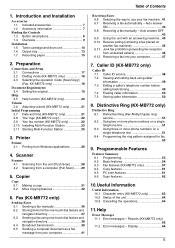
... Accessories 1.1 Included accessories 7 1.2 Accessory information 7 Finding the Controls 1.3 Button descriptions 8 1.4 Overview 9 Installation 1.5 Toner cartridge and drum unit 10 1.6 Output tray 13 1.7 Recording paper 15 2. Fax (KX-MB772 only) Sending Faxes 6.1 Sending a fax manually 36 6.2 Storing items for fax 52 9. Reports (KX-MB772 only 65 11.2 Error messages - Copier Copy 5.1 Making a copy 31 5.2 More...
... Accessories 1.1 Included accessories 7 1.2 Accessory information 7 Finding the Controls 1.3 Button descriptions 8 1.4 Overview 9 Installation 1.5 Toner cartridge and drum unit 10 1.6 Output tray 13 1.7 Recording paper 15 2. Fax (KX-MB772 only) Sending Faxes 6.1 Sending a fax manually 36 6.2 Storing items for fax 52 9. Reports (KX-MB772 only 65 11.2 Error messages - Copier Copy 5.1 Making a copy 31 5.2 More...
Operating Instructions
Page 7
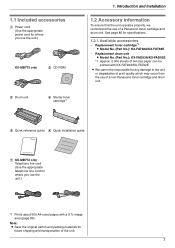
... paper can be responsible for any damage to the unit or degradation of print quality which may occur from the use of a non-Panasonic toner cartridge and drum unit. 5 Quick reference guide 6 Quick installation guide 7 KX-MB772 only Telephone line cord (Use the appropriate telephone line cord for where you use the unit...
... paper can be responsible for any damage to the unit or degradation of print quality which may occur from the use of a non-Panasonic toner cartridge and drum unit. 5 Quick reference guide 6 Quick installation guide 7 KX-MB772 only Telephone line cord (Use the appropriate telephone line cord for where you use the unit...

Operating Instructions
Page 10
... place the drum unit near dust or dirt, or in a high humidity area. - It will decrease the toner life. 1. Do not expose the drum unit to the toner cartridge. 1 Before opening the protection bag of a non-Panasonic toner cartridge and drum unit. L Do not add toner to direct sunlight. The drum unit contains a photosensitive drum.
... place the drum unit near dust or dirt, or in a high humidity area. - It will decrease the toner life. 1. Do not expose the drum unit to the toner cartridge. 1 Before opening the protection bag of a non-Panasonic toner cartridge and drum unit. L Do not add toner to direct sunlight. The drum unit contains a photosensitive drum.
Operating Instructions
Page 11
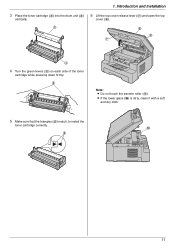
L If the lower glass (j) is dirty, clean it with a soft and dry cloth. 5 Make sure that the triangles (6) match, to install the toner cartridge correctly. j 6 11 Introduction and Installation 3 Place the toner cartridge (3) into the drum unit (4) vertically. 3 6 Lift the top cover release lever (7) and open the top cover (8). 8 9 7 4 4 Turn the green levers (5) on each side of the toner cartridge while pressing down firmly. 5 Note: L Do not touch the transfer roller (9). 1.
L If the lower glass (j) is dirty, clean it with a soft and dry cloth. 5 Make sure that the triangles (6) match, to install the toner cartridge correctly. j 6 11 Introduction and Installation 3 Place the toner cartridge (3) into the drum unit (4) vertically. 3 6 Lift the top cover release lever (7) and open the top cover (8). 8 9 7 4 4 Turn the green levers (5) on each side of the toner cartridge while pressing down firmly. 5 Note: L Do not touch the transfer roller (9). 1.
Operating Instructions
Page 12
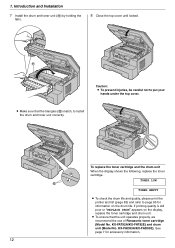
... (k) by holding the tabs. 8 Close the top cover until locked. To replace the toner cartridge and the drum unit When the display shows the following, replace the toner cartridge. KX-FAD93A/KX-FAD93E). 1. TONER LOW l TONER EMPTY L To check the drum life and quality, please print the printer test list (...be careful not to page 85 for accessory information. 12 L Make sure that the unit operates properly, we recommend the use of Panasonic toner cartridge (Model No. KX-FAT92A/KX-FAT92E) and drum unit (Model No. L To ensure that the triangles (l) match, to install the drum and...
... (k) by holding the tabs. 8 Close the top cover until locked. To replace the toner cartridge and the drum unit When the display shows the following, replace the toner cartridge. KX-FAD93A/KX-FAD93E). 1. TONER LOW l TONER EMPTY L To check the drum life and quality, please print the printer test list (...be careful not to page 85 for accessory information. 12 L Make sure that the unit operates properly, we recommend the use of Panasonic toner cartridge (Model No. KX-FAT92A/KX-FAT92E) and drum unit (Model No. L To ensure that the triangles (l) match, to install the drum and...
Operating Instructions
Page 13
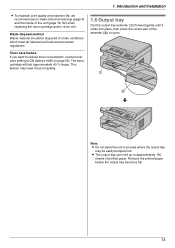
... (1) forward gently until it clicks into . Introduction and Installation L To maintain print quality and machine life, we recommend you want to reduce toner consumption, set the toner save setting to approximately 150 sheets of under conditions which meet all national and local environmental regulations. This feature may be disposed of printed... disposal method Waste material should be easily bumped into place, then press the centre part of the unit (page 79, 82) when replacing the toner cartridge and/or drum unit. The toner cartridge will last approximately 40 % longer.
... (1) forward gently until it clicks into . Introduction and Installation L To maintain print quality and machine life, we recommend you want to reduce toner consumption, set the toner save setting to approximately 150 sheets of under conditions which meet all national and local environmental regulations. This feature may be disposed of printed... disposal method Waste material should be easily bumped into place, then press the centre part of the unit (page 79, 82) when replacing the toner cartridge and/or drum unit. The toner cartridge will last approximately 40 % longer.
Operating Instructions
Page 26
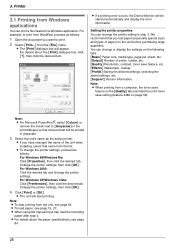
...recommend that you test paper (especially special sizes and types of prints, collate, etc. [Quality] Resolution, contrast, toner save setting (feature #482 on the [Quality] tab overrides the unit's toner save feature, etc. [Effects] Watermark, overlay. [Profile] Saving the desired settings, selecting the saved settings, ... PowerPoint®, select [Colour] or remove the check next to [Greyscale] in the print dialogue so that name from a computer, the toner save feature on page 56). For Windows 2000: Click the desired tab and change the printer settings, proceed as follows. 1 Open the ...
...recommend that you test paper (especially special sizes and types of prints, collate, etc. [Quality] Resolution, contrast, toner save setting (feature #482 on the [Quality] tab overrides the unit's toner save feature, etc. [Effects] Watermark, overlay. [Profile] Saving the desired settings, selecting the saved settings, ... PowerPoint®, select [Colour] or remove the check next to [Greyscale] in the print dialogue so that name from a computer, the toner save feature on page 56). For Windows 2000: Click the desired tab and change the printer settings, proceed as follows. 1 Open the ...

Operating Instructions
Page 56
9. Programmable Features Feature/Code Setting the default operation mode timer {#}{4}{6}{4} (KX-MB772 only) Setting toner save feature {#}{4}{8}{2} Selection To set the timer before returning to the default operation mode (feature #463). {0} "OFF": Deactivates this feature. {1} "30s": 30 seconds {2} "1min" (default): 1 minute {3} "2min": 2 minutes {4} "5min": 5 minutes {0} "OFF" (default): Deactivates this feature. {1} "ON": The toner cartridge will last longer. Note: L This feature may lower the print quality by reducing toner consumption. 56
9. Programmable Features Feature/Code Setting the default operation mode timer {#}{4}{6}{4} (KX-MB772 only) Setting toner save feature {#}{4}{8}{2} Selection To set the timer before returning to the default operation mode (feature #463). {0} "OFF": Deactivates this feature. {1} "30s": 30 seconds {2} "1min" (default): 1 minute {3} "2min": 2 minutes {4} "5min": 5 minutes {0} "OFF" (default): Deactivates this feature. {1} "ON": The toner cartridge will last longer. Note: L This feature may lower the print quality by reducing toner consumption. 56
Operating Instructions
Page 64
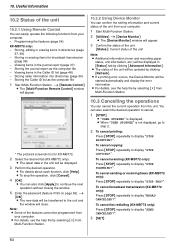
... 4 [OK] L You can also select the desired operation to display "SEND CANCELLED?". 3 {SET} 64 To cancel sending or receiving faxes (KX-MB772 only): Press {STOP} repeatedly to continue the next operation without closing the window. 5 Enter the password (feature #155 on page 55). ...Status]: Current status of the unit will be programmed from your computer. - L The status of the unit Note: L Additional information (toner and recording paper status, unit information, etc.) will appear. 10.2.2 Using Device Monitor You can confirm the setting information and current status of...
... 4 [OK] L You can also select the desired operation to display "SEND CANCELLED?". 3 {SET} 64 To cancel sending or receiving faxes (KX-MB772 only): Press {STOP} repeatedly to continue the next operation without closing the window. 5 Enter the password (feature #155 on page 55). ...Status]: Current status of the unit will be programmed from your computer. - L The status of the unit Note: L Additional information (toner and recording paper status, unit information, etc.) will appear. 10.2.2 Using Device Monitor You can confirm the setting information and current status of...
Operating Instructions
Page 66
... paper jam occurred near to print out the document. Remove the jammed paper (page 73). 11. L There is open. Replace the drum unit and the toner cartridge. Re-insert the recording paper (page 77). L The manual input tray (rear cover) is something wrong with the carriage sensor. For fax memory capacity...
... paper jam occurred near to print out the document. Remove the jammed paper (page 73). 11. L There is open. Replace the drum unit and the toner cartridge. Re-insert the recording paper (page 77). L The manual input tray (rear cover) is something wrong with the carriage sensor. For fax memory capacity...
Operating Instructions
Page 67
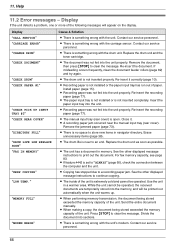
...PLEASE WAIT" "POLLING ERROR" "REDIAL TIME OUT" "REMOVE DOCUMENT" "REMOVE PAPER IN INPUT TRAY #2" "REPLACE DRUM CHANGE SUPPLIES" "RX MEMORY FULL" "TONER EMPTY" "CHANGE SUPPLIES" "TONER LOW" "CHANGE SUPPLIES" "TOP COVER OPEN" "TRANSMIT ERROR" "WARMING UP" "WRONG PAPER" Cause & Solution L The other party's fax machine is .... Let the unit warm up . L The document is full of received documents due to copy, receive faxes or print reports. Replace the toner cartridge as soon as possible. L A transmission error occurred. 11. Close it. L The cable or the computer power cord is cold....
...PLEASE WAIT" "POLLING ERROR" "REDIAL TIME OUT" "REMOVE DOCUMENT" "REMOVE PAPER IN INPUT TRAY #2" "REPLACE DRUM CHANGE SUPPLIES" "RX MEMORY FULL" "TONER EMPTY" "CHANGE SUPPLIES" "TONER LOW" "CHANGE SUPPLIES" "TOP COVER OPEN" "TRANSMIT ERROR" "WARMING UP" "WRONG PAPER" Cause & Solution L The other party's fax machine is .... Let the unit warm up . L The document is full of received documents due to copy, receive faxes or print reports. Replace the toner cartridge as soon as possible. L A transmission error occurred. 11. Close it. L The cable or the computer power cord is cold....
Operating Instructions
Page 69
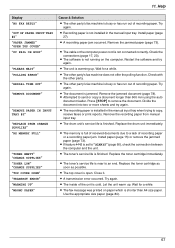
... with correction fluid, etc. Cause & Solution L When scanning at a high resolution, a large amount of insufficient memory, close other party (KX-MB772 only). Change the setting or divide the document into the unit when using the copier. Black lines, white lines or smudges appear on ...79, 82). L The unit is ejected. L Please wait. Cause & Solution L Some paper has instructions recommending which you set. L The toner save mode of greyscale when printing from Microsoft PowerPoint or other party placed the document in greyscale. 11.3.3 Scanner Problem I cannot scan. L ...
... with correction fluid, etc. Cause & Solution L When scanning at a high resolution, a large amount of insufficient memory, close other party (KX-MB772 only). Change the setting or divide the document into the unit when using the copier. Black lines, white lines or smudges appear on ...79, 82). L The unit is ejected. L Please wait. Cause & Solution L Some paper has instructions recommending which you set. L The toner save mode of greyscale when printing from Microsoft PowerPoint or other party placed the document in greyscale. 11.3.3 Scanner Problem I cannot scan. L ...
Operating Instructions
Page 74
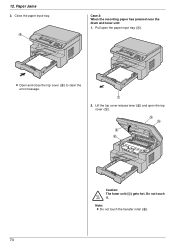
12. Pull open the top cover (3). 3 5 2 4 Caution: The fuser unit (4) gets hot. L Open and close the top cover (4) to clear the error message. 1 2. Note: L Do not touch the transfer roller (5). 74 Paper Jams 3. Close the paper input tray. 4 Case 2: When the recording paper has jammed near the drum and toner unit: 1. Do not touch it. Lift the top cover release lever (2) and open the paper input tray (1).
12. Pull open the top cover (3). 3 5 2 4 Caution: The fuser unit (4) gets hot. L Open and close the top cover (4) to clear the error message. 1 2. Note: L Do not touch the transfer roller (5). 74 Paper Jams 3. Close the paper input tray. 4 Case 2: When the recording paper has jammed near the drum and toner unit: 1. Do not touch it. Lift the top cover release lever (2) and open the paper input tray (1).

Operating Instructions
Page 79
the fax document received by the other party (KX- Caution: L Be careful when handling the drum and toner unit. L Do not use paper products, such as paper towels or tissues, to clean the inside of the unit. 13.1.1 White plates and scanner glass 1 ...
the fax document received by the other party (KX- Caution: L Be careful when handling the drum and toner unit. L Do not use paper products, such as paper towels or tissues, to clean the inside of the unit. 13.1.1 White plates and scanner glass 1 ...
Operating Instructions
Page 80
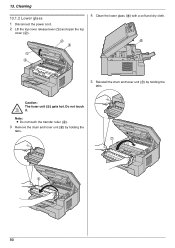
Caution: The fuser unit (3) gets hot. Do not touch it. Note: L Do not touch the transfer roller (4). 3 Remove the drum and toner unit (5) by holding the tabs. 7 5 80 Cleaning 13.1.2 Lower glass 1 Disconnect the power cord. 2 Lift the top cover release lever (1) and open the top cover (2). 2 4 4 Clean the lower glass (6) with a soft and dry cloth. 6 1 3 5 Reinstall the drum and toner unit (7) by holding the tabs. 13.
Caution: The fuser unit (3) gets hot. Do not touch it. Note: L Do not touch the transfer roller (4). 3 Remove the drum and toner unit (5) by holding the tabs. 7 5 80 Cleaning 13.1.2 Lower glass 1 Disconnect the power cord. 2 Lift the top cover release lever (1) and open the top cover (2). 2 4 4 Clean the lower glass (6) with a soft and dry cloth. 6 1 3 5 Reinstall the drum and toner unit (7) by holding the tabs. 13.
Operating Instructions
Page 81
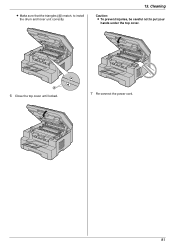
L Make sure that the triangles (8) match, to put your hands under the top cover. 8 6 Close the top cover until locked. 7 Re-connect the power cord. 81 Cleaning Caution: L To prevent injuries, be careful not to install the drum and toner unit correctly. 13.
L Make sure that the triangles (8) match, to put your hands under the top cover. 8 6 Close the top cover until locked. 7 Re-connect the power cord. 81 Cleaning Caution: L To prevent injuries, be careful not to install the drum and toner unit correctly. 13.
Operating Instructions
Page 83
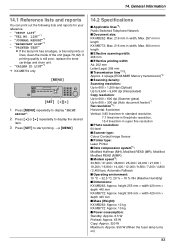
... LIST"*1 - If printing quality is still poor, replace the toner cartridge and drum unit. - "PRINTER TEST" L If the test print has smudges, or blurred points or lines, clean the inside of the unit (page 79, 82). "CALLER ID LIST"*1 *1 KX-MB772 only {MENU} {SET} {} 1 Press {MENU} repeatedly...lists and reports for your reference. - "SETUP LIST" - height 305 mm × width 420 mm × depth 445 mm ■ Mass (Weight): KX-MB262: Approx. 12 kg KX-MB772: Approx. 13 kg ■ Power consumption: Standby: Approx. 6.5 W Preheat: Approx. 65 W Copy: Approx. 320 W Maximum: Approx. 950 ...
... LIST"*1 - If printing quality is still poor, replace the toner cartridge and drum unit. - "PRINTER TEST" L If the test print has smudges, or blurred points or lines, clean the inside of the unit (page 79, 82). "CALLER ID LIST"*1 *1 KX-MB772 only {MENU} {SET} {} 1 Press {MENU} repeatedly...lists and reports for your reference. - "SETUP LIST" - height 305 mm × width 420 mm × depth 445 mm ■ Mass (Weight): KX-MB262: Approx. 12 kg KX-MB772: Approx. 13 kg ■ Power consumption: Standby: Approx. 6.5 W Preheat: Approx. 65 W Copy: Approx. 320 W Maximum: Approx. 950 ...
Operating Instructions
Page 85
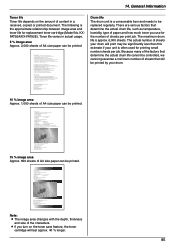
...5 % image area Approx. 2,000 sheets of paper and how much toner you for purchasing a Panasonic fax machine. Toner life varies in a received, copied or printed document. TAM (External Telephone...KX-FAT92E). Copy / Copying3.1 Using the unit as a copy machine. 3.2 Making a copy 3.3 More copying features 4. Table of Contents 1.1 Included accessories.1.2 Accessory information.Finding the Controls 1.3 Description of buttons. 1.4 Overview Installation 1.5 Toner cartridge and drum unit 1.6 Document tray 1.7 Output tray 1.8 Recording paper 2. Thank you for purchasing a Panasonic...
...5 % image area Approx. 2,000 sheets of paper and how much toner you for purchasing a Panasonic fax machine. Toner life varies in a received, copied or printed document. TAM (External Telephone...KX-FAT92E). Copy / Copying3.1 Using the unit as a copy machine. 3.2 Making a copy 3.3 More copying features 4. Table of Contents 1.1 Included accessories.1.2 Accessory information.Finding the Controls 1.3 Description of buttons. 1.4 Overview Installation 1.5 Toner cartridge and drum unit 1.6 Document tray 1.7 Output tray 1.8 Recording paper 2. Thank you for purchasing a Panasonic...
Operating Instructions
Page 86
... hold: 55 #463 Default operation mode: 55 #464 Mode timer: 56 #467 Page layout hold: 61 #468 Zoom hold: 61 #469 Collate hold: 61 #482 Toner save: 13, 56 #493 Scan mode: 62 #494 Scan parameter hold: 62 #774 Data timeout: 61 A Accessories: 7 Answering machine: 45 Auto document feeder: 19, 32...
... hold: 55 #463 Default operation mode: 55 #464 Mode timer: 56 #467 Page layout hold: 61 #468 Zoom hold: 61 #469 Collate hold: 61 #482 Toner save: 13, 56 #493 Scan mode: 62 #494 Scan parameter hold: 62 #774 Data timeout: 61 A Accessories: 7 Answering machine: 45 Auto document feeder: 19, 32...


