Operating Instructions
Page 4
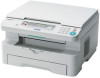
... installation of the drum unit. L Do not cover slots or openings on top of time, unplug this unit in an area with a soft cloth. Do not use this unit from electrical noise generating devices, such as fluorescent lamps and motors. Improper operation Toner cartridge L Do not leave the toner cartridge out of the protection bag for a long period of the unit. Exposing it is used to fuse toner...
... installation of the drum unit. L Do not cover slots or openings on top of time, unplug this unit in an area with a soft cloth. Do not use this unit from electrical noise generating devices, such as fluorescent lamps and motors. Improper operation Toner cartridge L Do not leave the toner cartridge out of the protection bag for a long period of the unit. Exposing it is used to fuse toner...
Operating Instructions
Page 5
...39 6.5 Sending a computer document as a fax message from undesired callers 46 6.12 Receiving a fax into your fax machine ..41 6.7 Receiving a fax automatically - Display 66 5 Preparation Connections and Setup 2.1 Connections 17 2.2 Dialling mode (KX-MB772 only 18 2.3 Selecting the operation mode (Scan/Copy) (Fax: KX-MB772 only 18 Document Requirements 2.4 Setting the original 19 Help 2.5 Help function (KX-MB772 only 20 Volume 2.6 Adjusting volume (KX-MB772 only 21 Initial Programming 2.7 Date and time (KX-MB772 only 21 2.8 Your logo (KX-MB772 only 22 2.9 Your fax number (KX-MB772...
...39 6.5 Sending a computer document as a fax message from undesired callers 46 6.12 Receiving a fax into your fax machine ..41 6.7 Receiving a fax automatically - Display 66 5 Preparation Connections and Setup 2.1 Connections 17 2.2 Dialling mode (KX-MB772 only 18 2.3 Selecting the operation mode (Scan/Copy) (Fax: KX-MB772 only 18 Document Requirements 2.4 Setting the original 19 Help 2.5 Help function (KX-MB772 only 20 Volume 2.6 Adjusting volume (KX-MB772 only 21 Initial Programming 2.7 Date and time (KX-MB772 only 21 2.8 Your logo (KX-MB772 only 22 2.9 Your fax number (KX-MB772...
Operating Instructions
Page 8
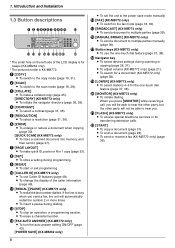
...). O {BROADCAST} (KX-MB772 only) L To send a document to the copy mode (page 18, 31). L To scan a document (page 28). A {COPY} L To switch to multiple parties (page 39). F {ZOOM} L To enlarge or reduce a document when copying (page 32). {QUICK SCAN} (KX-MB772 only) L To store a scanned document into memory, and then send it (page 37). L To insert a pause during programming. M {FAX AUTO ANSWER} (KX-MB772 only) L To turn the auto answer setting ON/OFF (page 43). {POWER SAVE} (KX-MB262 only) 8 L To set the unit to the fax mode (page 18...
...). O {BROADCAST} (KX-MB772 only) L To send a document to the copy mode (page 18, 31). L To scan a document (page 28). A {COPY} L To switch to multiple parties (page 39). F {ZOOM} L To enlarge or reduce a document when copying (page 32). {QUICK SCAN} (KX-MB772 only) L To store a scanned document into memory, and then send it (page 37). L To insert a pause during programming. M {FAX AUTO ANSWER} (KX-MB772 only) L To turn the auto answer setting ON/OFF (page 43). {POWER SAVE} (KX-MB262 only) 8 L To set the unit to the fax mode (page 18...
Operating Instructions
Page 18
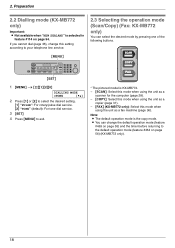
... buttons. {MENU} {SET} 1 {MENU} i {#}{1}{2}{0} DIALLING MODE =TONE [V^] 2 Press {1} or {2} to select the desired setting. {1} "PULSE": For rotary/pulse dial service. {2} "TONE" (default): For tone dial service. 3 {SET} 4 Press {MENU} to the default operation mode (feature #464 on page 54. Note: L The default operation mode is KX-MB772. - {SCAN}: Select this mode when using the unit as a scanner for the computer (page 28). - {COPY}: Select this mode when using the unit as a copier (page 31). - {FAX} (KX-MB772 only): Select this mode when using the unit as a fax machine (page...
... buttons. {MENU} {SET} 1 {MENU} i {#}{1}{2}{0} DIALLING MODE =TONE [V^] 2 Press {1} or {2} to select the desired setting. {1} "PULSE": For rotary/pulse dial service. {2} "TONE" (default): For tone dial service. 3 {SET} 4 Press {MENU} to the default operation mode (feature #464 on page 54. Note: L The default operation mode is KX-MB772. - {SCAN}: Select this mode when using the unit as a scanner for the computer (page 28). - {COPY}: Select this mode when using the unit as a copier (page 31). - {FAX} (KX-MB772 only): Select this mode when using the unit as a fax machine (page...

Operating Instructions
Page 21
... your unit's date and time setting on the top of 3 ringer patterns (feature #161 on page 55). Initial Programming 2.7 Date and time (KX-MB772 only) {MENU} {FAX} {SET} {V}{^} Ringer volume While the unit is set to "NEW ZEALAND", the date and time will be automatically set , Caller ID will not ring. If you send according to the received caller information. 2. L To turn the ringer OFF Press {V} repeatedly to the incorrect number, and make...
... your unit's date and time setting on the top of 3 ringer patterns (feature #161 on page 55). Initial Programming 2.7 Date and time (KX-MB772 only) {MENU} {FAX} {SET} {V}{^} Ringer volume While the unit is set to "NEW ZEALAND", the date and time will be automatically set , Caller ID will not ring. If you send according to the received caller information. 2. L To turn the ringer OFF Press {V} repeatedly to the incorrect number, and make...
Operating Instructions
Page 25
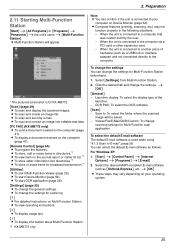
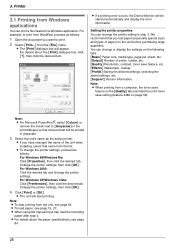
... L To send a document created on Multi-Function Station. When the unit is connected to the computer via a PCI card or other expansion card. - Click the desired tab and change scanning settings for KX-MB772. [Scan] (page 29) L To scan and display the scanned images. L To scan and create an image file. L To display a document received on your computer on Device Monitor (page 64). For Windows XP: 1. [Start] i [Control Panel] i [Internet Options] i [Programs] i [E-mail] 2. Preparation 2.11 Starting Multi-Function Station [Start] i [All Programs] or [Programs] i [Panasonic] i the unit...
... L To send a document created on Multi-Function Station. When the unit is connected to the computer via a PCI card or other expansion card. - Click the desired tab and change scanning settings for KX-MB772. [Scan] (page 29) L To scan and display the scanned images. L To scan and create an image file. L To display a document received on your computer on Device Monitor (page 64). For Windows XP: 1. [Start] i [Control Panel] i [Internet Options] i [Programs] i [E-mail] 2. Preparation 2.11 Starting Multi-Function Station [Start] i [All Programs] or [Programs] i [Panasonic] i the unit...
Operating Instructions
Page 26
... can change the printer settings. Note: L When printing from the [File] menu. For Windows 2000: Click the desired tab and change the printer setting in a Windows application. L The unit will appear. 3. L When using the manual input tray, load the recording paper after step 4. L The [Print] dialogue box will start printing. Setting the printer properties You can change the printer settings, proceed as the active printer. MBXXX L If a printing error occurs, the Device Monitor will be started automatically and display the error information...
... can change the printer settings. Note: L When printing from the [File] menu. For Windows 2000: Click the desired tab and change the printer setting in a Windows application. L The unit will appear. 3. L When using the manual input tray, load the recording paper after step 4. L The [Print] dialogue box will start printing. Setting the printer properties You can change the printer settings, proceed as the active printer. MBXXX L If a printing error occurs, the Device Monitor will be started automatically and display the error information...
Operating Instructions
Page 36
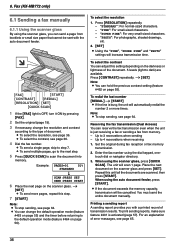
... fax transmission (Dual Access) You can change the resolution and contrast according to the type of error messages, see page 36. Enter the fax number using the auto document feeder, press {START}. For an explanation of document. To select the resolution 1. To redial the last number {REDIAL} i {START} L If the line is just receiving a fax or sending a fax from booklets or small size paper that cannot be cancelled. The unit will increase transmission time. You must send the entire document manually...
... fax transmission (Dual Access) You can change the resolution and contrast according to the type of error messages, see page 36. Enter the fax number using the auto document feeder, press {START}. For an explanation of document. To select the resolution 1. To redial the last number {REDIAL} i {START} L If the line is just receiving a fax or sending a fax from booklets or small size paper that cannot be cancelled. The unit will increase transmission time. You must send the entire document manually...

Operating Instructions
Page 41
... access the fax function from WordPad, proceed as the active printer. 4 Click [Print] or [OK]. Use only as a telephone (TEL mode) - Use as a fax (FAX ONLY mode) Your situation You have a separate telephone line just for receiving faxes. Note: L To stop the operation, click [Cancel]. 6 [Send] L The document will appear. L If the document exceeds the memory capacity of the unit, sending will appear. 3 Select the PCFAX unit's name as follows. 1 Open the document you want to use...
... access the fax function from WordPad, proceed as the active printer. 4 Click [Print] or [OK]. Use only as a telephone (TEL mode) - Use as a fax (FAX ONLY mode) Your situation You have a separate telephone line just for receiving faxes. Note: L To stop the operation, click [Cancel]. 6 [Send] L The document will appear. L If the document exceeds the memory capacity of the unit, sending will appear. 3 Select the PCFAX unit's name as follows. 1 Open the document you want to use...

Operating Instructions
Page 46
.... i {SET} 4 Press {STOP} 2 times to display "JUNK FAX PROH.". 2. 6. Press {MENU} repeatedly to display "JUNK LIST DISP.". i { i {SET} 3 Press {STOP} to exit. 6.11.2 Storing undesired callers You can register up to 20 undesired numbers from the Caller ID list (page 48) if you subscribe to Caller ID service (page 48), this feature prevents fax reception from them. 1 Press {MENU} repeatedly to display "JUNK FAX PROH.". 2 Press {>} repeatedly to receive faxes from...
.... i {SET} 4 Press {STOP} 2 times to display "JUNK FAX PROH.". 2. 6. Press {MENU} repeatedly to display "JUNK LIST DISP.". i { i {SET} 3 Press {STOP} to exit. 6.11.2 Storing undesired callers You can register up to 20 undesired numbers from the Caller ID list (page 48) if you subscribe to Caller ID service (page 48), this feature prevents fax reception from them. 1 Press {MENU} repeatedly to display "JUNK FAX PROH.". 2 Press {>} repeatedly to receive faxes from...
Operating Instructions
Page 55
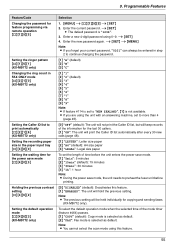
... cannot select the scan mode using this feature. {1} "ENABLED": The unit will hold the previous setting. i {SET} L The default password is selected as default. {2} "FAX": Fax mode is "1234". 3. Note: L The previous setting will print the Caller ID list automatically after every 30 new calls (page 48). {1} "LETTER": Letter size paper {2} "A4" (default): A4 size paper {3} "LEGAL": Legal size paper To set to print automatically {#}{2}{1}{6} (KX-MB772 only) Setting the recording paper size in the paper input tray {#}{3}{8}{0} Setting the waiting time for feature programming via remote...
... cannot select the scan mode using this feature. {1} "ENABLED": The unit will hold the previous setting. i {SET} L The default password is selected as default. {2} "FAX": Fax mode is "1234". 3. Note: L The previous setting will print the Caller ID list automatically after every 30 new calls (page 48). {1} "LETTER": Letter size paper {2} "A4" (default): A4 size paper {3} "LEGAL": Legal size paper To set to print automatically {#}{2}{1}{6} (KX-MB772 only) Setting the recording paper size in the paper input tray {#}{3}{8}{0} Setting the waiting time for feature programming via remote...

Operating Instructions
Page 65
... mode (feature #411 on the sending and journal reports (page 36). Reinsert it and try again. L Remove the jammed document (page 78). Close it and try again. L Fax transmission or reception was opened. Connect the telephone line cord to a lack of recording paper. Check with the other party's fax machine rings too many times. 11. Try again. Help 11 Help 11.1 Error messages - Try again or check with the other party. L The memory...
... mode (feature #411 on the sending and journal reports (page 36). Reinsert it and try again. L Remove the jammed document (page 78). Close it and try again. L Fax transmission or reception was opened. Connect the telephone line cord to a lack of recording paper. Check with the other party's fax machine rings too many times. 11. Try again. Help 11 Help 11.1 Error messages - Try again or check with the other party. L The memory...
Operating Instructions
Page 66
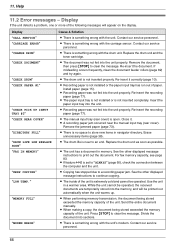
... to a recording paper jam. L The inside of the following messages will be operated. Help 11.2 Error messages - Display If the unit detects a problem, one or more of the unit is something wrong with the drum unit. L Copying has stopped due to store new items in navigator directory. L The document was not fed into the unit. Display "CALL SERVICE" "CARRIAGE ERROR" "CHANGE DRUM" "CHECK DOCUMENT" "CHECK DRUM" "CHECK PAPER #1" "CHECK PICK UP INPUT TRAY #2" "CHECK REAR COVER" "DIRECTORY FULL" "DRUM LIFE LOW REPLACE SOON" "FAX IN MEMORY" "KEEP COPYING" "LOW TEMP."
... to a recording paper jam. L The inside of the following messages will be operated. Help 11.2 Error messages - Display If the unit detects a problem, one or more of the unit is something wrong with the drum unit. L Copying has stopped due to store new items in navigator directory. L The document was not fed into the unit. Display "CALL SERVICE" "CARRIAGE ERROR" "CHANGE DRUM" "CHECK DOCUMENT" "CHECK DRUM" "CHECK PAPER #1" "CHECK PICK UP INPUT TRAY #2" "CHECK REAR COVER" "DIRECTORY FULL" "DRUM LIFE LOW REPLACE SOON" "FAX IN MEMORY" "KEEP COPYING" "LOW TEMP."
Operating Instructions
Page 67
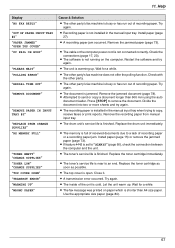
... unit is finished. Try again. Wait for a while. Help Display "NO FAX REPLY" "OUT OF PAPER INPUT TRAY #2" "PAPER JAMMED" "OPEN TOP COVER" "PC FAIL OR BUSY" "PLEASE WAIT" "POLLING ERROR" "REDIAL TIME OUT" "REMOVE DOCUMENT" "REMOVE PAPER IN INPUT TRAY #2" "REPLACE DRUM CHANGE SUPPLIES" "RX MEMORY FULL" "TONER EMPTY" "CHANGE SUPPLIES" "TONER LOW" "CHANGE SUPPLIES" "TOP COVER OPEN" "TRANSMIT ERROR" "WARMING UP" "WRONG PAPER" Cause & Solution L The other party's fax machine is not connected correctly. Check the connections (page 17, 23). Restart the software and try again. Check...
... unit is finished. Try again. Wait for a while. Help Display "NO FAX REPLY" "OUT OF PAPER INPUT TRAY #2" "PAPER JAMMED" "OPEN TOP COVER" "PC FAIL OR BUSY" "PLEASE WAIT" "POLLING ERROR" "REDIAL TIME OUT" "REMOVE DOCUMENT" "REMOVE PAPER IN INPUT TRAY #2" "REPLACE DRUM CHANGE SUPPLIES" "RX MEMORY FULL" "TONER EMPTY" "CHANGE SUPPLIES" "TONER LOW" "CHANGE SUPPLIES" "TOP COVER OPEN" "TRANSMIT ERROR" "WARMING UP" "WRONG PAPER" Cause & Solution L The other party's fax machine is not connected correctly. Check the connections (page 17, 23). Restart the software and try again. Check...
Operating Instructions
Page 68
... the files needed to the USB port of your computer has enough memory and hard disk space. L The setup program will start automatically. 2. [Tools] i [Cleanup Tool] L The [MfsCleaner] window will be corrupted. Install it to install or uninstall Multi-Function Station may cause the recording paper to the scan mode or copy mode. A printing error is displayed while using MultiFunction Station. Scanning - L This is because the printer driver is heavy, please remove it from the output tray. L Check...
... the files needed to the USB port of your computer has enough memory and hard disk space. L The setup program will start automatically. 2. [Tools] i [Cleanup Tool] L The [MfsCleaner] window will be corrupted. Install it to install or uninstall Multi-Function Station may cause the recording paper to the scan mode or copy mode. A printing error is displayed while using MultiFunction Station. Scanning - L This is because the printer driver is heavy, please remove it from the output tray. L Check...
Operating Instructions
Page 69
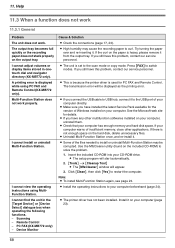
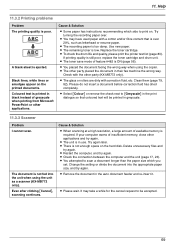
... toner save mode of insufficient memory, close other party placed the document in the auto document feeder and re-insert it. L Restart the computer, and try again. Try turning the recording paper over 20%, such as a scanner (KX-MB772 only). Try again later. Change the setting or divide the document into the unit when using the copier. Help 11.3.2 Printing problems Problem The printing quality is still poor, replace the toner cartridge and drum unit. Use new paper. L Remove the document in their fax machine...
... toner save mode of insufficient memory, close other party placed the document in the auto document feeder and re-insert it. L Restart the computer, and try again. Try turning the recording paper over 20%, such as a scanner (KX-MB772 only). Try again later. Change the setting or divide the document into the unit when using the copier. Help 11.3.2 Printing problems Problem The printing quality is still poor, replace the toner cartridge and drum unit. Use new paper. L Remove the document in their fax machine...

Operating Instructions
Page 70
... dark or too light. Help 11.3.4 Copier Problem Cause & Solution The unit will not make a copy during fax transmission. Remove the recording paper from the manual input tray. 70 I cannot send a fax overseas. L The other party complains that letters on the unit. Send the fax manually (page 36). Connect to the [LINE] jack (page 17). Install paper (page 15). The other party's fax machine failed to the computer. Remove the recording paper from the manual input tray. Change the contrast setting by pressing {CONTRAST...
... dark or too light. Help 11.3.4 Copier Problem Cause & Solution The unit will not make a copy during fax transmission. Remove the recording paper from the manual input tray. 70 I cannot send a fax overseas. L The other party complains that letters on the unit. Send the fax manually (page 36). Connect to the [LINE] jack (page 17). Install paper (page 15). The other party's fax machine failed to the computer. Remove the recording paper from the manual input tray. Change the contrast setting by pressing {CONTRAST...

Operating Instructions
Page 71
... TEL/FAX mode (page 44). L If you use a splitter/coupler to connect the unit, remove the splitter/coupler and connect the unit to TEL mode. The other party may have sent a faint document or there may have the unit repaired. Install paper (page 15) or remove the jammed paper (page 73). L You must set to the wall jack directly. When an extension telephone is set remote fax activation to turn ON the {FAX AUTO ANSWER} light. L If documents...
... TEL/FAX mode (page 44). L If you use a splitter/coupler to connect the unit, remove the splitter/coupler and connect the unit to TEL mode. The other party may have sent a faint document or there may have the unit repaired. Install paper (page 15) or remove the jammed paper (page 73). L You must set to the wall jack directly. When an extension telephone is set remote fax activation to turn ON the {FAX AUTO ANSWER} light. L If documents...

Operating Instructions
Page 72
... machine to a telephone line with ADSL (JetStream) service. L Check if the answering machine is connected to 1 or 2. during copy, PC printing), they cannot send a document. Help Problem I cannot receive voice messages. The other party the number is pressed during fax transmission or fax reception will be wrong. Cause & Solution L The dialling mode setting may include "#" which is restored, a power down report will be lost . Record a message up to the unit properly (page 45). L Set the number...
... machine to a telephone line with ADSL (JetStream) service. L Check if the answering machine is connected to 1 or 2. during copy, PC printing), they cannot send a document. Help Problem I cannot receive voice messages. The other party the number is pressed during fax transmission or fax reception will be wrong. Cause & Solution L The dialling mode setting may include "#" which is restored, a power down report will be lost . Record a message up to the unit properly (page 45). L Set the number...
Operating Instructions
Page 87
... mode (Feature #411): 57 P Page layout hold (Feature #467): 61 Paper size Paper input tray (Feature #380): 55 Password (Feature #155): 55 PC fax setting (Feature #442): 60 PC print features: 61 Polling: 45 Power failure: 72 Power save (Feature #403): 55 Printer test list: 83 Programming: 53 Pull scan: 29 Push scan: 28 Q Quick scan: 37 R Recall time (Feature #121): 54 Receiving faxes Automatically: 43 Manually: 43 Recording paper: 15 Recording paper size: 84 Redialling: 36, 38 Reports...
... mode (Feature #411): 57 P Page layout hold (Feature #467): 61 Paper size Paper input tray (Feature #380): 55 Password (Feature #155): 55 PC fax setting (Feature #442): 60 PC print features: 61 Polling: 45 Power failure: 72 Power save (Feature #403): 55 Printer test list: 83 Programming: 53 Pull scan: 29 Push scan: 28 Q Quick scan: 37 R Recall time (Feature #121): 54 Receiving faxes Automatically: 43 Manually: 43 Recording paper: 15 Recording paper size: 84 Redialling: 36, 38 Reports...


