
Network Camera
Page 7
... Using DHCP Getting IP address*2 Got IP address Updating Firmware Pressing FACTORY DEFAULT RESET button UPnPTM Failure Internal Failure Orange blinking Orange blinking Green blinking Green Green Green blinking Green blinking Green Green blinking Green Orange blinking Orange blinking Turning off (The camera restarts after that.) Orange blinking (About a 2-second interval) Red...
... Using DHCP Getting IP address*2 Got IP address Updating Firmware Pressing FACTORY DEFAULT RESET button UPnPTM Failure Internal Failure Orange blinking Orange blinking Green blinking Green Green Green blinking Green blinking Green Green blinking Green Orange blinking Orange blinking Turning off (The camera restarts after that.) Orange blinking (About a 2-second interval) Red...

Network Camera
Page 11
... 3.1 3.1.1 3.1.2 3.1.3 3.1.4 3.1.5 3.1.6 3.1.7 3.1.8 3.2 3.2.1 3.2.2 3.2.3 3.3 Maintenance page 134 Confirming the Status 135 Confirming Session Status 135 Displaying Alarm Logs 136 Restarting the Camera 136 Updating the Camera Firmware 137 Creating Configuration File 140 Loading Settings from a Configuration File 141 Resetting the Camera to Factory Default 142 Support page 143 Seeing Help page 143 Seeing Product Information 143 Seeing Support...
... 3.1 3.1.1 3.1.2 3.1.3 3.1.4 3.1.5 3.1.6 3.1.7 3.1.8 3.2 3.2.1 3.2.2 3.2.3 3.3 Maintenance page 134 Confirming the Status 135 Confirming Session Status 135 Displaying Alarm Logs 136 Restarting the Camera 136 Updating the Camera Firmware 137 Creating Configuration File 140 Loading Settings from a Configuration File 141 Resetting the Camera to Factory Default 142 Support page 143 Seeing Help page 143 Seeing Product Information 143 Seeing Support...

Network Camera
Page 20
... Auto Port Forwarding on the UPnP page for the Connection Mode of Static or DHCP. • Even if [Yes] is checked for Allow Access from Panasonic. from the Internet on the Automatic Setup page, or [Enable] is checked for Auto Port Forwarding on the UPnP page for the Connection Mode of... Static or DHCP, when the camera is not connected to display the banner can be set at Banner Display (see page 125). Operating Instructions The Banner When the...
... Auto Port Forwarding on the UPnP page for the Connection Mode of Static or DHCP. • Even if [Yes] is checked for Allow Access from Panasonic. from the Internet on the Automatic Setup page, or [Enable] is checked for Auto Port Forwarding on the UPnP page for the Connection Mode of... Static or DHCP, when the camera is not connected to display the banner can be set at Banner Display (see page 125). Operating Instructions The Banner When the...

Network Camera
Page 37
... each transfer condition, click [Delete Buffered Images] on the internal memory, the following operations also delete all buffered images. - Restarting, updating firmware or resetting the camera to delete images for [Enable Image Buffer/Transfer]. (See page 87, page 96 or page 107) [For assistance, please call: 1-800...-272-7033] 37 Saving the Date and Time page. - Turning off the camera. - Operating Instructions 1.5.1 Deleting Buffered Images If you are buffering images on the Trigger page (see page 87, page 96 or page 107).
... each transfer condition, click [Delete Buffered Images] on the internal memory, the following operations also delete all buffered images. - Restarting, updating firmware or resetting the camera to delete images for [Enable Image Buffer/Transfer]. (See page 87, page 96 or page 107) [For assistance, please call: 1-800...-272-7033] 37 Saving the Date and Time page. - Turning off the camera. - Operating Instructions 1.5.1 Deleting Buffered Images If you are buffering images on the Trigger page (see page 87, page 96 or page 107).

Network Camera
Page 95
Click [Go to factory default. [For assistance, please call: 1-800-272-7033] 95 Turning off the camera. - Restarting, updating firmware or resetting the camera to Trigger page]. • The Trigger page is displayed. 9. is displayed. Operating Instructions 8. Note • If you are saved. • When finished, "Success!" Saving the Date and Time page. - Confirm the settings, and click [Save]. • New settings are buffering images on the internal memory, the following operations also delete all buffered images. -
Click [Go to factory default. [For assistance, please call: 1-800-272-7033] 95 Turning off the camera. - Restarting, updating firmware or resetting the camera to Trigger page]. • The Trigger page is displayed. 9. is displayed. Operating Instructions 8. Note • If you are saved. • When finished, "Success!" Saving the Date and Time page. - Confirm the settings, and click [Save]. • New settings are buffering images on the internal memory, the following operations also delete all buffered images. -

Network Camera
Page 106
... interval to transfer image to Trigger page]. • The Trigger page is recommended. • Alarm transfer stops its operations until the camera finishes all buffered images. - Click [Go to a cell phone, many E-mails may be in the following operation. 120 seconds 1st... buffering images on the internal memory, the following operations also delete all transfers. Turning off the camera. - For example, if the camera transfers 3 images per minute frequency is displayed. Restarting, updating firmware or resetting the camera to a large phone bill. Saving the Date and Time page. -
... interval to transfer image to Trigger page]. • The Trigger page is recommended. • Alarm transfer stops its operations until the camera finishes all buffered images. - Click [Go to a cell phone, many E-mails may be in the following operation. 120 seconds 1st... buffering images on the internal memory, the following operations also delete all transfers. Turning off the camera. - For example, if the camera transfers 3 images per minute frequency is displayed. Restarting, updating firmware or resetting the camera to a large phone bill. Saving the Date and Time page. -

Network Camera
Page 117
... Detectable A Motion Detection signal is recommended. • Motion Detection transfer stops its operations until the camera finishes all buffered images. - Restarting, updating firmware or resetting the camera to light or wind may not be in the dark. [For assistance, please call: 1-800-272...-7033] 117 Enabling Motion Detection delays the frame rate of the camera. Therefore, we recommend you set a long interval....
... Detectable A Motion Detection signal is recommended. • Motion Detection transfer stops its operations until the camera finishes all buffered images. - Restarting, updating firmware or resetting the camera to light or wind may not be in the dark. [For assistance, please call: 1-800-272...-7033] 117 Enabling Motion Detection delays the frame rate of the camera. Therefore, we recommend you set a long interval....

Network Camera
Page 126
..., Maintenance and Support pages are saved. 126 Banner Display • When the camera accesses the Internet, the banner displays product information about cameras or announcements about the latest firmware, etc. from English, French, German, Italian, Spanish, Russian, Simplified Chinese ... for Administrator is particularly recommended. • When checked, the banner is displayed for enhanced motion. Language • Select the initial language from Panasonic. Motion, 3 s, 5 s, 10 s, 30 s, and 60 s Time stamp setting • You can be changed. Refresh Interval • Select...
..., Maintenance and Support pages are saved. 126 Banner Display • When the camera accesses the Internet, the banner displays product information about cameras or announcements about the latest firmware, etc. from English, French, German, Italian, Spanish, Russian, Simplified Chinese ... for Administrator is particularly recommended. • When checked, the banner is displayed for enhanced motion. Language • Select the initial language from Panasonic. Motion, 3 s, 5 s, 10 s, 30 s, and 60 s Time stamp setting • You can be changed. Refresh Interval • Select...

Network Camera
Page 134
... and status (see page 135). (2) Session Status Displays information on access to the camera (see page 135). (3) Alarm Log Displays alarm logs (see page 136). (4) Restart Restarts the camera (see page 136). (5) Update Firmware Updates the camera firmware (see page 137). (6) Save Settings Creates a configuration file (see page 140). (7) Load Settings Loads settings from a configuration...
... and status (see page 135). (2) Session Status Displays information on access to the camera (see page 135). (3) Alarm Log Displays alarm logs (see page 136). (4) Restart Restarts the camera (see page 136). (5) Update Firmware Updates the camera firmware (see page 137). (6) Save Settings Creates a configuration file (see page 140). (7) Load Settings Loads settings from a configuration...
Network Camera
Page 137
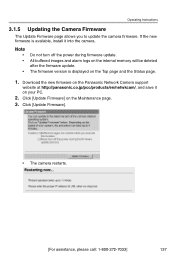
...; Do not turn off the power during firmware update. Click [Update Firmware] on the internal memory will be deleted after the firmware update. Operating Instructions 3.1.5 Updating the Camera Firmware The Update Firmware page allows you to update the camera firmware. If the new firmware is displayed on the Panasonic Network Camera support website at http://panasonic.co.jp/pcc/products/en/netwkcam/, and...
...; Do not turn off the power during firmware update. Click [Update Firmware] on the internal memory will be deleted after the firmware update. Operating Instructions 3.1.5 Updating the Camera Firmware The Update Firmware page allows you to update the camera firmware. If the new firmware is displayed on the Panasonic Network Camera support website at http://panasonic.co.jp/pcc/products/en/netwkcam/, and...

Network Camera
Page 138
.... • The next message is displayed during update. • The camera restarts automatically after update. • The Top page is displayed in about 1 minute. 138 Confirm the firmware file name, and click [Update Firmware]. • Clicking [Cancel] takes you back to select the firmware. 5. Operating Instructions • The Update page is displayed in about...
.... • The next message is displayed during update. • The camera restarts automatically after update. • The Top page is displayed in about 1 minute. 138 Confirm the firmware file name, and click [Update Firmware]. • Clicking [Cancel] takes you back to select the firmware. 5. Operating Instructions • The Update page is displayed in about...

Network Camera
Page 139
Updated version • If the version number is updated, the firmware update is updated. Confirm that the version number on the Top page is complete. [For assistance, please call: 1-800-272-7033] 139 Operating Instructions 7.
Updated version • If the version number is updated, the firmware update is updated. Confirm that the version number on the Top page is complete. [For assistance, please call: 1-800-272-7033] 139 Operating Instructions 7.

Network Camera
Page 140
...saved image has privacy information. Click [Save Settings] on the Save As dialog box. • The configuration file is a firmware version difference between the camera that you create a configuration file from the configuration file on the Load Settings page (see page 141). Prevent private information ... load settings to, the settings may not be loaded to update the camera, create a configuration file after updating the firmware. If you change it, the settings cannot be changed. If you try to the camera. 140 Note • • The file extension (.dat) cannot ...
...saved image has privacy information. Click [Save Settings] on the Save As dialog box. • The configuration file is a firmware version difference between the camera that you create a configuration file from the configuration file on the Load Settings page (see page 141). Prevent private information ... load settings to, the settings may not be loaded to update the camera, create a configuration file after updating the firmware. If you change it, the settings cannot be changed. If you try to the camera. 140 Note • • The file extension (.dat) cannot ...

Network Camera
Page 141
... [Load]. 5. When the settings are loaded, the network settings are also loaded as they were saved. • If you try to update the camera, create a configuration file after updating the firmware. Click [Restart]. • The camera restarts, and the Top page is displayed in the ...data field. 4. Note • The configuration file has network settings. Select the configuration file on the ...
... [Load]. 5. When the settings are loaded, the network settings are also loaded as they were saved. • If you try to update the camera, create a configuration file after updating the firmware. Click [Restart]. • The camera restarts, and the Top page is displayed in the ...data field. 4. Note • The configuration file has network settings. Select the configuration file on the ...

Network Camera
Page 175
R Reset to Factory Default page 142 Restart page 136 Rotating the mouse wheel 25 S Save Settings page 140 Security: Administrator page 80 Session Status 135 Setup page 40 Setup Program 160 Single Camera page 17 Specifications 170 Status page 135 Support Information page 144 Support page 143 System Requirements for your PC 5 T Talk 30 Timer Image Buffer/Transfer 87 Top page 14 Trademarks 4 Transport mode 55, 118 Tunnel mode 58, 119 U Update Firmware page 137 UPnP page 62 W Web Browser 5, 6 Operating Instructions 175
R Reset to Factory Default page 142 Restart page 136 Rotating the mouse wheel 25 S Save Settings page 140 Security: Administrator page 80 Session Status 135 Setup page 40 Setup Program 160 Single Camera page 17 Specifications 170 Status page 135 Support Information page 144 Support page 143 System Requirements for your PC 5 T Talk 30 Timer Image Buffer/Transfer 87 Top page 14 Trademarks 4 Transport mode 55, 118 Tunnel mode 58, 119 U Update Firmware page 137 UPnP page 62 W Web Browser 5, 6 Operating Instructions 175
